Tried a Render Farm and Got Burned? How to Choose One You Can Trust
We have all been there: a massive deadline is staring you down, your local workstation is screaming at 100% capacity, and you decide to offload the project to a cloud render farm. You expect a fast, painless delivery. Instead, you get a corrupted frame, missing textures, an unexpected invoice that eats your entire project profit, or a support team that goes completely silent when your job crashes at 2:00 AM. Getting burned by a cloud rendering service is almost a rite of passage for 3D artists. However, it does not mean cloud rendering is a bad choice; it usually means there is a mismatch between what you need and what the platform actually provides. You can avoid these costly mistakes entirely by using a strict, neutral framework to evaluate any service before you click upload or type in your credit card information.
To help you protect your budget and your sanity, iRender has put together a straightforward checklist on how to choose a render farm you can trust.
Let’s get started!
Why did your last render farm experience go badly?
If you had a bad experience with a render farm, do not worry. You are not alone, and it is a very common problem. Most of the time, things go wrong because of four simple reasons:
- Wrong looks: Your final pictures do not look like your original work because of missing textures or wrong software versions.
- High costs: Your final bill is much higher than you expected.
- No help: The support team is missing when your render crashes in the middle of the night.
- Wrong tools: The platform cannot run your specific software or plugins.
We must admit that these problems happen quite often. But this does not mean all cloud rendering is bad. It usually just means you did not check the service carefully before paying. You can easily avoid these headaches by using a simple checklist before you give any company your money.
The two models, and why the mismatch causes most disappointment
SaaS Render Farms
With a Software-as-a-Service model, you package your project file, upload it through a plugin or a web interface, and wait for the system to process the frames.
- How it works: The automated system distributes your project across multiple nodes in their network.
- What you control: Very little. You cannot open the software interface, tweak live settings, or manually fix a broken asset link during the process.
- What you must manage: You must ensure your local scene file is perfectly packaged with absolutely no absolute file paths or custom plugin discrepancies before uploading.
IaaS Render Farms
With an Infrastructure-as-a-Service model, you do not upload a scene file to a black box. Instead, you rent a complete, high-end remote computer or a multi-GPU server.
- How it works: You log into a remote desktop that functions exactly like a powerful computer sitting under your own desk.
- What you control: Everything. You have full administrative access to install your specific version of Blender, Redshift, Unreal Engine, Lumion, or any obscure plugin you own.
- What you must manage: You are responsible for setting up the environment, launching the render, and tracking your active machine time.
The checklist: six things to verify before you pay
Before committing your project or your budget to any service, run them through this six-point verification checklist.
Software and Plugin Compatibility
If you are running a specific minor patch of a production engine alongside three distinct third-party plugins, you must know if the platform supports that exact combination. If it is a managed farm, you are at the mercy of their automated environment. If it is a remote server model, you have the freedom to install it yourself.
Billing Structures and Idle Time Policies
You must understand exactly when the billing clock starts ticking.
- Does it start when your files begin uploading?
- Does it start when the remote machine boots up?
- What happens if your render finishes early and the machine sits idle while you are asleep?
Failed Job Policies
When a machine crashes or a frame outputs as a solid black image due to a system error, who absorbs the cost? A trustworthy service will have a clear, documented policy detailing how they handle refunds or credit compensation for technical server failures.
Support
A contact form or an automated email ticketing system is useless when your project is due in four hours. Look for platforms that provide live, human chat directly on their dashboard. Test their response times during your actual working hours, especially if you reside in a different time zone.
Data Security
Your project files represent intellectual property, often protected by client NDAs. Read the fine print on how your data is handled. Where is it stored? Who has access to the physical hardware? Most importantly, how long does your data remain on their drives after your project concludes, and can you manually trigger a permanent deletion?
Availability of Trial
Never trust a platform that forces you to deposit a large sum of money just to see if their system works. A reliable platform will offer a small trial so you can test their pipeline with your projects.
How to run a low risk trial
When a render farm gives you free trial credits, do not test it with a simple sample file from their website. Those sample files are made to run perfectly without any errors. Instead, test the service with a real piece of your own work. Pick just one heavy frame or a very short animation from a project you already finished at home.
Step 1: Test your file
Send your real project file to the render farm and start the job.
Step 2: Compare the final pictures
Download the finished image. Put it side-by-side with the version you rendered on your home computer. Look closely at the lights, colors, textures, and effects to see if they match.
Step 3: Check the real price
If the image looks correct, check exactly how much time and money the service used. Use this real number to guess how much your whole project will cost. Do not just trust the simple price calculator on the website.
Where iRender fits, and where it does not
The Strengths
Because iRender gives you a full remote computer instead of just an upload button, it solves many common rendering problems. Here is what makes it strong:
- Massive GPU power: You get to use top-tier hardware, including up to 8 dedicated NVIDIA RTX 4090/5090 graphics cards on a single machine. Each card carries 24GB of VRAM, giving you massive speed and memory for heavy scenes.
- Total installation control: You have full administrator rights. You can install any version of Blender, Redshift, Cinema 4D, or Unreal Engine. Because you use the exact same software versions and plugins you have at home, your final images will match your local test frames perfectly.
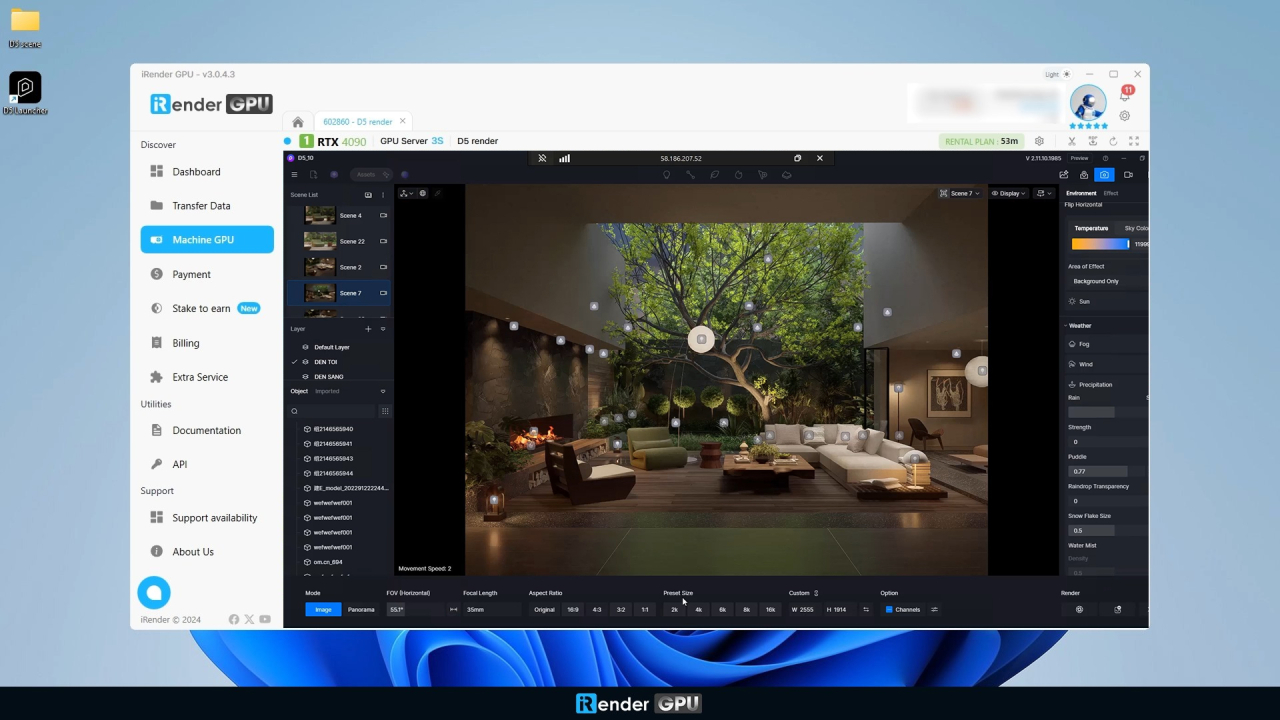
- Runs real-time applications: Traditional upload-and-render farms cannot handle real-time software. Because iRender gives you a real Windows or Linux desktop, you can easily run real-time apps like Lumion, Enscape, Twinmotion, and Unreal Engine without any issues.
The Downsides
Our model gives you total freedom, but it also means you have more responsibilities.
- Paying from Connection Readiness: Your billing clock starts the moment the remote computer turns on( the connect button appears). It does not start when you hit the “Render” button. You pay for the minutes you spend opening files and setting up your software environment.
- Paying for idle time: If your render finishes at 3:00 AM while you are sleeping, the remote computer stays on and keeps charging your balance. To avoid wasting money, you must remember to turn on our built-in auto-shutdown feature before you go to bed.
If you are a beginner who wants a straightforward, one-click upload solution, or if your project consists of a massive, standard CPU-based batch job that you want to throw into a system queue overnight without ever managing an OS interface, a traditional SaaS render farm is a more logical choice for your workflow.
Take full control with your own remote workstation with iRender
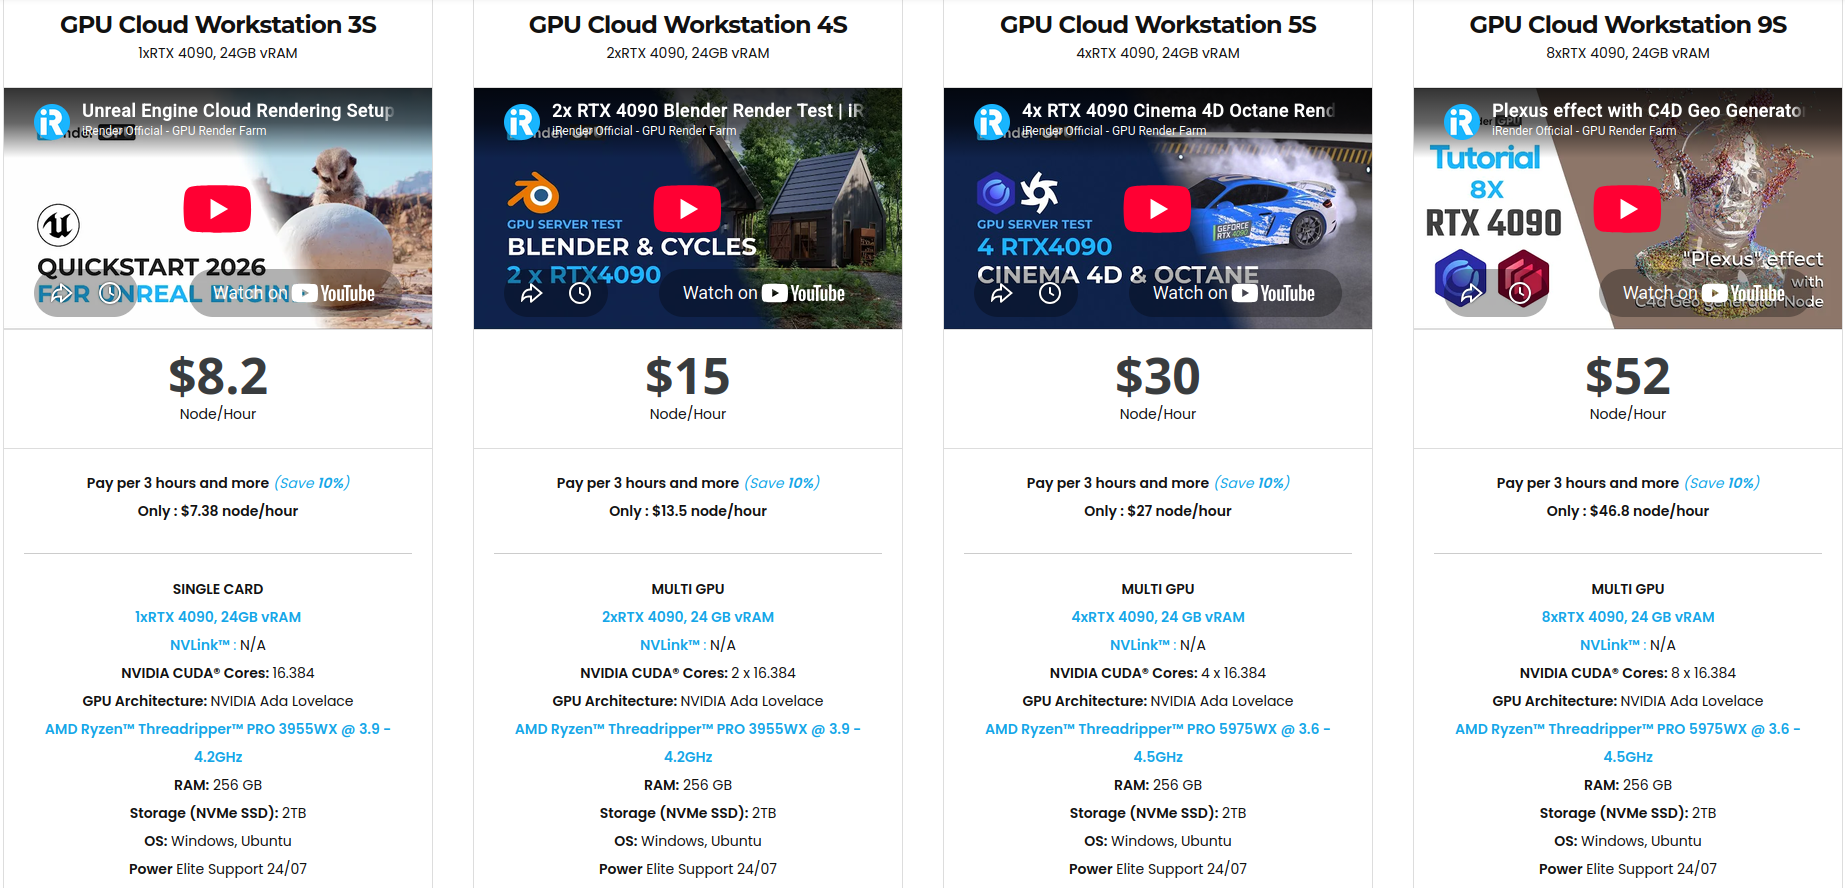
If you have had problems with render farms before, iRender gives you a more reliable way to render. Instead of relying on automated farms, you get a dedicated Windows remote workstation with full administrative access. iRender equips you with powerhouse specs: AMD Threadripper Pro, 256GB RAM, and configurations scaled from 1 to 8 top-tier NVIDIA RTX 4090 or next-gen RTX 5090 GPUs delivering unmatched rendering speed.
You can check all servers’ configuration below:
You also have full control over your files and software. Upload your project before starting the server, then connect when the machine is ready. Billing starts when the server is fully booted and the Connect button appears, so you only pay when the workstation is ready to use. For artists who want more control, predictable costs, and fewer surprises, iRender provides a straightforward alternative to traditional render farms.
Register today to take advantage of a 100% bonus on your very first deposit!
Let’s watch the tutorial video to see how our service works:

FAQ
- How do I choose a render farm I can trust?
To find a trustworthy render farm, you need to check six things before paying any money. Make sure the platform runs your exact software versions and plugins, and see exactly when their billing clock starts. You should also ask how they handle refunds for crashed jobs, how fast their live support answers, and how they protect your data. Finally, always look for a service that lets you test a real project with a free trial first.
2. Why did my render farm bill come out higher than expected?
Your bill is usually high because of how the company calculates time. When you rent a full machine, you pay from the exact moment the computer turns on, not when the actual rendering starts. Also, the system will keep charging you if the computer stays turned on and does nothing while you are away. To fix this, always check the billing rules and use an auto-shutdown tool to turn off the machine when your work finishes.
3. Should I use a managed render farm or rent a full machine?
You should choose a model based on what your project needs. A managed SaaS farm is better if you want a simple system where you just upload a file, let it run overnight, and get your pictures back without extra work. However, renting a full machine is the right choice if you need to install custom plugins, use specific software versions, or run real-time apps like Lumion and Unreal Engine.