
4K Renders Crash Your GPU? VRAM Requirements Explained
This catches people because the scene feels identical. You did not add geometry or textures; you only changed a resolution number, so a crash seems unfair. The reason sits in a part of VRAM most people never think about: the buffers your renderer keeps for the image it is building, which grow directly with how many pixels you are producing.
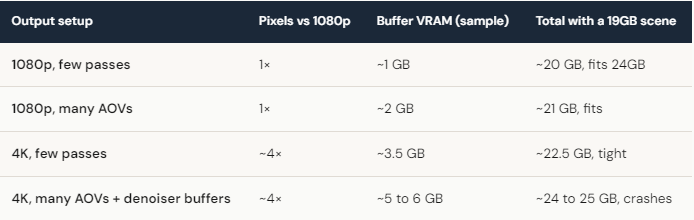
Think of VRAM in two parts. One part holds the scene, the geometry and textures, and that stays the same whether you render at 1080p or 4K. The other part holds the output buffers, the final image plus every render pass and AOV, and that part scales with pixel count. A 4K frame has roughly four times the pixels of 1080p, so those buffers grow about fourfold, and if you are stacking a dozen passes for compositing, each one grows with it.
Why does a higher resolution crash a render that worked before?
Because the scene data was already using most of your card, and the larger buffers were the bit that tipped it over. When a scene sits at 20 of 24GB at 1080p, you have about 4GB of headroom. Move to 4K and the buffers can easily claim more than that, especially with a full set of AOVs and the extra albedo and normal buffers a denoiser needs. The render does not fail because the scene got heavier. It fails because the output got bigger and there was no room left for it.
The number of render passes matters as much as the resolution. People rendering a single beauty pass at 4K often have no trouble, while the same person adding cryptomatte, depth, normals, position, and a handful of light groups can double the buffer memory at the same resolution. If you are close to the edge, the AOV list is one of the first places to trim.
How much VRAM do I actually need for 4K?
There is no single number, because it varies with how heavy your scene is before you add the output. A light scene with modest textures renders 4K comfortably on 24GB. A scene that already sits near the limit at 1080p will struggle at 4K no matter how clean the geometry is, simply because the buffers need room you do not have. The practical move is to measure your scene’s VRAM at 1080p, look at how much headroom is left, and decide whether four times the buffer size will fit before you commit a long 4K sequence.
When you are a little over, you have a few sensible options. Render at 4K with a trimmed AOV list and add passes back only as you need them. Cap textures so the scene side of VRAM shrinks and leaves room for the buffers. Or render in regions or tiles if your engine supports it, so the full frame is assembled from pieces that each fit. Out of core helps with the scene data but does little for the buffers, which need to stay on the card.

When 24GB simply is not enough for the 4K job, and where iRender fits
If you need 4K with a deep set of passes on an already heavy scene, you can reach a point where 24GB cannot hold the scene and the buffers at once, and trimming would compromise the work. Renting a machine is one way around it without buying hardware you will use for one project. iRender machines are RTX 4090s with 24GB each, so they will not give you more VRAM than your own card per GPU, and that is worth saying plainly. What they add is 256GB of system RAM for the scene side of memory through out of core, fast storage, and up to 8 cards to render a heavy 4K sequence quickly. You install your own engine and setup so the output matches your local result, which is what “your renders, your rules” is about.
What to watch for: the timer begins when the server boots, an idle machine is wasted money the same as a busy one, and the initial setup needs fifteen to thirty minutes before your saved image gets you going. Auto-shutdown protects you from leaving one running after a 4K batch finishes overnight. If you would rather hand a frame to a queue and collect the result, a SaaS render farm does that with less hands-on time, while iRender suits anyone who wants control of the environment and the system memory headroom for heavy 4K work.