
Missing Textures on Your Render Farm Output? Here’s the Fix (Step-by-Step)
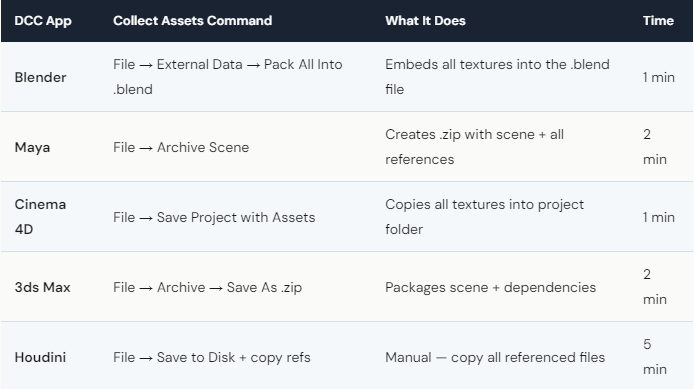
Missing textures on render farm output are caused by broken file paths — your local scene references textures at “C:\Users\You\Project\Textures\wood.png,” but that path doesn’t exist on the cloud server. The result: pink or black objects, missing materials, and wasted render time. The fix is the same across all major DCC apps: collect all assets into a portable package before uploading. Blender: External Data → Pack All Into Blend. Maya: File → Archive Scene. C4D: Save Project with Assets. 3ds Max: Asset Tracking → Set Path. On iRender (IaaS), you can also verify textures load correctly in the viewport before batch-rendering — something SaaS farms can’t offer because you never see the scene on their servers.
Why Do Textures Break When Moving to a Cloud Server?
It’s a path problem, not a texture problem. Your scene file stores the location of each texture — an absolute path like “C:\Users\John\Desktop\Project\Textures\brick_diffuse_4k.png.” When you upload the scene to iRender’s server, that exact path doesn’t exist. The renderer can’t find the file, so it renders the material as pink (Blender), black (Maya/C4D), or with a missing texture placeholder.
The solution has two parts. Part 1: collect assets locally using your DCC app’s built-in tool (see table above). This either embeds textures into the scene file (Blender’s “Pack All”) or copies them into a relative folder structure that travels with the scene. Part 2: verify on the server before batch-rendering. On iRender, open the scene via remote desktop, switch to a rendered viewport or IPR, and check that materials look correct. This 2-minute verification prevents hours of wasted render time.
The IaaS advantage is significant here. On SaaS farms (GarageFarm, RebusFarm), you upload and hope. If textures are missing, you discover it after the render completes — and you’ve already paid for those broken frames. On iRender, you verify before committing. Your renders, your rules — including the rule that says “look before you leap.”
What If Textures Are Still Missing After Collecting Assets?
Sometimes the collect-assets step misses files. Common causes:
UDIM textures: Some collect-assets tools don’t properly handle UDIM tile naming (texture.1001.exr, texture.1002.exr). Manually verify that all UDIM tiles are in the project folder after collecting.
Procedural textures referencing external files: Substance-generated textures or OSL shaders that reference external .sbsar or .osl files may not get collected. Export these as image textures (PNG/EXR) before uploading.
Plugin-specific textures: Third-party material libraries (Poliigon, Quixel) sometimes store textures in their own managed folders. After collecting assets, check that these textures were actually copied into your project — not just referenced from the plugin’s install directory.
The nuclear option: If you can’t figure out which texture is missing, open the scene on the iRender server, switch to wireframe view, then enable rendered view one material at a time. The material that turns pink is the one with the broken path. Find that texture locally, upload it, and re-link manually.
For studios dealing with this repeatedly, establish a pre-upload checklist: (1) Collect assets, (2) Open scene from the collected folder (not the original), (3) Verify materials in viewport, (4) Upload the collected folder. If the scene looks right when opened from the collected folder locally, it’ll look right on the cloud server. This 5-minute process saves hours of troubleshooting.