
Why Is My 3D Render So Slow? Every Cause and How to Cut Render Time in 2026
I have watched a render bar crawl at 2 a.m. more times than I would like to admit. The thing I had to learn the hard way is this: “my render is slow” is not a diagnosis. It is a symptom. The first instinct is always to blame the GPU and go shopping for a new card. But in my experience, maybe one slow render out of five is actually a hardware problem. The other four are things you can fix tonight, for free, before you spend a cent.
So let’s go through it the way I would on my own machine. In the order that actually saves time, not the order that is easiest to write about.
First: is it the scene, or the settings?
Before touching anything, I open the stats. Every engine has them: render time per pass, ray count, memory used. If you skip this step you are just guessing, and guessing is how a 20-minute fix turns into a wasted evening.
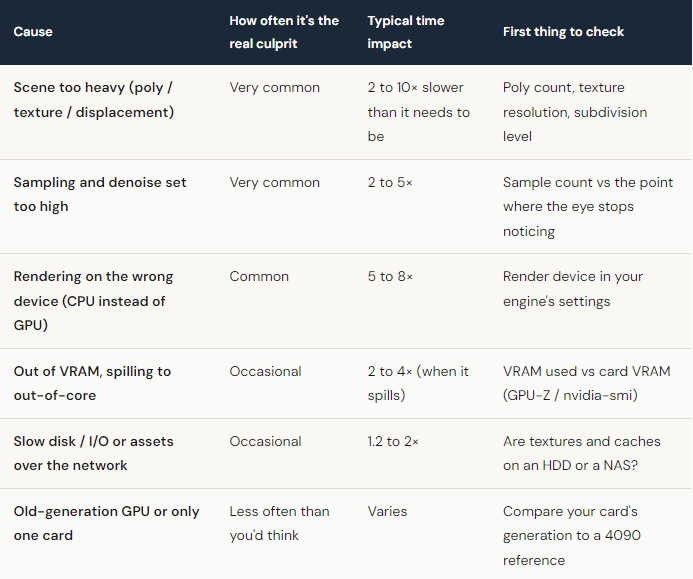
Nine times out of ten the heaviest cost is hiding in the scene. A few things I check first, in this order:
- Subdivision and displacement. A single subdivided object at render level 4 can quietly multiply into tens of millions of polygons. I have cut a frame nearly in half just by dropping a hero object from level 4 to level 3. On camera you literally cannot tell.
- Texture sizes. Eight 8K textures on objects that take up 40 pixels on screen is a classic mistake. Resize whatever is far from camera. Your VRAM and your render time will both thank you.
- Hidden geometry still being evaluated. That entire city block behind the camera? If it is not culled, the renderer may still be tracing rays toward it.
- Light count and shadow rays. Forty area lights, each casting soft shadows, is a tax you pay on every single sample.
Here is the boring truth nobody likes. A clean 200k-poly scene on a mid-range GPU will beat a bloated 12-million-poly scene on a monster card, every time. Optimization is unglamorous, and it is almost always the highest-leverage thing you can do.
Is your sampling and denoising doing more harm than good?
This is the setting I see cranked to the moon the most. Someone hit fireflies once, panicked, set samples to 4096, and never touched it again. Now every frame pays for noise that a denoiser would have cleaned up for almost nothing.
Here is the move that has saved me the most hours: render with fewer samples and lean on a modern denoiser. On a recent interior shot, I dropped from 4096 samples to around 512 plus OptiX denoising. Per-frame time went from roughly 14 minutes to about 3.5 minutes, and in motion you genuinely cannot tell which is which. The denoise pass itself added maybe 4 to 8 seconds. That is the trade: a few seconds of denoising to skip thousands of samples.
Two caveats, because denoising is not magic:
- Animation flicker. Frame-by-frame denoisers can shimmer across a sequence. Use a temporal or animation-aware denoiser for moving shots, not the single-frame one.
- Fine detail. Push samples too low and a denoiser will smear small specular detail and thin geometry. Find the floor for your scene. There is no universal number.
CPU or GPU: are you even rendering on the right thing?
Sounds obvious. It is not. I have lost real time to a scene quietly rendering on CPU because a project file came in with the wrong device set, or because one node in the material graph was not GPU-supported and the engine silently fell back.
For most GPU-accelerated engines, like Redshift, Octane, Cycles on CUDA or OptiX, and V-Ray GPU, a single modern GPU will crush a mainstream CPU on the same scene. A frame that took me about 42 minutes on a 16-core CPU dropped to roughly 6 minutes on one RTX 4090. That is not a tweak. That is the difference between rendering overnight and rendering over lunch.
But this part matters: GPU is not automatically the answer.
- Some features and shaders are CPU-only, or behave differently on GPU. Check your engine’s compatibility list before you assume.
- Heavy volumetrics, some displacement workflows, and certain CPU renderers like Arnold CPU or Mantra are genuinely strong on CPU and may not see the same jump.
- If your scene does not fit in VRAM, switching to GPU can backfire, which is exactly the next section.
When it is genuinely the hardware (and not your fault)
Okay. Say you have cleaned the scene, your samples are sane, you are on the right device, and a frame is still slow. Now we can talk hardware, because now it is earned.
You are out of VRAM and didn’t notice
This is the sneaky one. When a scene exceeds your card’s VRAM (24GB on an RTX 4090, less on most cards), the engine spills into out-of-core memory, meaning system RAM or, worse, disk. It keeps rendering, so nothing looks broken. It just gets 2 to 4 times slower, and you assume the scene is “just heavy.” Watch actual VRAM usage with GPU-Z or nvidia-smi while a frame renders. If you are pinned at the ceiling, that is your answer.
One GPU can only do so much
A single card has a hard ceiling. You can optimize a scene beautifully and still need more cores than one GPU has. This is especially true for animation, where the problem is not one slow frame. It is three thousand of them.
I’ve optimized everything and it’s still slow. Now what?
If you have done all of the above and the frame is as lean as it is going to get, you have hit the one wall optimization cannot move. You need more GPUs running at once. That is the only thing left that changes the number, and it is where I will be straight with you about what cloud rendering does and does not do.
This is also where the iRender approach is different from a typical send-and-render farm, so let me be specific instead of vague. Most farms decide which software, plugins, and versions you are allowed to use. You upload a file and hope it comes back looking like it did on your machine. iRender hands you a full remote workstation, with RTX 4090 GPUs, 256GB RAM, and fast NVMe, and you install your software, your plugins, your exact versions. The render matches your local machine because you set it up, not a template. That is the whole idea behind “your renders, your rules.”
What scaling actually looks like (and why it isn’t perfectly linear)
Here is the part the marketing pages skip. Eight GPUs do not make you eight times faster. There is overhead: loading the scene into each card, syncing, I/O. In practice, the scaling on a heavy single frame looks more like this:
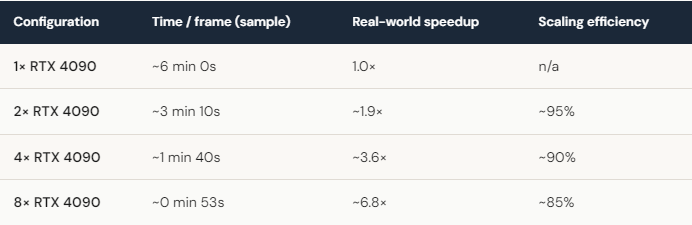
So that 108-hour animation? Spread across multiple multi-GPU servers, you are realistically looking at finishing overnight instead of next week. But you pay for the overhead, and the per-frame cost does not drop to zero. Going from 4 to 8 GPUs roughly halves the time, but the efficiency slips. For a lot of my daily work, 4× is the sweet spot. I only reach for 8× when a deadline is genuinely on fire.
The honest downsides, because there are some
I would rather you hear this from me than find out at 3 a.m.
- The billing timer starts when the server boots, not when the render starts. If you spin up a machine and go make coffee, you are paying for coffee time. Package your scene first.
- You have to shut it down yourself. The single most common way people waste money on IaaS is leaving an idle server running overnight after the render already finished. Set an alarm. iRender can auto-shutdown, so use it.
- First-time setup takes a bit. Expect roughly 15 to 30 minutes the first session to install and configure. After that your image is saved and you are rendering again in a couple of minutes. If you have a deadline tomorrow, do a test run today, not tomorrow night.
And here is the part you do not always hear: sometimes a cloud GPU server is the wrong tool. If you are a beginner who just wants drag-and-drop simplicity, a managed SaaS render farm is easier to start with. If you are rendering a pure CPU engine like Arnold CPU or Mantra in an overnight batch and you do not need a live desktop, an automated send-and-render farm can be cheaper and more hands-off than managing a server yourself. iRender earns its place when you need GPU horsepower, full control over your environment, or you are running real-time apps that a SaaS render farm simply cannot run. If that is not you, I would rather you use the right tool.