Quick Reference Guide in Octane for Cinema 4D
While Otoy has provided over 30 specialized guides that delve deeply into various topics within OctaneRender, exploring each guide extensively would require a very long time. To address this, this Quick Reference Guide in Octane has been drastically condensed to focus only on the most important information per topic that we would need quick access to. Let’s explore with iRender!
The Live Viewer
The Live Viewer is where we will interact with Octane most of the time.
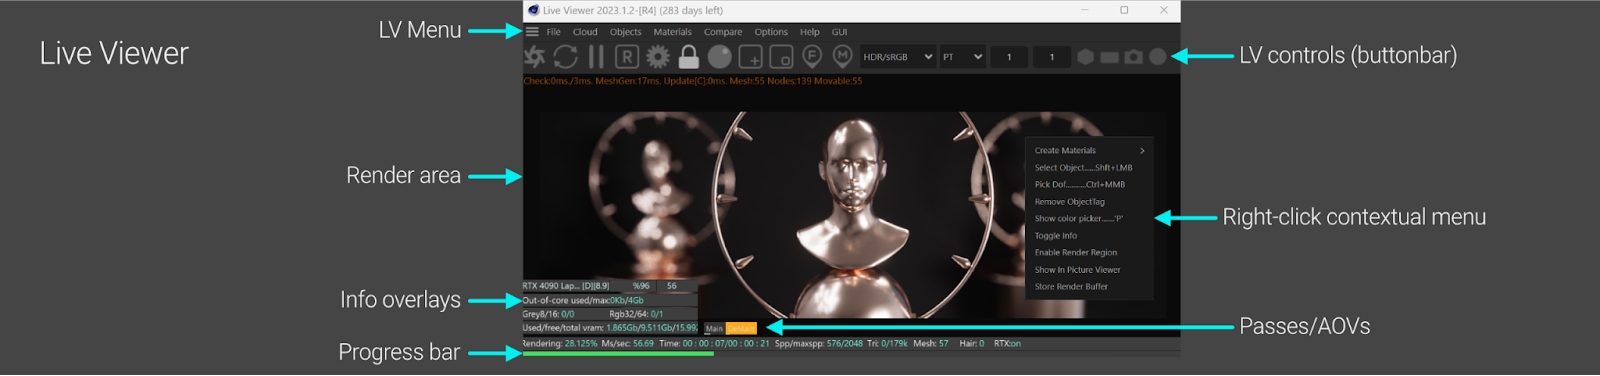
Similar to a C4D viewport, the render area allows us to navigate around the scene, apply materials directly to objects, set the focus, and access other options via right-click menus.
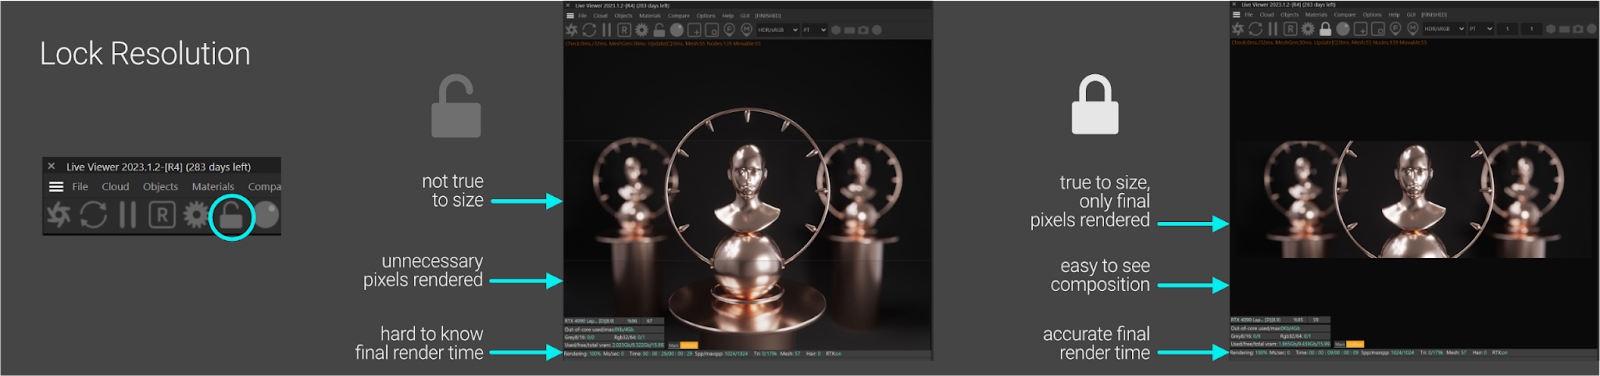
The command bar contains controls for basic render functions like starting/stopping the render process, opening Octane settings, and selecting focus and materials. The Lock Resolution button should be always on since it displays the render at an actual 1:1 pixel size, hiding non-rendered areas to provide an accurate representation of the final composition and allow for better estimation of render times.
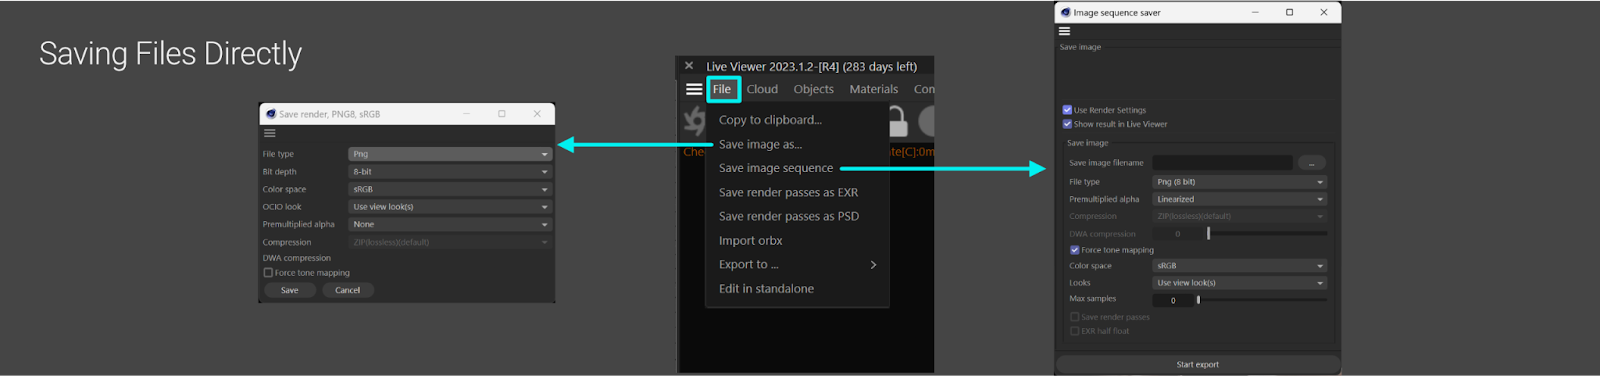
The menu includes access to all the lights, cameras, materials, objects, and other scene elements. It also shows A/B comparison controls and additional useful tools. Through the File menu, we can save renders and sequences directly without using C4D’s Picture Viewer (ensure the Lock Resolution button is enabled first). This allows for saving results when non-standard color management is in use. The settings here are generally self-explanatory. There are also options to save render passes in EXR or PSD format once AOVs are configured in the C4D settings.
Environments
Environments provide both overall scene lighting and reflections that can be seen in shiny materials. An environment is required for Octane to render anything, as it will default to a 90% default white environment if no Environment is added to the scene.
The Octane Environment object is a C4D Sky object with an Octane Environment tag on it. It comes in three configurations which are Texture, HDRI, and UVW. These configurations can be toggled between via the little blue and green half circle icons in the Main tab of the Octane Environment tag.
Rotating the C4D Sky object itself has no effect – any rotation must be applied within the Environment tag. The Power control alters the intensity of the light cast from the environment.
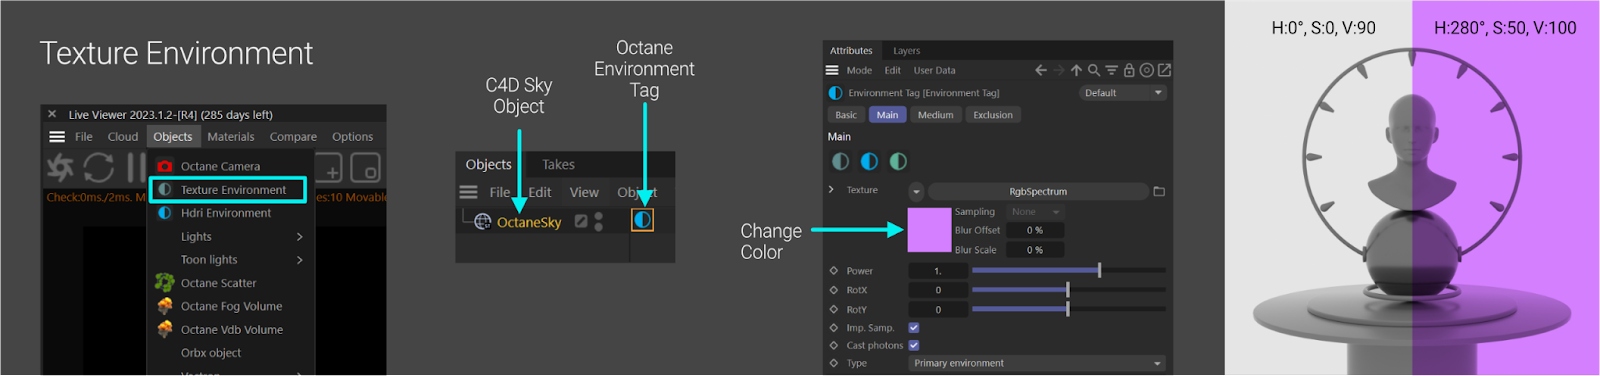
The Texture Environment uses an attached RGB spectrum node to produce a single color. We can modify that color by clicking the little square preview.
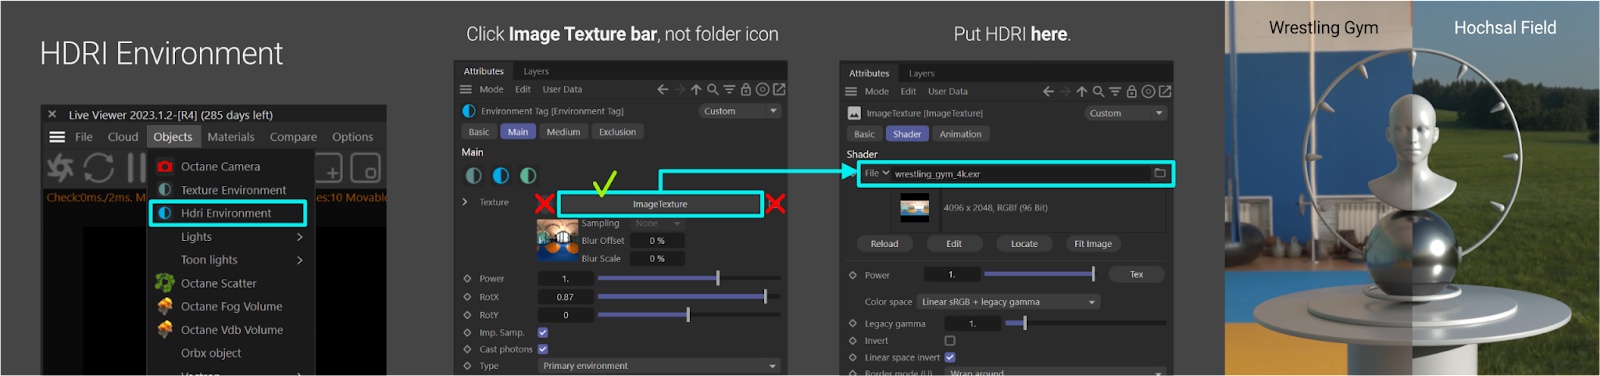
The HDRI environment has an Image Texture node preconfigured for HDRI images. Important note: The HDRI images need to be loaded into the Image Texture node (click the long bar saying ImageTexture to get into this node, then drop the image in the File field). Don’t replace the Image Texture node with an image file or anything else.
The UVW Environment works with gradient or pattern textures, allowing the environment tag’s rotation controls (Rot.X and Rot.Y) to function properly.
We can set different environments for lighting/reflections versus just background visibility by changing the type to primary or visible (Primary is lighting/reflections, Visible is the background).
The Octane Daylight rig simulates an outdoor sun and sky system.
Physical Lights
Physical lights refer to directional light panels that can be moved around to have more control over scene lighting. The size, shape and coordinates of the ligh are set within the C4D Light Object. Meanwhile, the color, intensity, and other illumination attributes are configured through the Octane Light Tag.
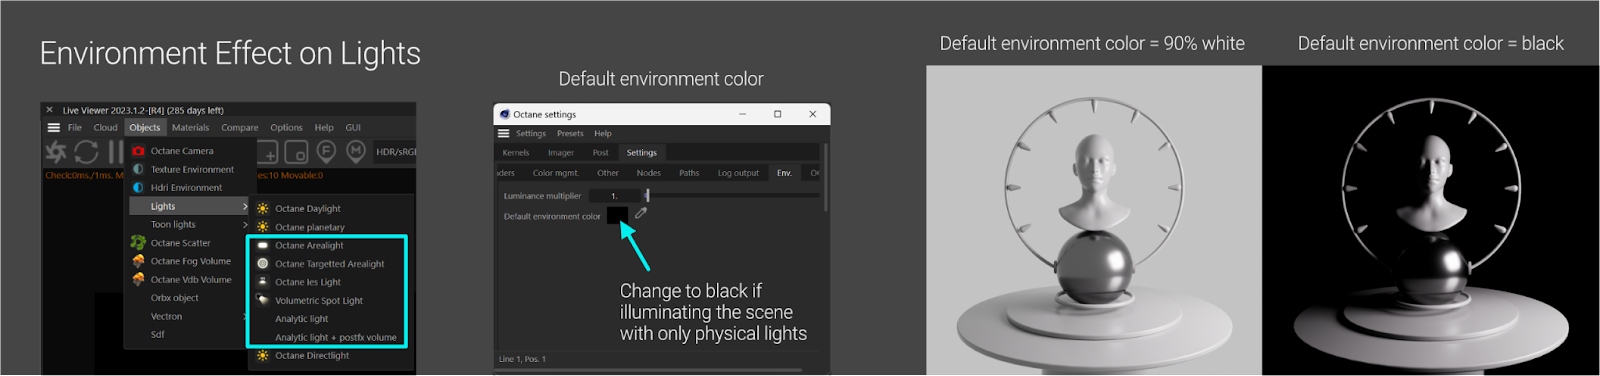
As mentioned previously, Octane needs an environment to produce any renders. If one is not added, it will use the default environment in the Octane Settings > Settings Tab > Env. Subtab. By default, this is a 90% white environment, so it impacts the scene. For full control of our lighting, it’s best to set this to black to disable it. Relying only on physical lights to illuminate the scene to avoid washes of color from the default environment.
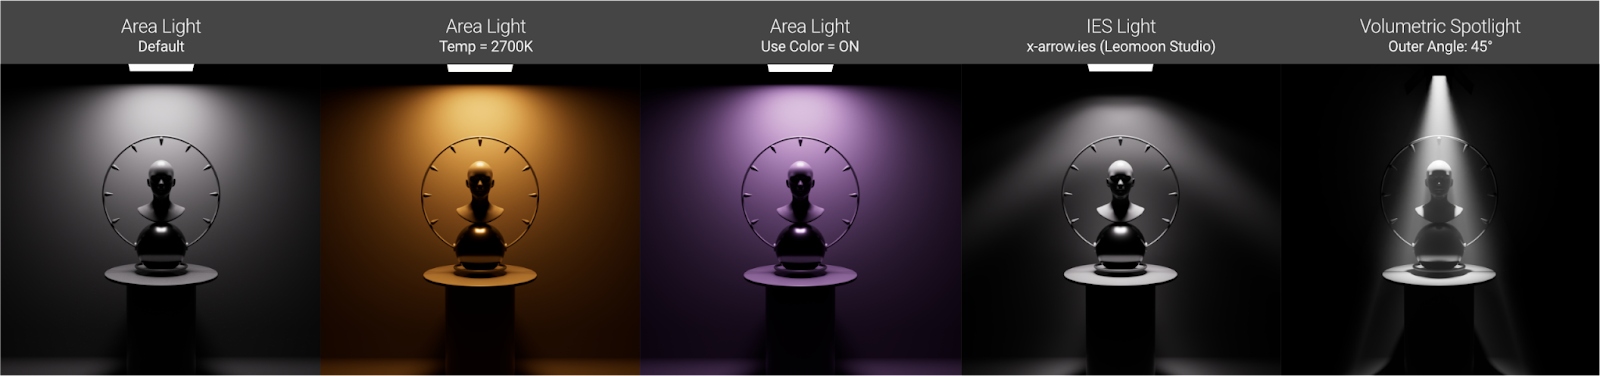
An Area Light simulates an illuminated panel. Most Octane light types are simply C4D Area Light with an Octane Light tag configured to different settings.
Temperature is measured in the Kelvin number that is found on lights in hardware stores. Lower values (2000-5000) appear more yellowish and reddish, while higher values (7000+) are more blueish. 6500K is a neutral white.
Textures affect color and patterns similar to gels or gobo atop the light. RGB values provide coloring beyond temperature controls. If we check “Use Color”, will take on the color in the C4D Light Object’s General tab. This will blend with the Temperature color. Therefore, if we do this, we always need the temperature at 6500K, or neutral white.
Distribution determines the emitting portion, accepting grayscale images or IES data to simulate realistic lights with differently shaped glass lenses. IES light is an area light; it has the ImageTexture node already set up properly for IES textures which are based on real-world light fixtures.
The Volumetric Spotlight uses a C4D Spotlight object with scattering in its cone, to simulate fog in it. This can produce some nice effects, but it takes a lot longer to render cleanly.
Materials
Materials control how light interacts with objects in the scene. Octane’s material system entirely replaces C4D’s one. Therefore, it does not build on standard C4D objects like environments and lights do.
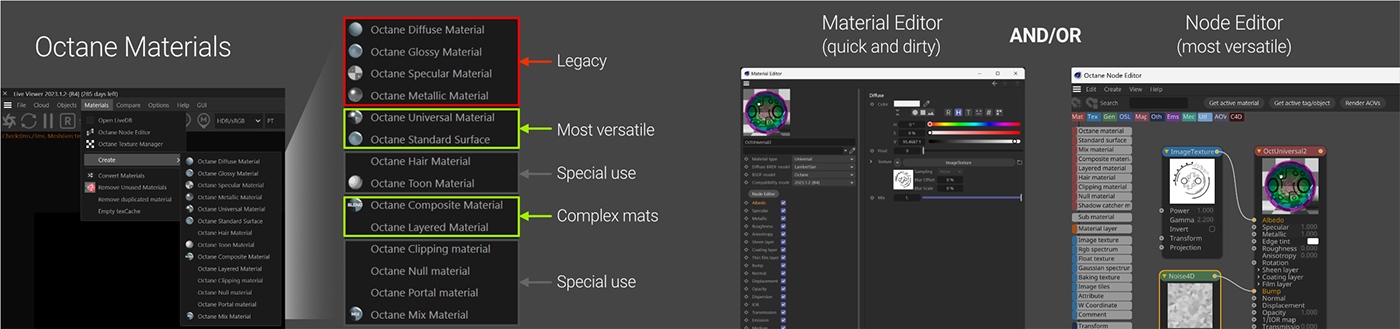
Materials are found in their own menu in the Live Viewer. While there are many types, the Universal Material is currently the best and most versatile option, replacing legacy Diffuse, Glossy, Specular and Metallic materials. Layered and Composite materials work well for highly complex situations, though the Universal Material can also handle layers if not too complex.
Materials can be edited in either C4D’s Material Editor (by double-clicking the material or single-clicking and looking in the Attributes Manage) or through Octane’s Node editor. C4D’s Material Editor is good for easy edits like tweaking a color or specular value. Octane’s Node editor is better and easier for more complex edits.
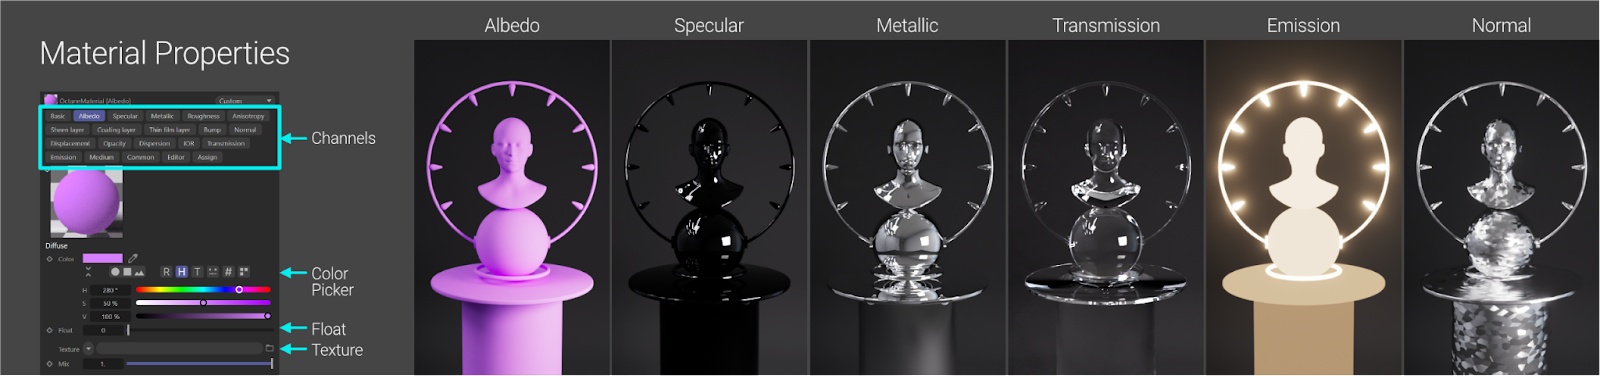
All materials are made up of channels that control individual properties of the material. Different material types support different channels, but the Universal Material includes all options. Some channels override others (for example, Metallic overrides Specular), and some channels work in conjunction (for example, IOR and Transmission).
Most channels contain a 0-1 linear Float slider to set the effect level. The Color Picker overrides the float slider. Anything other than 0/0/0 (black) in the color picker will override whatever float value is there. The Texture field (drives the channel with an image or procedural texture) overrides the Color Picker, though there is a Mix slider that blends these two.
Camera
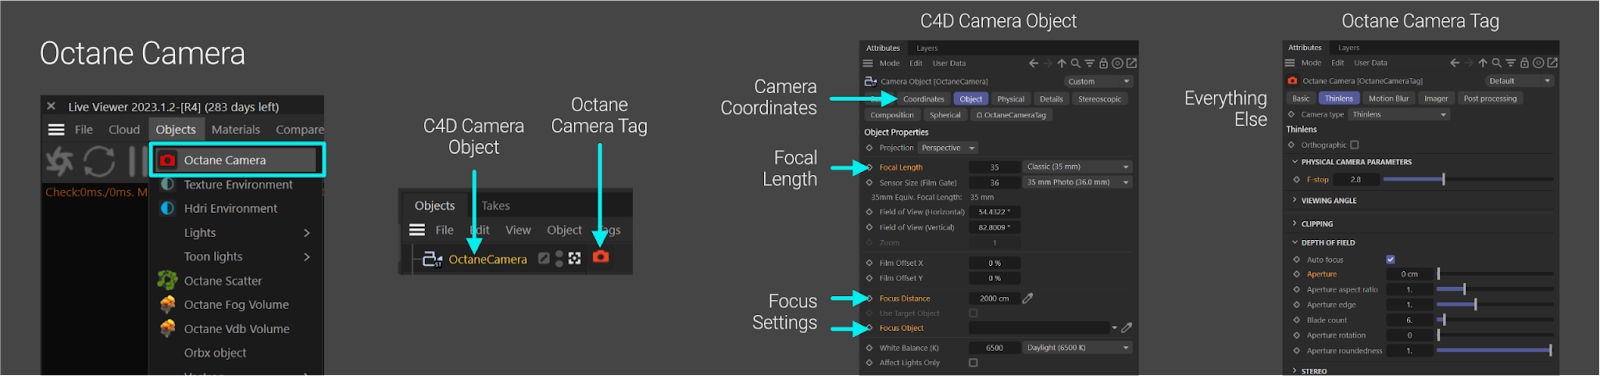
The Octane camera is a standard C4D Camera object with an Octane Camera tag on it. The C4D Camera object controls position, scale, and rotation in the Coordinates tab, along with focal length, focus distance and focus object in the Object tab. However, the Octane Camera Tag handles most other important aspects like depth of field (DoF), motion blur, perspective settings, and options to override the Imager and Post-Processing.

Depth of Field (DoF) in Octane can be tricky to understand. The aperture value ultimately controls the blurriness of objects both in front of and behind the focal point – a larger number means more blur. This relates to real-world F-stops where lower values mean more blur. Strangely, a new Octane camera defaults to f/2.8 yet shows no DoF in the render, even though f/2.8 typically produces shallow DOF. Properly, it should default to infinity (f/), like when manually setting the aperture to 0. Once either the aperture or f-stop is adjusted from their initial states, DOF works as expected. The default values just initially cause confusion until tweaked.
After setting up DoF, we can set the focus in two ways.

-
- Go into Focus Picker mode (F icon in the Live Viewer) and click somewhere in the window.
- Go into the C4D Camera object’s attributes and manually set it or pick a focus object to track.
Settings
Settings for Octane can be found in both C4D’s Render Settings and Octane’s Settings.
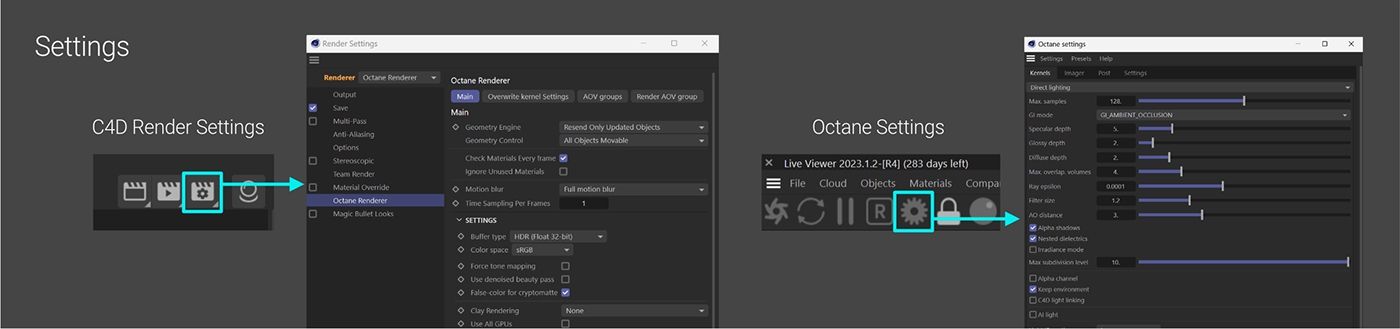
Octane Settings (Gear icon in the Live Viewer)
This is mostly about things that affect the render engine itself.
-
- Kernels tab: optimizing speed/quality for a scene
- Imager tab: color management and other image controls
- Post tab: Bloom/Glare/other post stuff
- Settings tab: other odds and ends like UI controls, account settings, default environment, etc.
You can save your Octane settings presets here by using the Presets menu at the top.
C4D’s Render Settings (Ctl-B or Cmd-B)
This is where you can set the Output Settings (like pixel dimensions, frame range, frame rate, and stuff like that). Regardless of how you are saving your files (directly out of Octane via the Live Viewer or via C4D’s Picture Viewer), these settings need to be set here.
The Save section: set your path here if you are using the C4D Picture Viewer to render images. You can skip this section if saving from the Live Viewer. We don’t need it if we’re saving from the Live Viewer.
Multi-pass will turn on if you enable AOVs.
Other sections including Anti Aliasing, Options, Stereoscopic, Team Render, and Material Override are all for C4D’s built-in render engines. For Octane, you will ignore them.
Octane Renderer section: There are four tabs in this section.
-
- The Main and Overwrite kernel Settings tabs mainly deal with how Octane interacts with Cinema 4D when saving to the Picture Viewer. The Main covers settings such as network rendering, color management, motion blur, GPU usage, etc. The Overwrite kernel Settings when enabled, shows all the kernel settings in the Octane Settings and uses those settings instead of the ones in the Octane Settings. This is useful if you want to build C4D presets with specific Octane settings. It does not override Post and Imager settings, but those can be overridden in a Camera if you want.
- The AOV groups and Render AOV groups tabs handle AOVs (multi-pass rendering). Both for exporting in the Picture Viewer and directly out of the Live Viewer.
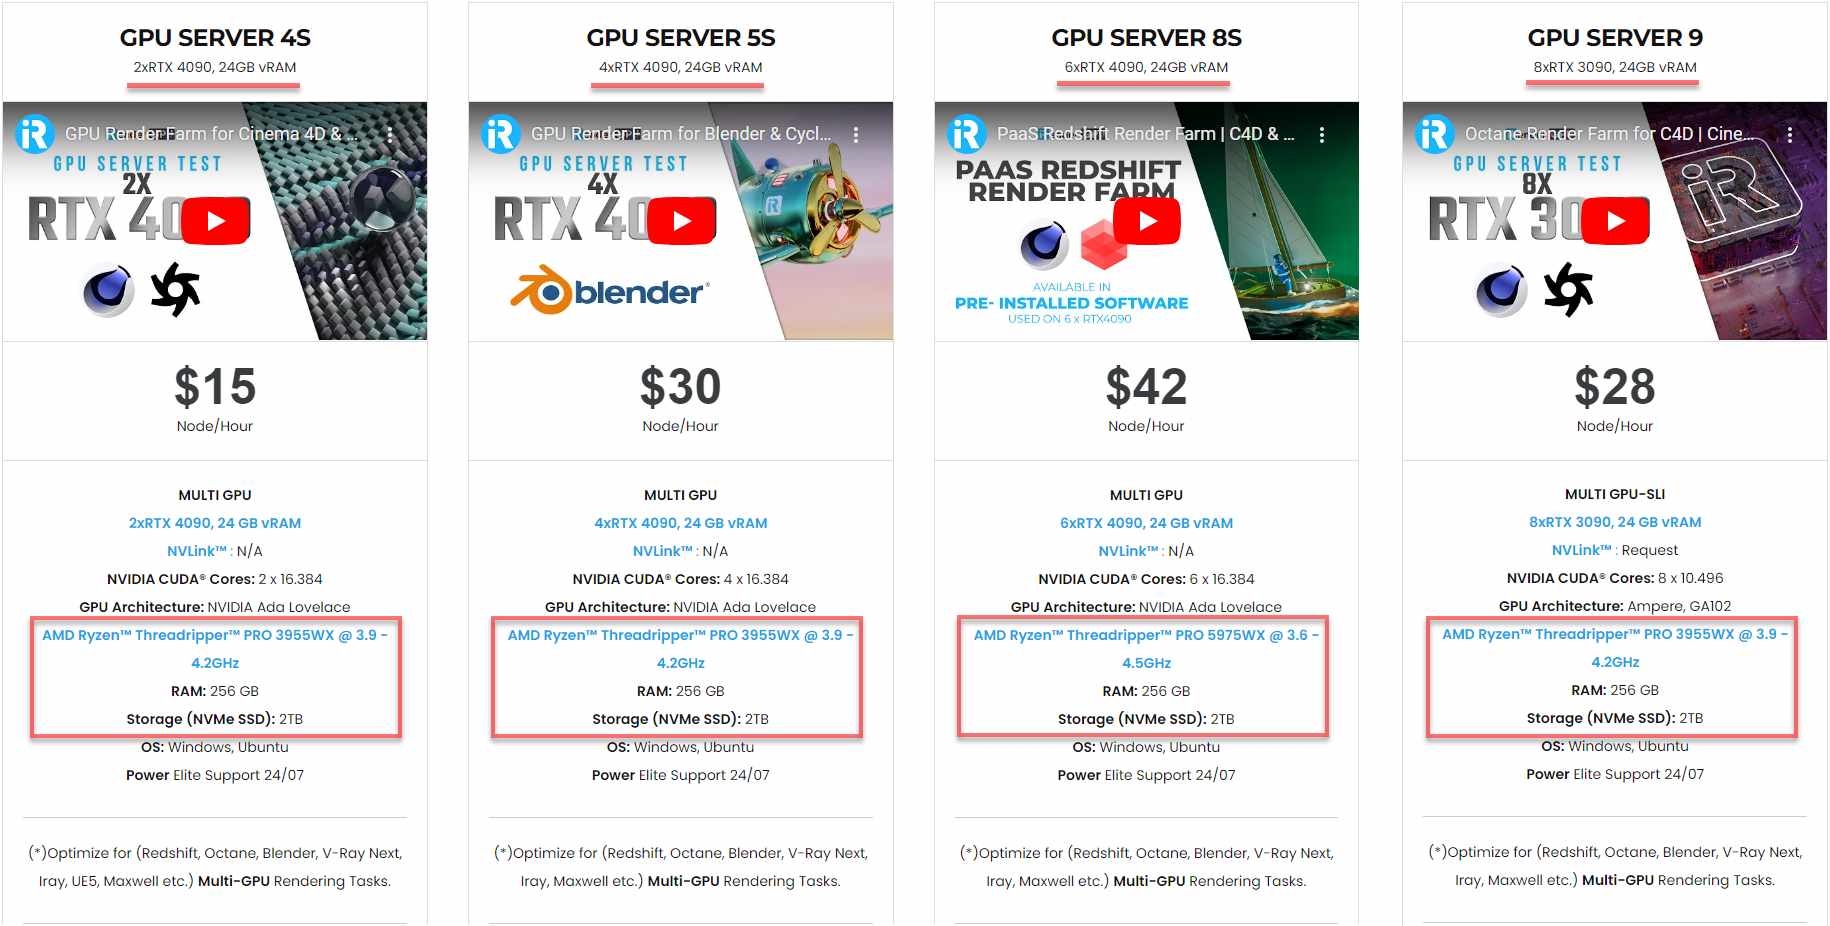
Speed up Octane rendering to the faster with iRender
iRender powers up your creativity with unlimited GPU rendering resources. Our GPU render farm houses the most powerful 3D rendering machines. Configure from 1 to 8 GPU with top-tier RTX 4090/RTX 3090, Threadripper Pro CPUs, 256GB RAM, and 2TB SSD storage – iRender’s machines can handle any Octane project demands.
Once you rent our machines, you will own them as your personal private workstations. Therefore, you can use Octane with any software and plugin versions you want.
As an official partner of Maxon, we provide pre-installed C4D machines to streamline your pipeline further! Currently, we provide one free C4D license for all our users. Let’s see a workflow using C4D and Octane through our desktop app.

Wondering how to estimate the rendering cost for your projects? This video will clarify:

This June, we are offering an attractive 100% Bonus Program for our new users making the first deposit within 24 hours of registration.
Enjoy a FREE TRIAL to try our RTX 4090 machines and boost your Octane rendering now!
For further information, please do not hesitate to contact us at [email protected] or mobile: +84915875500.
iRender – Thank you & Happy Rendering!
Reference source: otoy.com
Related Posts
The latest creative news from Octane Cloud Rendering.