10 Modeling Tips in Cinema 4D with iRender
Modeling is an area that many Cinema 4D users, especially new ones, are not very comfortable in. Let’s find out 10 modeling tips in Cinema 4D with iRender today.
1. SELECT PARTS OF YOUR MODEL WITH EASE
A big part of modeling is selecting the parts of editable geometry you want to work with. Fill selection lets you use edge selections to isolate polygons easily. Make looped edge selections around what you want to poly select, then switch to fill selection and hover over each isolated area to select the polys.
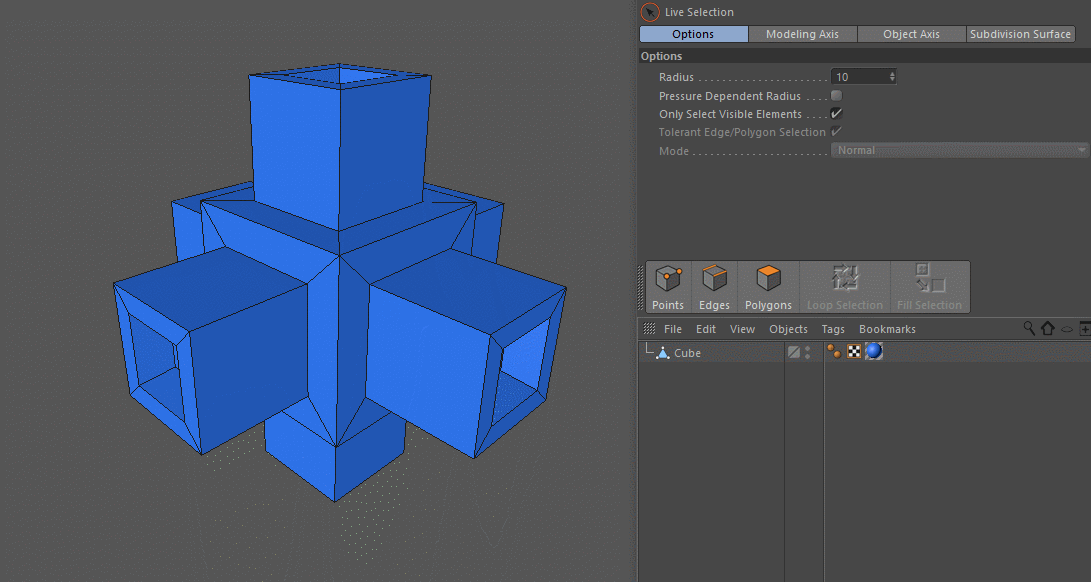
Another way to select sections of your model is through the phong break selection tool. This detects breaks in the phong shading of your model to define the selectable areas.
Pro Tip: Be sure to use the tag override and use lower phong angles to narrow the selection.
2. CLOTH SURFACE ON FLAT GEOMETRY = LIVE EXTRUSIONS
So you’ve got the Extrude object to extrude splines, but what about flat editable geometry? If you have the Studio version of Cinema 4D, just parent the geo to a cloth surface for a non-destructive & animatable extrusion.
3. BEVEL EVERYTHING
One of the easiest ways to create better looking models is to add bevels. Nothing in real life has razor sharp edges so why should your models?
Bevels allow for geometry to catch highlights and add a level of detail that makes it look less digital. Of course you can model this into your editable geometry with the bevel tool, but an easier way to add a bevel is through the Bevel deformer which keeps it nice and non-destructive allowing you to fine-tune its look. Simply add the Bevel deformer as a child of the main object.

4. SAVE ITERATIONS
It should go without saying that modeling parametrically or non-destructively as possible is always a good way to go since you can always get back to a previous state. But if you need to do some mesh surgery for greater detail or want to lighten up your scene’s playback speed, you’ll want to work with editable geometry. But before you hit that ‘C’ key, make sure to save a copy to get back to, either in a new .c4d file, or stashed in a hidden layer.
5. MAKE GEOMETRY AS LIGHT AS POSSIBLE
A good modeling tip in Cinema 4D is to only make meshes as dense as necessary. It’s generally a good thing to have lots of geometry around areas where deformation will happen. However, for rigid bodies knock that geometry down till you have the bare minimum.
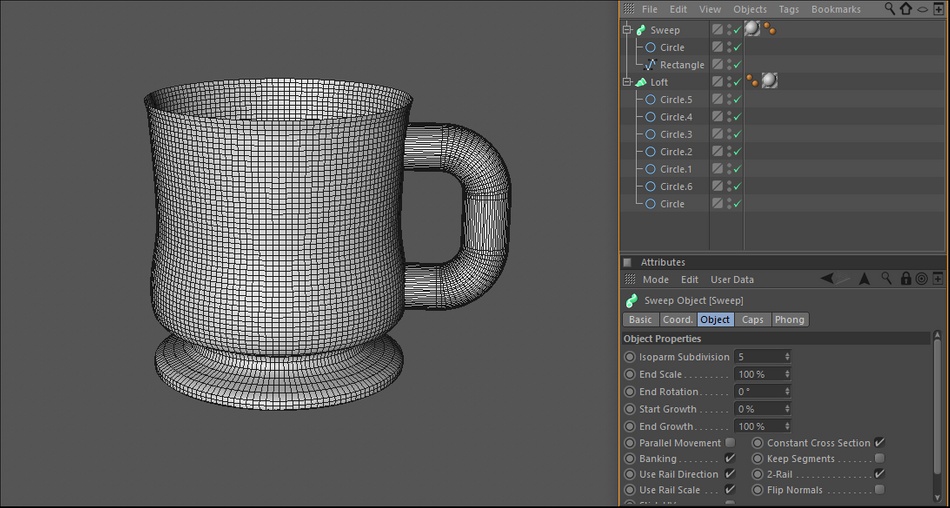
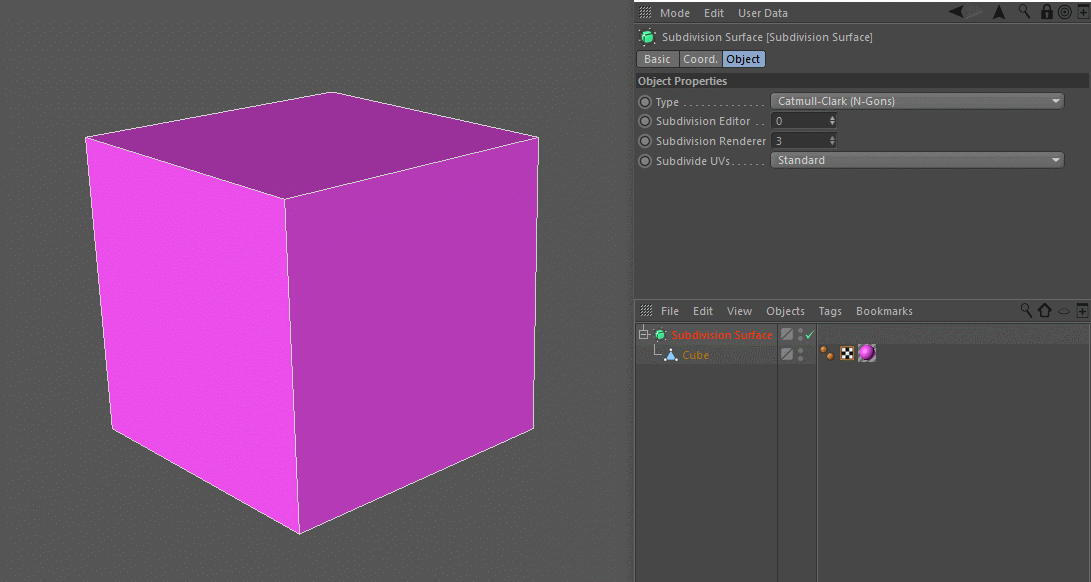
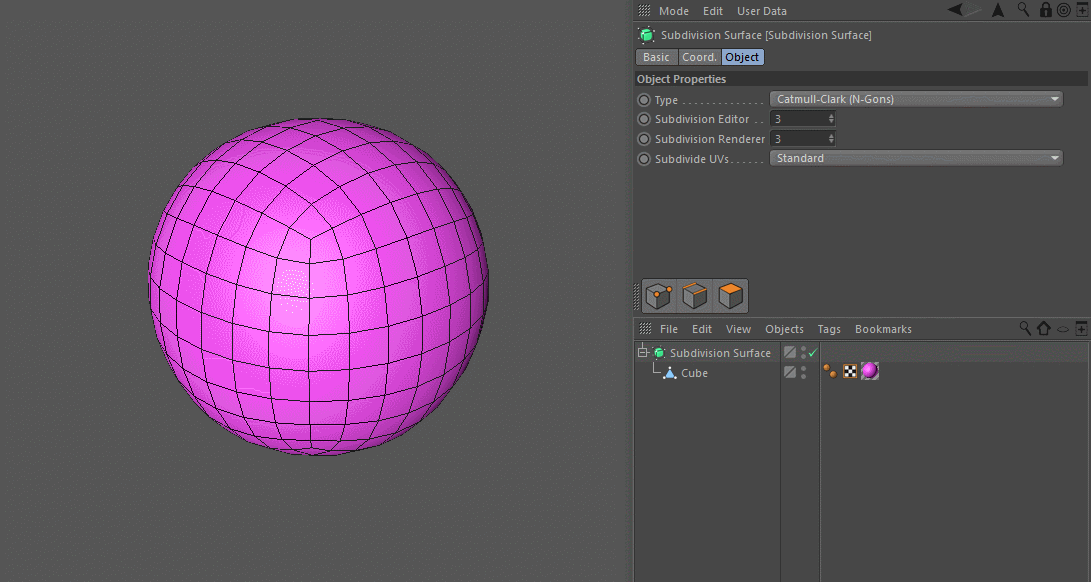
6. USE SUBDIVISION SURFACES
By keeping it light, your scene’s viewport stays fluid and if you need to bump up the resolution, add a Subdivision Surface object to the mix. Set the subdivision editor to 0 or 1 as you work your scene and 2 or higher for subdivision renderer.
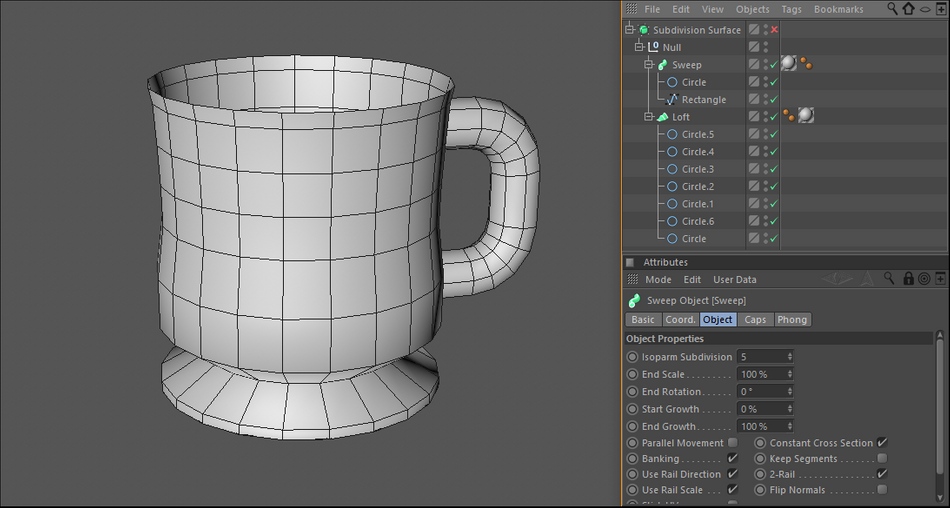
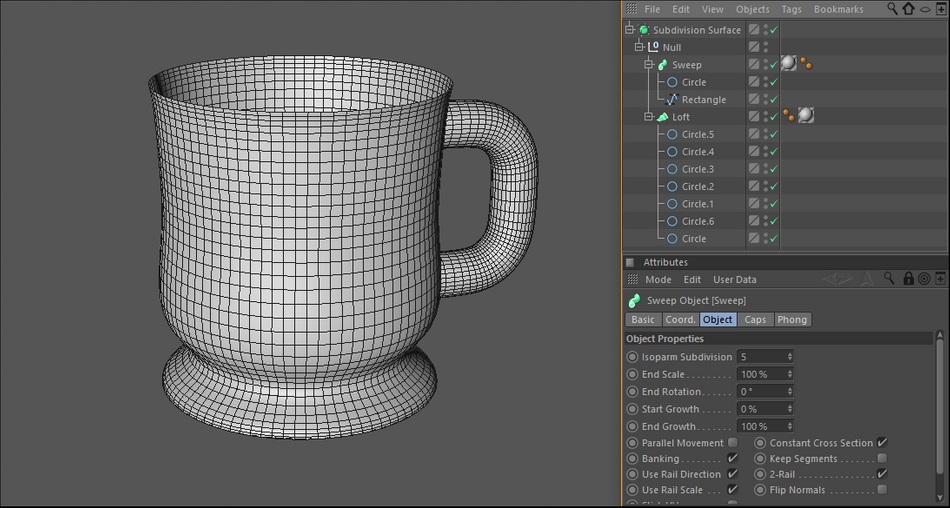
At each level, subdivision surfaces will take a polygon and divide it into 4 with the end result smoothing and rounding your geometry. So smoothing a cube will round it into a ball as you increase levels. Neat!
You can select points, edges and polygons and ‘crease’ or weight them so they don’t get rounded. Simply select the components of your base mesh, hold down the period key as you drag left and right. All the weighted information gets saved in a new SDS Weight tag.
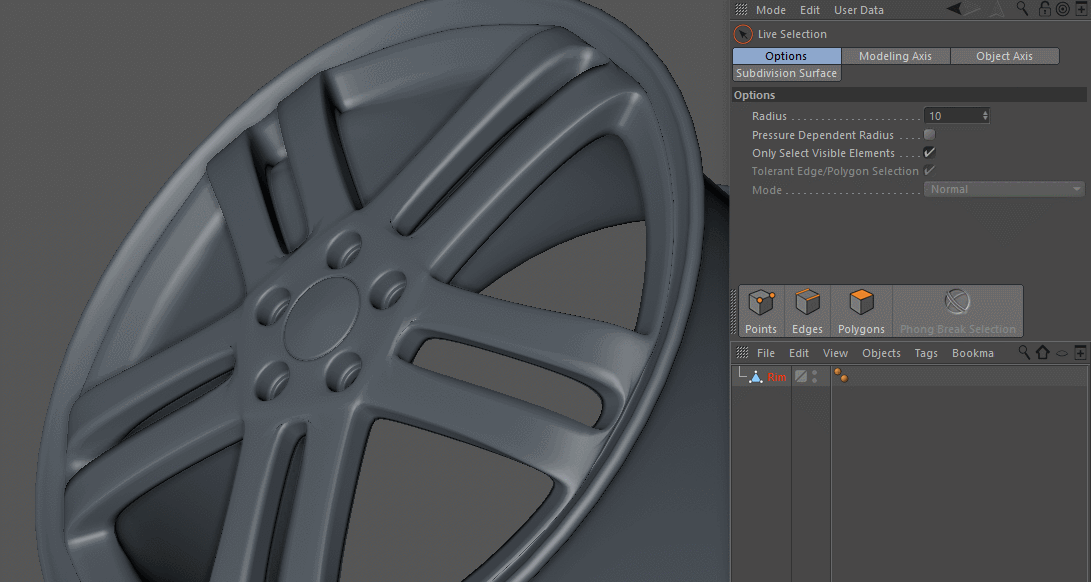
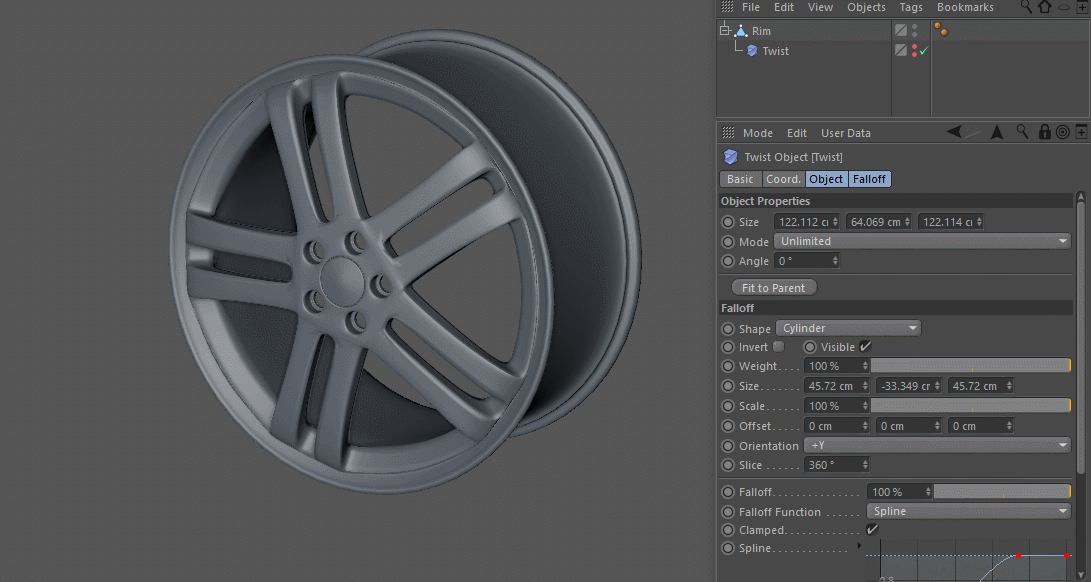
7. USE FALLOFFS ON EFFECTORS AND DEFORMERS AS MODELING TOOLS
Where geometry is complex or dense, you can use falloffs found in the deformers and mograph effectors as modeling tools. How? Take a tire rim for example: What if you wanted to introduce a twist to the spokes of the rim? You could do a soft selection with the rotation tool, but that’s destructive. Instead, put a twist deformer and use a cylindrical falloff to only affect the spokes and not the entire geo of the rim.
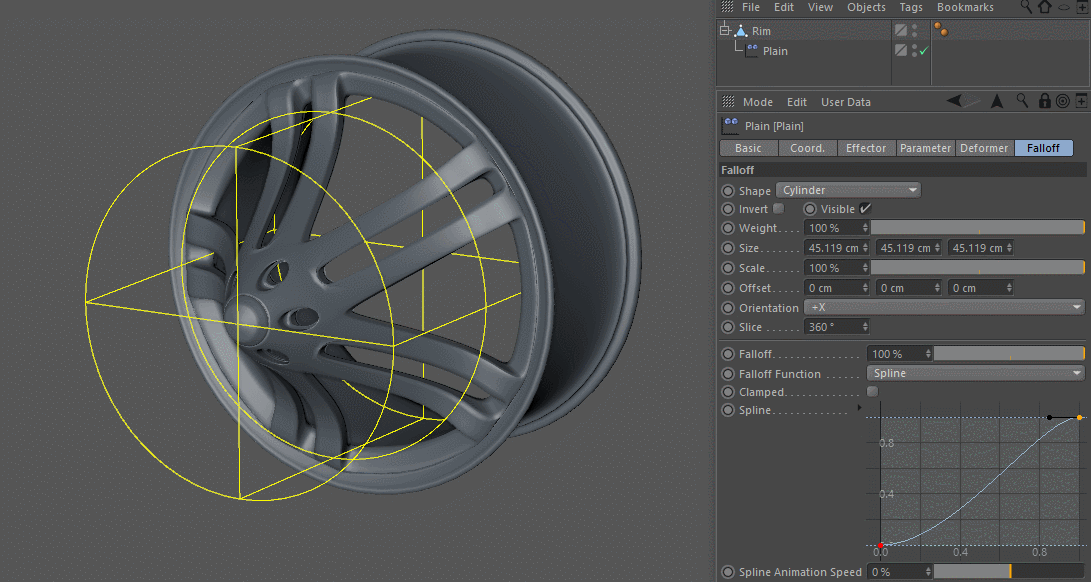
Likewise by using a mograph plain effector in point deformation mode and as a child of the rim, we can push and pull geo and limit what geometry is affected by using cylindrical falloff.
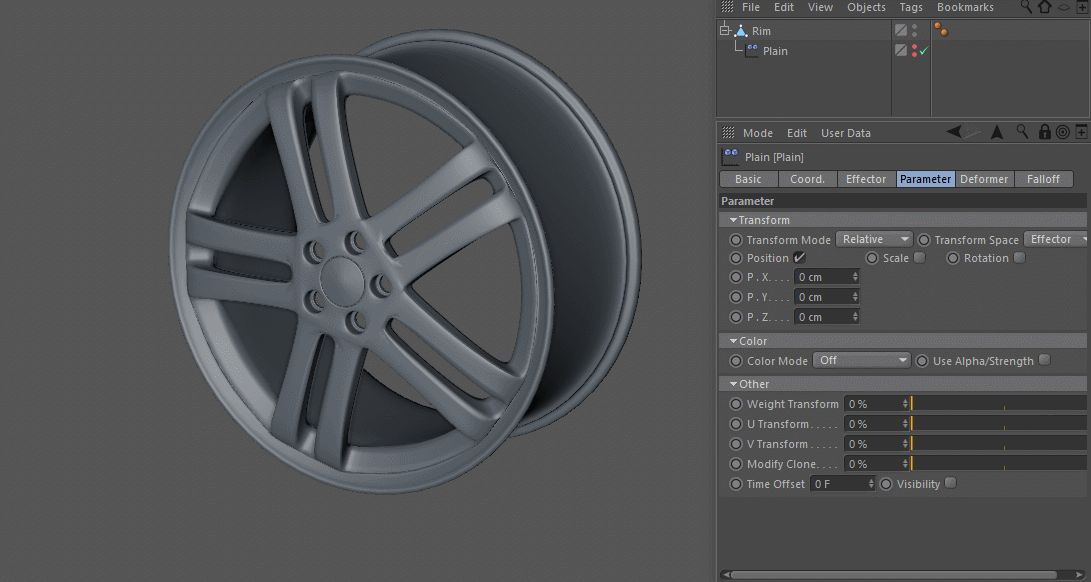
To really get fancy, you can play with the spline parameters of the falloff. By the way, this is all animatable?!
8. TRANSFORM GEOMETRY LIKE PHOTOSHOP
One of modeling tools is a free plugin from Welters Cinema 4D plugins called Transform. With Transform you can easily take polygon objects or selected geometry and shear, non uniformly scale, and rotate on edges all using the transform display cage around the object.
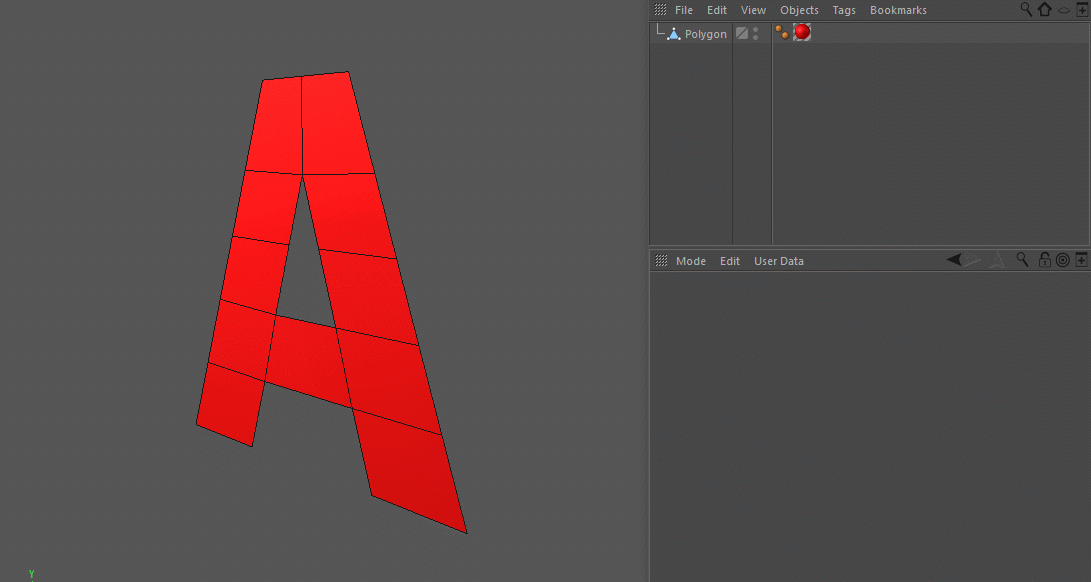
9. 5 POINT STAR SPLINE
If we’re honest, we’ve all wrestled with trying to get a simple 5 point star from a spline object to point upward. The fix is simple, rotate the 5 point star -90 degrees on the rotation B coordinate. But now although it points up, the green Y axis tells us it’s really on its side. To fix this:
- Make the star editable
- Enable axis modification mode
- In the coordinates manager, zero out the rotation B value.
Bonus tip: if you need this object often, save it to your library. With it selected, in the object manager go to File > Save Selected Object As.
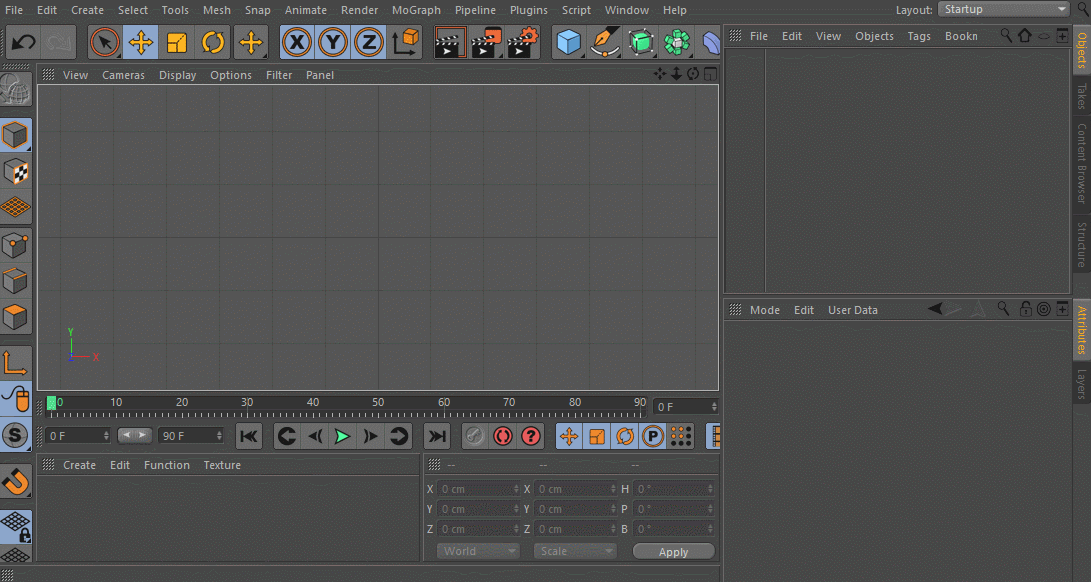
10. ADD GEOMETRY WHERE OBJECTS DEFORM
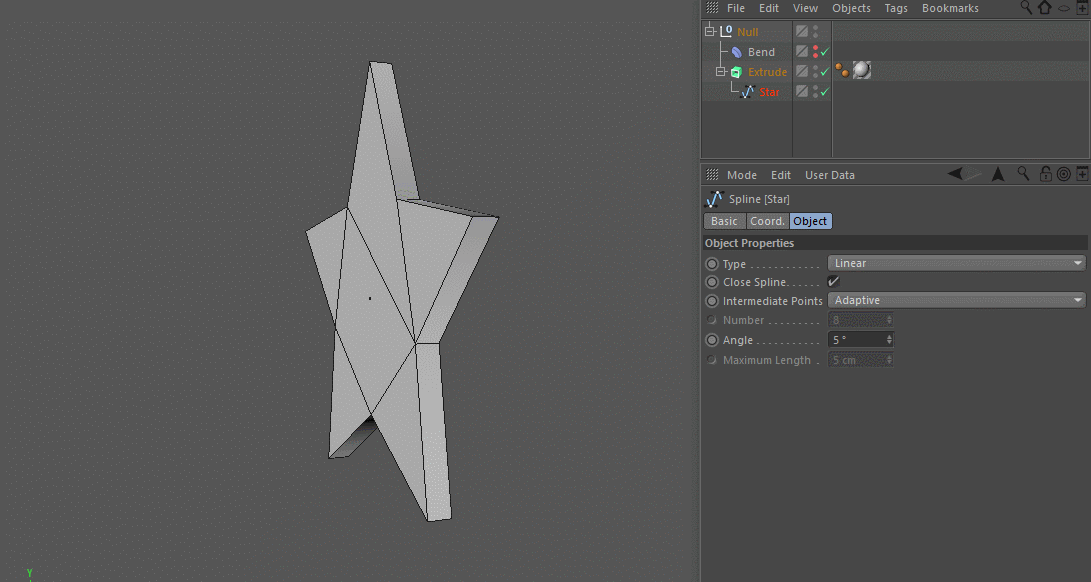
Take the star we just made and throw it into an Extrude object. Now add a bend to it and what do you get? Something pretty blocky.
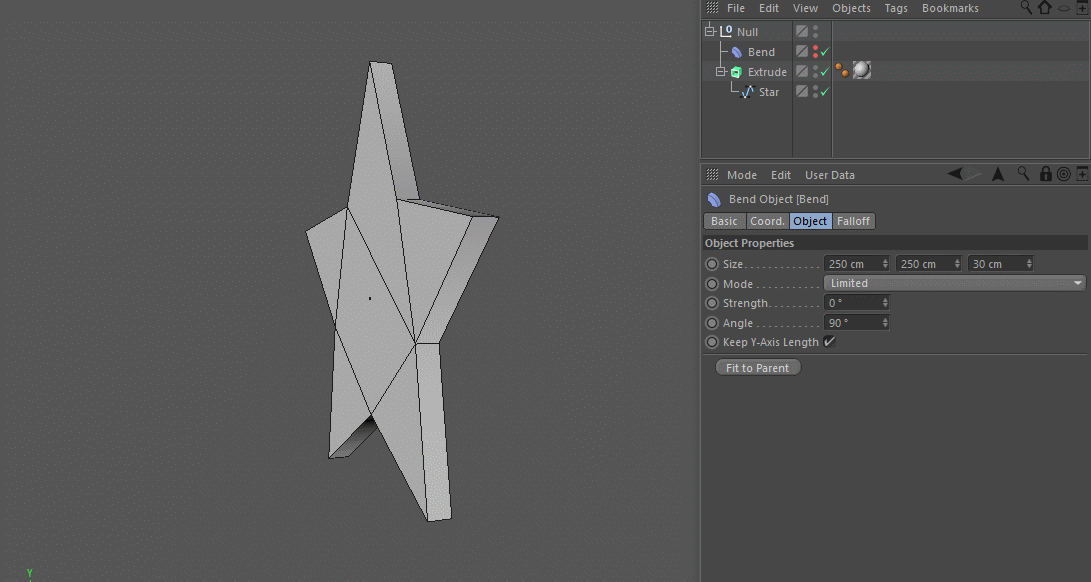
To smooth this out we can add more generated geometry by changing the number of intermediate points on the Star spline. As a result the bend has more to work with. But the center of the star is still pretty blocky.
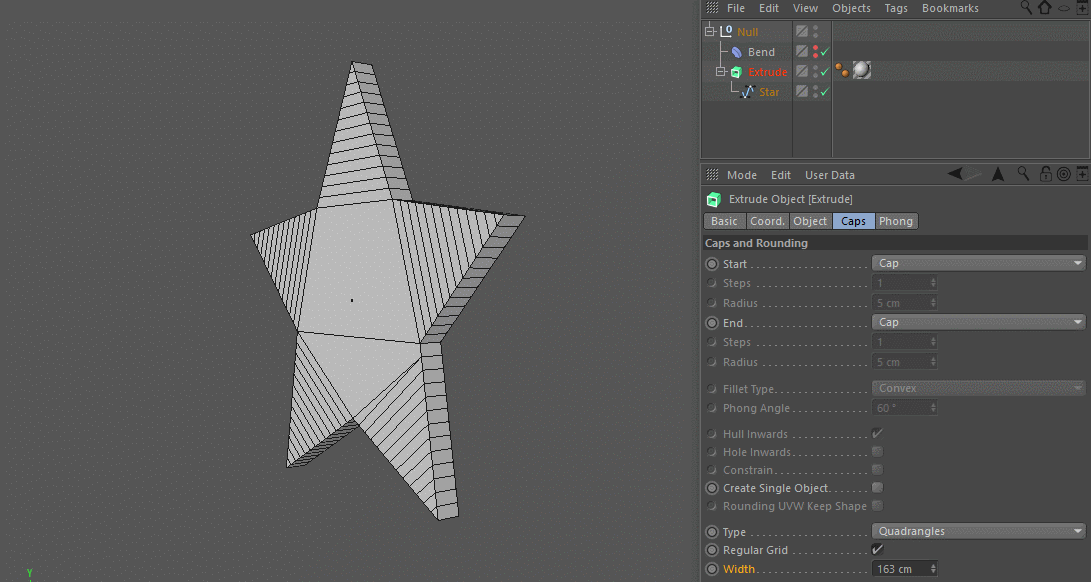
To add more geometry to the caps of the extrude object, change the cap type to ‘Quadrangles’ & enable ‘Regular Grid’. Yes, this introduces triangles where all quads would be better, but unless we want to take the time to make this editable and manually add our geometry with the Polygon Pen tool, this seems like a speedy alternative.
Best Cloud Rendering Service For Cinema 4D
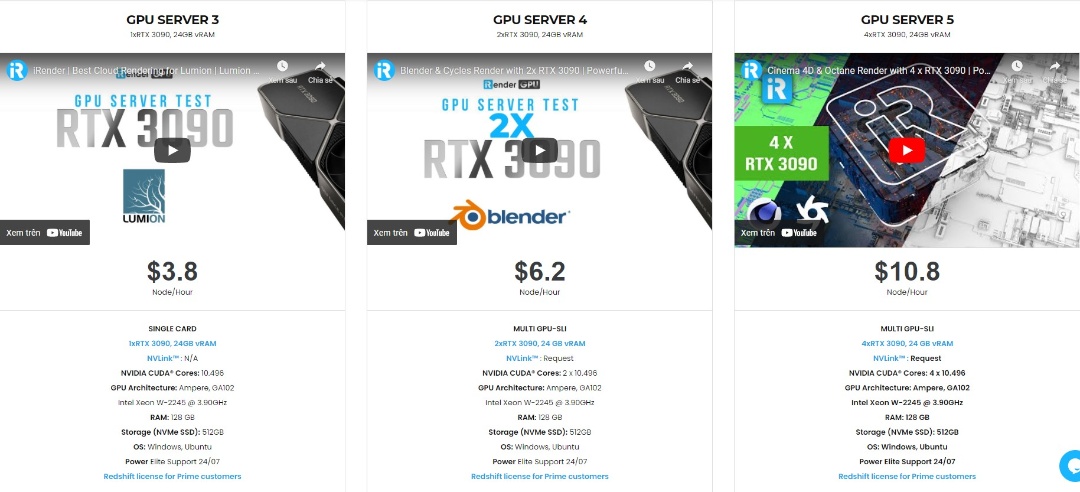
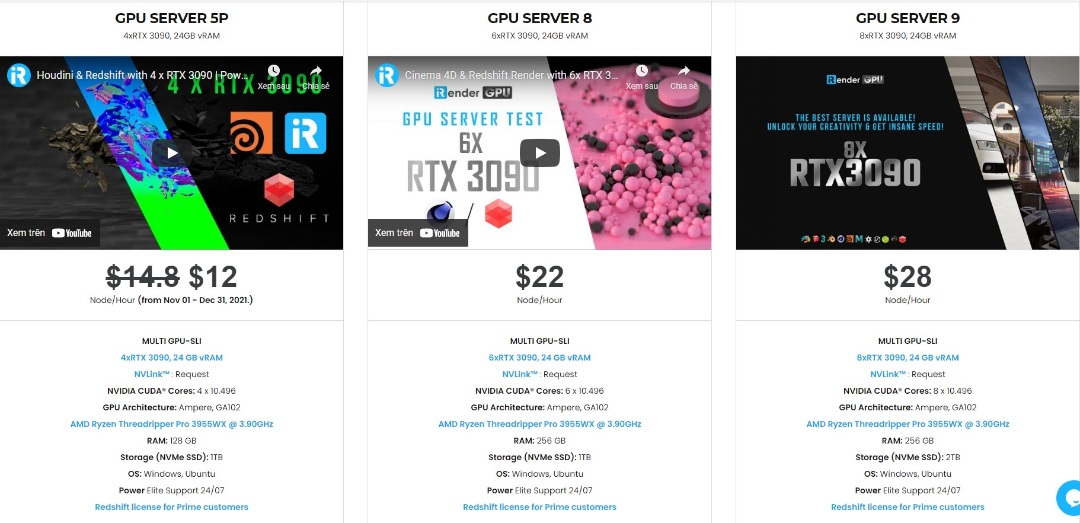
iRender is a GPU-Acceleration Cloud Rendering Service for Multi-GPU Rendering with Powerful Render Nodes: 2/4/6/8x RTX 3090/3080/2080Ti, provides high computing performance on the model of IaaS (Infrastructure-as-a-Service). Cinema 4D users can easily choose their machine configuration from recommended system requirements to high-end options, which suit all your project demands and will speed up your rendering process many times.
High-end hardware configuration
- Single and Multi-GPU servers: 1/2/4/6/8x RTX 3090/3080/2080Ti. Especially, NVIDIA RTX 3090 – the most powerful graphic card.
- 24 GB vRAM capacity, fitting to the heaviest images and scenes. NVLink/SLI requested for bigger vRAM.
- A RAM capacity of 128/256 GB.
- Storage (NVMe SSD): 512GB/1TB/2TB.
- Intel Xeon W-2245 or AMD Ryzen Threadripper Pro 3955WX CPU with a high clock speed of 3.90GHz.
Let’s see rendering tests with Cinema 4D and Octane, Redshift on servers 6x RTX 3090 at iRender:


Reasonable price
iRender provides high-end configuration at a reasonable price. You can see that iRender’s package always costs much cheaper than packages of other render farms (in performance/price ratio). Moreover, iRender’s clients will enjoy many attractive promotions and discounts. For example, this December, we offer a promotion for new users and discounted prices for many servers, users will take advantage of these to level up their renders.

For Cinema 4D users with large-scale projects, iRender offers the daily/weekly/monthly/yearly Fixed Rental packages, which saves you up to 30% of the cost compared to the hourly rental. Please read more about our Fixed rental service here.
And much more utilities
To reduce the rendering time more, users can run multiple machines at the same time. You can use the machines separately or connect them by using Thinkbox Deadline. iRender provides Redshift license, Thinkbox Deadline license for Prime customers. Users, who recharge enough points to become Prime customers, will not only be able to use Redshift/Thinkbox Deadline license without usage or maintenance costs, but also enjoy a lot of exclusive benefits.
In addition, users can request extra services to make full use of iRender servers, for example, expand image threshold, increase the size of network drive (Z:), open port, install NVLink, and change hardware. Surprisingly, you get all of these services for free.
Conclusion
Hopefully, these modeling tips in Cinema 4D will help you make some polygonal magic. With all the outstanding advantages mentioned above, you must have found yourself the perfect choice for Cinema 4D projects. We believe together with Cinema 4D, our GPU accelerated servers will bring greater interactivity and speed to artist workflows. What users can get from iRender is not only the best quality products but also the high security and the most comfortable render time.

So, do not hesitate anymore, let’s REGISTER for an account today to get a FREE COUPON to experience our service and reach a new level of cloud rendering.
Thank you & Happy Rendering!
Source and image: ALAN DEMAFILES
Related Posts
The latest creative news from Cinema 4D Cloud Rendering , V-Ray Cloud Rendering , Redshift Cloud Rendering, Octane Cloud Rendering, 3D VFX Plugins & Cloud Rendering.