Explain Redshift Volume Shader’s parameters
Volume Shader’s parameters are crucial settings in rendering non-homogeneous volume objects such as smoke and fire. This article will break down each element of these settings in Redshift for Cinema 4D.
Volume Shader
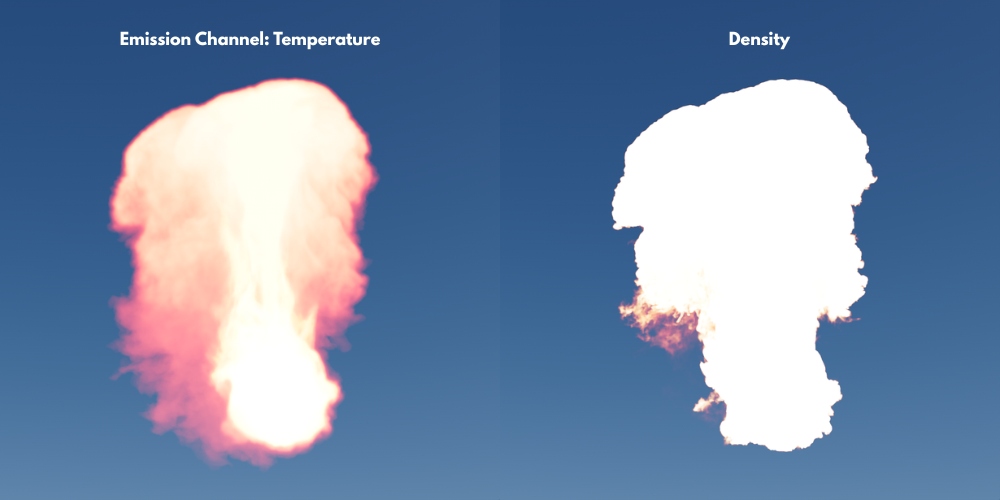
Before exploring the detailed Volume Shader’s parameters, we should understand their definition. The Redshift Volume shader was designed to render heterogeneous volume objects such as smoke or fire based on physics. The Volume shader will use the grids of voxel data inside the volume objects to control their shading components. Regularly, these grids are stored in OpenVDB files. In Redshift, the OpenVDB files in a volume shader are referred to as channels. And, there are two typical channels in Redshift: ‘Density’ for smoke rendering and ‘Temperature’ for fire rendering.
The Redshift Volume Shader is broken down into 3 shading elements: scatter, absorption, and emission. Scatter is like the diffuse shading, which makes the volume object appear brighter or darker. Absorption is similar to volume transparency, which creates the feeling of solidity or density of the object. Lastly, Emission is used when you want to adjust the light intensity of the self-illuminating effect, like fire.
Now, let’s get into these 3 components’ settings.
1. Scatter

Scatter is the first setting in Redshift Volume Shader’s parameters, which is the primary shading component for clouds and smoke.
Channel

The name of the channel should be typed in the textbox. And, the typical name for the Scatter channel is ‘density’. Please note that Redshift needs either the Scatter or Emission channel name to start rendering volume. In case you want to render a cloud with no need for a self-illuminating effect, you only choose the Scatter channel and leave the Emission channel blank.
Scatter Coefficient
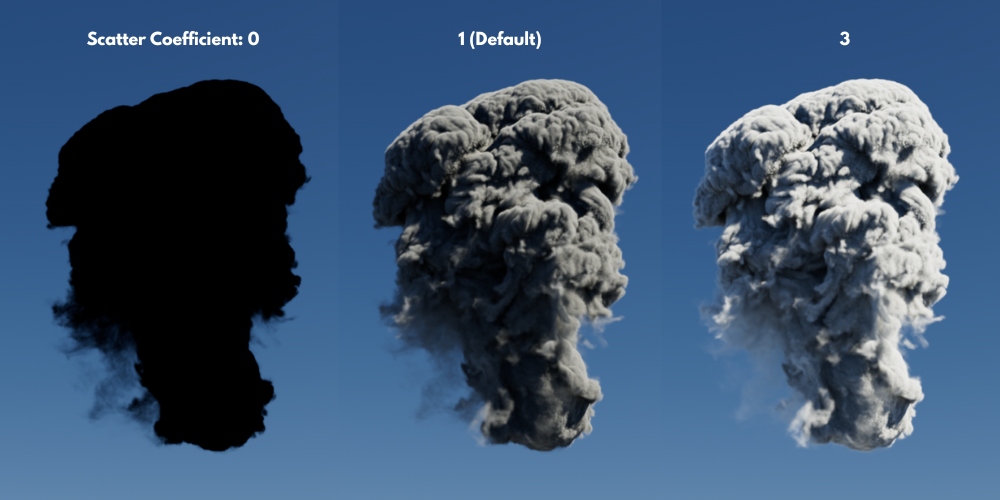
This value controls the strength of the scattered light hitting a volume object. If you increase the value, the volume will look brighter. And, setting it at 0 will result in a black object even when there is a light source in the scene.
Tint
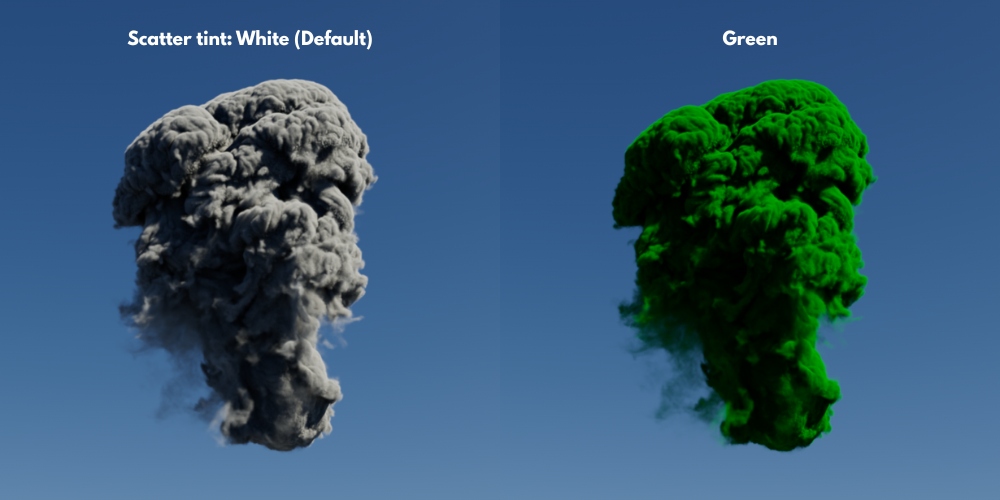
If you don’t want the default color of smoky grey, you can use this option to change the overall color of the volume.
Scatter Color Ramp
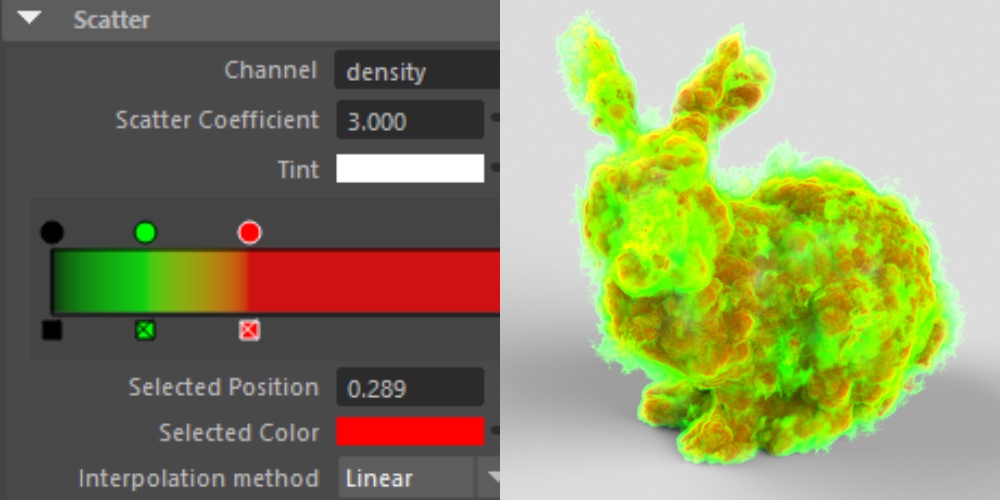
The Scatter color ramp is an advanced tint feature for setting colors based on the density values. The left side of the ramp controls the low-density values’ color, while the right side determines the color for the higher-density values.
Anisotropy

In reality, light is scattered not only on the surface of the object but also inside it. That’s why we have the Anisotropy setting. The value of 0 generates isotropic scattering, while Negative values result in more back scattering, or Positive ones lead to more forward scattering.
2. Absorption
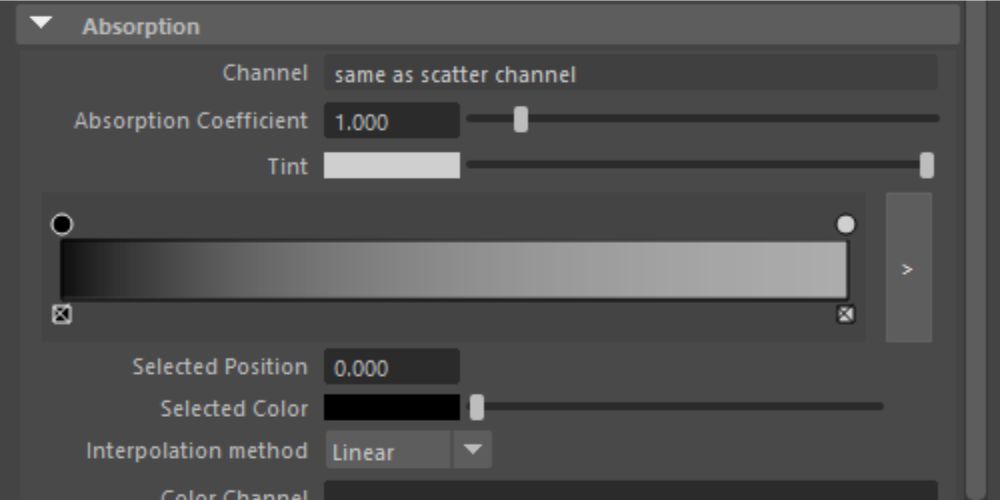
The second component of Redshift Volume Shader’s parameters is Absorption, which controls the transparency of the object.
Absorption Coefficient
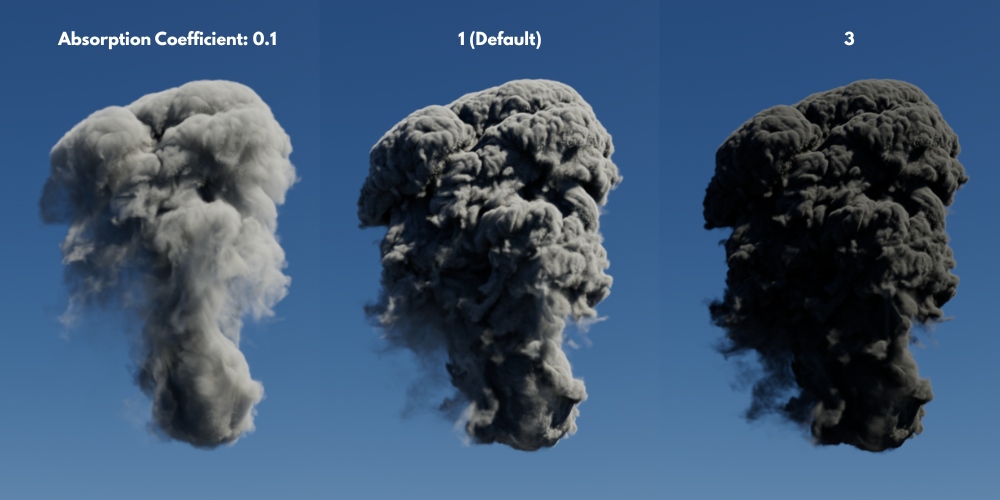
Absorption Coefficient drives the density of the volume object. The higher the value, the more opaque and the darker the volume becomes.
It’s recommended by Maxon to modify the Scatter and Absorption coefficients by the same amount.
Tint

This option is used to change the absorption color of the volume.
Absorption Scalar Ramp
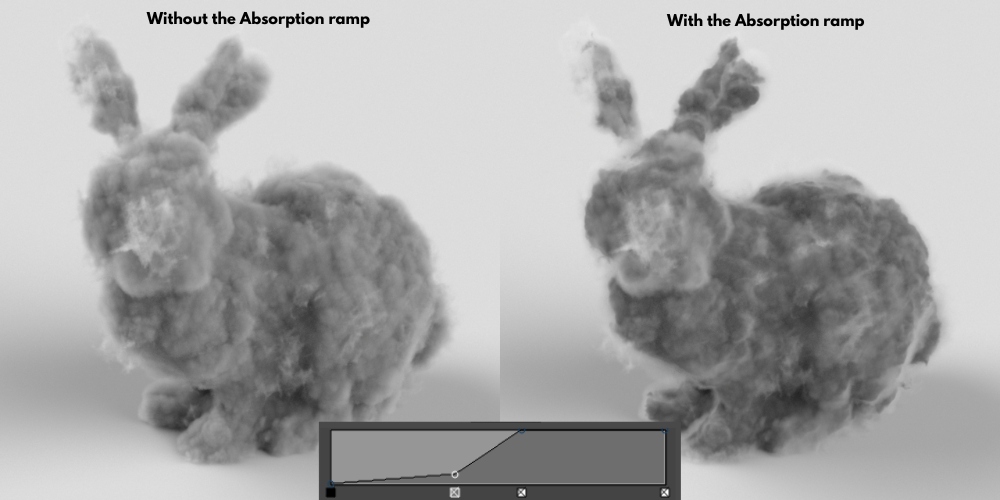
You can use the Absorption Scalar Ramp to have more advanced control of the opacity or the color of the volume object based on the density value. It works similarly to the Scatter’s ramp.
Color Channel
If you already have an Open VDB file to color, you can enter the file name here instead of setting the Tint above.
3. Emission
The last component of Volume Shader’s parameters that we explore is the Emission. This element is essential when creating self-illuminating effects, such as fire and explosions.
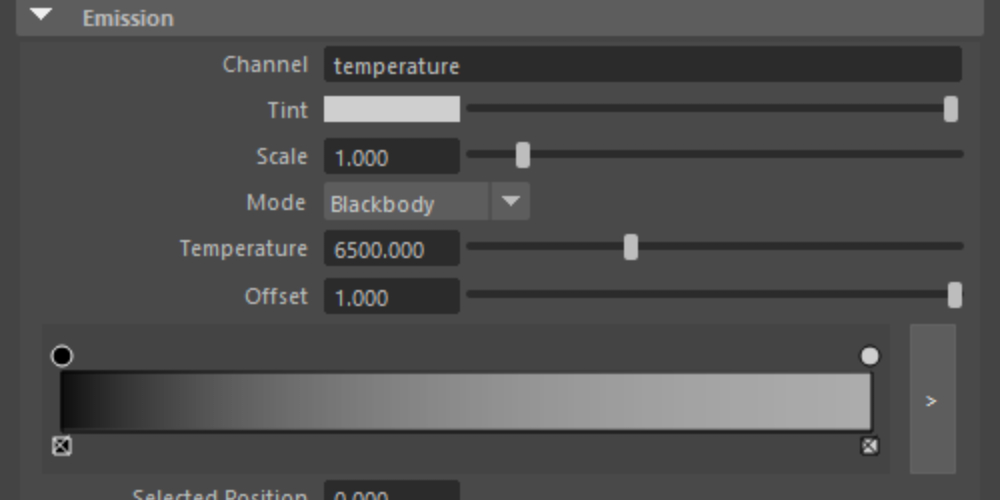
Channel
The typical name for the Emmision channel is ‘temperature’. Besides, the channel name can be chosen from ExplosiaFX, FumeFX, or Turbulence FD, depending on the specific result you want to achieve.
Tint
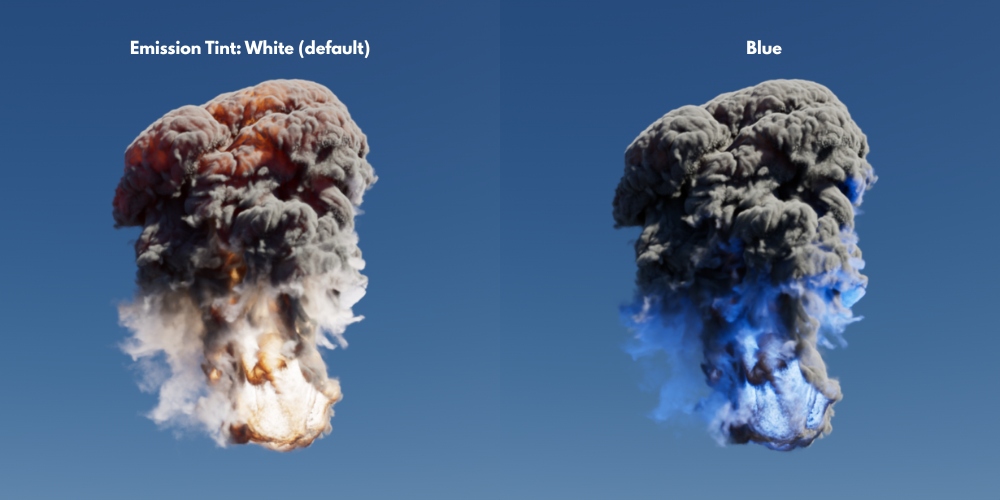
Since the temperature channel only controls the heat of the emissive mass, the Tint feature is needed to set its color.
Scale
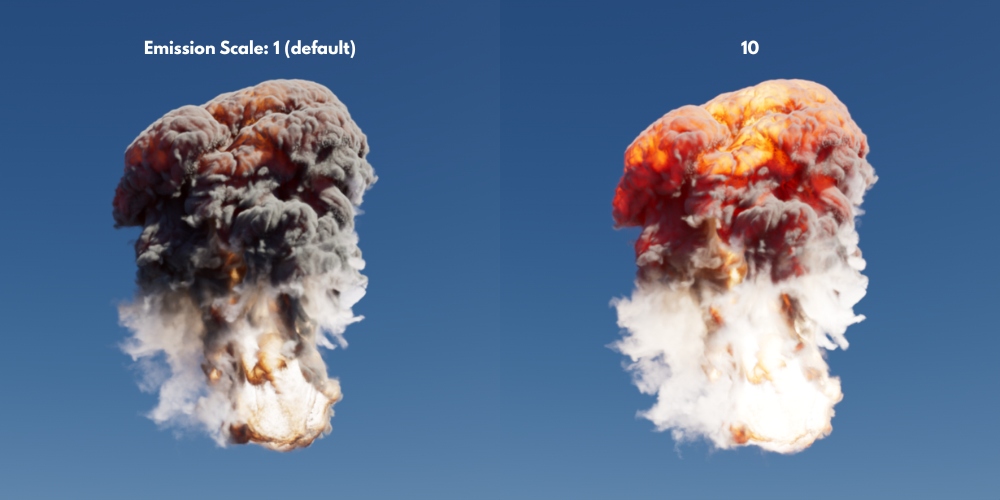
You can increase the emission intensity by multiplying the emission channel by the Scale. A Scale of 0 will lead to no emission.
Emission mode
There are 2 modes for emission:
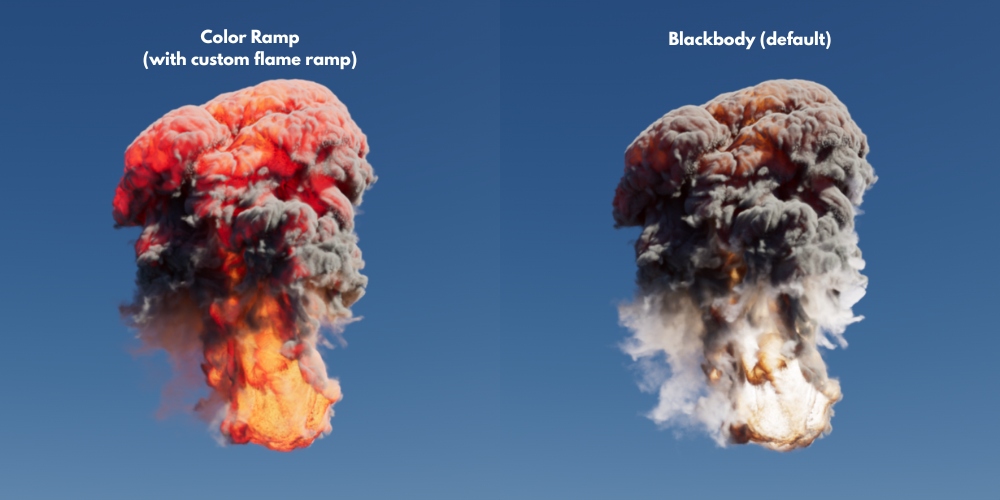
- Color Ramp – Emission color is customized by the emission remap ramp.
- Blackbody – Emission color is controlled by a physically based rendering method, used for effects like explosions and flames.
Emission Remap Ramp
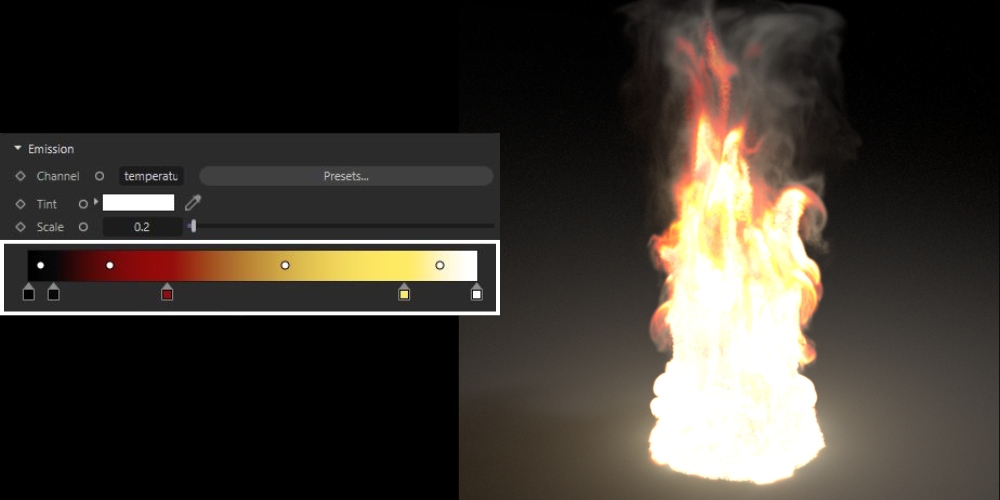
With this tool, you can color the emission volume based on the temperature level. The colors from left to right sides of the ramp correspond to volumes from low to high temperature.
Taking the flame above as an example, you would set the ramp like this:
- Low temperatures – black/gray
- Medium temperatures – red
- Higher temperatures – yellow/white
Please note that the fire above is the result of all 3 component settings of Redshift Volume Shader’s parameters.
Color Channel
You can use an OpenVDB file for the emission component’s color as an alternative to Tint or Ramp.
Color Mode
This mode controls how the Color Channel combines with Emission Remap Ramp and Tint.
There are 3 options available:
- Multiply with ramp: The Color Channel will multiply with the Emission Tint gradient.
- Multiply with temperature: The Color Channel will multiply with the Emission Channel before combining with the Tint and the Tint gradient
- Replace: The Color Channel will completely replace the Emission Channel.
Temperature
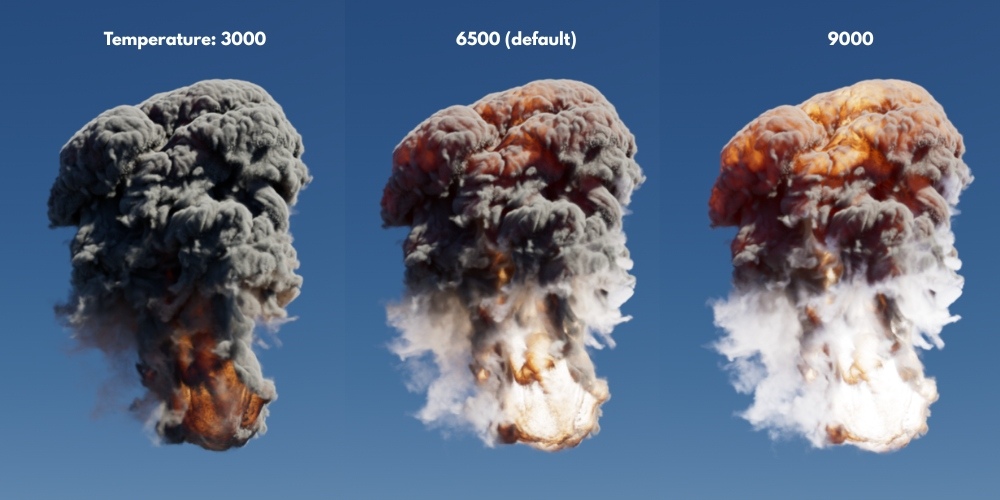
This setting sets the emission value based on the Kelvin temperature range. The color and intensity of the emission volume will change as the parameter is increased or decreased.
Offset
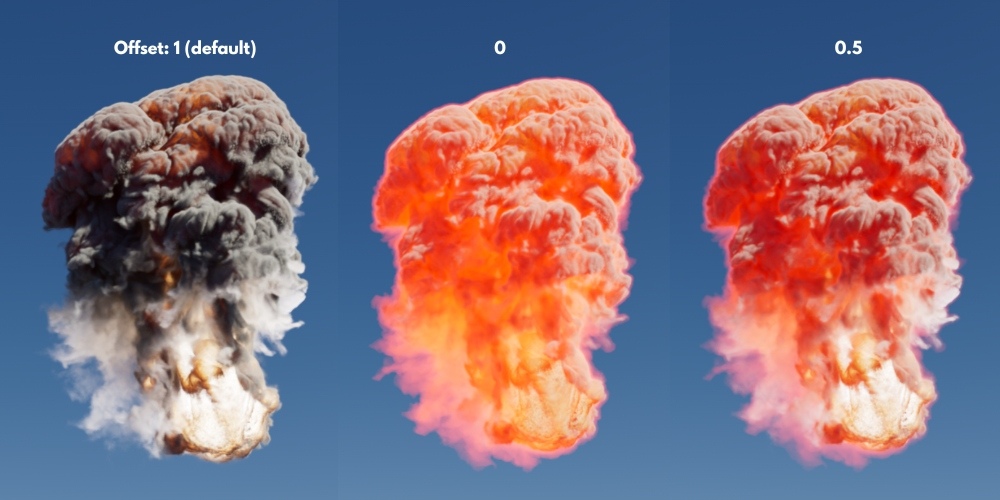
Offset changes the emission intensity according to the emission channel value and the calculated physically correct radiance. It’s best to leave it at the default value to get the physically correct results.
Utilize iRender powerful nodes to enhance the Redshift rendering
iRender offers high-performance machines equipped with premium specs such as the AMD Ryzen™ Threadripper™ PRO 3955WX (3.9–4.2GHz), along with options for 1, 2, 4, 6, or 8 RTX 4090 or RTX 3090 GPUs, 256GB of RAM, and 2TB NVMe SSD storage.
Additionally, iRender provides each user with a free Cinema 4D – Redshift license, eliminating the need to transfer your own license to our render nodes.
Why can iRender be a great render farm for you?
In addition to high-configuration servers, iRender provides many other utilities to provide the best user experience.
- Dedicated server for individuals: You have full control and access to the server you rent. The working environment (installed apps, files) will be stored for the next use.
- Easy and free file transfer between your computer and iRender’s server: The transferring task can be done via iRender GPU application for Windows and the iRender Drive application for MacOS.
- 24/7 assistance: iRender’s attentive agents are always ready to support all your queries.
- All software compatibility: iRender’s PCs are built to meet the configuration needs of all 3D software and rendering tools at a variety of cost levels for users to choose from.
Let’s see how fast Redshift renders on iRender’s nodes!


New users will get a 100% bonus for the first transaction within 24 hours of their registration. No minimum amount!! If you top up 50$, you will get 100 points in total to hire our machines.
If you have any questions, please get in touch with me through email [email protected] or our 24/7 support team for a quick response.
Thank you for reading
Source: Maxon
Related Posts
The latest creative news from iRender render farm for Redshift