
How light works in Octane for Cinema 4D
Lighting plays a crucial role in all 3D applications. No lighting means no render. Lighting in an unbiased renderer like Octane’s Path Tracing kernel attempts to mimic real-world physics. This means that if we set up lighting following real-world rules, we can achieve beautiful and realistic results without extensive tweaking of many settings or cheating too much. However, if we don’t set up lighting up properly, it can result in noise, artifacts, and other issues that cause frustration. This guide will explain how light works in Octane for you to produce beautiful and realistic renders.
An In-depth guide on how light works in Octane
All emission is the same

All emission is the same in Octane. This may seem weird because we have long been taught that there are significant differences between an HDRI, area light, blackbody, and emissive texture; however, the truth is that all emission (light generation) in Octane works in the same way, just with different defaults and settings.
In Octane, light occurs when a polygonal object has an emissive material that is applied to it.
-
-
- Some random piece of geometry (with a material applied) that contains a Blackbody or Texture Emission node in the Emission channel emits light.
- An Octane area light is a procedurally created geometry object with an Emission node built-in. It works in the same way as the random polygon object with an emissive material but with a few more controls for simpler placement and various default settings. It, like a material, can be configured to use a Blackbody or Texture Emission node. By default, the area light is a plane (rectangle), but it can be changed to a disc, sphere, cube, cylinder, or a few other shapes.
- An Octane targeted area light is a light that has a C4D Target tag and can aim at an external object. This tag can be applied to any light (or object) once it has been created; this is just a shortcut to get this tag on a new light.
- An Octane IES light is a type of area light that has certain (but not all) default settings to make working with IES textures easier.
- An Octane spot light is a type of area light with an adjustable spotlight distribution. It makes use of Octane’s Spectron system to add additional settings such as barn doors and a volumetric cone to better simulate a real spotlight.
- An HDRI, or texture environment, is a massive sphere with an emissive texture on the inside. The power settings for this and the sun/sky rig are on an entirely another scale than a smaller fixture since they’re supposed to simulate an entire environment that puts out orders of magnitude more light than an LED bulb.
- An Octane Daylight rig is a collection of procedural textures and geometry that simulates a massive, powerful light source that’s so far away (The Sun). While it works in the same way as any other light, this rig hides and obscures lots of the standard controls to make it more intuitive.
-
Emission
In the real world, everything that emits light (such as the semiconductor in an LED, a filament in an incandescent bulb, or a ball of burning hydrogen in space) emits in all potential directions that the emitting surface allows for. As a result, the rays are never parallel or directable.
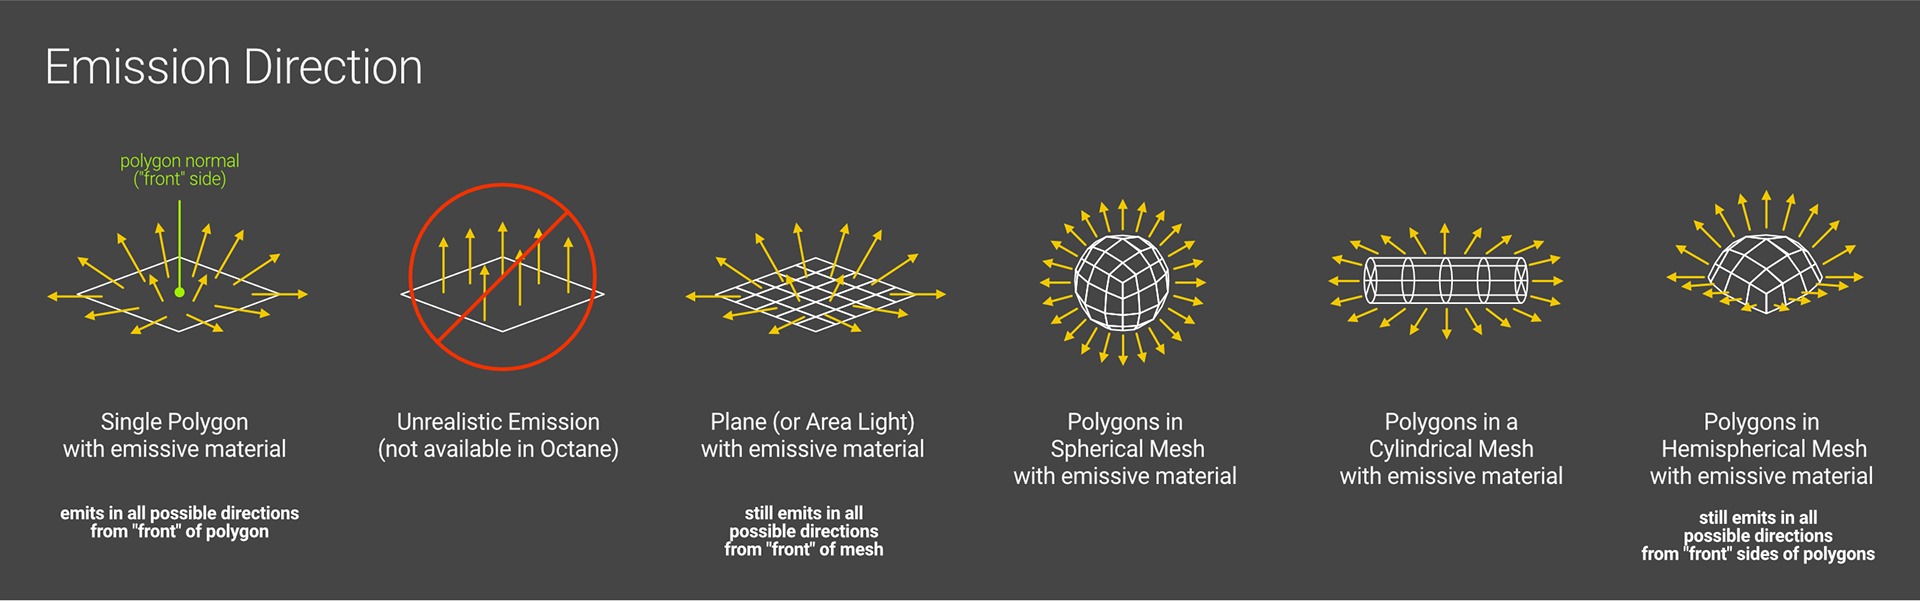
The sun is the closest natural thing to a parallel light; it still emits in all directions, but because it’s so large and so far away, we only receive a tiny portion of its rays that are essentially parallel with one another. When light is generated, lasers emit in all directions as well, but they have a complicated mechanism of redirecting the rays that currently Octane can not yet imitate.
Because Octane’s Path Tracing kernel is an unbiased render engine that simulates this behavior, we are unable to control or align rays coming from an emitting surface.
Why is this important?
This omnidirectional emission behavior, together with realistic falloff (how far a ray travels before running out of energy) and secondary bounces (Global Illumination), creates very realistic lighting without requiring us to adjust too many settings, as we would in a biased engine. This is fantastic.
What’s not so fantastic is it’s difficult for an unbiased renderer (such as Octane’s Path Tracing kernel) to calculate the paths of all of these rays, especially when some or many of them are prevented or hidden behind materials with refraction. Because of this difficulty, calculation errors accumulate and are visually seen as noise and artifacts such as fireflies. We can typically get a decent render if we throw enough samples at the problem. However, it would be preferable to just set it up perfectly the first time to make everything as fast and efficient as possible, right?
So, what can we do?
Octane is developed to imitate real-world physics with light and materials. Therefore, the best we can do is to use real-world values. We’ll need to discover how those values are translated into light and material settings. Following that, we can avoid doing things that are very demanding on the engine if we don’t have to. Finally, we could use AI and other techniques to help optimize the sampling method to ensure the image resolves faster without sacrificing the appealing look of a neutral render. If everything else fails, we can either brute force it by putting in a lot of time, or we may simply cheat. Let’s learn more about those values.
Wattage/Efficiency (Power/Texture)
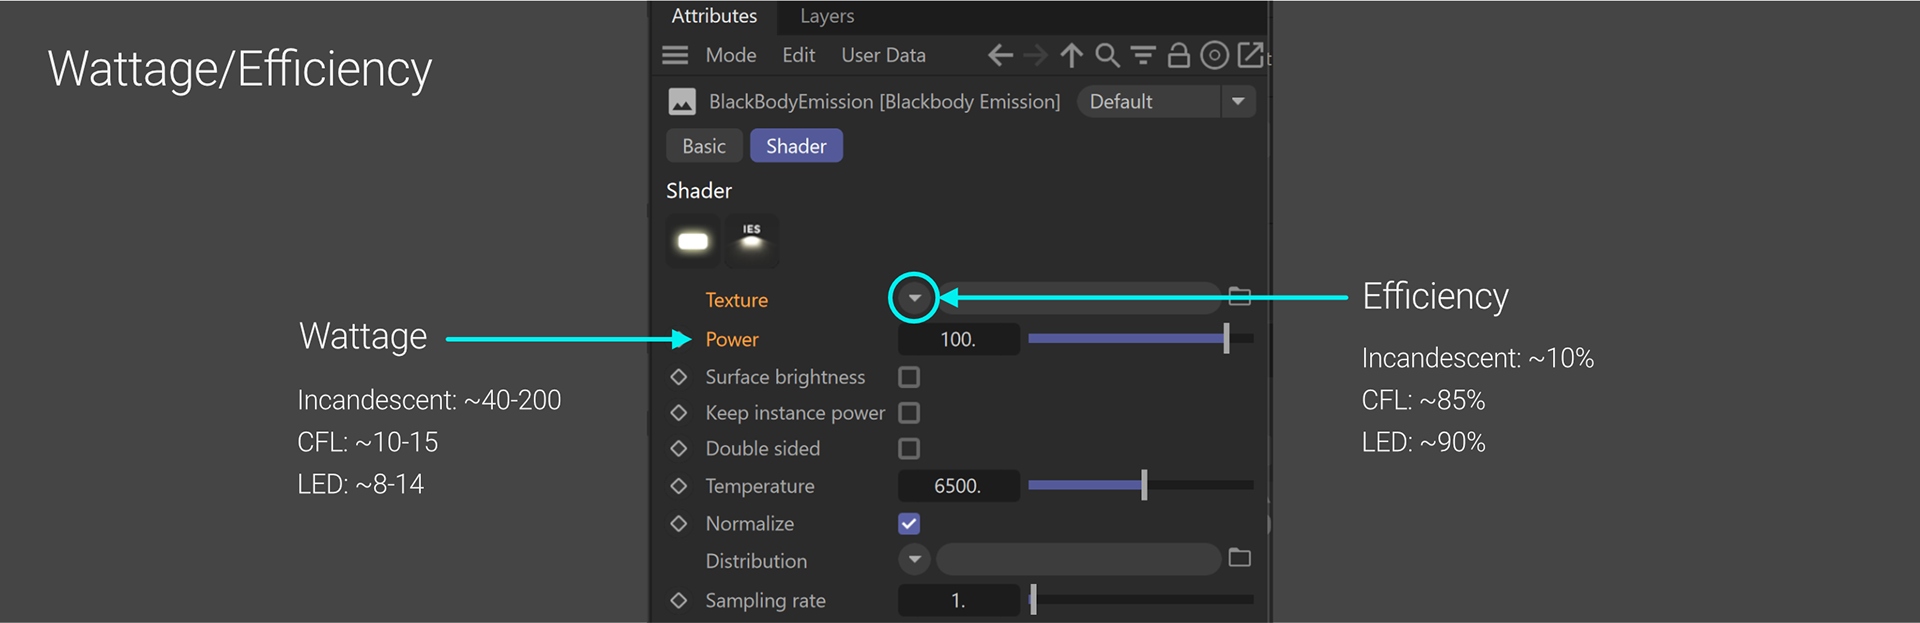
In Octane, Emission operates on a wattage/efficiency model.
The Power field is equal to the Wattage of the light source. A 100 Watt incandescent bulb is set to 100 Power, and a 12 Watt LED is set to 12 Power. All is well and good, but as any bulb shopper knows, a 12 Watt LED produces nearly the same amount of light as a 100 Watt incandescent. The difference is in efficiency.
In Octane, the Texture field determines Efficiency. Incandescent bulbs utilize 100 Watts, however, they are only approximately 10% efficient (the other 90% of the energy goes to heat). To imitate this type of bulb, we’d use 100 in the Power field but link a texture node (such as Float Texture) to the Texture field and set it to 0.1. LEDs are approximately 90% efficient, thus if we took the same light and set the Float Texture in the Texture field to 0.9, we could lower the Power to 11 to mimic the LED and receive almost the same amount of light as our incandescent light.
Important: We MUST use a texture in the Texture field to simulate real-world lights. There are some built-in settings in different light objects that aren’t visible or controllable in their current state, thus we’ll override them by attaching a node to set our own values.
A Blackbody or Texture Emission node in a material has a Float of 0.025 (2.5% efficiency). The default value for an area light is 0.1718441 (17.2% efficiency). This means that if we create a Plane object and apply an emissive material to it, it will emit much less light than an Octane area light of the same size. We can get these two objects to operate similarly if we manually override and set the values.
Gaussian Spectrum Texture
Octane is a spectral renderer, which means it defines light (and color) using wavelengths, widths, and power, just like real physics. The Gaussian Spectrum node is what works with these values and produces the best and most realistic results.
Although RGB/HSV models are supported (through an RGB Spectrum node), Octane will convert them to Gaussian before rendering. Because RGB/HSV might produce unrealistic colors causing problems when converting to Gaussian, there may be blown-out or noisy harsh areas if excessive RGB values are applied. The more we can use a Gaussian Spectrum texture instead of an RGB Spectrum or Float texture (particularly with emission), the better we’ll be.
Surface Brightness
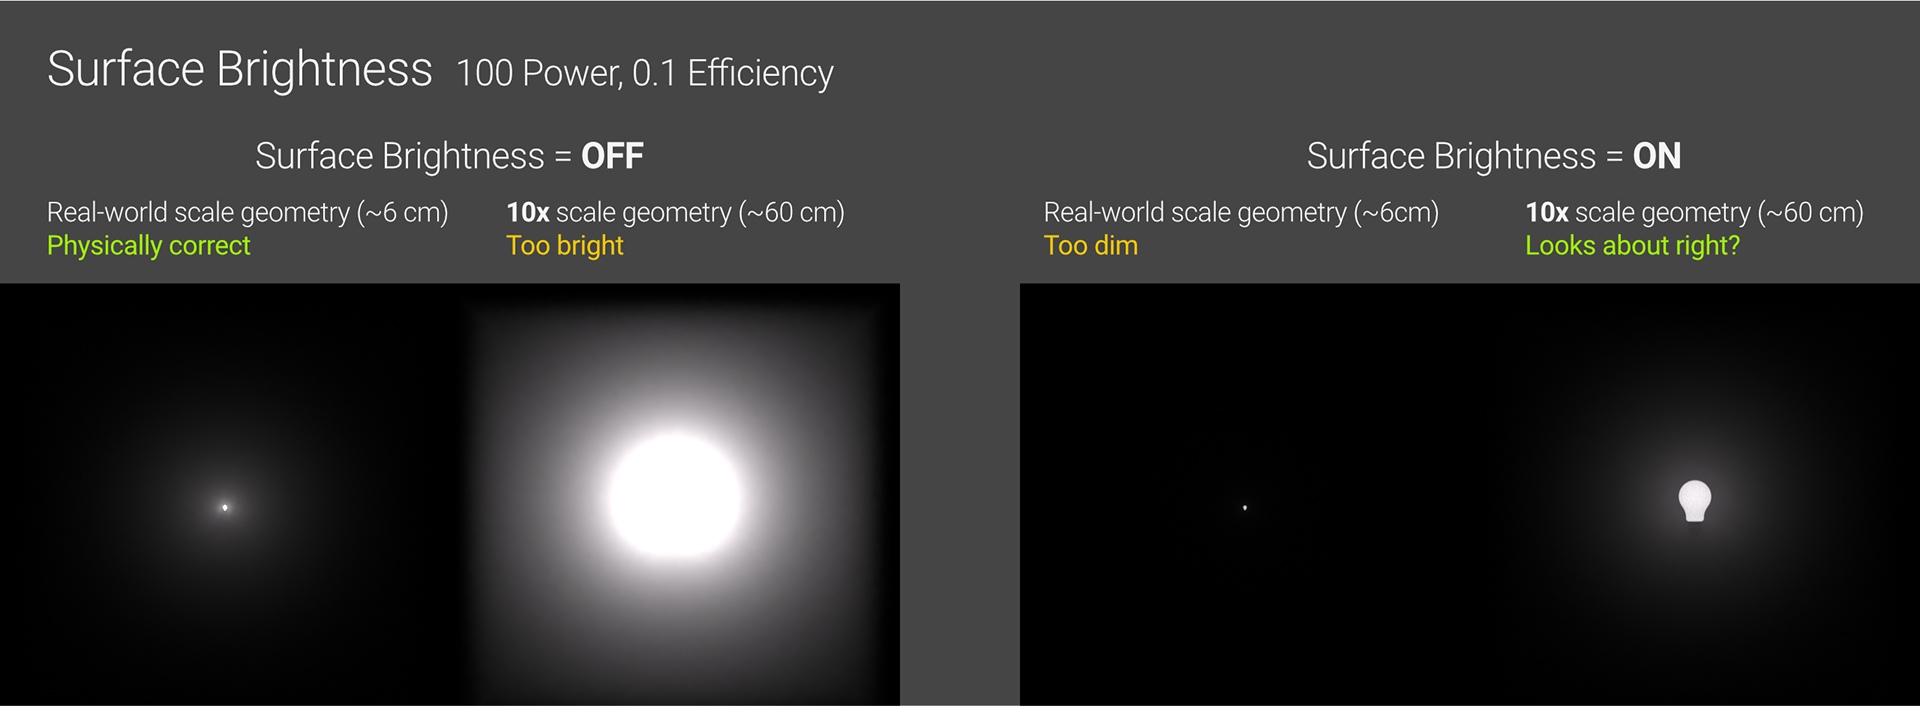
The Wattage/Efficiency model works well for lower scale real-world light fixtures, but it is dependent on real-world scaled objects and emission sources.
For instance, assume we created a polygon model of an incandescent lightbulb. We built it 2 3/8″ (5.9 cm) in diameter because that’s how big it is in real life. We applied an emissive material with a power of 100 (100 Watt) and a Gaussian Spectrum in the Texture field set to 1/1/0.1 to limit the efficiency to 10%, just like a real incandescent bulb.
When Surface Brightness is OFF, this texture emits the appropriate amount of light when attached to our model because it estimates the bulb is approximately the correct size. This is the way to make a realistic interior since we can trust the values of the many light sources in our scene to put the correct quantity of light relative to one another.
Let’s imagine we place our bulb in a scene that wasn’t designed to scale – say, ten times larger. We’ll simply scale our bulb up 10 times. With Surface Brightness still turned off, we suddenly have a little sun in our scene, filling everything with light because the emissive surface is far too huge.
Surface Brightness comes into play here. We no longer have to try to match an exact real world light source. We are just trying to make the material look correct by estimating values. Enabling Surface Brightness means the emission texture now considers the size of the mesh and keeps the mesh surface at the same brightness, regardless of the object’s size. Our 10x larger bulb now somewhat looks like we would expect a large novelty lightbulb-shaped lamp to look. If we scale it to 100x, it will still look approximately correct.
After that, if we reduce our bulb back to actual size, but still keep Surface Brightness on, we will see that it is too dim (as in the above image). The surface polygons remain the same brightness, but there isn’t as much surface area now. So it’s not outputting as much light overall – we’d have to compensate with extra power (or turn off surface brightness).
In a word, if we want to match the exact light that we have the specs for, we want to turn off the surface brightness and put in the correct power (Wattage) and efficiency (Texture). If we just want some arbitrary glowy thing in a scene, especially, one that animates in size, or if we’re using neon tubes or something that can be a variety of sizes but needs to maintain the same apparent brightness, we’ll turn on the surface brightness and eyeball the power until it looks right.
It is turned on by default in an area light and turned off in an emissive texture.
Distribution
If we want more realism, visual intrigue, or faster render times with our interior lights, the Distribution field is where the magic will happen.
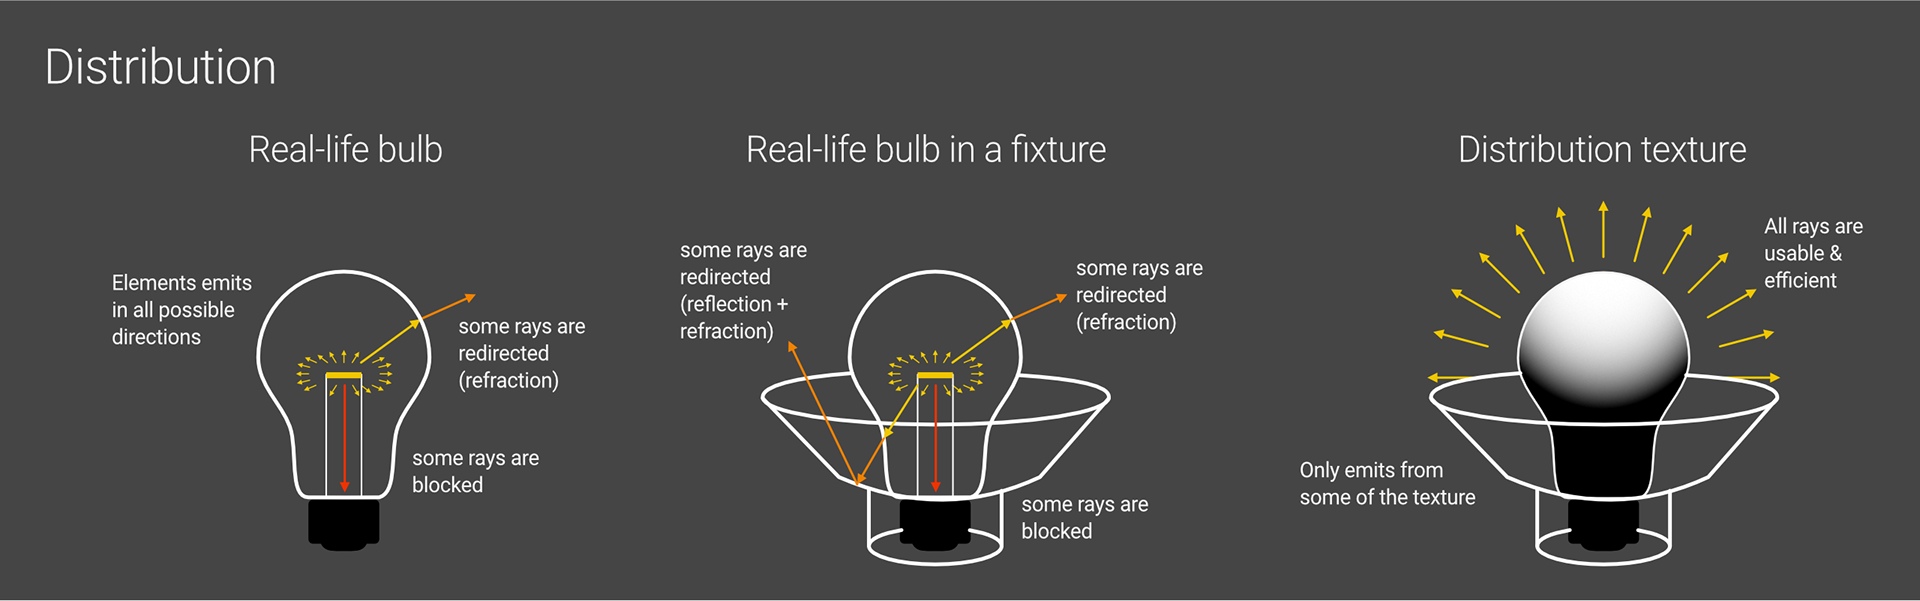
A Blackbody or Texture Emission node’s projection is always Spherical. That is, light emits from all possible directions from the polygons’ normal side (front), just as it does in real life.
In practice, this emissive element would be covered in a glass or plastic bulb, which would then be put in some kind of housing. The bulb itself may diffuse or refract part of the light, and the housing may block a portion of it while reflecting or refracting some of it depending on the type of fixture.
If we were to simulate this exactly in an unbiased renderer like Octane by constructing a fixture that blocks some of the light while focusing or diffusing others, the difficulty of calculating all those rays would skyrocket (especially with a lot of refraction), and we would end up with a horrid mess of fireflies and noise that would take a ton of samples and time to resolve (if at all) due to the nature of path tracing.
Even if we could control the noise, we’d have to continually modify the lens, glass form, housing shape, and so on to obtain a close approximation of how the light is distributed.
Fortunately, we can simulate what real-world lights do in their housings by blocking or dimming areas of the emission texture itself using the Distribution field. We can apply a texture to the light-emitting surface (rather than burying it in a glass tube), and the material will simply not emit rays from these problematic areas, dimming the portions that would normally be semi-blocked, and we’ll end up with an approximation of how the light would really function in its enclosure in a much shorter period of time.
This is obviously not ideal if our render is a macro view of a lightbulb. However, it works well in interiors and other scenes where we aren’t hyper-focused on the emitting element itself.
Distribution Textures
The Distribution field, as mentioned before, takes a texture. We might add some random texture, like noise or checkerboard, and obtain fascinating results. It’s hard to control, however, since all light in Octane is spherical mapped. So let’s take a look at two methods to make good distribution textures.
Spotlight distribution
A Spotlight Distribution node in Octane is a quick and easy method to observe what Distribution actually does.
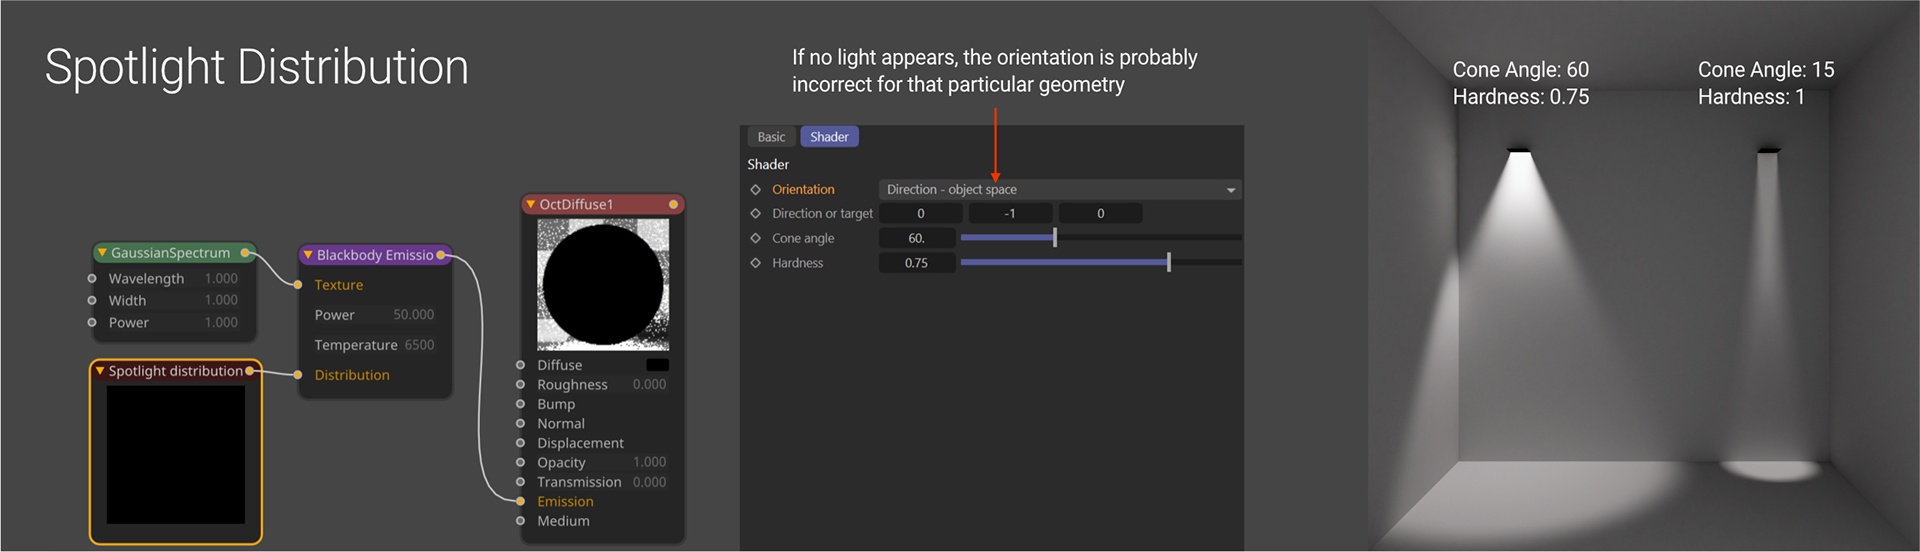
The spot distro effectively takes the entire spherically mapped emission area of the material and blocks out the majority of it, leaving a small circle on one side that generates a directional cone of light. The greater the circle, the less space it blocks and the wider the cone. The fuzzier the circle’s edges, the softer the spotlight.
Important: If we use this in an emissive material on random geometry, we must set the Orientation to “Direction – object” space so that the spot moves with the object when we rotate it. There are additional options in here as well, such as Direction- world space if we want the light to always point down. This is just a problem with emissive materials; area lights with the default spot distribution will aim correctly.
Because we’re blocking a portion of the emitting texture, the smaller the cone, the less light is emitted; if we make it too small, we may not see anything until we crank up the power. Just something to keep in mind.
IES Lights
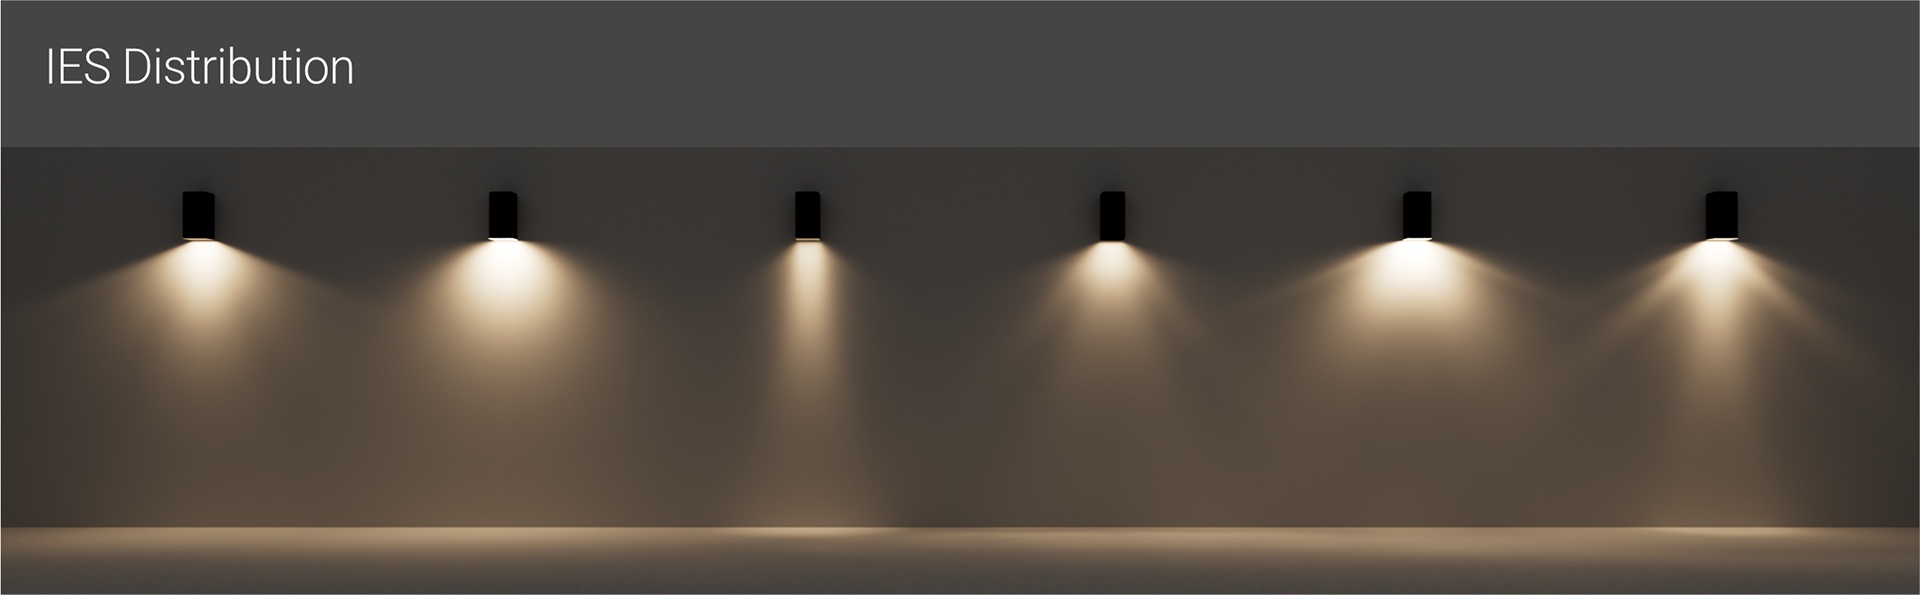
The IES (Illuminating Engineering Society) created an open standard for these textures that is realistic enough to be used in engineering light simulation tools like Dialux while still being great for aesthetic 3D software like Octane. In fact, the .ies file can be utilized straight in Octane without being converted.
Most light manufacturers’ websites provide IES files for free because they want you to simulate their lights before purchasing the real thing for your house or business. Even better, 3D models of the actual fixtures are frequently free from the same sources, allowing us to map our correct distributions to real-looking fixtures! Also, the IES data manage efficiency for us, thus there’s no need to guess or waste time researching it.
Proper IES Light Setup
Because .ies files contain engineering data rather than creative image textures, there are a few things we’ll need to do to correctly set up an IES light if we want to match the real-world data contained in the file. IES files can be used in an Octane Light object, such as the Area Light, or in an emissive material. Both are functionally identical but with distinct defaults and considerations.
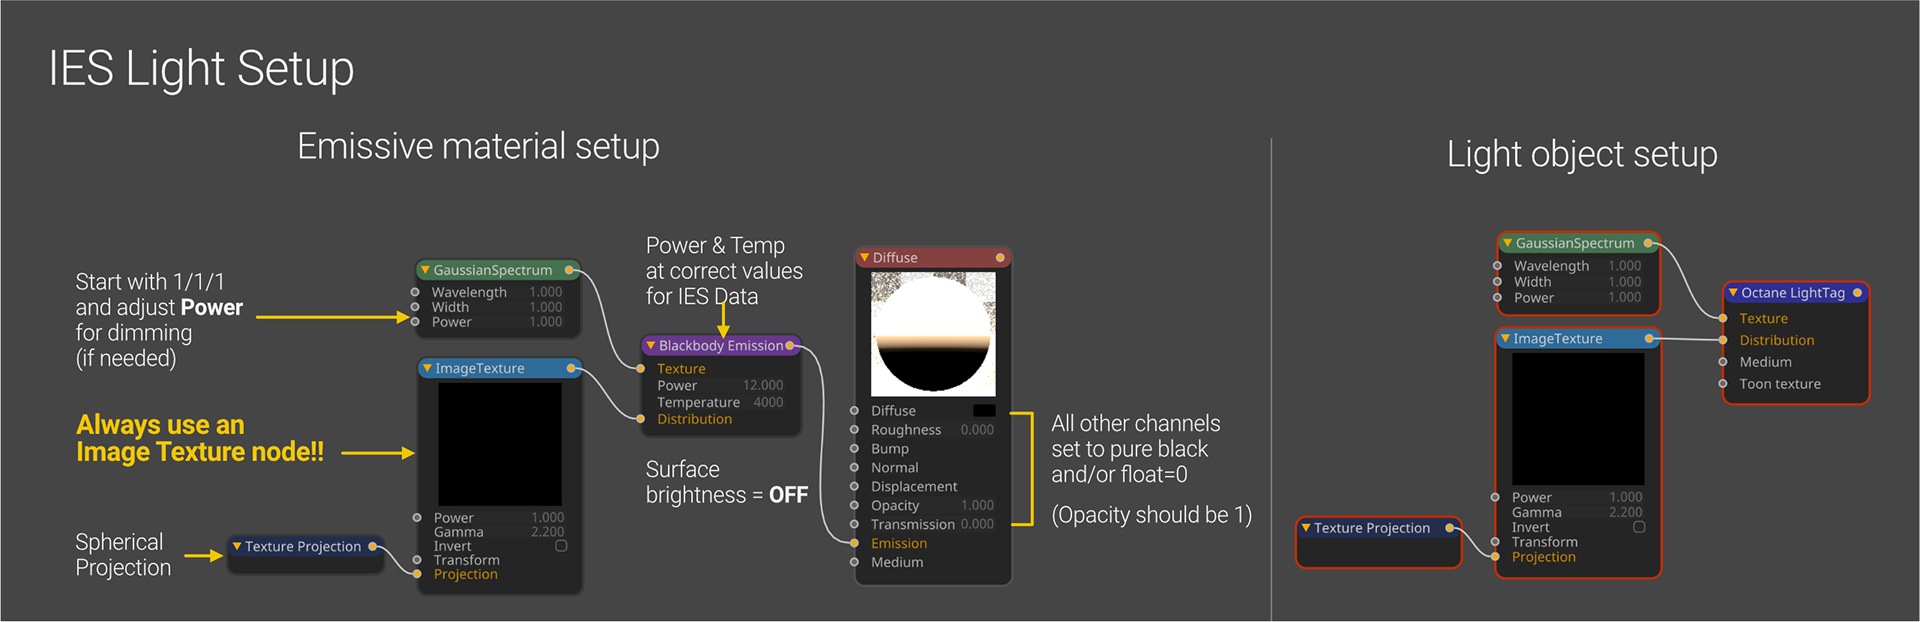
If we use an Area Light, we’ll need to scale it to roughly the size of the fixture for which the IES data was designed. This is under the Details tab of the actual light object (not the tag).
If we use material, all channels (except for Emission and Opacity) should be set to pure black and/or 0 float (no contribution) – this is especially important for the Albedo/Diffuse channel. The Opacity should be set to 1. It’s usually easier to utilize a Diffuse material for an emissive because there are fewer things to turn off. Then, connect a Blackbody Emission (not a Texture Emission) to the Emission channel and then turn OFF surface brightness.
The remaining procedures are similar for both a light and an emissive material.
The Power and Temperature of the Emission should be matched to the real-world power and temperature of the light on which the IES data is based. If we can’t find the specs on the manufacturer’s website, we can pretty safely assume LED at this point, which is usually in the 7.5 – 15W range, and the temperature is probably in a range of 2800 – 7000K.
In the Texture field:
Attach a Gaussian Spectrum node and set all three values to 1 (wavelength, width, and power). The IES texture will manage the efficiency for us, but we may achieve purposeful dimming by lowering the Gaussian Spectrum’s Power.
In the Distribution field:
We must remember to always use an image texture node. If we simply click the little down arrow next to the Distribution field and select the IES file instead of c4doctane>ImageTexture, the IES will import a C4D Bitmap shader, causing everything to break. If an Image Texture node is not used, there will be wailing, gnashing of teeth, and fire and brimstone.
-
-
- We must ensure that the .ies file is loaded in the File field rather than the .png preview that is sometimes included.
-
-
-
- The ImageTexture’s Power needs to be set to 1 – we will change the dimming in the Gaussian Spectrum node.
-
-
-
- The ImageTexture’s Color space needs to be set to non-color data. Gamma is then irrelevant.
-
-
-
- The ImageTexture should be attached with a Projection node set to Spherical; this will allow us to target the light, whereas UVW Projection will not (even if the emission will still be spherical).
-
Coloring lights
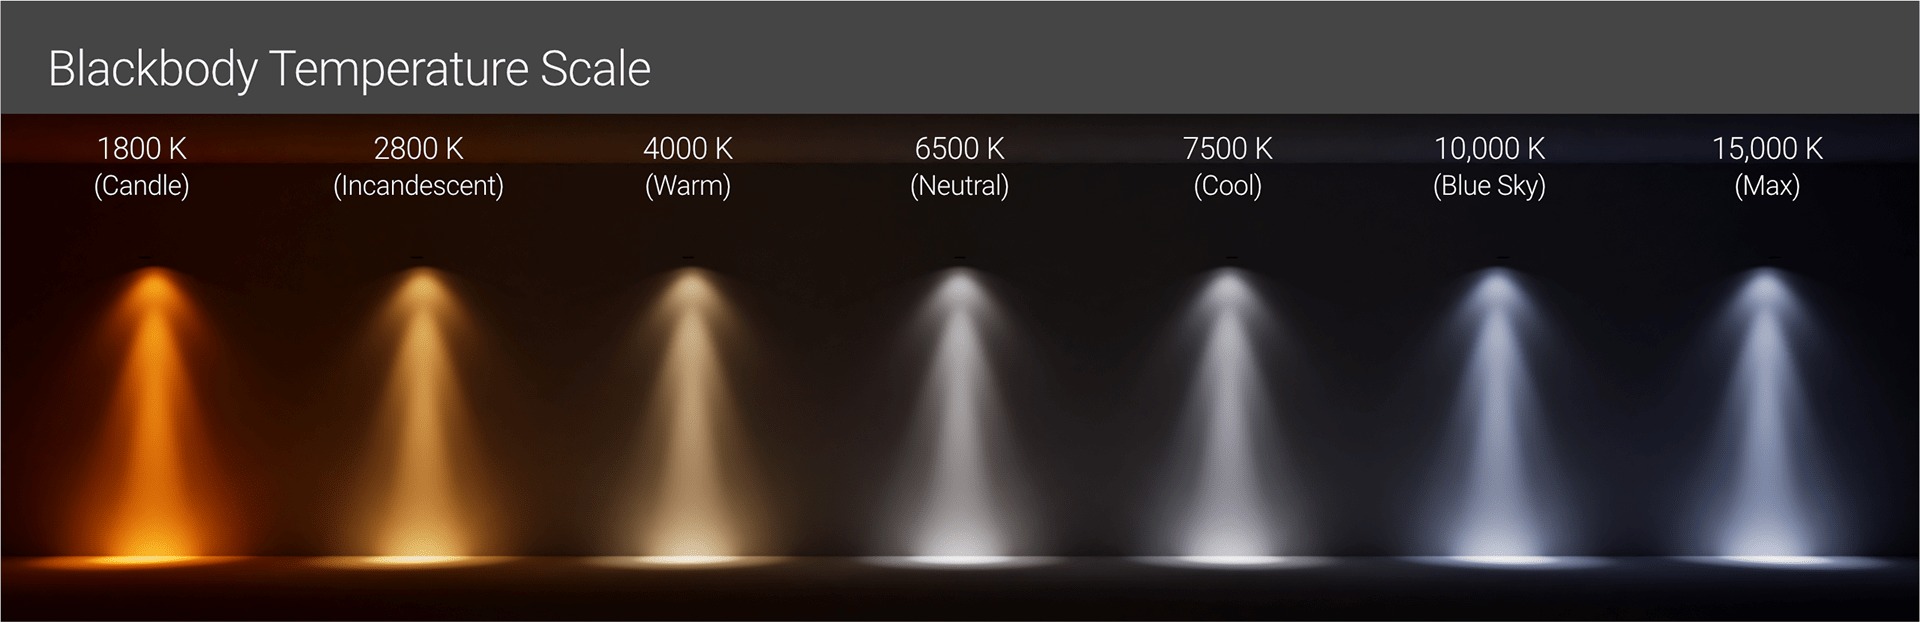
We have two approaches for coloring lights in Octane. The Blackbody Emission node utilizes the scientific black body radiation scale, which is often used in real-world light fixtures and to depict celestial objects such as stars. This is perfect for simulating an interior light fixture (such as an IES light) or simply creating a warmer or cooler light. For neon or other lights that utilize colored glass or gels, we can use Texture Emission to select a color that is not on the black body scale.
The primary difference between Blackbody and Texture emission is how color is handled.
Blackbody Emission
Texture Emission
Another approach is coloring light through the Texture Emission node. Rather than having a unique temperature setting like Blackbody, this relies on the Texture input to specify the color. The Texture field is there to manage efficiency, thus there is now a relationship between color and efficiency (as it does in the real world). Different wavelength has different apparent brightness.
We can put any texture in here, but if we want a specific color, we can use an RGB Spectrum node to define the color via RGB or HSV, a Float Texture to get a 0-1 grayscale, or a Gaussian Spectrum, which is what we really want to control noise and fireflies.
If we use RGB or Float, we need to avoid extremes like 255,0,0 (or 1,0,0 if we’re using Octane’s color model) or float values higher than 0.95 or such. Because all Gaussian values are real-world, we won’t have any problems there.
To manage the color with a Gaussian Spectrum node, we must work in small increments and approach it similarly to an HSV color model. It becomes complicated because of how light works and how the eye sees it. The three settings in the Gaussian Spectrum node (wavelength, width, and power) are all interrelated, and getting the proper color isn’t as simple as shifting one slider.
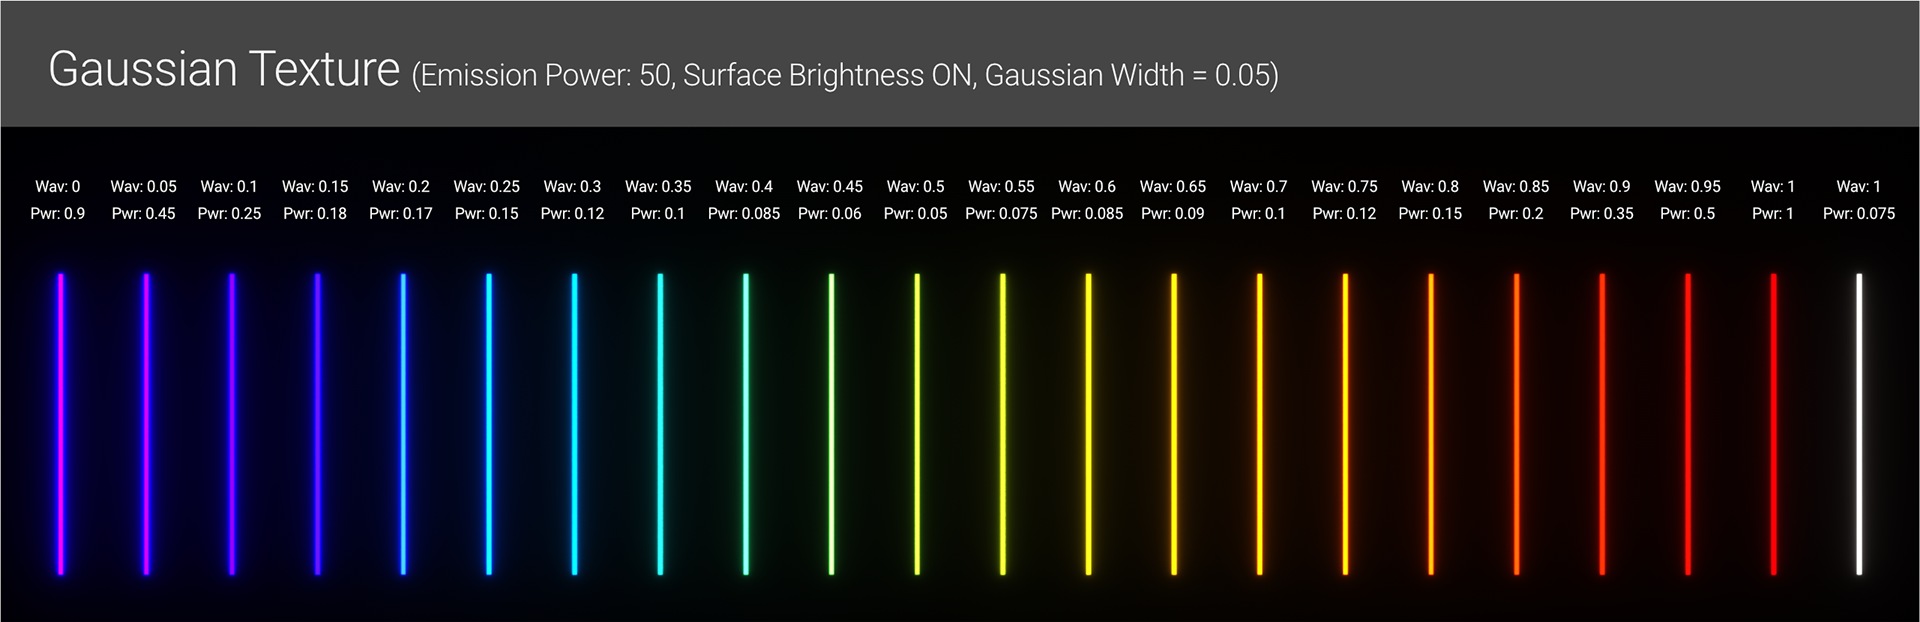
Wavelength is similar to Hue. The wavelength range of the visible light spectrum in the real world is 380-720nM. However, in Octane, it’s been remapped to a 0-1 scale, with 0 as violet and 1 as red.
Width is similar to Saturation, but what it really does is spread out the range using the Wavelength value as a center point, so the color starts to mix in with surrounding hues and becomes less saturated-ish as it grows larger. A width of 1 generates full spectrum (white) light, as shown by the bar on the far right in the image above. A width of 0.05 creates an extremely thin band that, like the other bars above, isolates single colors much better.
Power is similar to Value, but it significantly relies on color. As in the image above, with the same Emission Power and width (apart from white), we can see that we need to reduce the Gaussian’s Power all the way down to 0.05 for the 0.5 wavelength tube (greenish-yellow) to have almost the same relative intensity as the 1 wavelength tube (red). It works on a bell curve and may be evaluated by turning up the Bloom post effect and checking if a certain color is significantly hotter than another.
Wrap-up
That covers the majority of the main aspects of how light works in Octane. Hopefully, this article has given you a better grasp of how lighting works and can help you create faster, cleaner, more accurate renders.
Render faster in Octane with iRender
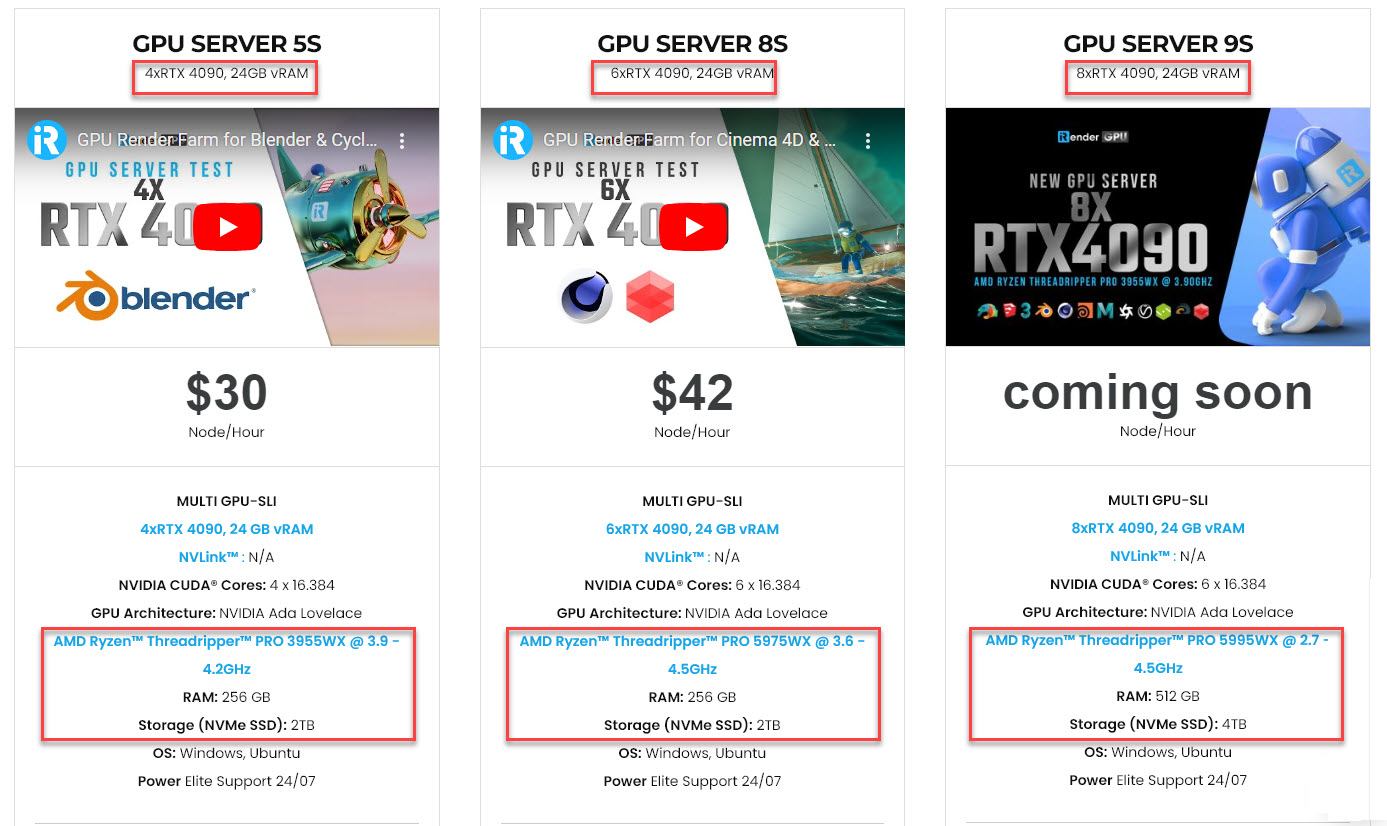
iRender provides high-performance GPU rendering services to unleash creativity for 3D artists. We offer flexible configurations of 1, 2, 4, 6, and 8 GPU servers using the top-tier RTX 4090 and RTX 3090 for accelerated Octane rendering. Powered by powerful AMD Ryzen Threadripper PRO CPUs with up to 64 cores, 256GB RAM, and 2TB NVMe SSD storage, our servers can handle even the most demanding Octane scenes.
Best of all, we grant you complete access to your rented servers. You can install any software, plugins, or Octane versions you need. We treat your rented servers like your personal workstations – no restrictions apply.
This freedom enables you, 3D artists, to realize creative visions without limitations. Leverage our accelerated GPU rendering and scalable power to easily tackle CPU-intensive renders that formerly bottlenecked creativity.
Check out Octane rendering performance on our 6x RTX 4090 server powered by AMD Ryzen Threadripper PRO 5975WX:

Make iRender your partner in creativity and unleash your potential with our high-performance GPU servers.
Start rendering today!
iRender – Happy Rendering!
Reference sources: Scott Benson on otoy.com
Related Posts
The latest creative news from Octane Cloud Rendering.


