Way to use the new camera keyframe animations in Keyshot
Are you looking to take your KeyShot path animations to the next level? One method to increase the visual look and break away from the expected is path animations. KeyShot 2023 has replaced camera path animation with a keyframe-based camera animation solution, building on the keyframe architecture that exists in Keyshot. Dynamic camera animations can be created more quickly than ever before. In this article today, we will find the way to use the new camera keyframe animations in Keyshot.
What is a camera path animation?
For those new to Keyshot, KeyShot’s camera path animation allows you to move the camera around your scene on an organic and fluid path. The great thing is that you can design this path. It’s easy to make changes and helps you add some unique camera angles and movements to your animations.
In KeyShot, there are partial animations and camera animations. Since path animation is applied to the camera, it is created by adding animation to an existing camera in your KeyShot scene.
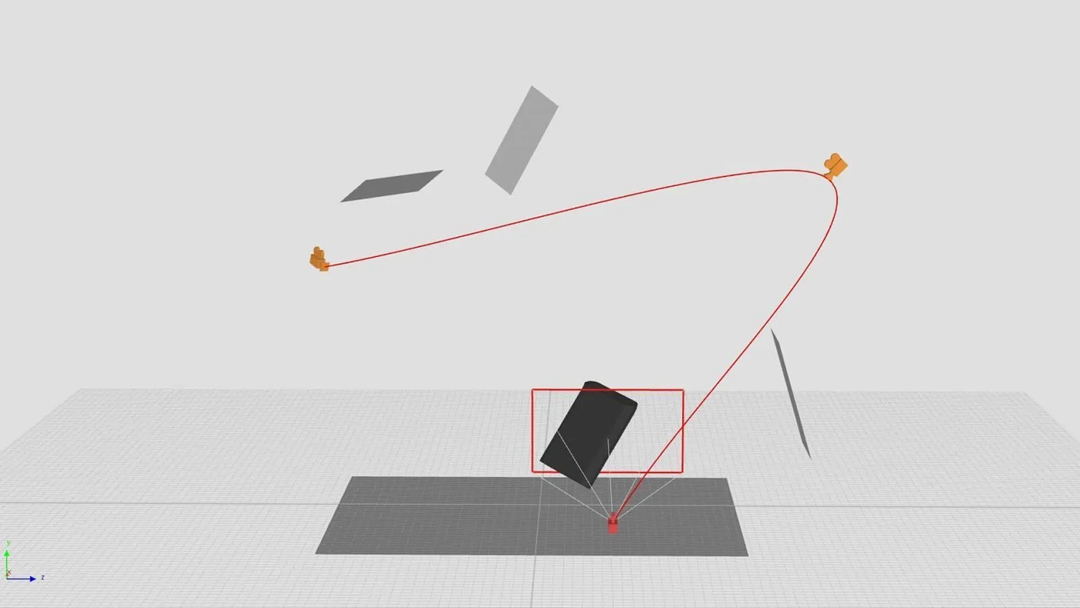
A camera path is shown in the KeyShot Geometry View (Image Source: Willgibbons)
How to use Camera Animation?
Adding a Keyframe Animation
You’ll need an animated scene and an open Animation timeline before starting (A-key or choose Window, Animation).
You can add a camera keyframe animation in one of three ways below:
- Using the Animation Wizard: Select Keyframe from the Camera Animations section by clicking the Animation Wizard button on the Animation timeline, then click Next. The next step is to choose the camera you want to animate from the list of visible cameras.
- Through the scene tree: Finding the camera, right-clicking it, and choosing Keyframe from the Add Animation flyout menu will allow you to animate it.
- Using the Camera List: The final method for adding a camera keyframe animation is to choose the camera from your camera list located under the Camera tab. Choose Keyframe from the Animation flyout menu by performing a right-click. (Note: If the Animation menu is grayed-out, unlock the camera.)

Working with Camera Keyframes
Once you’ve added a camera keyframe animation, the Animation timeline’s first keyframe will show up. There are two options for adding keyframes from this point on, both of which can be found on the animation menu directly above the timeline.

Image Source: Keyshot Blog
Through the Add Keyframe button: This button has a plus symbol in the right corner and looks like a diamond. To use this method, you must first choose the point on the timeline where you want your next camera view to be, then click the Add Keyframe button to add a keyframe to the timeline at that point. Finally, you must move the camera into the appropriate view. Now, as you scrub through the animation, the camera will switch from where you had previously set it to where you have now set it.
With Record Keyframe: This appears to be a recording icon and is located immediately to the right of the Add Keyframe button. You can click anywhere on the timeline while the Record Keyframe is chosen and then move the camera into the desired view at that time. When Record is selected, KeyShot will instantly add a keyframe to the timeline at the location of the camera change.
Both methods allow you to quickly and easily create dynamic animations.
Adjust Your Settings
After adding your keyframes, you can adjust your settings by dragging each keyframe on the timeline to change timing as well as by making adjustments in each keyframe’s Properties pane. It’s crucial to remember that each keyframe has an independent range of motion, so changing one won’t change the others.

Image Source: Keyshot
When the Properties panel is open and the Keyframe Settings section is expanded, the Interpolation Method setting is an important one that you should be aware of. There are two types of Interpolation Method:
Path Interpolation Method: When Path is selected, your camera will move between points on either side of a target in a straight line, creating an effect like a dolly in and dolly out. Additionally, this approach is very similar to the old camera path animation provided by KeyShot the camera keyframing was replaced. You can change your tension settings the same way you could with camera path animations when Path is selected.
Orbit Interpolation Method: When Orbit is chosen and a camera target is chosen, the camera will move from point A to point B while trying to keep the first camera’s original distance. Because the camera orbits the point of interest rather than flying by it, the camera transition is smoother as a result.
Benefits of using Camera Keyframe Animations
The biggest benefit of Camera Keyframe Animations is that they are incredibly simple to use. They are a faster and easier way of creating dynamic camera movements than combining multiple camera animations. It’s easy to modify the camera path.
Most of KeyShot’s camera animations are very basic. They are considered a one-click solution for product animation. For example, dolly, zoom, or trajectory are all simple camera animations that move the camera in one direction. Most people chain these basic animations together to create a full animation with different types of movement. Those with more experience are used to stacking multiple camera animations to create more complex and interesting animations. This can quickly get messy and sometimes causes conflicts in the animation timeline.
The Best Solution for Keyshot rendering with RTX4909
We can say RTX4090 is a good choice for Keyshot rendering, because of its power and high amount of CUDA cores and RT cores.
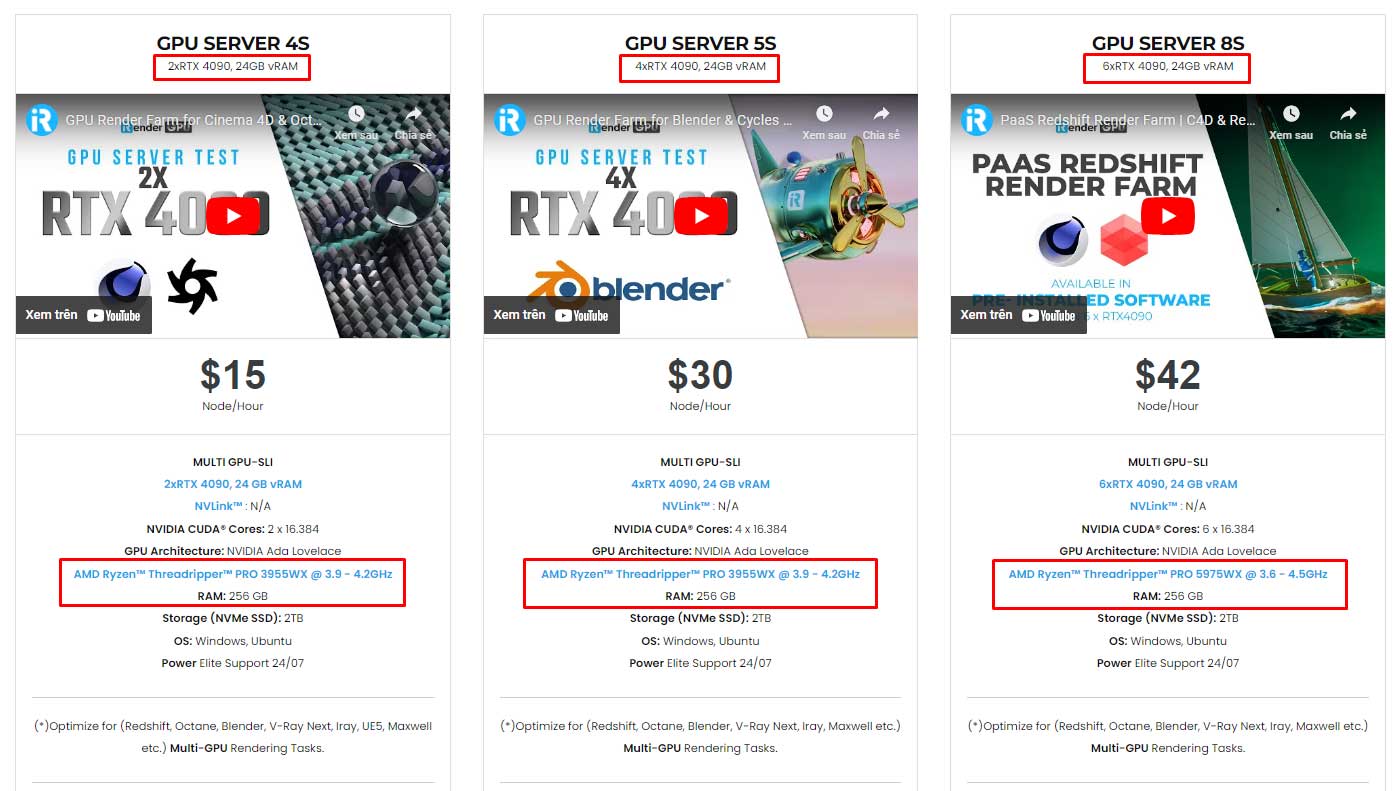
iRender is a Professional GPU-Acceleration Cloud Rendering Service provider in PC optimization for rendering Keyshot. We offer you high configurations machines with high-end specifications like AMD Ryzen™ Threadripper™ PRO 3955WX @ 3.9 – 4.2GHz or AMD Ryzen™ Threadripper™ PRO 5975WX @ 3.6 – 4.5GHz, RAM 256GB, Storage NVMe SSD 2TB. Most importantly, we always update to the latest GPU technology, with 1/2/4/6/8 x RTX3090/RTX4090.
You can install Keyshot on our remote server then add your own license to use. Without Keyshot, you can install any software which suitable for your meet because you will have take full control of it. For Keyshot, you can refer these our servers:
Recently, we launched iRender app for Windows users. This application is very convenient, you just download it for free and a workflow with iRender will be built-in:

Especially, this month, we offer for all users can use 1 of our Redshift/Cinema 4D licenses. We also have the option to pre-installed C4D and Redshift, you won’t take much time to install them.
Create ACCOUNT now to enjoy the big deal! If you have any comments about our article, please do not hesitate to reach us at [email protected] or Whatsapp: +(84) 916017116.
iRender – Happy Rendering!
Related Posts
The latest creative news from KeyShot Cloud Rendering , Cinema 4D Cloud Rendering , 3D VFX Plugins & Cloud Rendering.