Advanced Tips for Walk Cycles in Blender
Creating a walk cycle in Blender is a fundamental skill in the realm of 3D animation, serving as one of the key building blocks for bringing characters to life. A well-executed walk cycle not only conveys the character’s personality and mood but also enhances the overall narrative of your project. Whether you’re an aspiring animator, a game developer, or a seasoned artist looking to refine your skills, mastering the art of walk cycles will significantly enhance your animation toolkit.
In the blog, iRender will explore advanced tips for Walk Cycles in Blender that elevate your animation from good to great.
Let’s get moving!
Understanding of a Walk Cycle
A walk cycle in Blender is a looping animation that simulates a character walking in place or through space. It involves creating a sequence of key poses that mimic the natural movements of walking — such as lifting the foot, swinging the arms, shifting the hips, and transferring weight. The walk cycle is an essential component of animation, particularly in character animation, as it helps in conveying the personality and style of movement of a character.
Key Components of a Walk Cycle
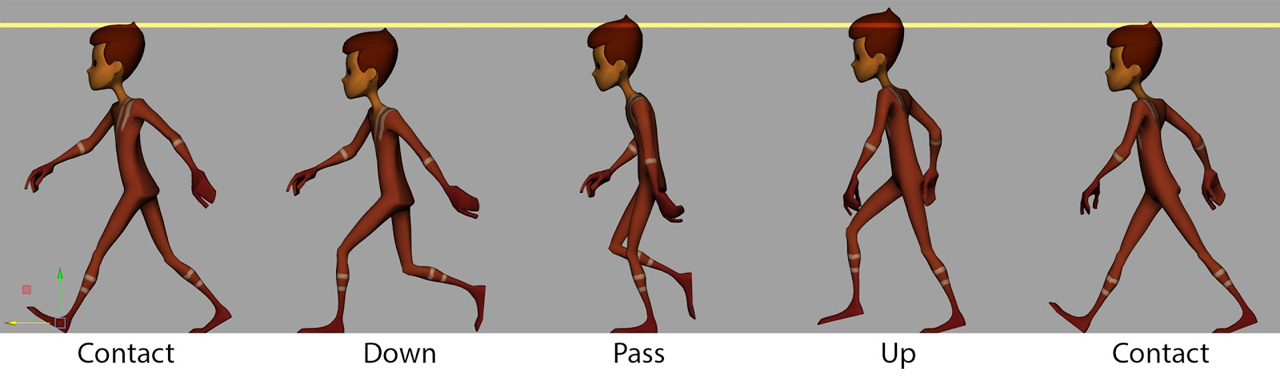
- Contact Position: This is the moment when one foot is making contact with the ground while the other leg is preparing to lift off. In this pose, the body weight is balanced between both feet.
- Down Position: Once the foot makes contact, the body typically lowers slightly as the character’s weight shifts onto that leg. This adds a sense of realism to the motion.
- Passing Position: At this stage, the character’s legs are together, with the foot that was in front now passing the leg that is behind. This position often includes a slight forward lean of the upper body.
- Up Position: As the character prepares to lift the back leg off the ground, the character’s body rises again. The forward leg begins to shift its weight and move ahead to prepare for the next step.
Why do you use a walk cycle in blender?
Using a walk cycle in Blender (or any animation software) serves several important purposes in the animation process. Here are some of the key reasons why animators use walk cycles:
Efficiency
A walk cycle is designed to be a repeating sequence, allowing for extended walking animations without having to create every frame from scratch. Once you have a complete cycle, you can easily loop it throughout your animation sequence. By using a walk cycle, animators can save time and effort. Instead of animating each step individually, they can focus on refining the cycles and incorporating them into larger animations.
Foundation of Character Animation
Learning to create walk cycles helps animators understand the principles of movement, weight, balance, and timing. Mastering these fundamentals provides a strong foundation for more complex animations, such as running, jumping, or interacting with objects. A well-executed walk cycle reflects a character’s personality and traits. For example, a character’s walk may be confident, timid, leisurely, or hurried, influencing how the audience perceives them.
Realism and Appeal
A walk cycle captures the mechanics of bipedal movement, allowing characters to walk in a naturalistic way. This realism enhances the believability of the animation and the overall storytelling. The way a character walks can convey emotions or state of mind. A character might have a bouncy, light walk when happy, or a heavy, dragging gait when sad or defeated.
Character Interaction
A walk cycle can be integrated into scenes where characters interact with their environment, such as walking on different terrains, entering/exiting rooms, or navigating through crowds. Using a standardized walk cycle helps maintain consistency in character movements, especially when animating for longer performances or across multiple scenes.
Advanced Tips for Walk Cycles in Blender
Deep Observation and Use of Reference
Before touching a single keyframe, it is crucial to study real human locomotion. A walk cycle isn’t just a mechanical repetition of steps; it carries the character’s personality, mood, weight, and intent. Advanced animators often start by watching real footage or referencing motion capture (mocap) data to analyze timing, posture, and secondary motion.
You can watch websites like Mixamo, MotionBuilder, or YouTube to gather different walk types — from casual strolls to military marches. If possible, record yourself walking and observe frame-by-frame how your hips, shoulders, arms, and head behave.
In Blender, you can even import mocap data (like .bvh or .fbx) and use it as a live reference or retarget it to your rig for further animation polishing.
Structure with Poses and Breakdowns
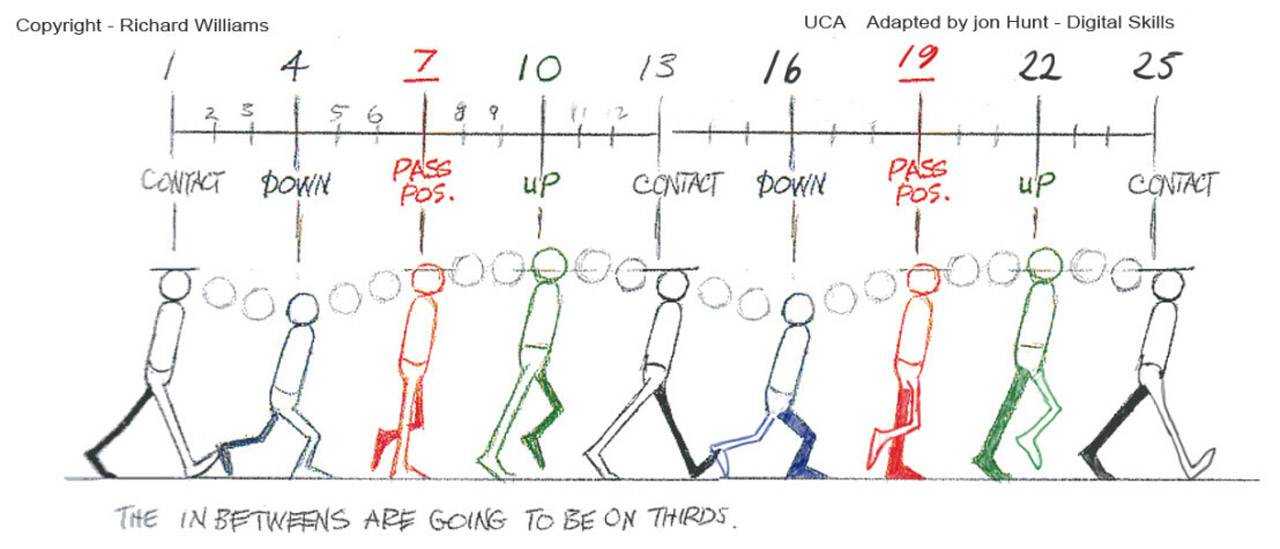
A walk cycle typically runs on 24 frames per cycle (12 frames per step), and while contact positions at frame 1 and 13 are critical, you must also add breakdown poses to control the rhythm and body mechanics:
- Frame 1 & 13 – Contact Pose: One foot touches the ground while the other prepares to lift off.
- Frame 4 & 16 – Down Pose: Shows weight being absorbed as the foot lands.
- Frame 7 & 19 – Passing Pose: The back foot passes the front foot at its highest point.
- Frame 10 & 22 – Up Pose: The body lifts slightly as the rear foot prepares to land.
By establishing these five main poses and using Blender’s pose-to-pose workflow, you gain precise control over motion flow. The Dope Sheet and Action Editor help you manage and adjust keyframes effectively during this stage.
Fine-Tuning in the Graph Editor
Once the core motion is blocked out, move into the Graph Editor — the heart of advanced animation refinement in Blender. Here, you’ll optimize curves for smooth transitions, realistic arcs, and natural motion.
- Easing: Use ease-in and ease-out to avoid robotic or linear motion. The legs may snap during a step, but hips and arms should flow naturally.
- Overlapping Action: Animate follow-through on arms, fingers, hair, or clothing. These elements should not stop abruptly.
- Polishing Arcs: The motion of elbows, knees, and even the head should follow clean arcs to ensure natural movement. Enable curve handles, adjust tangents, and use Ctrl + T to flatten or auto-smooth transitions between keyframes. Use tools like Clean Channels or Simplify F-Curves to minimize jitter and maintain visual clarity.
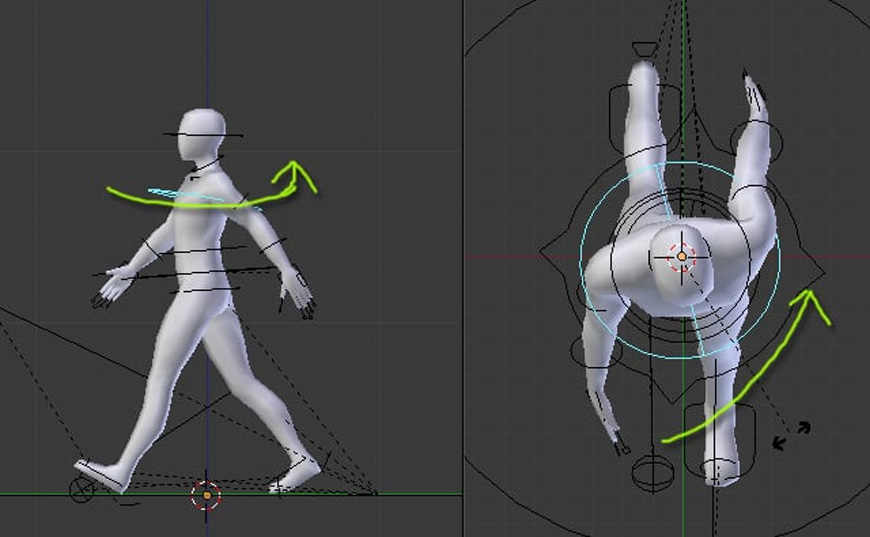
Mastering the Pelvis, Spine, and Shoulders
In a high-quality walk cycle, the pelvis leads the motion. Many beginner animators overlook this and only move the legs. In reality, the hips:
- Shift side to side with the weight transfer.
- Tilt and rotate subtly with each step.
- Move forward slightly ahead of the rest of the body.
Meanwhile, the spine counter-rotates to maintain balance, and the shoulders twist in opposition to the hips — a principle called contrapposto. These upper body motions help ground the character and give a sense of real weight and momentum. Add a slight head bob and ensure that the neck and head remain responsive but not stiff — they should follow the body with a slight delay, creating a sense of flexibility.
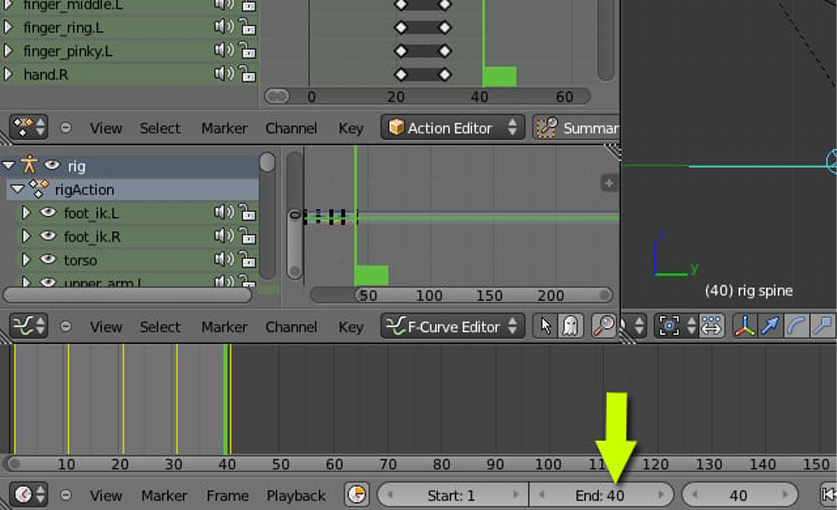
Looping, timing and seamless playback
Creating a seamless walk cycle in Blender requires careful attention to looping, timing, and playback to ensure that the animation appears fluid and believable. In Blender, the key to achieving this lies in precise timing and matching the first and last frames perfectly. A standard walk cycle is typically animated over 24 frames (12 frames per step), and the final frame should return the character to the exact pose and motion flow of the first frame — except in cases where the motion is additive, such as forward translation. This ensures that when the animation loops, there’s no visible jump or jerk.
Also, you should use the Graph Editor to smooth F-curves and apply the Cycle Modifier to relevant channels to automate clean looping. For characters moving forward, it’s common to animate the cycle “in-place” and then move the root bone or use a path constraint to drive forward motion separately. Always test playback in the Timeline or NLA Editor, and scrub through the loop repeatedly to ensure consistency in contact, rhythm, and momentum. Correcting foot sliding, ensuring clean foot plants, and avoiding floating or twitching arms will significantly enhance the loop’s believability.
Final Thoughts
Creating advanced walk cycles in Blender goes far beyond the basic mechanics of stepping. It’s about understanding body mechanics, timing, rhythm, and character performance at a deeper level. By studying real-life movement, refining poses with clean transitions, and using Blender’s powerful animation tools like the Graph Editor and NLA Editor, you can craft walk cycles that feel smooth, expressive, and professional. The careful attention to looping, pelvis dynamics, overlapping actions, and personality transforms a simple walk into a living moment that communicates emotion and intent. With practice and observation, these advanced techniques will help you bring characters to life with confidence and clarity — one step at a time.
iRender - The Best Render Farm Provides RTX 4090 for rendering Blender Projects
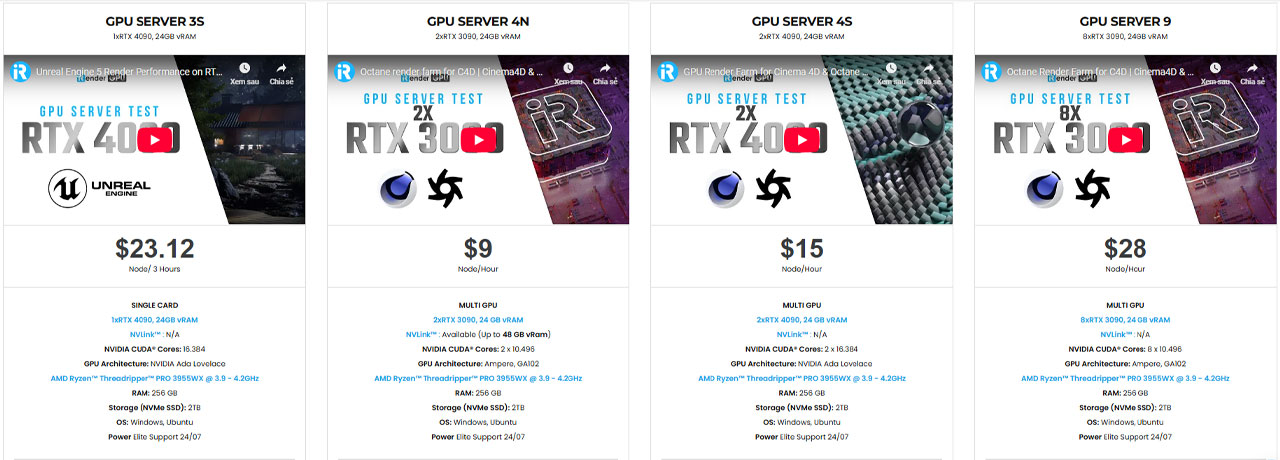
iRender is proud to be one of the best GPU service providers on the market. You can find a lot of options suitable for your Blender project. We are releasing new servers for iRender’s users, which have powerful processing capabilities of AMD Ryzen Threadripper Pro 3955WX @ 3.90GHz- 4.2GHz and AMD Ryzen™ Threadripper™ PRO 5975WX @ 3.6 – 4.5GHz. Besides, they have multi-GPUs: 2/ 4/ 6/ 8 RTX 4090 24GB VRAM to boost performance in the rendering process. The high-end configuration is extremely suitable for complex Blender projects. Right now, we have pre-installed Blender 4.4.1 option when you create a machine, so you won’t take time to install software.
Blender can use multi cards to render, you can refer any servers to speed up your rendering. Please have a look at all servers following:

Let’s see how our RTX4090 performs when rendering with Blender scenes:


Free and Convenient Transferring tools
iRender offers a powerful and free file transfer tool: iRender drive for macOS and Linux user. With fast file transfer speed, large data capacity, and completely free. You can transfer all the necessary data into our iRender drive tool at any time without connecting to the server. The data will be automatically synchronized in the Z drive inside the server, ready for you to use.
The tool is also integrated into iRender GPU app, an all in one application where you can free your workflow from accessing iRender website, and just have to work on the iRender GPU app.
Flexible Price
The price of server 3S is $8.2 per hour. However, the server is available for fixed rental when you boot (price at $23.124 for 3 hours rental, about 6% off compared to hourly basis). And you can even catch more attractive option for your big project when you rent it for daily/weekly/monthly basis, with discount from 10-20%.
In case you have any problems or questions, don’t hesitate to contact the 24/7 support team. We will be happy to help you with your questions and problems at all times.
We are running a SPECIAL OFFER: 100% Additional Bonus for new clients who register an account and make a top-up within 24 hours after their registration.
Register an account today to experience our service or contact us via the email [email protected] or WhatsApp: (+84) 912075500 for advice and support.
Happy Rendering!
Related Posts
The latest creative news from Blender Cloud rendering.