
Basic Activities To Interact With Node Editor In Octane For Cinema 4D
There are two ways to edit materials and objects in Octane for Cinema 4D. The first is using a Material Editor or Attributes Manager window to edit the material’s parameters. However, it is only suitable when we make simple changes like altering colors. Once things get more complicated and we start layering up effects, constantly going up and down levels gets confusing and cumbersome. In such cases, it is much better to use Node Editor because it provides you with you a flat, visual map of everything that makes up your material or object, and allows you to quickly focus in on the area you want to modify. In this article today, we will have a look at basic activities to interact with Node Editor in Octane for Cinema 4D.
1. Access the Node Editor
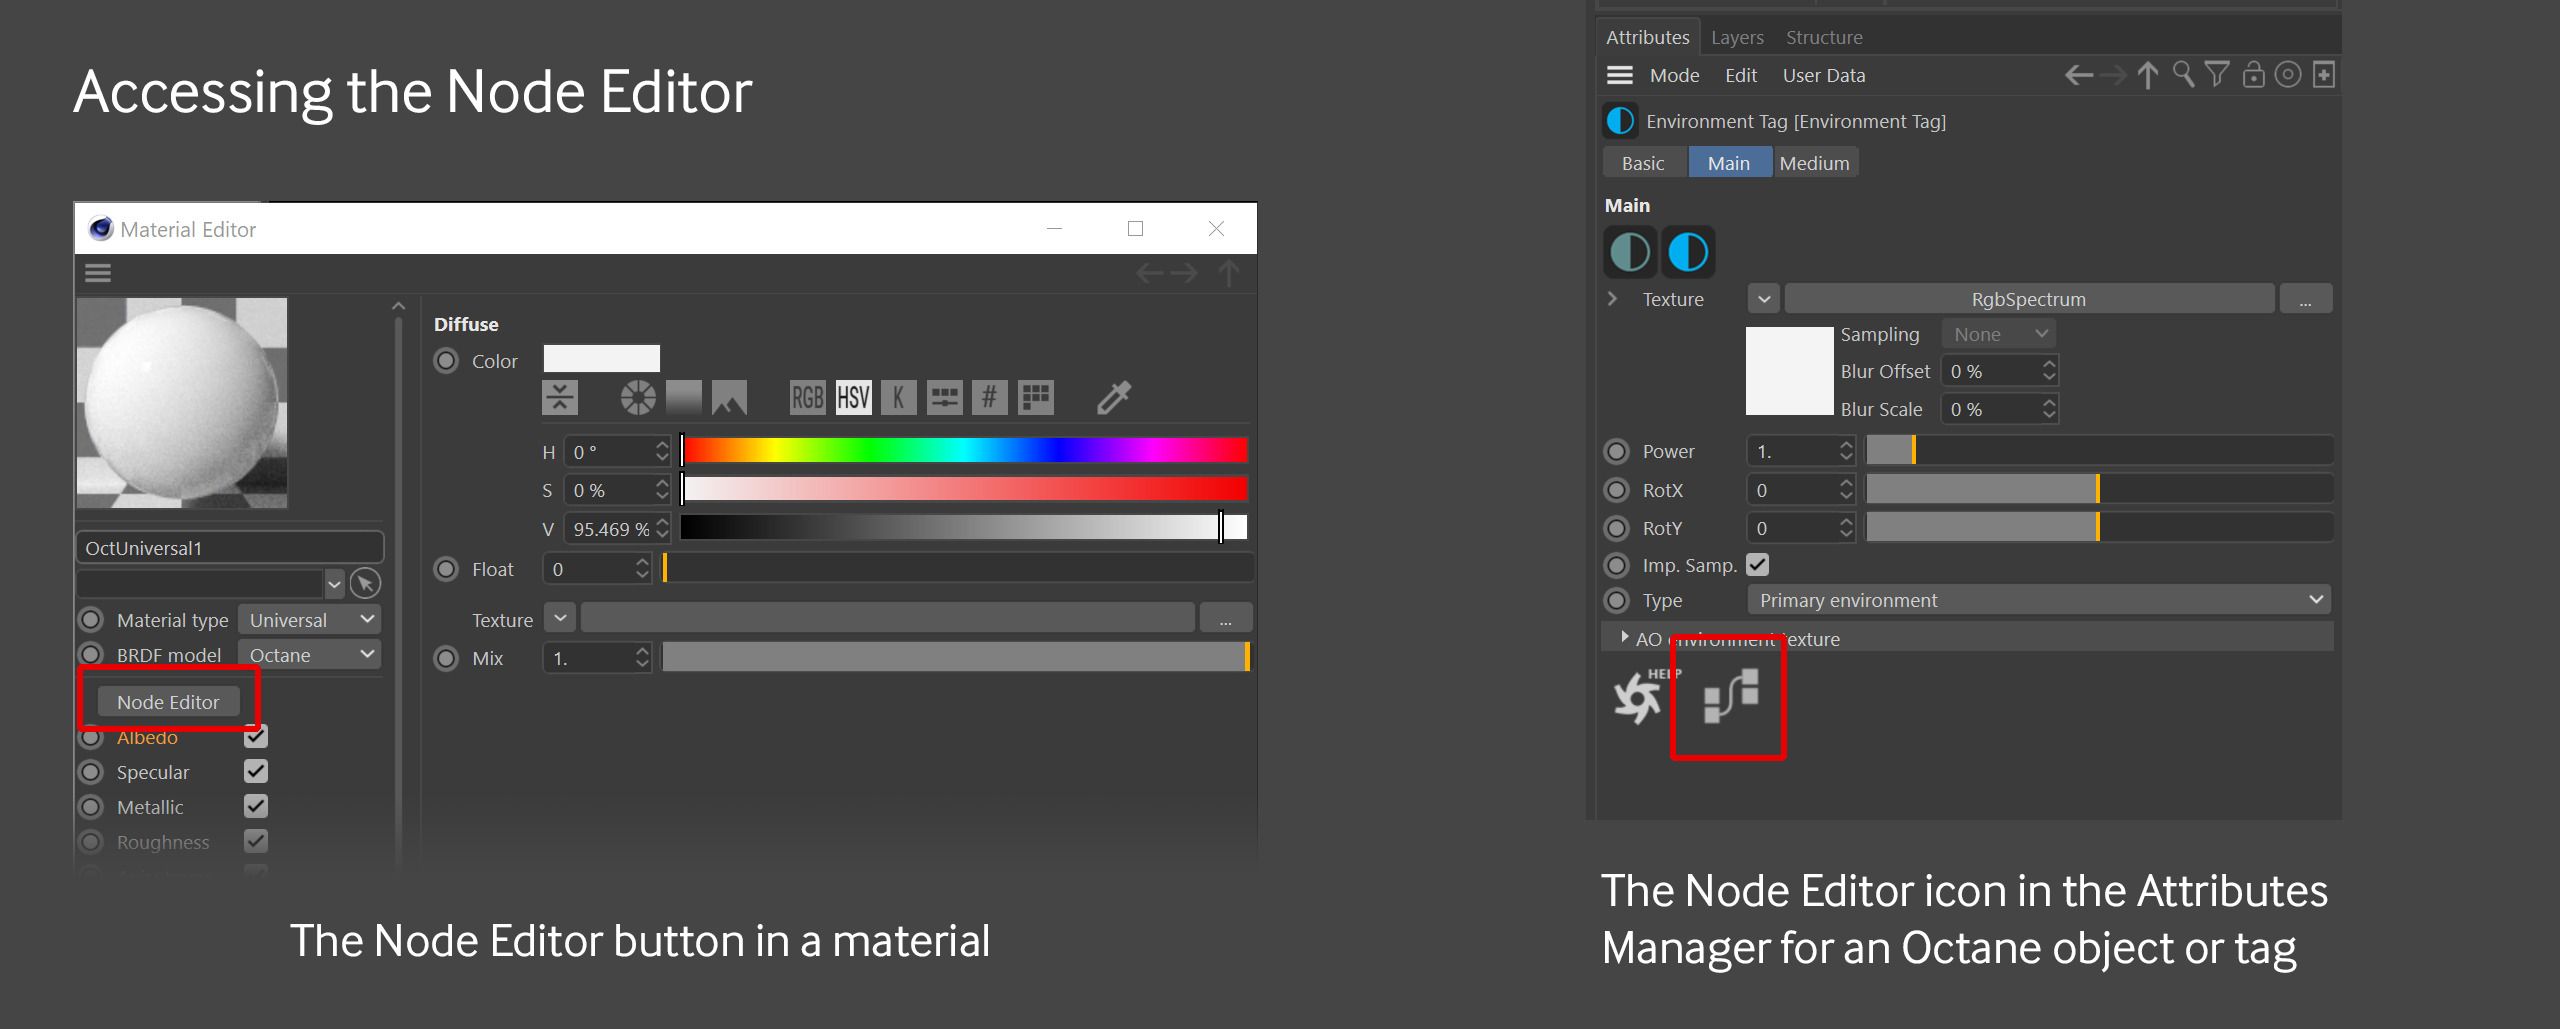
Any Octane material can access the Node Editor by two ways:
-
-
-
-
-
- If you are using the Attributes Manager, Node Editor can be found in the upper left corner near the material preview. In the Attributes manager, it is also accessible for the majority of Octane objects or tags via a connector and a little square icon next to the Help button.
- If you are using Material Editor, Node Editor is in the Basic tab
-
-
-
-
The Node Editor is mostly used to edit materials, although other objects, such as the Volume/SDF, Environments, and Lights, have exposed properties in the Node Editor that allow you to create intriguing effects. There is little use entering the Node Editor for tags like the Camera tag and Octane Object tag because they don’t have any available parameters.
2. Main components in Node Editor
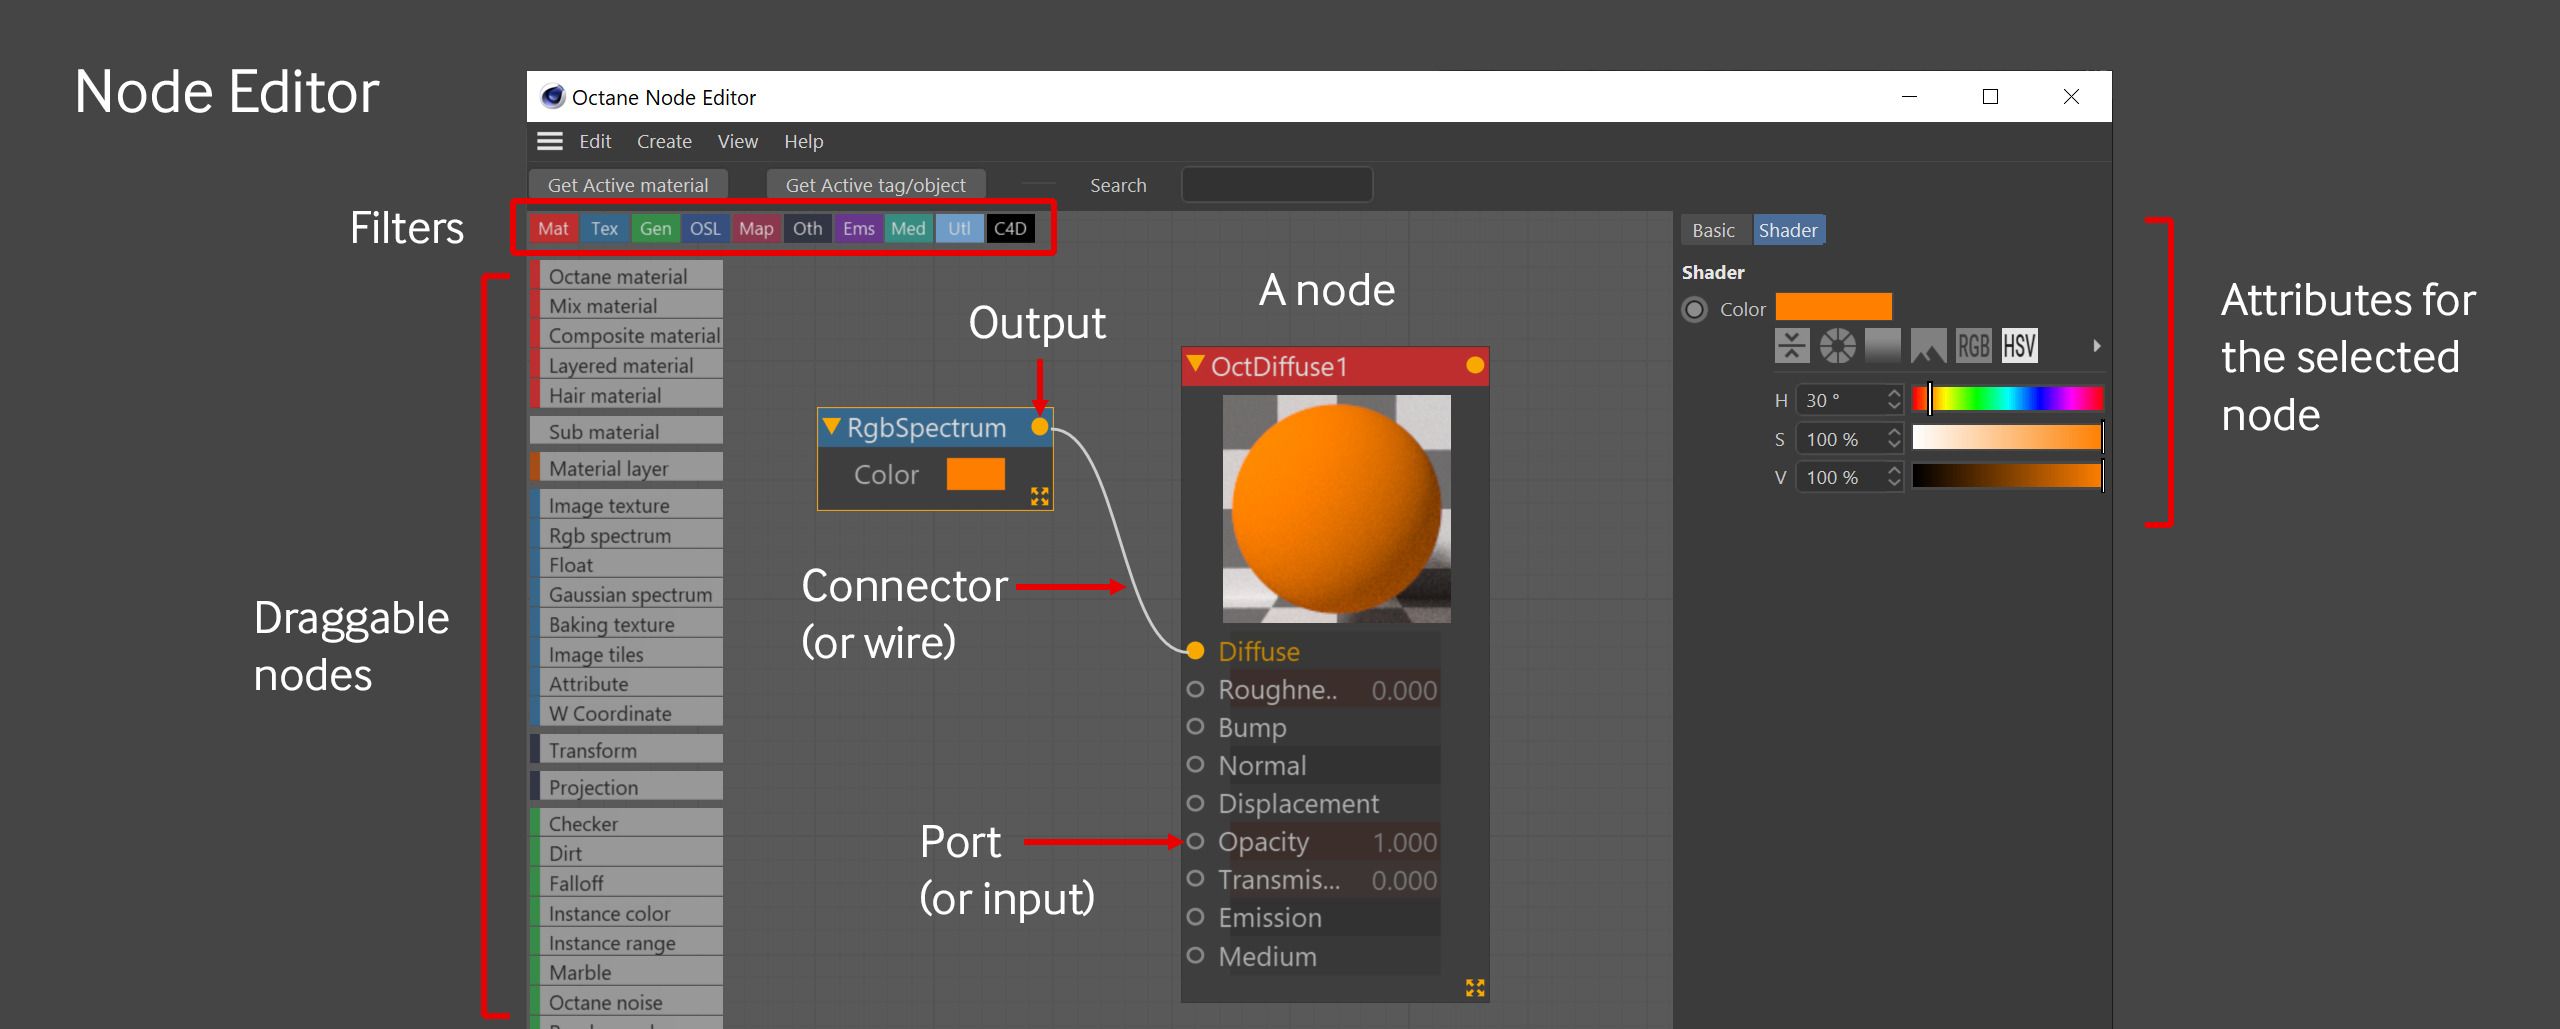
In the middle is where you create and connect nodes via a light gray node graph area. On the left is available nodes that you can add into the node graph area. At the top are small colored boxes to help you filter the available node list by category. On the right is an attributes manager window to modify parameters for the selected node.
3. Navigate
In the Node Editor, you can pan and zoom by pressing the middle mouse button for panning and alt (or option)-right mouse button for zooming, or by holding down the 1 key and dragging the mouse to pan and the 2 key to zoom. The main Node Editor area (not the section with the list of nodes) can be scrolled with the scrollwheel or by using two fingers to drag up and down on the trackpad. If you become disoriented, you can press H on the keyboard or choose Frame All from the View menu in the Node Editor.
By grabbing the list of nodes on the left with the middle mouse button and dragging it up and down, you may scroll it. If you’re not utilizing a 3-button input device, two-finger scrolling on a trackpad or the scrollwheel on a mouse will also work here.
4. Create new nodes
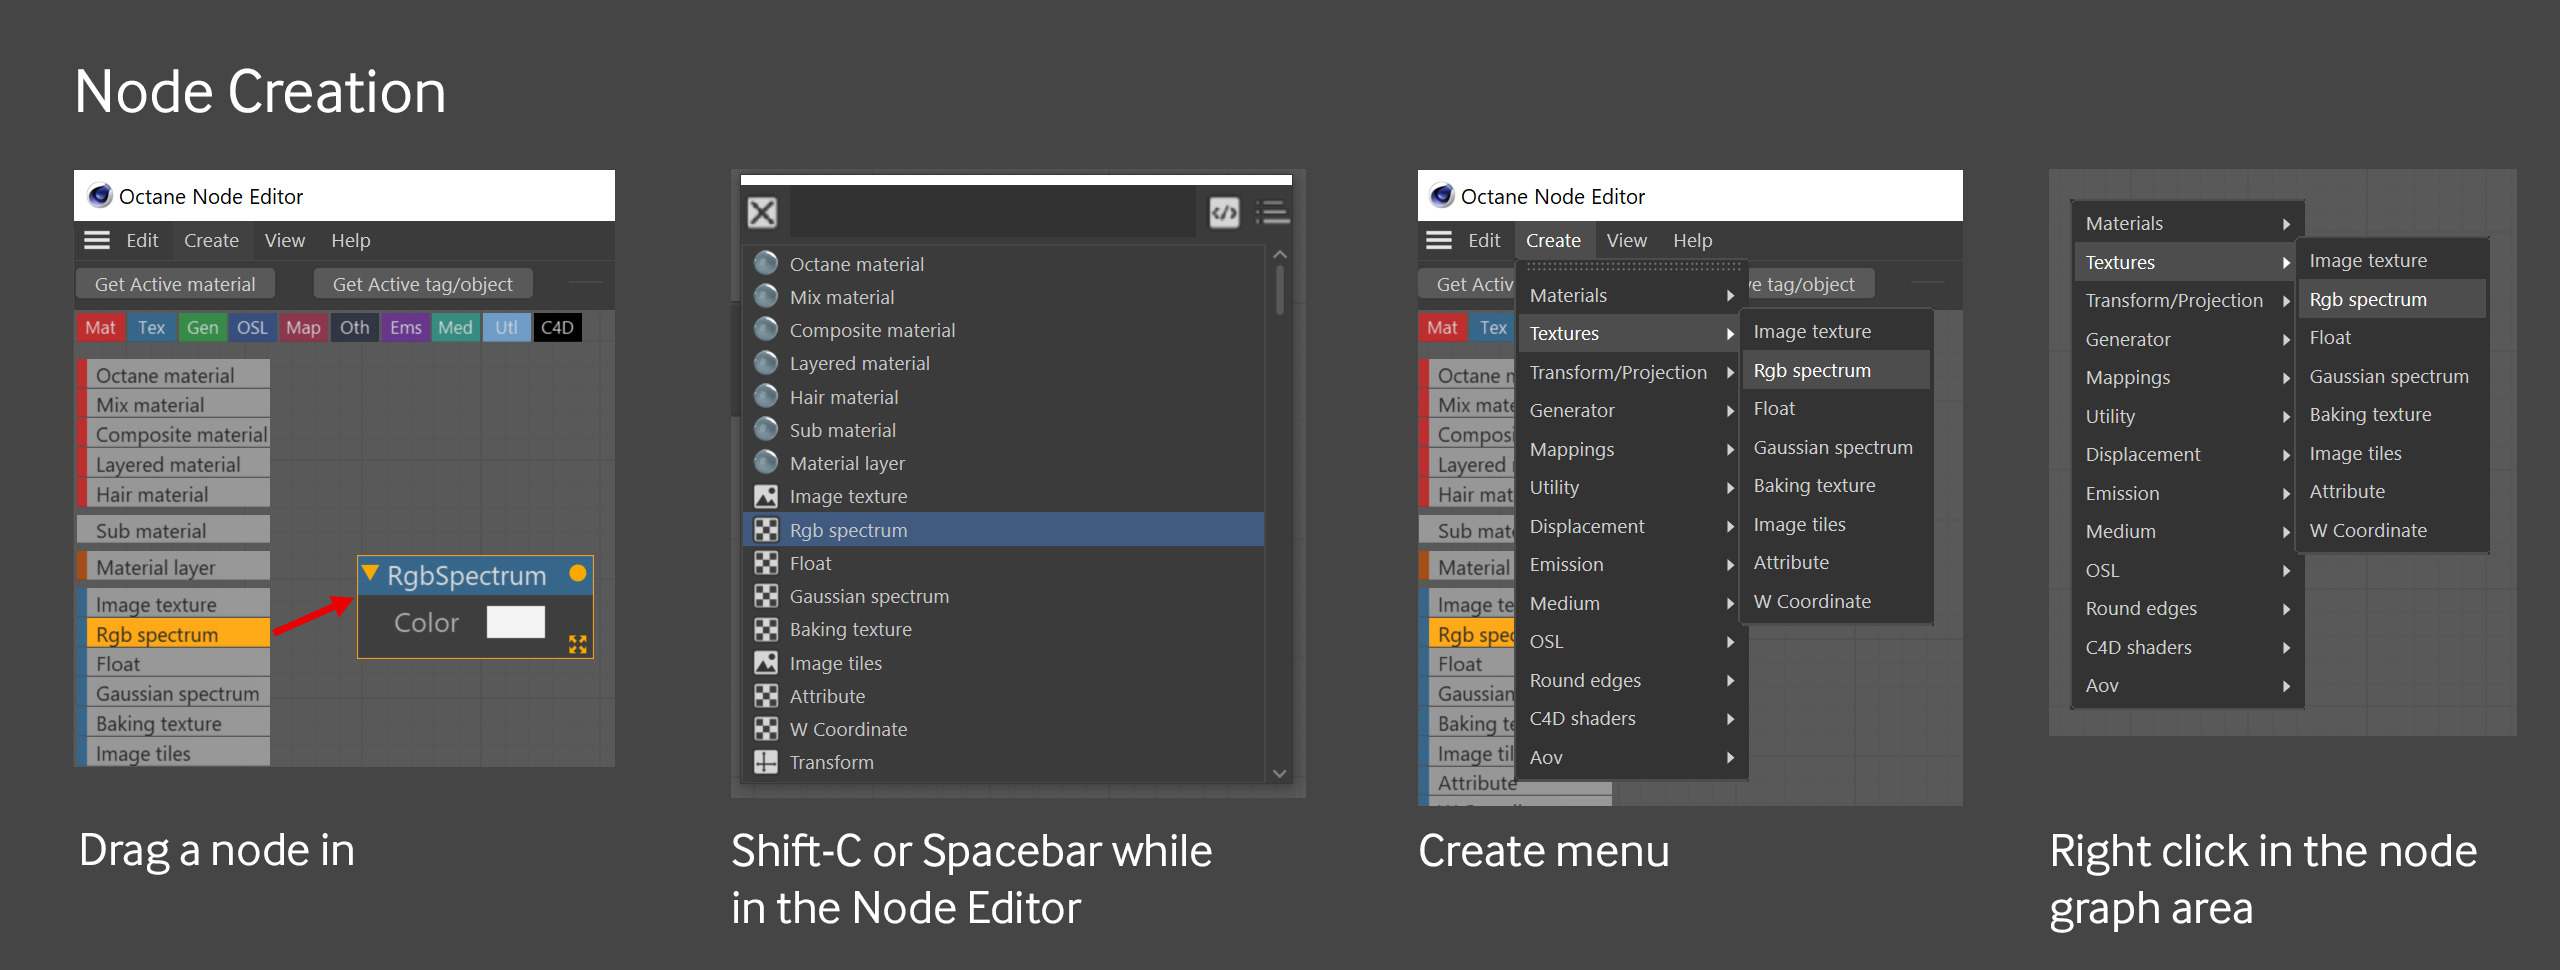
New nodes can be made in numerous ways. The most straightforward method is to drag a node from the list on the left into the Node Editor window. By selecting the little colored boxes in the top left, you can filter this list by turning on and off the various categories. If you know the name of the node, you can also use the search box at the top to narrow down the list. Once you’re finished, make sure to close all the tabs at the top and/or clear the search box.
As you become more familiar with the nodes’ names, you may search for them in the Node Editor by using the spacebar or Shift-C simultaneously.
You can also right-click anywhere in the Node Editor to bring up a list of nodes if none of those other options are successful for you. Another way is that you can also choose a node from the Create option at the top of Node Editor.
A list of nodes that can connect there will appear when you draw a connector from an output port into the light gray node graph region and drop it. By selecting them and control-dragging them, or by using the copy/paste keyboard shortcut, you can duplicate an existing node.
5. Connect nodes
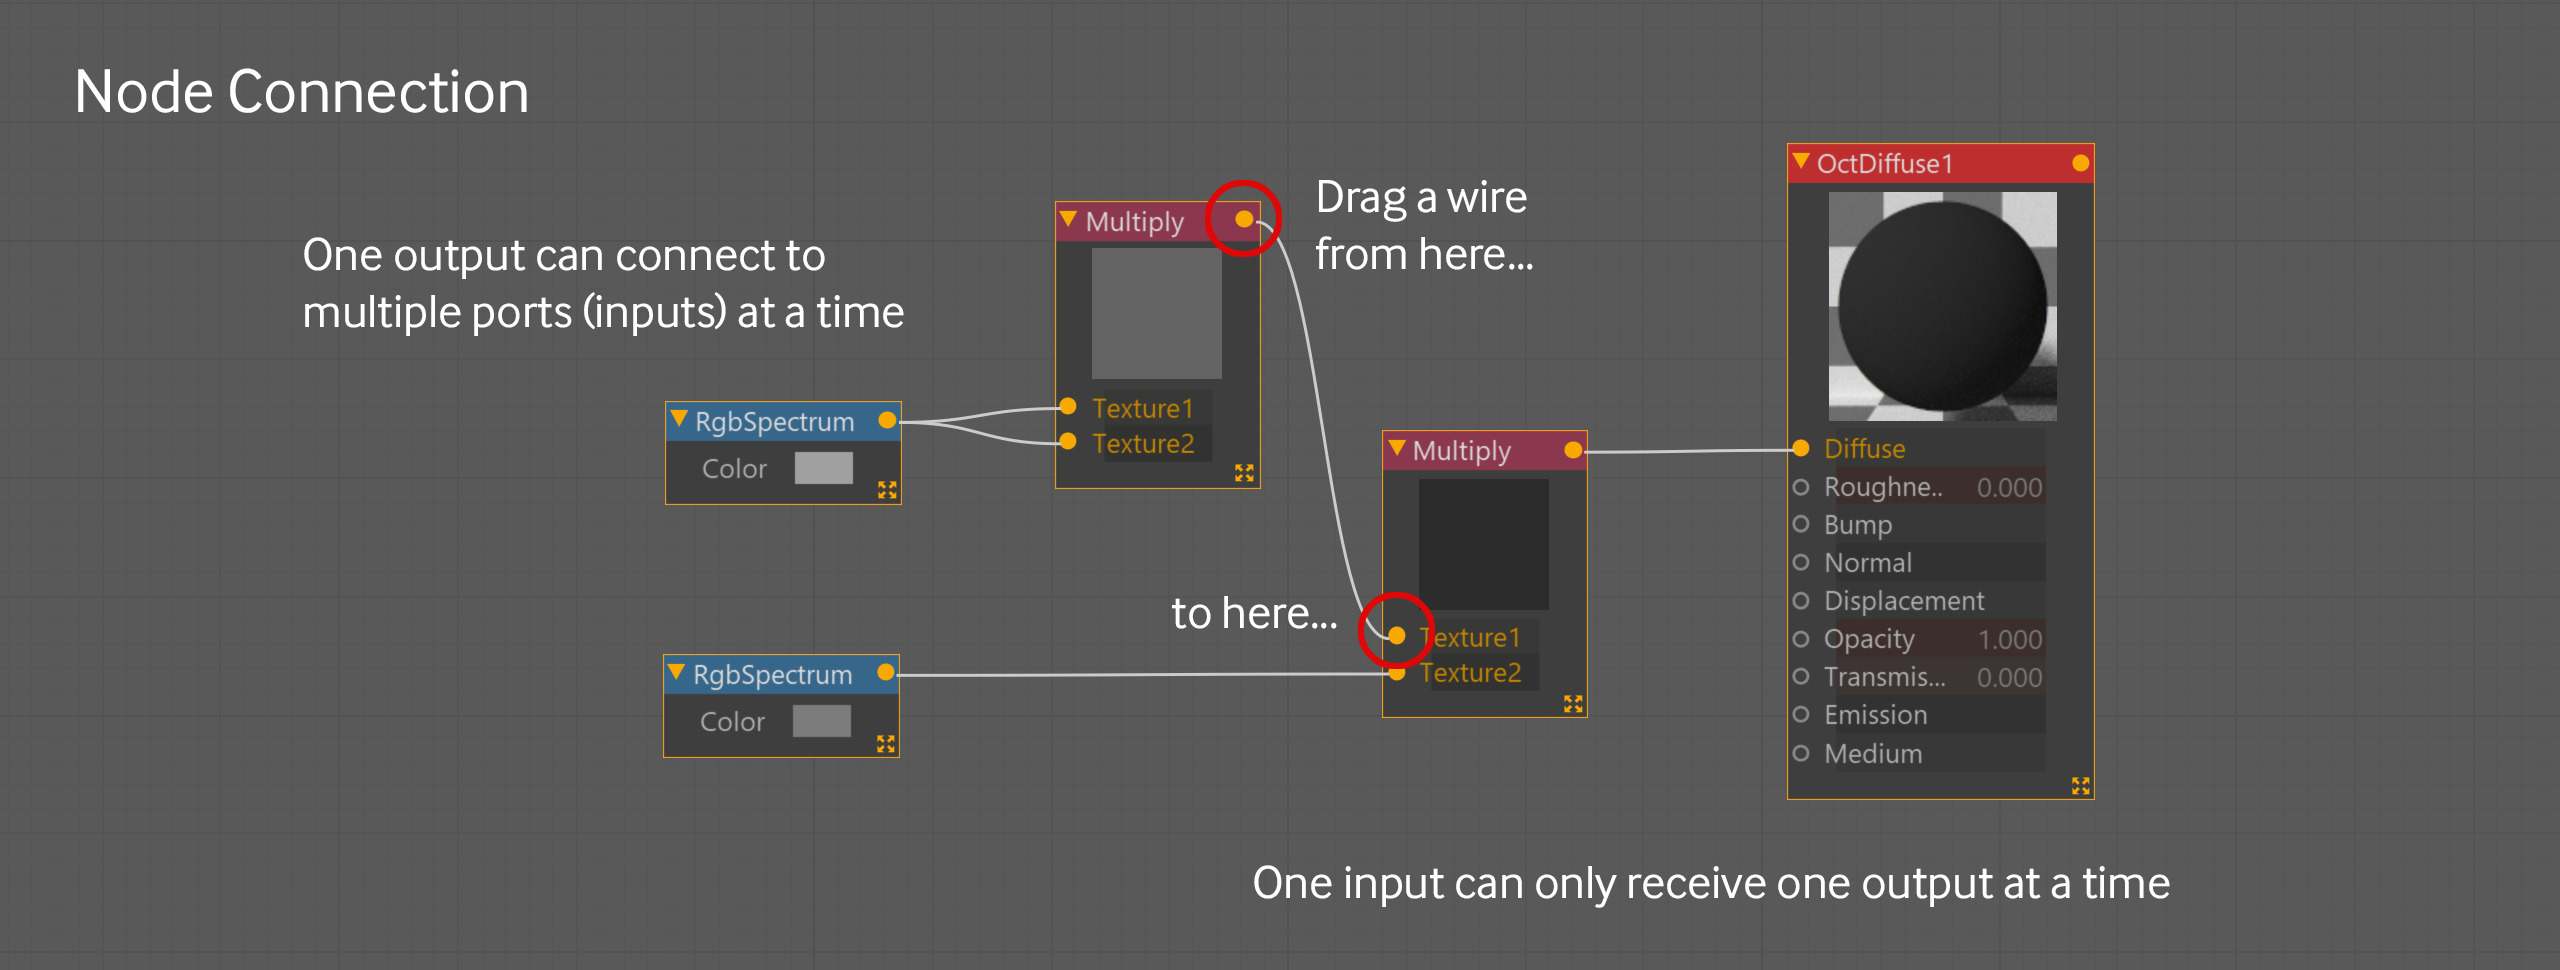
Click the small orange-yellow dot (the output) in the top right corner of a node and drag a line (referred to as a wire or connector) from it to an open circle on the left side of another node to link the nodes together (called a port or input).
This will typically work, but occasionally two nodes will simply be unable to join. You’ll discover which ones relate to one another later on in this tutorial.
A node’s output may be connected to other nodes’ inputs. This implies that you can simultaneously drive several channels in a material with a single texture.
However, a node’s left input port can only accept one connector per input port. If you want to aggregate the output of three or four nodes, some nodes let you add more input ports.
Dragging a node directly into an open port on the Material from the node list on the left will generate and connect the new node; try it with an RGB spectrum into Bump.
You can drag a node from the left and drop it on the wire to place it between two other nodes if you want them to be next to each other. A Color Correction node might be inserted between the RGB spectrum and the Albedo.
Double-click a wire or drag a wire out of the port it’s attached to (the right side of the connection) and dump it into the ether to detach nodes.
6. Organize Nodes
You might wish to decrease some of the nodes as your node graph grows to lessen visual clutter.
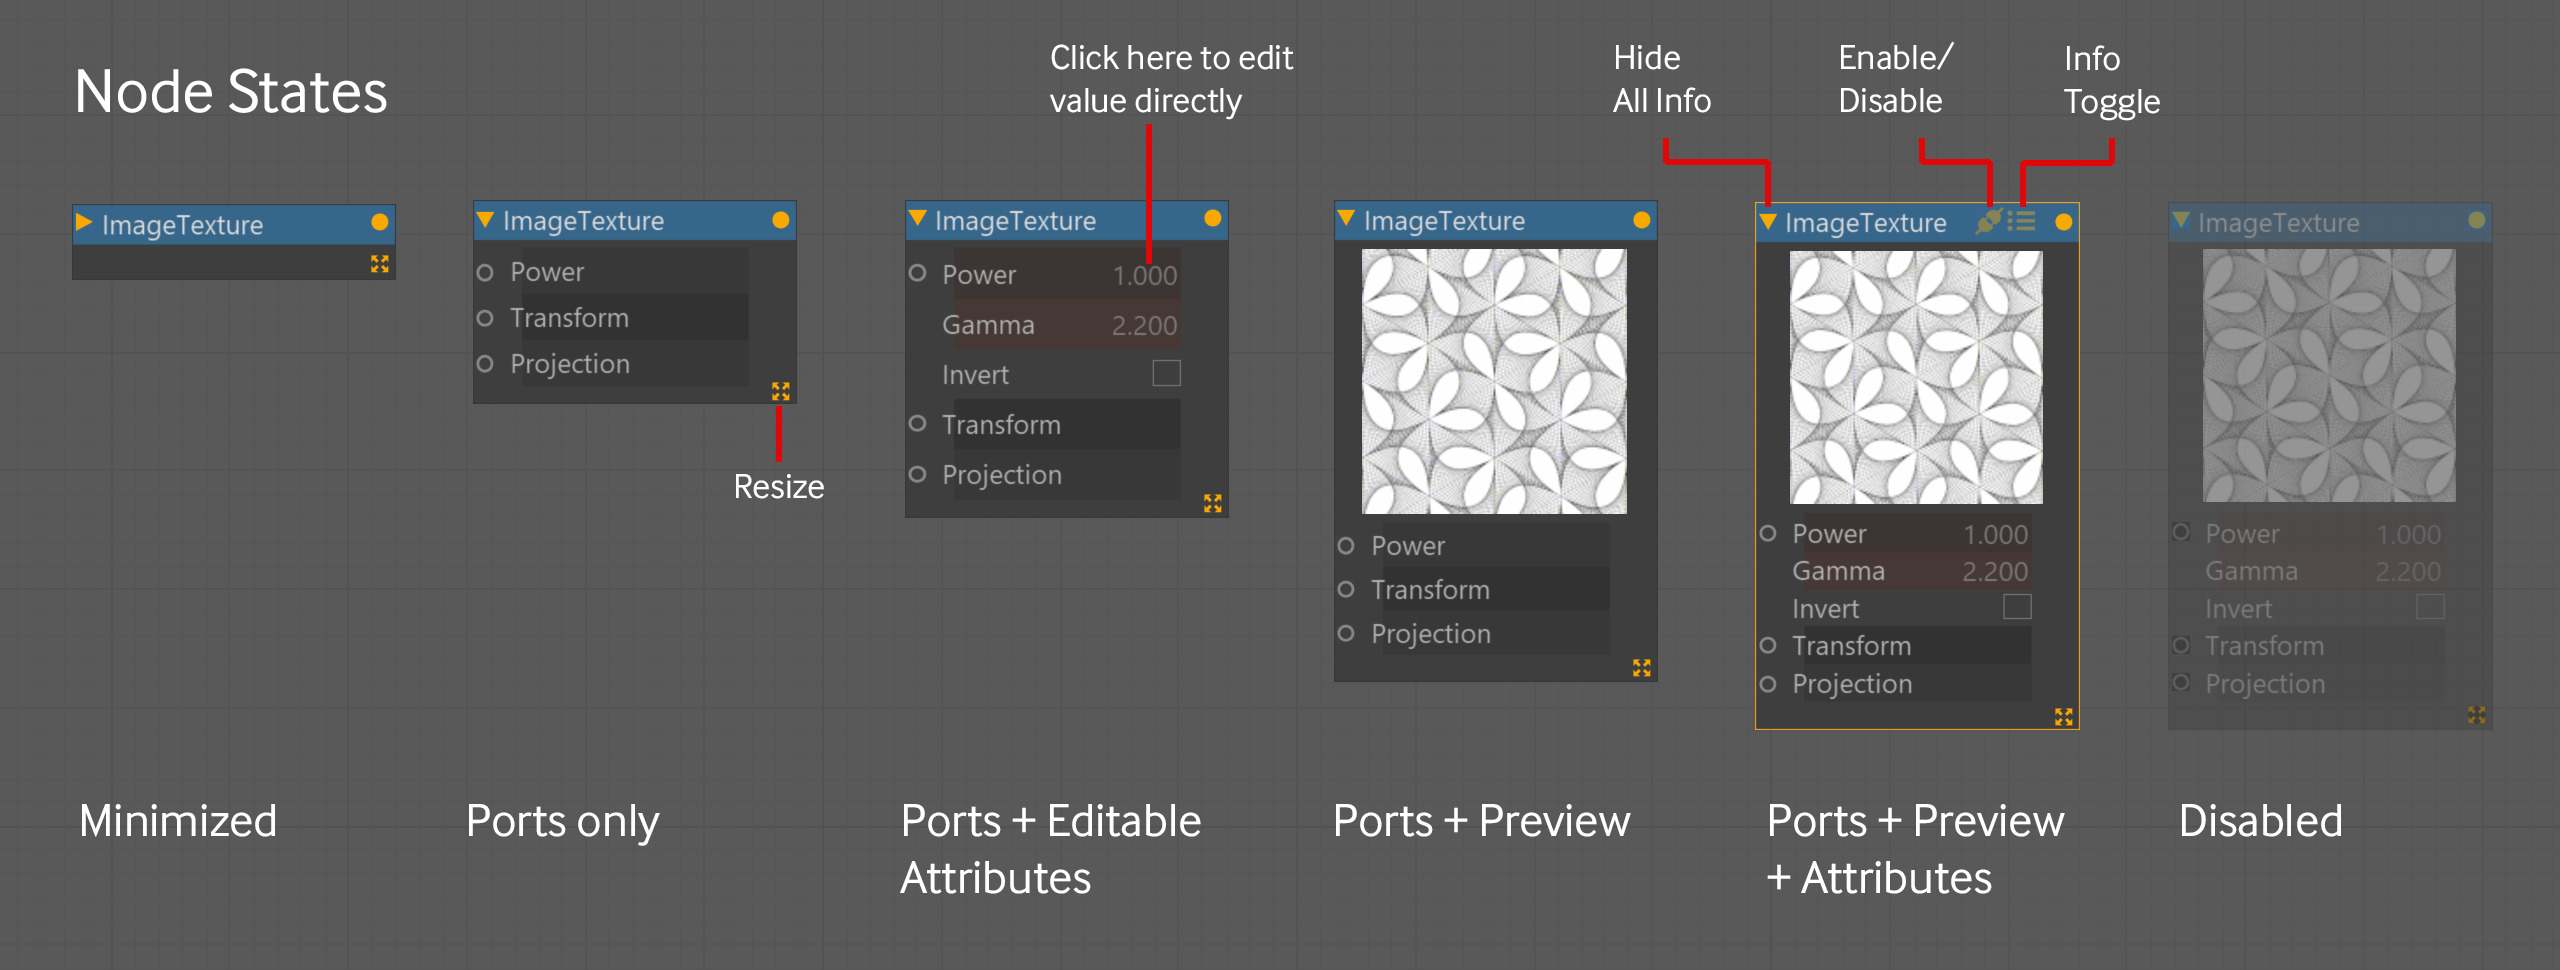
Some of the information will also expand and collapse when you double-click on the node’s colored titlebar. This is also accomplished by the tiny yellow triangle to the left of the name.
A node’s titlebar has icons that can be clicked on to enable or disable the node and turn on or off its editable characteristics in the bottom portion of the node. The properties that are editable actually allow you to edit something by clicking in the value box. The node will be collapsed if you switch the visibility or editable properties too soon, as Octane will interpret this as a double click.
You may also instantly resize any node by grabbing the tiny yellow 4-way handle located in the bottom right corner of any edge.
The option to enable or disable the preview is available when you right-click a node. When performing a lot of quick lookdev, previews can slow down the process. However, they also offer a very important visual indicator of what your node graph is doing at that moment, so turn them on and off as necessary.
A few nodes can be moved about by left-clicking and dragging a box around them. Shift-dragging another box that crosses a node will add it to the selection even if you cannot shift, alt, or control-click a node to do so.
You can right-click on a selection of nodes and select Auto-arrange. There are different degrees of success with this, but often it will take a disorganized graph and give you a decent place to start reorganizing it.
You can rename any node you have selected by clicking the basic tab in the attributes manager on the right.
When a node is disabled, it stops contributing to your material until you turn it back on. To achieve this, click the tiny plug icon in the titlebar’s right corner (appears when you click the titlebar).
7. Edit the Node Editor
The Node Editor can be tailored using a variety of parameters. Some of them can be accessed in the Edit menu, while the remaining ones are in the Octane Settings tab in Nodes (the Node Editor’s Edit menu has a shortcut that takes you right there).
Why should you choose iRender cloud rendering service for Octane?
We bring the power of Cloud GPU Computing directly to your desk
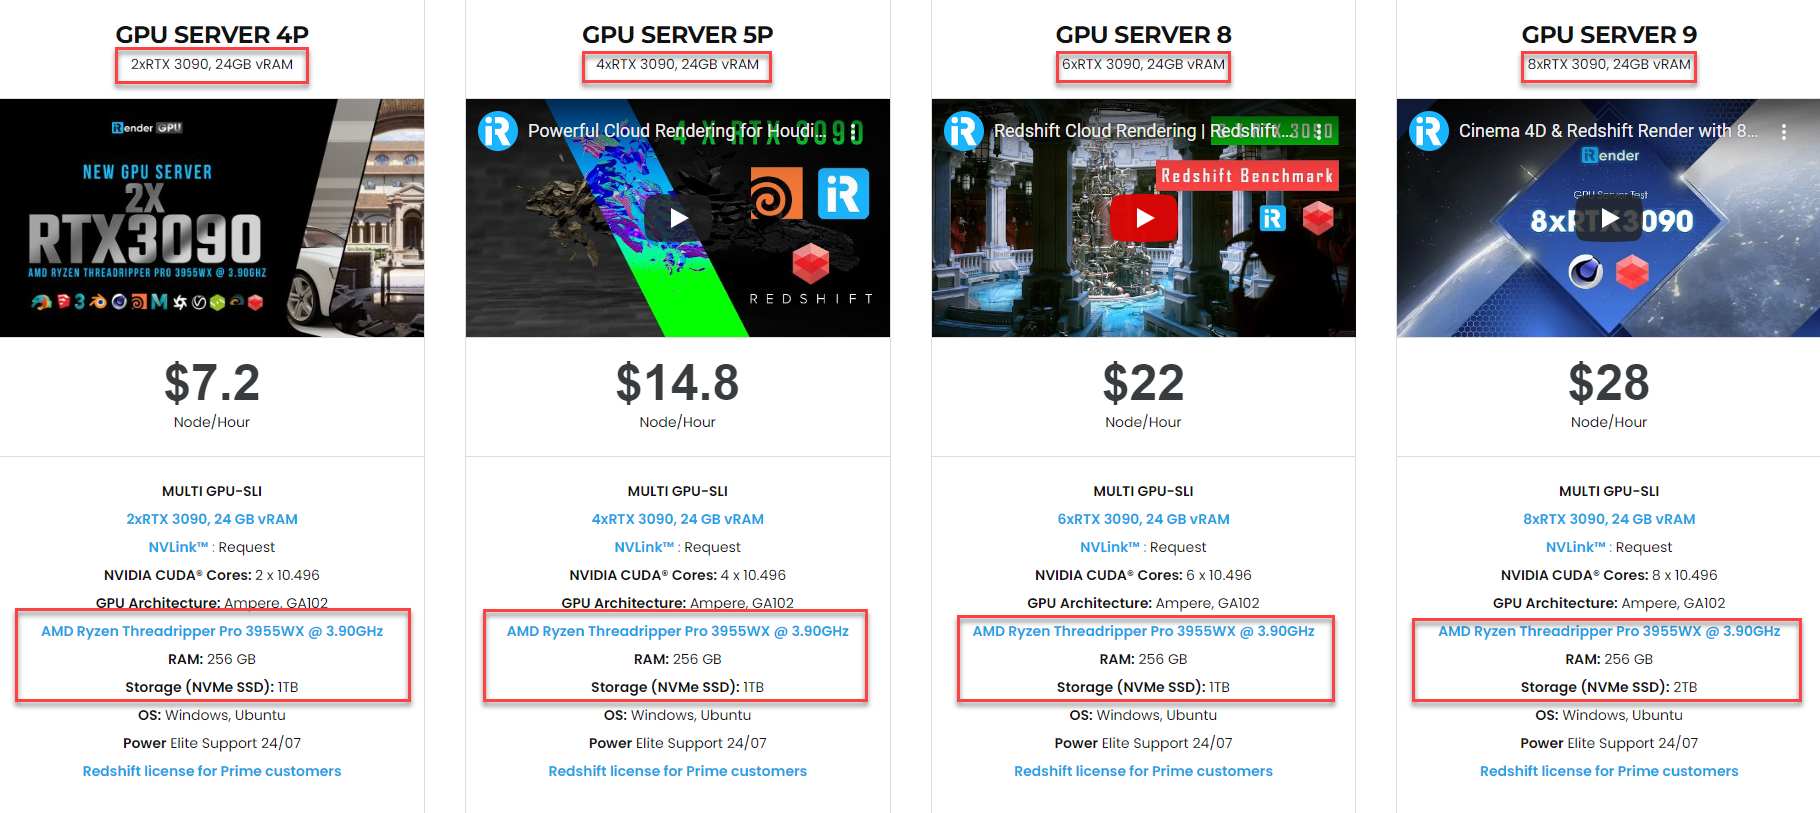
iRender Render Farm is a Powerful GPU-Acceleration Cloud Rendering for almost softwares including Octane. We offer a choice of server packages ranging from single GPU to 8 GPU RTX 3090, allowing you to pick the best server package for your demand.
To understand more about Octane’s performance on our servers, you can see the following video:

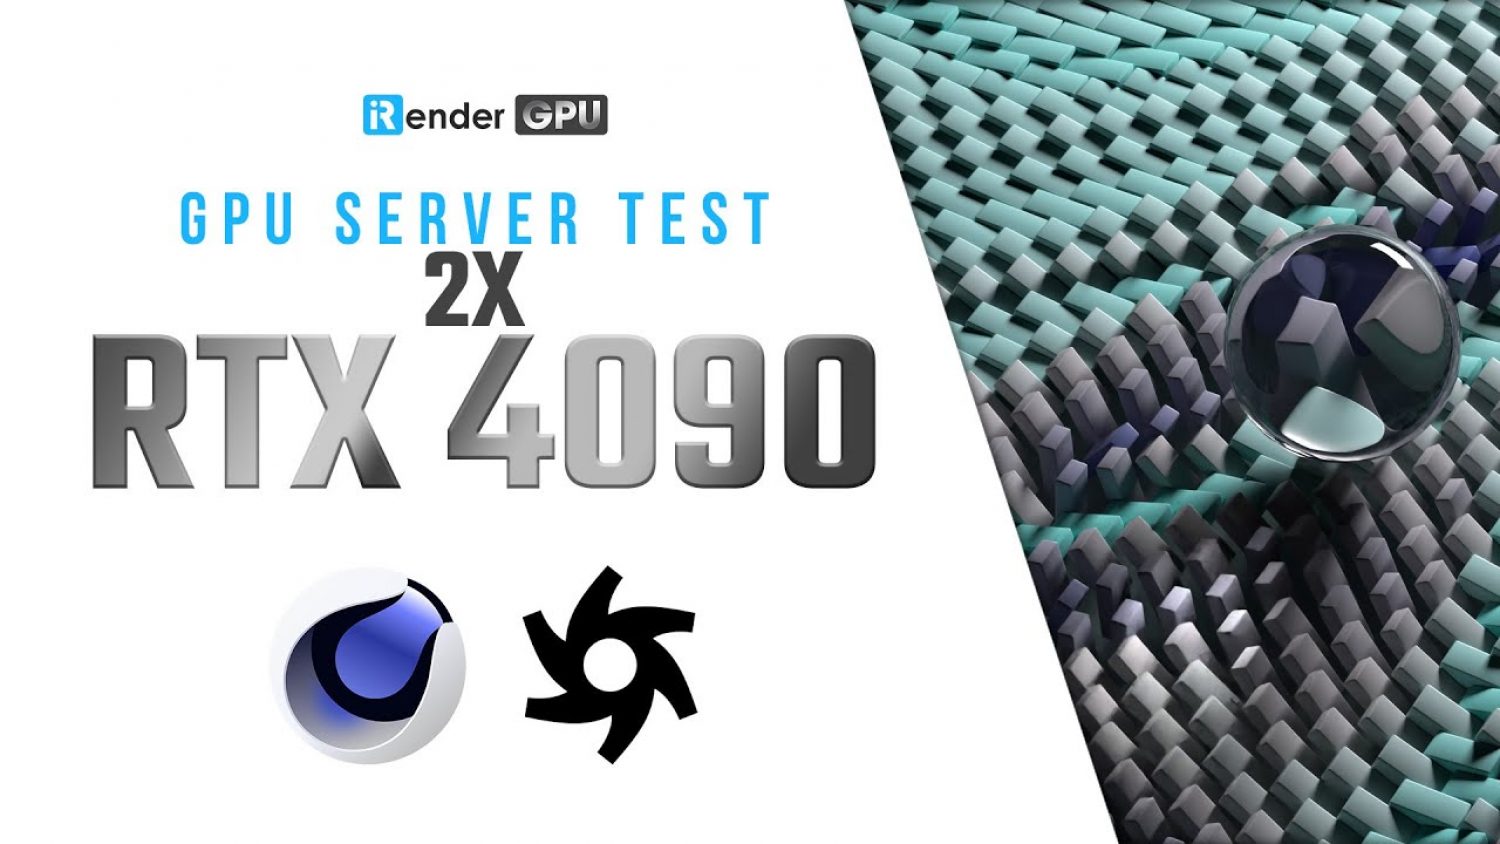
Especially, iRender has launched server 4S with CPU AMD Ryzen™ Threadripper™ PRO 5955WX @ 4.0 – 4.5GHz and 2 RTX 4090s one of the newest Nvidia cards. With this improvement, iRender promises to bring you unprecedented experiences when rendering with Octane.
You can install any software and use our servers as your own computers
Once connecting to your iRender computer via Windows Remote Desktop, you will have full control over the machine as if you were owning a powerful computer rig of your own. You can install any software and plugins you want just once, and all will be saved for future use. In addition, iRender also provides you with a lot of useful features such as NV Links so that you can take full advantage of our service for your work.
Our customer support and technical team is available 24/7
In case you have any problems or questions, don’t hesitate to contact the 24/7 support team. We will be happy to help you with your questions and problems at all times.
iRender, in particular, is running a fantastic deal for you: new clients will receive a 20% bonus on their first purchase within 24 hours of enrolling.

Besides, we are committed to providing you with a rendering experience unlike any other. iRender has appreciated in many global rankings (e.g: CGDirector, Lumion Official, Radarrender, InspirationTuts CAD, All3DP, VFXRendering). To learn and enjoy more, please create an account here.
iRender – Happy Rendering!
Source: Source: docs.otoy.com
Related Posts
The latest creative news from Redshift Cloud Rendering, V-Ray Cloud Rendering , Octane Cloud rendering, Houdini Cloud rendering, 3D VFX Plugins & Cloud Rendering.


