Control noise and artifacts in Octane for C4D
In the previous article, we learned how Octane’s Path Tracing kernel mimics reality through a deep dive into how light works in Octane. If we set up lighting following real-world rules, we can achieve beautiful and realistic results without tweaking many settings or cheating too much. However, incorrect lighting causes noise and artifacts, and Heartache. So, how to control noise and artifacts in Octane for C4D for realistic renders? This guide will help you find the ways.
1. The problem of noise and artifacts in Octane
PT kernel in Octane, an unbiased path-tracing engine, works by essentially shooting a bunch of rays from the camera into the scene and calculating their paths to various light sources. The more difficult for rays to trace the paths, the more samples/calculations are needed for a clean result. This difficulty shows up visually as noise and artifacts.
These calculations aim to mimic reality, so unrealistic values for lights and materials are harder to resolve, leading to more noise. With extreme values, calculations begin to break down, and render errors will appear like fireflies, color clipping, and hotspots.
This isn’t to say a perfectly realistic scene will always result in clean, quick renders. If the ray paths to light sources are obscured, blocked, or refracted (through glass), the calculations become much harder and noisier, taking longer to resolve cleanly.
2. What can we do to control noise and artifacts in Octane for C4D?
First, we need to set up our scene properly to minimize noise and artifacts in Octane. Once we optimize our scene, we can apply tricks and tweaks to clean up any remaining issues.
2.1 Set up our scene properly
Real-world Scale
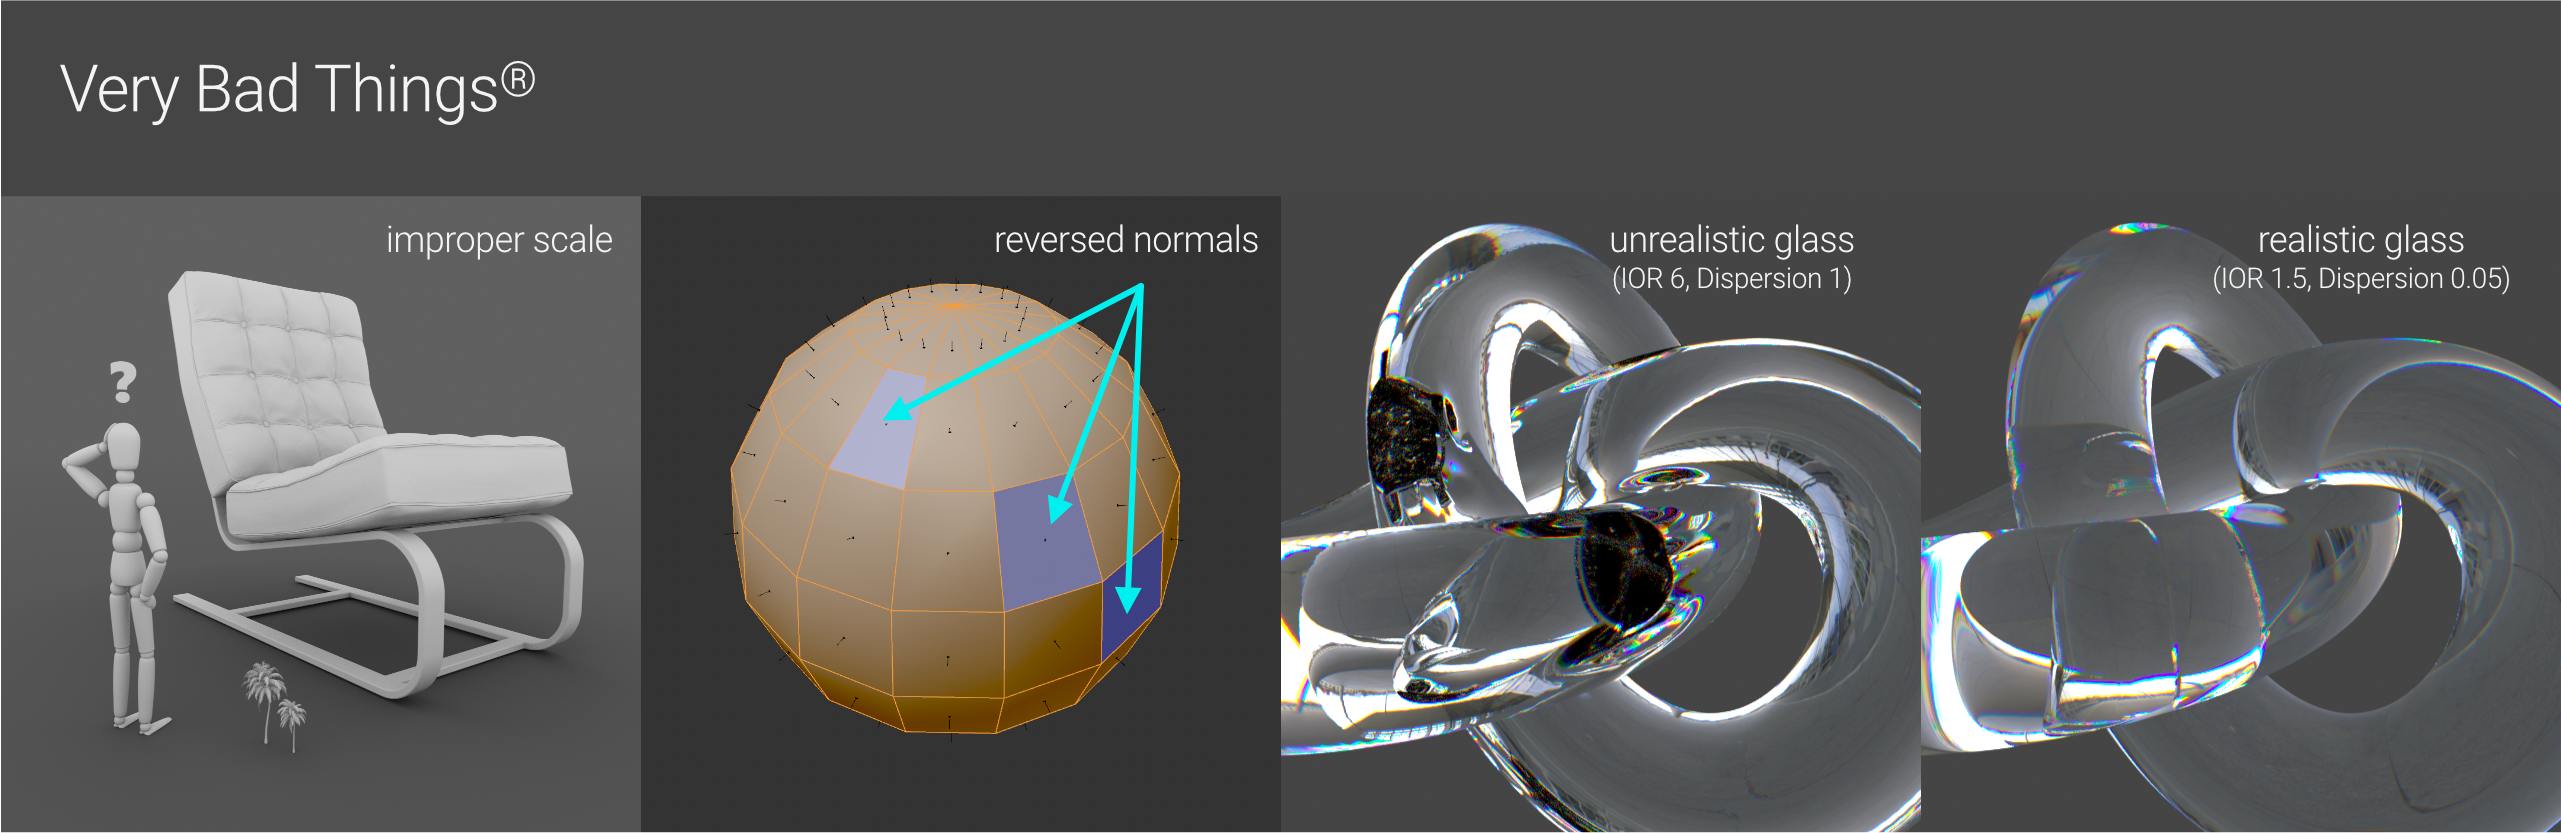
First and foremost, making sure a real-world scale for the scene. The easiest way is to add a C4D Figure object into the scene as a reference. This will check if plants are tiny or chairs are large. All objects should be close to their actual size in real life, so light interacts correctly. If objects are abstract like sculptures, we still want reasonable sizes. Plausibility is key.
If using real-world light fixture geometry downloaded from a manufacturer, we must ensure it is properly scaled. Often these are imported in millimeter scale rather than centimeter scale, so we have to make accordingly adjustments before bringing them into C4D to match real-life dimensions.
Check the Normals
This step is important because lots of calculations rely on normals, especially for emitting surfaces. Imported CAD models can have incorrect normals, so we should ensure as many normals as possible face outwards (orange in C4D, not blue when selected).
Realistic Materials
Our materials should also be physically plausible. If using RGB Spectrum for our colors in the Albedo/Diffuse channel, we should avoid extreme values (e.g. 100% red, 0% green/blue, or 100% S or V using an HSV model). Gaussian Spectrum avoids this issue; however, it’s a bigger pain to find an exact color this way.
After RGB spectrum colors, the next biggest causes of noise are usually unrealistic IOR (Index of Refraction) and Dispersion values. The more unrealistic these are, the worse the render errors will be. Displacement and Mediums (for things like glass and liquids) are especially difficult for the renderer to calculate, so if they can be replaced with approximations like Bump and Diffuse Transmission, that would speed up the render. If not, they just need to be optimized and kept within the realm of reality.
Lights
For lights, we’ll want to use a texture to manually control efficiency. The Gaussian Spectrum node is often the best option unless we need an exact RGB color. If using an IES distribution, it will handle efficiency for us. We can use a 1/1/1 Gaussian Spectrum and lower the Power to intentionally dim the light.
Placement & Blocking
A hard and fast rule is that we should avoid blocking or obscuring light rays as much as possible, especially the most powerful ones. Instead, we want to mask and control the distribution and move our fixtures around so they emit outward and as unobstructed as possible.
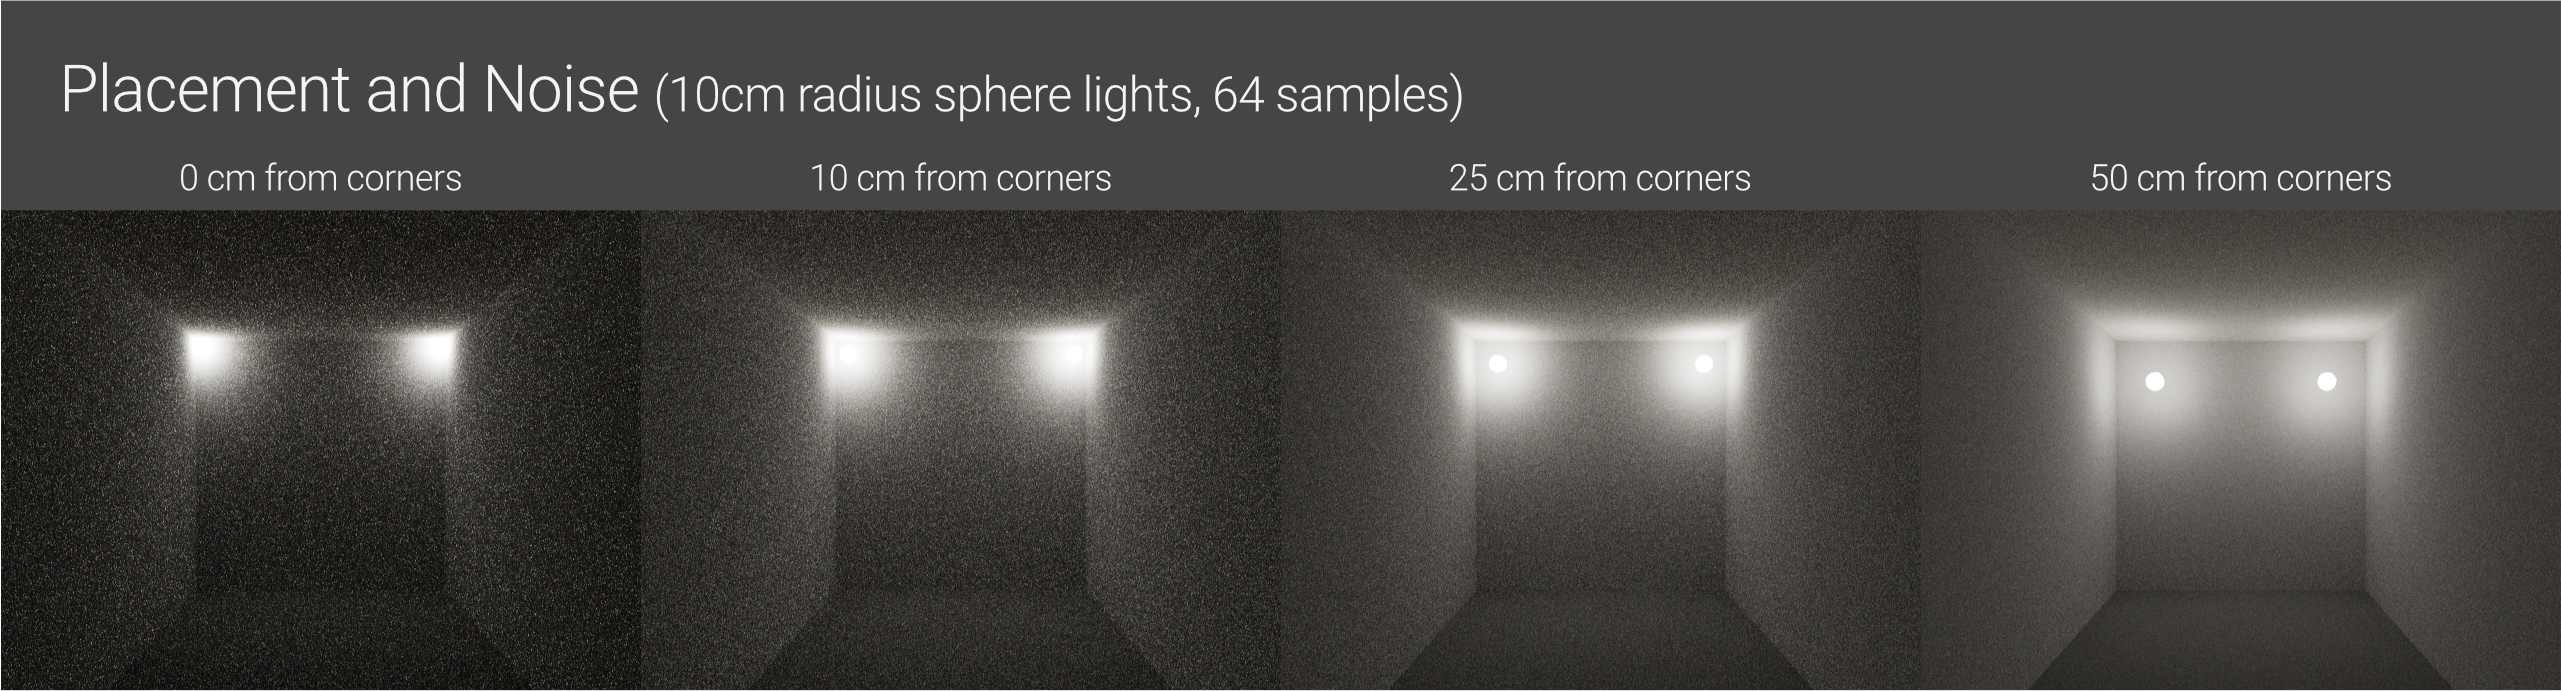
In the scene above, the lights and environment are the same. We see two omnidirectional area lights with a Power of 10, Gaussian Spectrum Texture of 1/1/0.2. “Use primitives” is enabled, also there is no distribution texture. Render settings are Pathtracing at 64 samples with AI Light on. All other settings are at default, the only difference is how far the lights are from the walls and ceiling.
There are just two lights in the scene, thus all the rays which are used to illuminate the scene must trace back to them. The more obscured the emitting area is, the harder it is to calculate and the more noise appears.
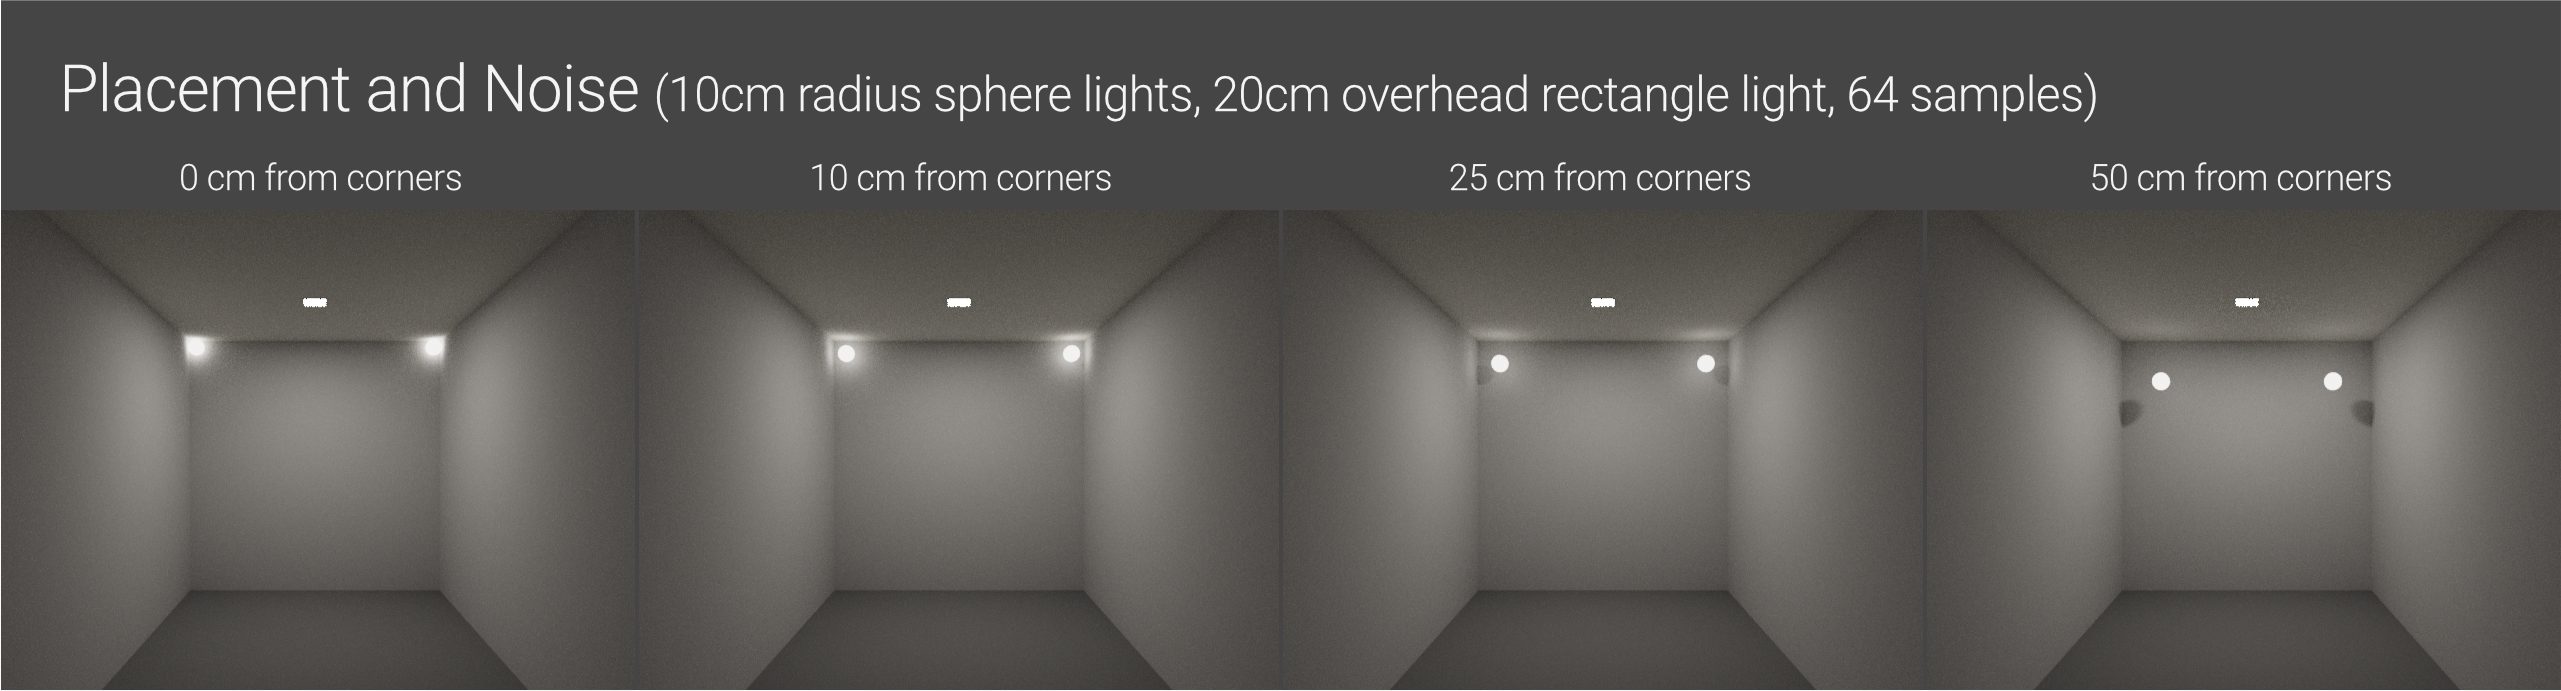
This is the same scene except the sphere lights have been dimmed to 1 power, while the overhead rectangle area light was added as the main illumination source. The overhead light has 20 Power, a 1/1/1 Gaussian Texture, and is placed 1cm from the ceiling. The ceiling light emits rays in all directions, but only from the bottom side, so none are blocked. As the most powerful light source in the room, most rays will trace back to it. Even with the 2 weaker lights against the walls, the scene is not very noisy at 64 samples. The same strategy can be used with distribution textures for recessed lights to ensure rays are not blocked.
2.2 AI, Tweaks and Cheats
If we have already optimized our geometry, materials, and lights, some render settings can still help reduce noise and artifacts in our scene. Depending on the certain scene, they will have different levels of success.
AI Light System & Spectron
The AI Light system optimizes light sampling specifically for each individual scene using algorithms that “learn” the scene. With AI Light enabled, the number of samples needed to achieve a clean render goes down significantly. A great thing about this AI Light system is that it remains unbiased – it doesn’t actually limit rays, it just prioritizes which ones to focus on to resolve them more cleanly. Since AI Light affects all emissions in Octane, it’s generally best to leave it enabled unless it causes issues for a specific scene.
All we have to do is check the “AI Light” box in the Kernel settings, and the AI Light System will go to work optimizing the render for our scene.
Spectron is a procedural lighting system native to Octane Render that simulates even more realistic lighting effects. Here, we will just focus on Spectron Primitives, which make Area Lights render much faster and cleaner, especially when combined with the AI Light system. As of now, Spectron is only available for Area Lights.

In the Light Settings Tab > Octane Light Tag, the “Use primitives” option replaces the area light with a Spectron Primitive. In the Light Object’s settings (not the tag) > Details tab, the Area Shape dropdown lets us choose a shape for the area light.
Importantly, only the Rectangle and Sphere shapes are currently supported by Spectron. Selecting these will swap the light for the corresponding Spectron version. The other area shape options (Disc, Cylinder, etc) will still change the light’s shape but will not be replaced by Spectron primitives. They will still benefit from the AI Light optimizations.
The Outer Radius, Size X, and Size Y values change the size of the light. All other settings in this section are for C4D’s native render engines only and are ignored by Octane.
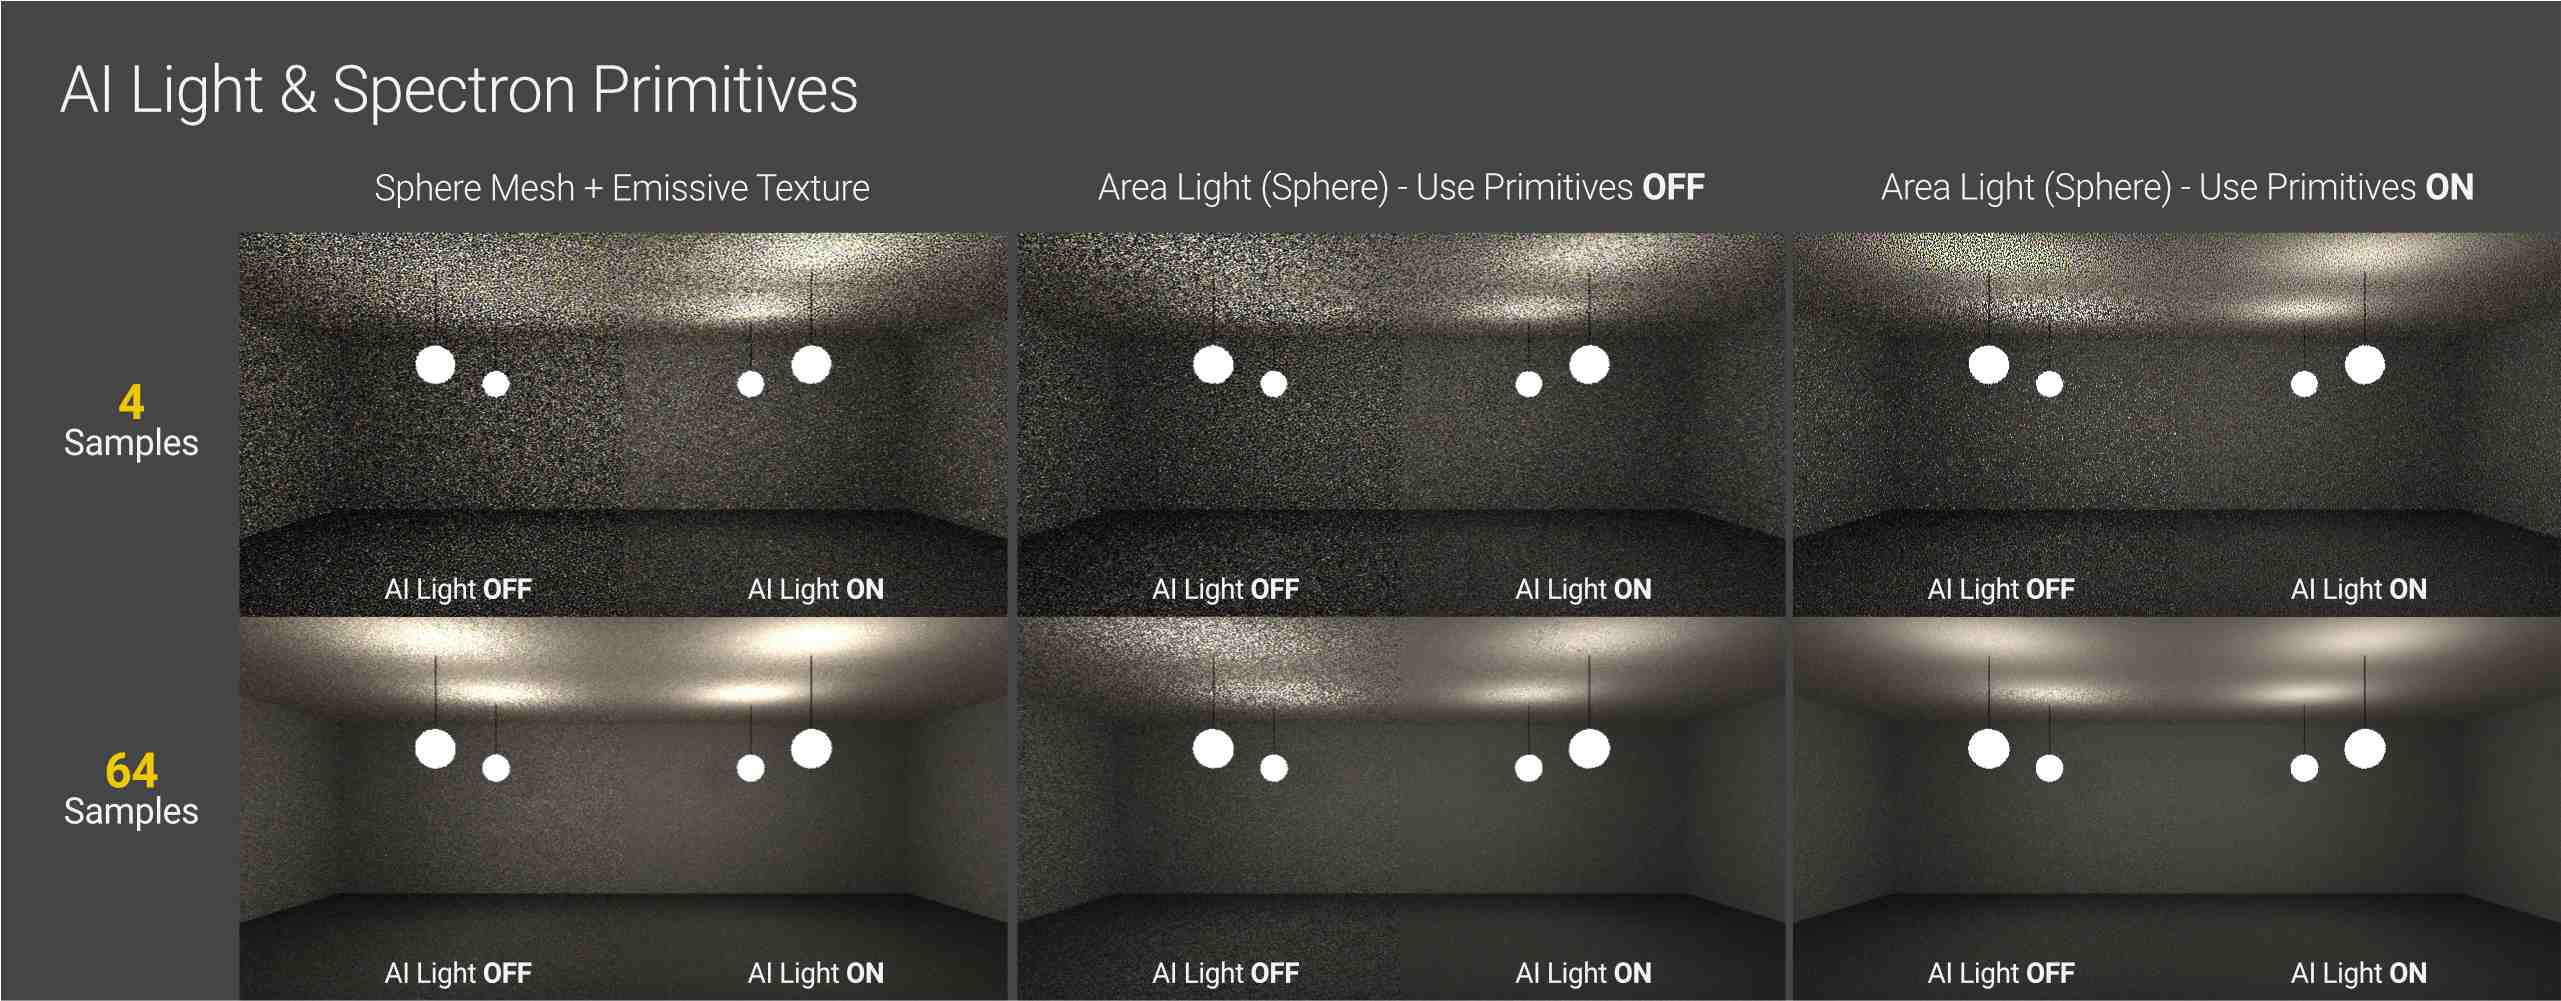
The above illustration compares a spherical emissive geometry, a non-Spectron area light sphere, and a Spectron area light sphere. It also shows how these options interact with the AI Light system.
All three were given the same properties and render settings. They all have a diameter of 20cm. A Gaussian Spectrum node set to 1/1/0.2 controls the texture. The temperature is set to 4000K and the Emission Power is set at 7.5. The room is a fully enclosed box with no other lighting. Different materials are applied to the ceiling, walls, and floor to illustrate noise in both darker and lighter areas. For the render settings, GI Clamp is set to the default of 1,000,000 and no denoising or hot pixel removal is applied.
The results show:
-
-
- There is not much difference between using a non-Spectron Area Light and an emissive material. The AI Light system handles both well.
- When Spectron Primitives are enabled, the scene becomes cleaner even without AI Light on, and much cleaner with it.
-
This means we have a choice when using real-world fixture geometry from a light manufacturer’s site:
Option 1: Use an emissive material with the proper distribution texture, turn on AI Light, and deal with any remaining noise in other ways.
Option 2: Create a sphere or rectangle Spectron area light, place it inside the fixture geometry, and use Light Linking to hide the fixture from the area light. Apply a low-powered emissive material to the fixture geometry. We would likely only go with this option for tricky lighting situations where we cannot control noise through other means.
Adaptive Sampling
Adaptive sampling is a technique that intelligently allocates more rendering samples to complicated areas of an image and fewer samples to simpler areas. It still helps maintain the unbiased, realistic look of the render.
It works by creating a noise map (which is visible in the Live Viewer at the bottom). When a particular area of the render is deemed sufficiently smooth/clean, Octane stops adding more samples to that area and instead focuses its sampling on noisier/grainier areas.
The results are variable, depending on the scene’s lighting complexity and difficulty to render. In some cases, it is quite effective at quickly resolving problem areas. But in other cases, especially simpler scenes that don’t require as many samples, it can introduce issues like fireflies. There are settings to adjust the threshold and minimum number of samples to fine-tune the method.
Adaptive sampling also produces unbiased results and works well with AI lighting techniques.
Path Termination (Path Term) Power
In scenes where noise in dark areas remains high despite all methods we have tried, lowering the Path Term can help. This causes Octane to spend more time rendering darker areas, improving quality at the cost of speed. Conversely, for scenes without many dark areas, increasing the path termination value may yield faster render times with little impact on quality. Nonetheless, in most cases, other optimization techniques work well enough without adjusting path termination.
GI Clamp
GI Clamp is a traditional way to reduce noise but introduces bias into the render. This setting limits secondary light bounces in the scene, reducing noise. But its lower setting value is at the cost of realism – especially for interiors where secondary bounces are important.
Fortunately, we may not need to lower the GI Clamp aggressively – or at all – if we have properly prepared the scene by keeping everything realistic and unobstructed. This allows many problematic light rays to naturally become extinguished before causing issues.
We now have better options like AI Light and Adaptive Sampling, which we should utilize instead. We should only use GI Clamp as a last resort or for non-photorealistic renders where realism does not matter.
Important: Combining GI Clamp with AI Light can damage the render, so you should choose one or the other. If you opt for AI Light, you should leave GI Clamp at its default high value of 1 million.
Hotpixel Removal
Pulling the hotpixel removal slider downward targets and removes fireflies. The default is 1, and lower values reduce the threshold for extremely bright pixels, eliminating them from the render. It works well when fireflies are obvious, but setting it too low can start removing highlight detail. Around 0.5 is generally good.
Denoiser
The denoiser uses AI to reduce noise in a render. This can drastically shorten render times, requiring only a fraction of the samples for a clean result. However, depending on the scene, it can impart an over-processed look, wreck tight patterns, or introduce artifacts in animations. It works best as a polishing pass rather than a primary noise reduction method for most scenes.
Light Linking
Light linking allows us to prevent specific light sources from illuminating problematic objects. While unrealistic, this can reduce noise and resolve rendering issues. However, we may need to adjust other lights to compensate.
In recent Octane versions, we can use C4D’s Light Linking system. Just go to the Project tab of a light object and select the objects we want the light to ignore.
We have to enable C4D Light Linking in the Octane kernel settings to use this feature.
Hopefully, this guide has improved your understanding of how these techniques work to control noise and artifacts in Octane and will help you to produce faster, cleaner, and more realistic renders.
3. Render faster in Octane with iRender
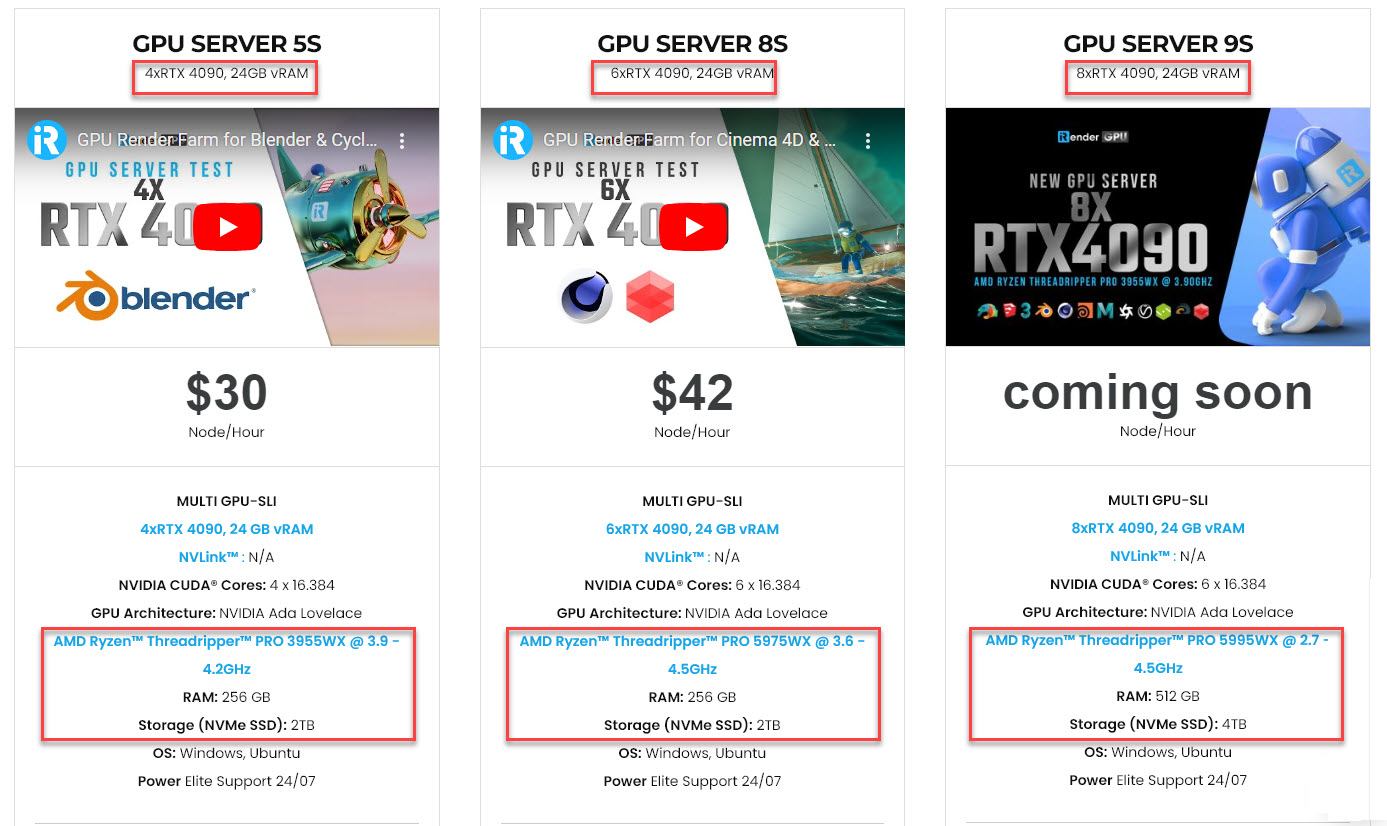
iRender provides high-performance GPU rendering services to unleash creativity for 3D artists. We offer flexible configurations of 1, 2, 4, 6, and 8 GPU servers using the top-tier RTX 4090 and RTX 3090 for accelerated Octane rendering. Powered by powerful AMD Ryzen Threadripper PRO CPUs with up to 64 cores, 256GB RAM, and 2TB NVMe SSD storage, our servers can handle even the most demanding Octane scenes.
Best of all, we grant you complete access to your rented servers. You can install any software, plugins, or Octane versions you need. We treat your rented servers like your personal workstations – no restrictions apply. This freedom enables you, 3D artists, to realize creative visions without limitations. Leverage our accelerated GPU rendering and scalable power to easily tackle CPU-intensive renders that formerly bottlenecked creativity.
Using iRender’s server more efficiently in just one desktop app:

Check out Octane rendering performance on our 6x RTX 4090 server powered by AMD Ryzen Threadripper PRO 5975WX:

Make iRender your partner in creativity and unleash your potential with our high-performance GPU servers and start rendering today!
iRender – Happy Rendering!
Reference sources: Scott Benson on otoy.com
Related Posts
The latest creative news from Octane Cloud Rendering.