Discovering Onion Skinning in Animation in Blender 4.2
As we all know, modern or traditional animation relies on precise techniques in motion. The artist has to carefully observe human actions and then sketch them on the animation smoothly and fluidly. Onion Skinning is a feature that helps artists a lot in creating animations. Onion skinning is usually activated in Blender using the “Grease Pencil” tool. When onion skinning is enabled, you can see the previous and next frames as translucent images while working on the current frame. Onion skinning has its roots in traditional animation methods and still plays an important role even in today’s sophisticated digital platforms.
Let’s discover Onion Skinning in Animation in Blender 4.2 with iRender today!
Introduction to Onion Skinning

Onion skinning is a 2D computer graphics method used to create animated cartoons and edit movies that allows you to see many frames at once. This allows the animator or editor to make decisions on how to create or update an image based on the previous image in the sequence.
In computer software, this effect is created by making frames translucent and projecting them on top of each other.
In Blender, Onion Skinning shows ghosts of the keyframes before and after the current frame allowing animators to make decisions in the animation sequence. The main switch to show/hide Onion Skinning is in the Viewport Overlays, but Grease Pencil Onion Skinning is per-layer and the visibility can be toggled in the layer list. Onion skinning is a way of displaying many scenes of an animation simultaneously, with each frame slightly transparent and placed on top of the others. This technique enables animators to use the previous and next frames as reference points for the current frame they are working on. This allows them to make sure that the character’s movement remains consistent across all frames.
Onion skinning allows animators to create smoother animations by showing how their characters move over time. Without this approach, it would be difficult to achieve smooth transitions between poses. Animators would have to rely primarily on memory or guessing to draw each frame.
Onion skinning is an extremely important method for animators who want to create smooth, consistent motions. It allows users to see how their characters move over time and ensures that their movements remain consistent throughout all frames. Whether using 2D or 3D animation software, onion skinning is a necessary tool for all animators.
Why is it called onion skinning?
The name ‘onion skinning’ derives from comparisons between the editing technique and a vegetable. Similar to how an onion has many translucent layers of skin, animation frames are generated on semi-transparent sheets known as cels.
This led Disney animators in the 1920s to refer to them as ‘onion skins,’ and layering them on top of one another, similar to the layers of an onion, became known as ‘onion skinning.
The Importance of Onion Skinning

Image Source: Toon Boom
Onion skinning is a valuable feature in animation software like Blender as it allows animators to see multiple frames of an animation simultaneously. This feature helps them to maintain consistency in the movements and positioning of characters or objects throughout the animation sequence. By being able to see preceding and succeeding frames overlaying the current frame, animators can ensure smooth transitions and fluid motion. It also helps in identifying any inconsistencies or errors in the animation, making the overall process more efficient and improving the quality of the final output.
Why is onion skinning used in animation?
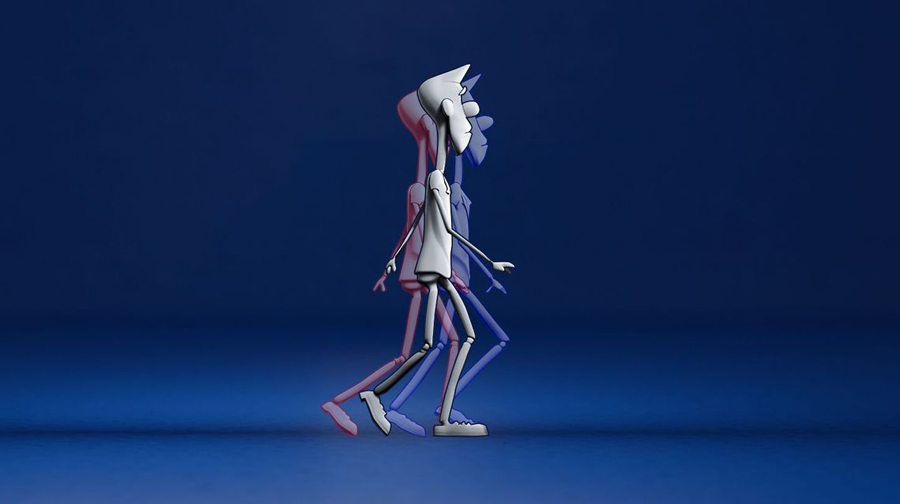
Onion Skinning (Image Source: Videobolt)
Traditional animations consist of multiple unique sketches, each with little changes, that are shown in quick succession. For those watching, the sketches appear as one continuous moving image.
To achieve the effect, each image must be replaced with the next while your brain and eyes retain the previous one. Because the eye sees the old image for a fraction of a second as the new image appears there is a sense of movement or flow between the two images or frames1. When this process is performed across many animation frames, it leads to a moving image.
If the angles and shape of the drawing in one frame differ too much from the following one, the sense of fluid movement between the two is lost. Onion skinning allowed animators to be extremely precise when arranging the outlines of their characters and scenes. By placing the next image on top of the previous one, they were able to see through the semi-transparent material and decide where the lines should be created to simulate natural movement. With a view like this, the artists can readily identify and fix errors. Onion skin animation is consequently essential for creating smooth, flowing animations.
Conclusion
In Blender, onion skinning is a feature that allows animators to overlay multiple frames in the 3D viewport to assist with frame-by-frame animation. By displaying the previous and next frames as semi-transparent overlays, animators can more easily visualize the movement and make adjustments to ensure smooth motion. This feature is especially helpful for animators working on complex animations that require careful attention to detail and fluidity. Utilizing onion skinning in Blender can significantly streamline the animation process and improve the overall quality of the final animation.
How to use Onion Skinning in Blender with iRender Farm?
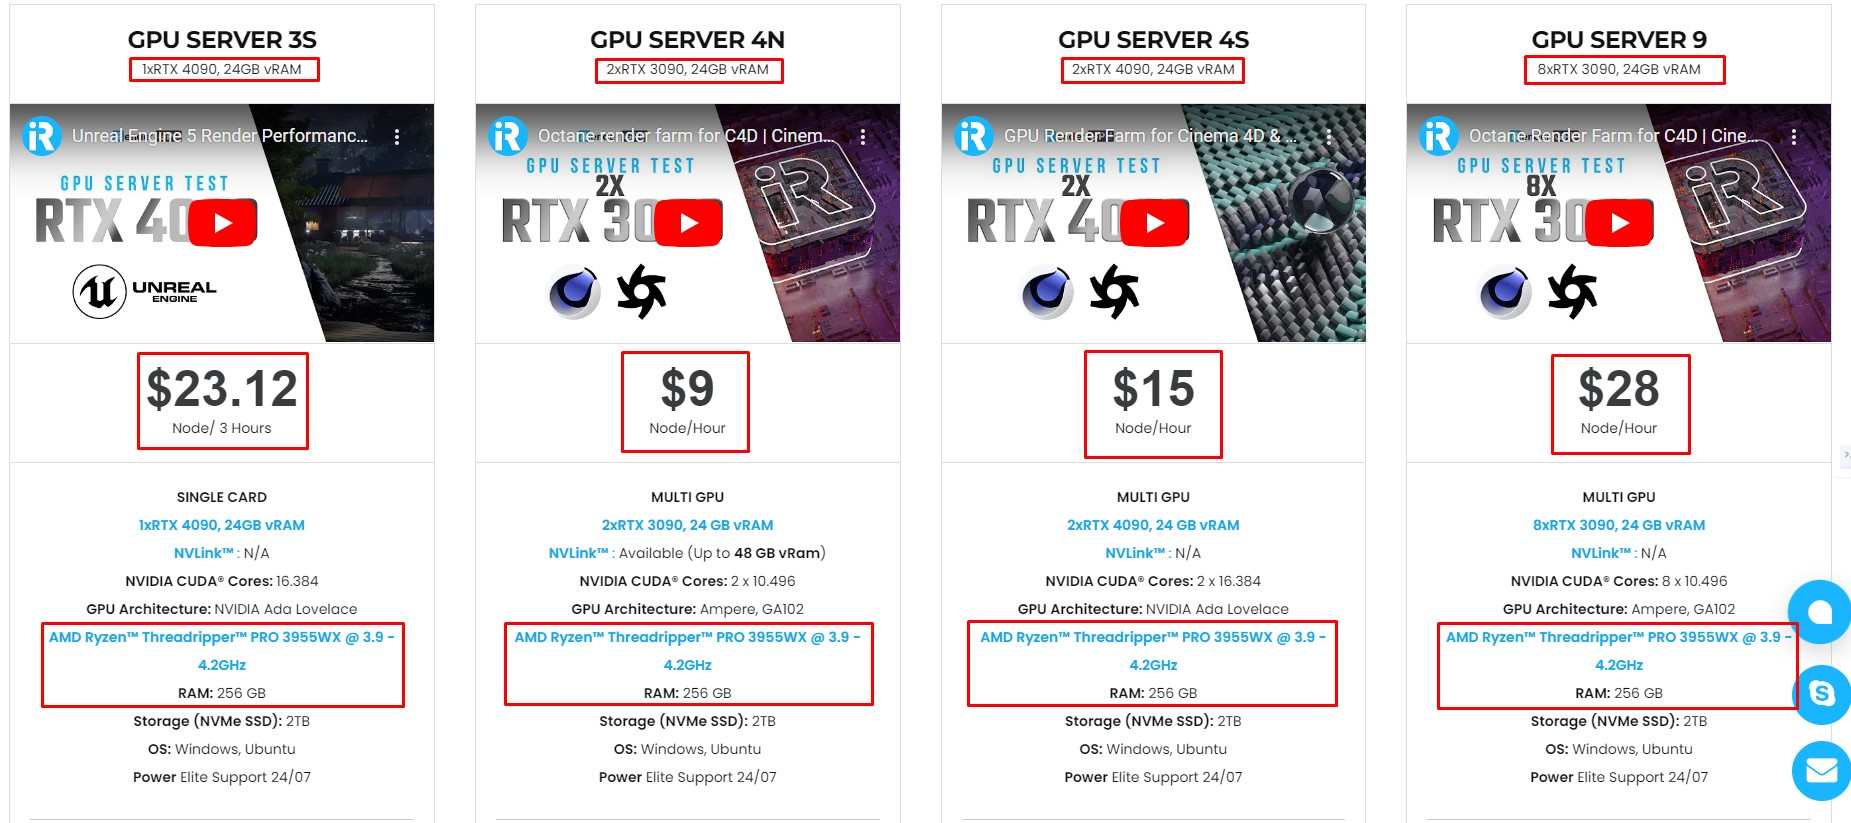
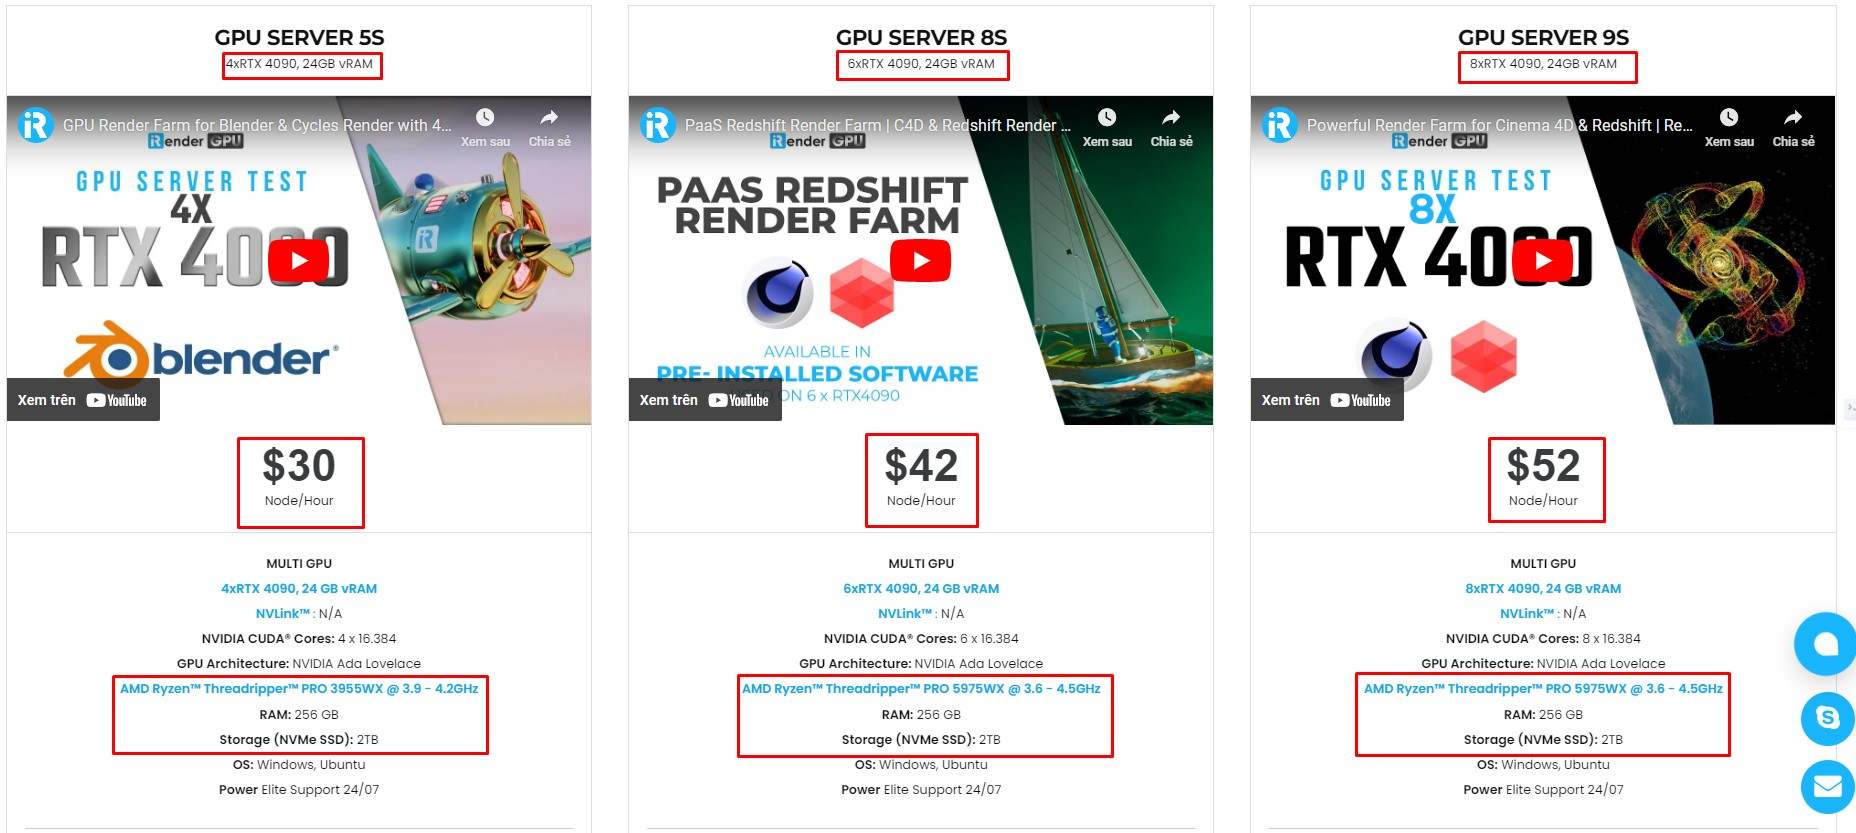
First of all, iRender – the best cloud rendering service, provides high-configuration servers that increase CPU and GPU rendering speeds. We support all software currently. Our iRender GPU Render Farm offers from 1/2/4/6/8 RTX 4090s and 8 RTX 3090 servers. All servers at iRender are also equipped with AMD Ryzen™ Threadripper™ PRO 3955WX @ 3.9 – 4.2GHz or AMD Ryzen™ Threadripper™ PRO 5975WX @ 3.6 – 4.5GHz, 256GB RAM, 2TB Storage NVMe SSD.
iRender has an easy workflow with pre-installed Blender 4.2 LTS.
You can choose the server which suitable for your project, we have various options here:
Let’s check out video test on rendering Blender was made by iRender Team:


Besides, we also have flexible prices for all small to big projects. You can check out this video to estimate the cost with us:

Enjoy our new beast and boost your multiple GPUs rendering now! If you have any comments about our article, please do not hesitate to reach us at [email protected] or Whatsapp: +(84) 916017116.
iRender – Happy Rendering!
Related Posts
The latest creative news from Blender Cloud Rendering, Redshift Cloud Rendering, Houdini Cloud Rendering , Octane Cloud Rendering, 3D VFX Plugins & Cloud Rendering.