Enable GPU Raytracing Collisions in Niagara in Unreal Engine
In Unreal Engine, the Niagara VFX System is the primary tool for creating visual effects (VFX). It provides a powerful collision system that allows particles to interact with geometry. By allowing precise control over how particles interact with surfaces and objects, the collision system plays an important role in creating dynamic and visually appealing effects in games or simulations. Furthermore, offloading collision calculations to the GPU makes complex collisions more realistic.
In this article, let’s join iRender to explore how to enable GPU Raytracing Collisions in Niagara in Unreal Engine.
Understanding of Collisions in Niagara
Collisions refer to the interactions and collisions between particles within a particle system. These collisions govern how particles react when they come into contact with each other or with other objects in the environment.
The Collisions module in Niagara allows developers to define and control the behavior of particle collisions, including aspects such as bounce, friction, and spatial interactions. By configuring collision parameters, developers can create visually engaging and physically realistic effects, such as sparks bouncing off surfaces, fluid simulations interacting with obstacles, or particles responding to external forces.
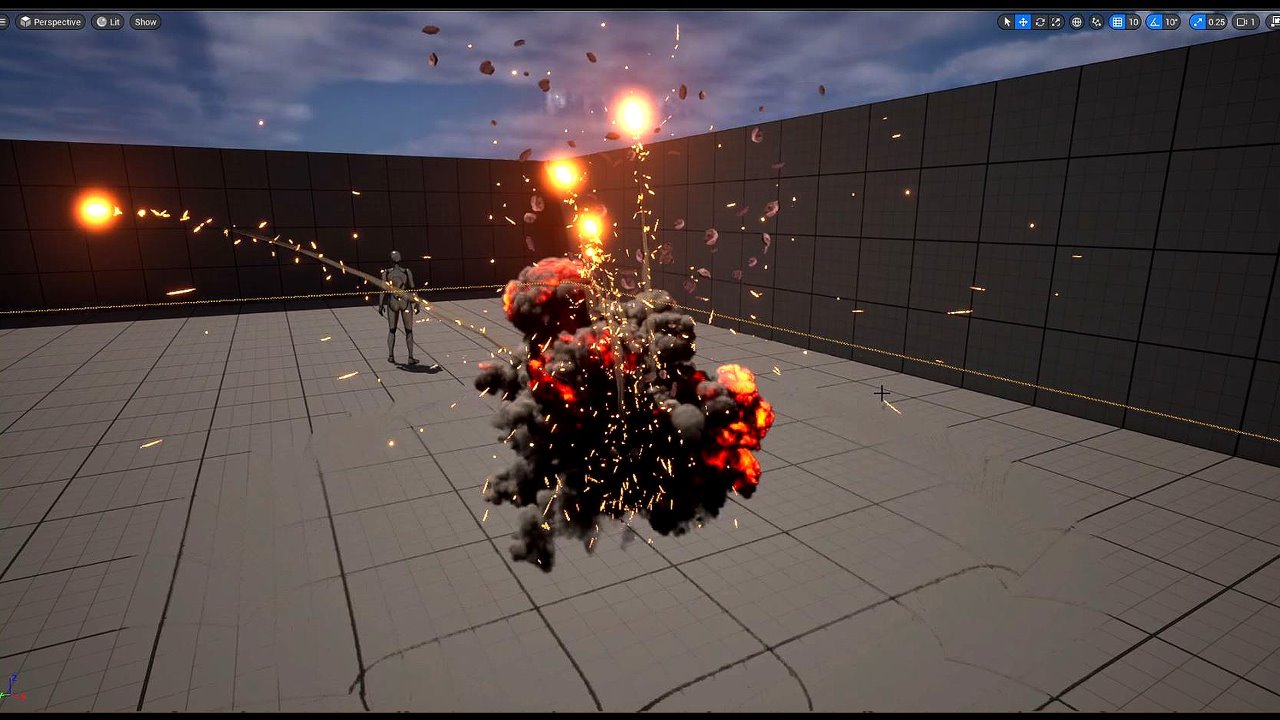
When enabling GPU ray tracing collisions in Niagara within Unreal Engine, developers can take advantage of the GPU’s processing power to handle these particle collisions efficiently, leading to more complex and detailed collision behaviors in their visual effects. This technology offers a significant leap forward in creating stunning and realistic visual experiences within Unreal Engine.
Enable GPU Raytracing Collisions in Niagara in Unreal Engine
In Unreal Engine, you can use the Collision module to set up a particle system to collide with objects on a level-by-level basis.
In previous versions of Unreal Engine, when using a GPU emitter, you had a few options in this module. Typically, most use the Depth Buffer option, which creates an environment simulation. This was a low-cost solution, but it was also low-fidelity. The shapes were not described accurately, and if a particle left the screen, it would disappear immediately.
Now, GPU Raytracing Collisions is an experimental option in the Collision module. Therefore, you can use hardware ray tracing on the GPU. Whether the emitter and its particles were on screen or hidden behind an object, the collision would use ray tracing to calculate a more accurate result.
Note: The computation is asynchronous, so Niagara collisions will be one frame slower.
1. Adjust Your Project Settings
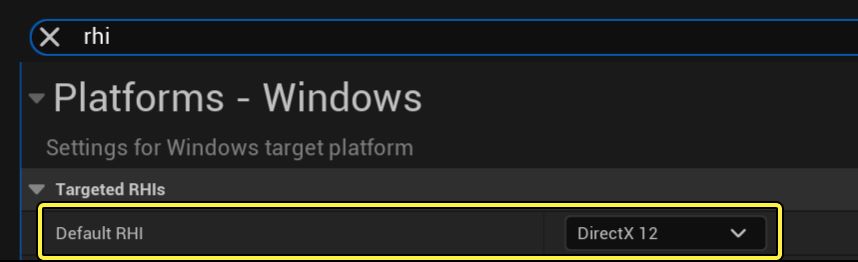
To use this feature, your project must be set to DirectX 12 and your GPU must have hardware ray tracing enabled. To enable these options, follow these instructions:
- Open Edit > Project Settings.
- Search for rhi.
- Set the Default RHI option to DirectX 12.
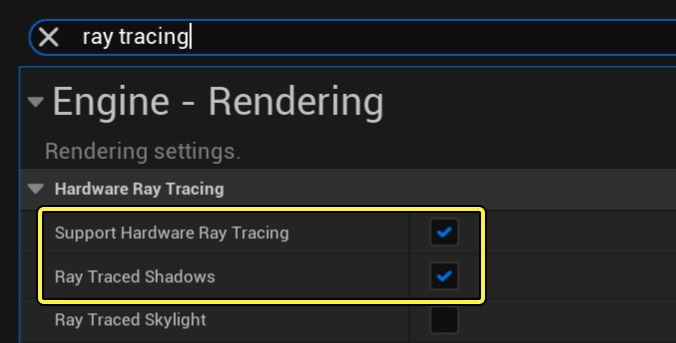
Next, enable ray tracing, also in your Project Settings.
- Search for ray tracing.
- Enable the options Support Hardware Ray Tracing and Ray Traced Shadows.
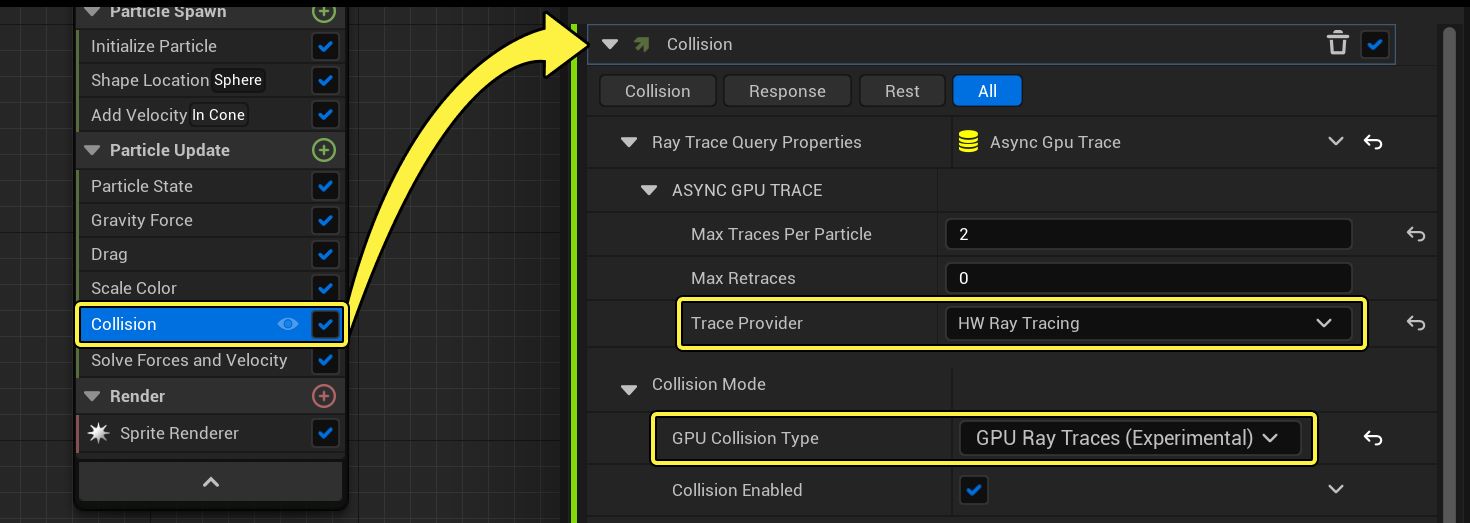
2. Set Up the Collision Module
In the Collision module, adjust the settings to use this experimental feature. Set GPU Collision Type to GPU Ray Traces (Experimental).
Note: By default, Trace Provider is set to Project Settings. However, you can also manually set it to HW Ray Tracing.
3. Set Up A Fallback (Optional)
You can set up a fallback in case ray tracing isn’t available. To do this, go to Edit > Project Settings.
In the Plugins > Niagara section of the settings, there’s a setting called Async Gpu Trace DI. It has an array set up with two options, HW Ray Tracing and Global Signed Distance Fields. When your options are set up like this, the system will try to use ray tracing first, but if ray tracing isn’t available, it will fall back to distance fields instead. These are the default settings.

You can add elements to the array or reorder it if needed. However, in most cases, the default settings will be sufficient.
Sum Up
By leveraging GPU ray-traced collisions in Niagara in Unreal Engine, developers can enhance the visual quality and realism of their projects. Whether creating dynamic particle effects, fluid simulations, or complex object interactions, GPU ray-traced collisions provide a powerful tool for achieving stunning visuals. Experiment with different settings, test your simulations and unleash the full potential of GPU-accelerated ray tracing in your Unreal Engine projects.
Get high-quality Unreal Engine rendering with iRender
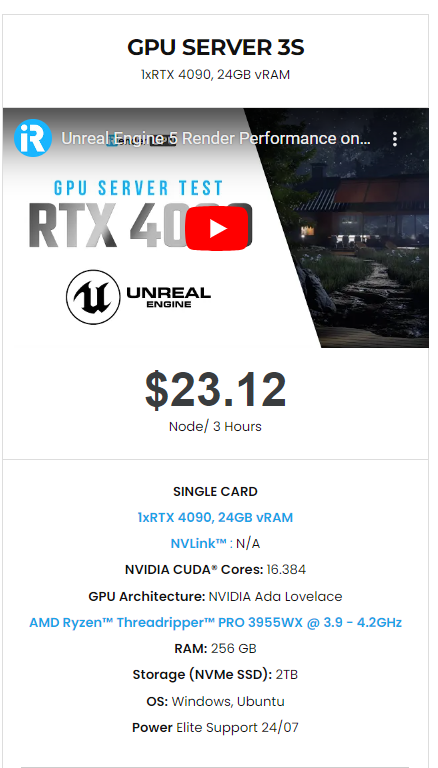
iRender – the best cloud rendering service, provides high-configuration servers that increase CPU and GPU rendering speeds. We offer the most powerful RTX 4090 configuration packages on the market, all equipped with AMD RyzenTM ThreadripperTM PRO 3955WX @ 3.9 – 4.2GHz and AMD Ryzen™ Threadripper™ PRO 5975WX @ 3.6 – 4.5GHz processors, 256GB RAM and 2T NVMe SSD hard drive capacity. With a wide range of GPU servers (1/2/4/6/8x) – RTX 4090, you can choose the server that suits your needs to start the rendering process.
With Unreal Engine, this 3S (1xRTX 4090) server is the best choice.
Simple Workflow
You just need to transfer your files, connect to the remote machine, and install Unreal Engine, as well as the necessary render engine and plugins with licenses. Then you can render yourself like the way you do on your local PC. Setting up ONCE and your working environment will be saved and ready to use at any time.

Why choose iRender?
Transferring data may cost time and money on the remote server. However at iRender, you can upload and download your files without booting the server, then you can save a lot of money.
We have an iRender GPU app for Windows PC which integrates all features and is easy to use, and an iRender Drive app for MacOS users to transfer data only. Moreover, there are many reasons why this is the best render farm for your project.
- 100% Software Support: We support all 3D software, their plugins, and render engines.
- Full Control: Our service will give you full control over the servers you rent. Therefore, you are free to create your own working environment.
- Go Green: We are committed to using 100% solar renewable energy towards environmental sustainability.
- Real-human 24/7 Support: Our professional support agents and technicians guarantee to bring you the best rendering experience.
Let’s see Unreal Engine’s performance on our server

If you still wonder if this is the right place for your project, REGISTER NOW to get a trial and receive a 100% bonus promotion for your first transaction within 24 hours of registration with us.

For more detailed information, please contact us via Live chat 24/7 or WhatsApp: +(84) 962868890 or Email: [email protected]
iRender – Happy Rendering!
Images and References: unrealengine.com
Related Posts
The latest creative news from Unreal Engine Cloud rendering.