Facial Rigging with shape keys with Blender
Facial rigging is an essential step in 3D character animation, allowing animators to create realistic expressions and movements. One of the most effective methods for facial rigging in Blender is using shape keys. Shape keys provide a straightforward way to deform a mesh by interpolating between different predefined positions, making them particularly useful for facial expressions and lip-syncing.
In this article, iRender will explore the process of facial rigging with shape keys in Blender, its advantages, and best practices for achieving natural and expressive results.
Understanding Shape Keys in Blender

Image Source: Blender Studio
Shape Keys in Blender are a feature that enables artists to create and manage different deformations of a 3D mesh object by storing various vertex configurations. In Blender, shape keys are created by storing a base shape (the default state of the mesh) and modifying specific vertices to form additional shapes. These alternate shapes, called key shapes, can be blended together to produce complex facial expressions. This tool is particularly valuable for character rigging, enabling detailed animations through keyframing and mixing multiple Shape Keys for complex effects.
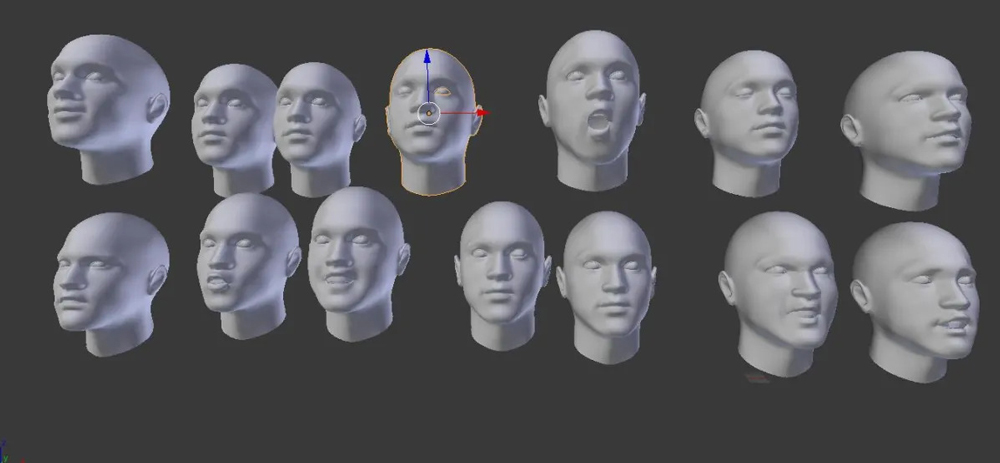
Creating Shape Keys for Facial Rigging
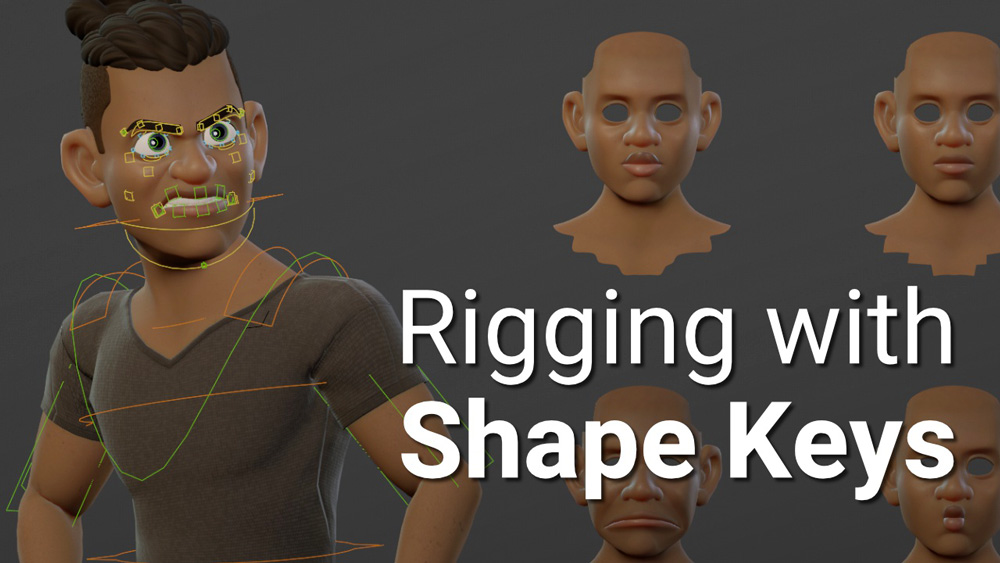
Image Source: Blender Studio
Creating shape keys is duplicating the face mesh and creating designed deformations on this.
Prepare the Mesh: Ensure the character’s face is properly modeled with adequate topology for smooth deformations. Edge loops should follow the natural flow of facial muscles.
Add a Basis Shape Key: In the Object Data Properties panel, navigate to the Shape Keys section and create a “Basis” shape key. This serves as the default state of the mesh.
Create Additional Shape Keys: Add new shape keys and modify the vertices using Blender’s sculpting or edit tools. Common shape keys for facial animation include:
- Blinking (Upper and Lower Eyelids)
- Eyebrow Movements (Raising and Furrowing)
- Mouth Shapes for Speech (Visemes like “O”, “M”, “F”, “E”, etc.)
- Smiles, Frowns, and Other Expressions
Animate Using Shape Keys: Adjust shape key values in the Dope Sheet or Timeline by setting keyframes. This allows for smooth transitions between expressions.
Advantages of Using Shape Keys
One of the primary advantages of using shape keys is the ability to create complex deformations and facial expressions efficiently. By defining different shapes for a 3D mesh, artists can easily transition from one expression to another, allowing for subtle nuances in emotions. This is particularly valuable in character animation, where conveying the right expression is crucial to storytelling. Shape keys enable animators to achieve a high level of detail and realism without needing to rig a character extensively, saving time and effort in the animation pipeline.
Another significant benefit is the non-destructive nature of shape keys. Artists can adjust the influence of each shape key independently without altering the original mesh, allowing for a flexible and iterative workflow.
Using shape keys also promotes an efficient workflow. Instead of creating new versions of a model for each different pose or expression, animators can simply adjust the shape keys. This not only saves time but also reduces the resources needed for 3D production.
Moreover, shape keys offer non-destructive editing capabilities, enabling artists to experiment with different looks without permanently altering the base mesh. This is particularly useful in collaborative projects, where multiple team members may be working on a single character.
Disadvantages of Using Shape Keys
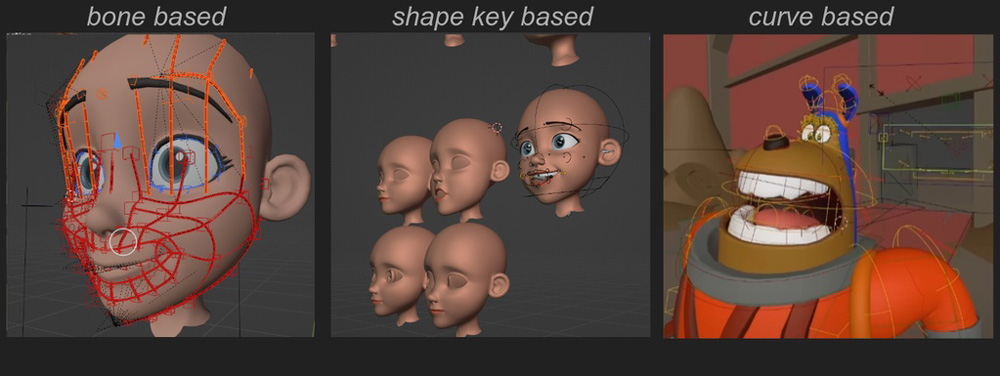
Image Source: Blender Studio
While shape keys are a powerful feature for 3D modeling and animation, they also come with certain disadvantages that artists and animators must consider. One of the primary drawbacks is the increased complexity in managing multiple shape keys. As the number of shape keys grows, it can become challenging to keep track of them and ensure that they blend properly with one another. This complexity can lead to confusion, especially in larger projects where numerous expressions or states need to be controlled. Additionally, if the shape keys are not organized well, it may hinder the workflow and slow down the animation process, rather than streamline it.
Another disadvantage is that shape keys can consume more memory and computational resources, particularly when used extensively on high-polygon models. Each shape key introduces additional data that the 3D software must handle, which can lead to performance issues, especially on less powerful machines. As a result, animators may experience slower playback and rendering times, making evaluating animations in real time cumbersome.
Another consideration is that shape keys can limit the adaptability of a character if the design evolves during the production process. If changes are made to the base mesh, it may necessitate the recreation or modification of existing shape keys to maintain consistency in animation. This can be time-consuming.
Best Practices for Facial Rigging with Shape Keys
To maximize the effectiveness of shape keys in facial rigging, follow these best practices:
- Use a Consistent Naming Convention – Label shape keys clearly (e.g., ‘Blink_Left’, ‘Smile’, ‘Mouth_Open’) for easier management.
- Optimize the Number of Shape Keys – Avoid excessive shape keys that may complicate animation; instead, use a balanced set covering primary expressions and phonemes.
- Combine Shape Keys with Other Techniques – Shape keys can be complemented with bones for jaw movement or physics-based simulations for secondary facial motion.
- Utilize Blender’s Action Constraints – This helps automate complex interactions between shape keys and rig components.
Conclusion
Facial rigging using shape keys in Blender is an efficient and intuitive method for achieving realistic expressions and speech animation. Shape keys offer an excellent alternative to traditional bone-based facial rigs by providing precise control over deformations while remaining computationally efficient. Whether for game development, animation, or digital art, mastering shape keys in Blender enhances an artist’s ability to bring characters to life with expressive and believable facial animations.
Creating Facial Rigging in Blender with iRender Farm
iRender provides high-configuration servers that increase CPU and GPU rendering speeds. Right now, we offer from 1/2/4/6/8 RTX 4090s and 8 RTX 3090 servers. All servers at iRender are also equipped with AMD Ryzen™ Threadripper™ PRO 3955WX @ 3.9 – 4.2GHz or AMD Ryzen™ Threadripper™ PRO 5975WX @ 3.6 – 4.5GHz, 256GB RAM, 2TB Storage NVMe SSD.
You can check all our servers with its configuration here:
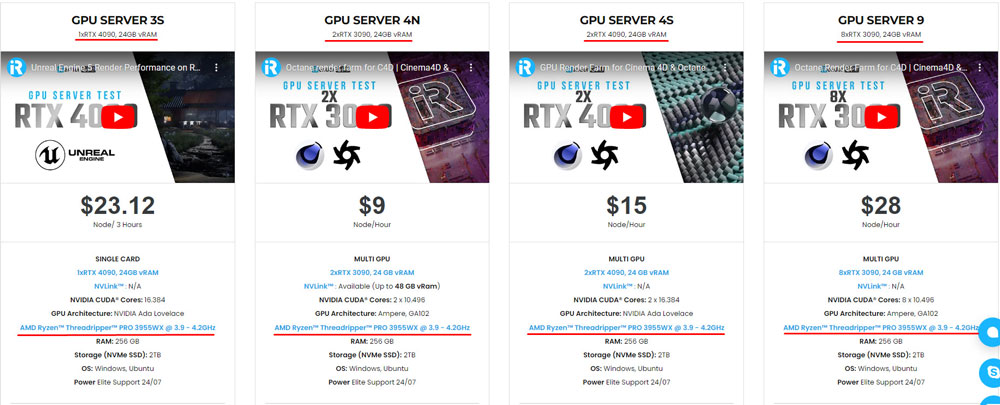

Besides, you also can watch some of our test videos on RTX 4090 card:


Besides, we also have flexible prices for all small to big projects. This month, we have a HOT DEAL like this:

Enjoy our high-end GPU now and boost your multiple GPUs rendering now! If you have any comments about our article, please do not hesitate to reach us at [email protected] or Whatsapp: +(84) 916017116.
iRender – Happy Rendering!
Related Posts
The latest creative news from Blender Cloud Rendering.