
Fixing Normals in Blender with iRender
When creating models, you will often encounter problems related to Normals and face orientation. These problems can be confusing when it comes to identifying them and how to resolve them. So what are normals and how to fix them in Blender?
Let’s deep dive into in today’s blog with iRender!
What are Normals in Blender?
Image Source: Blender Nation
In Blender, “normals” refer to the direction in which the face of a 3D model is pointing. Each face has a normal vector that is perpendicular to the face, indicating its orientation. Normals are crucial for rendering, shading, and lighting in 3D graphics.
Here are some key points about normals in Blender:
- Normal Vectors: Each face in a 3D model has a normal vector associated with it, which determines the direction the face is pointing.
- Shading and Rendering: Normals play a significant role in how the surface of a 3D model interacts with light, affecting the shading and rendering of the model.
- Surface Smoothness: Normals also influence the smoothness of the surface. Correct normal directions are essential for achieving smooth shading and accurate surface appearance.
- Editing Normals: In Blender, users can edit normals to control how the surface of a model responds to lighting and shading. This can be done to improve the visual quality of the 3D model.
Understanding and manipulating normals is crucial for achieving realistic and visually appealing 3D models in Blender.
In 3D rendering, normal refers to the direction in which geometry elements point. Normals exist for both faces and vertices in your model; for each face and vertex, a piece of Normal Data exists to tell the computer which direction it is facing, which influences how it is rendered. Apart from face Normals and vertex normals, there are also Split Normals.
Types of Normals in Blender
In Blender, there are primarily two types of normals that are commonly used:
- Face Normals: These normals are associated with the individual faces of a 3D model. They determine the direction in which each face is pointing. Face normals are crucial for rendering, shading, and calculating the lighting of the model.
- Vertex Normals: These normals are determined at each vertex of a 3D model, and calculated as the average of the adjacent face normals. Vertex normals play a significant role in achieving smooth shading and accurate surface appearance in 3D models. When the vertex normals are consistent across adjacent faces, it helps in creating smooth surfaces.
Understanding and controlling these types of normals is essential for manipulating the appearance and behavior of 3D models in Blender. They are vital for achieving realistic and visually appealing results in 3D rendering.
Identifying Incorrect Normals
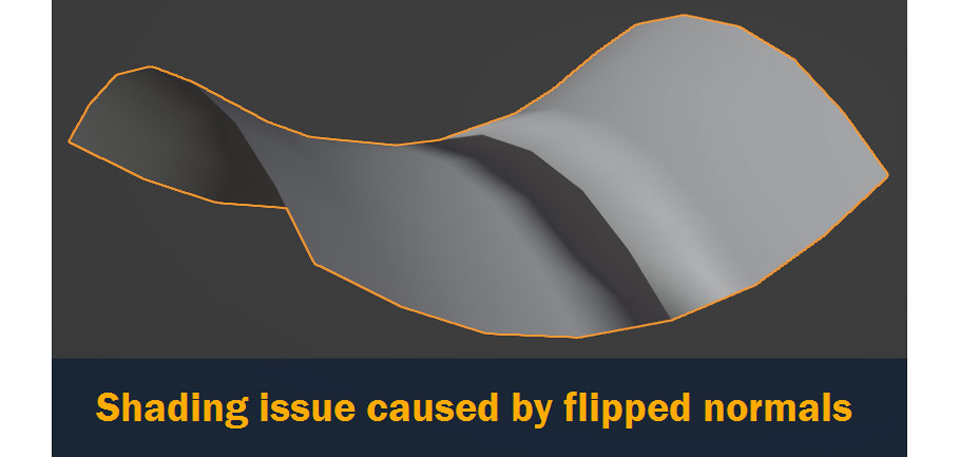
One major issue with normals in Blender is that they have been flipped or inverted. This might cause a variety of problems later on in the 3D workflow, but you’ll usually notice shading issues immediately away, such as the unwanted dark shadow in this screenshot:
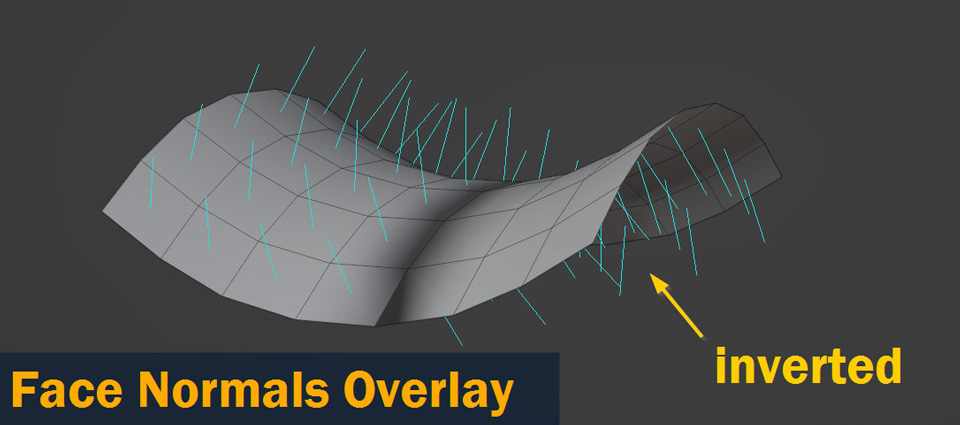
The inverted normal can also cause all sorts of strange problems with your modeling operations. If the blue lines on the faces are facing inward instead of outward, it means the normals on those faces are reversed. Then we just need to re-enable the Face Normals overlay on the face as shown above.
Enabling the Face Orientation overlay gives a better look at face orientation. To do this, select Face Orientation from the Overlays dropdown menu in the top right corner of the viewport.
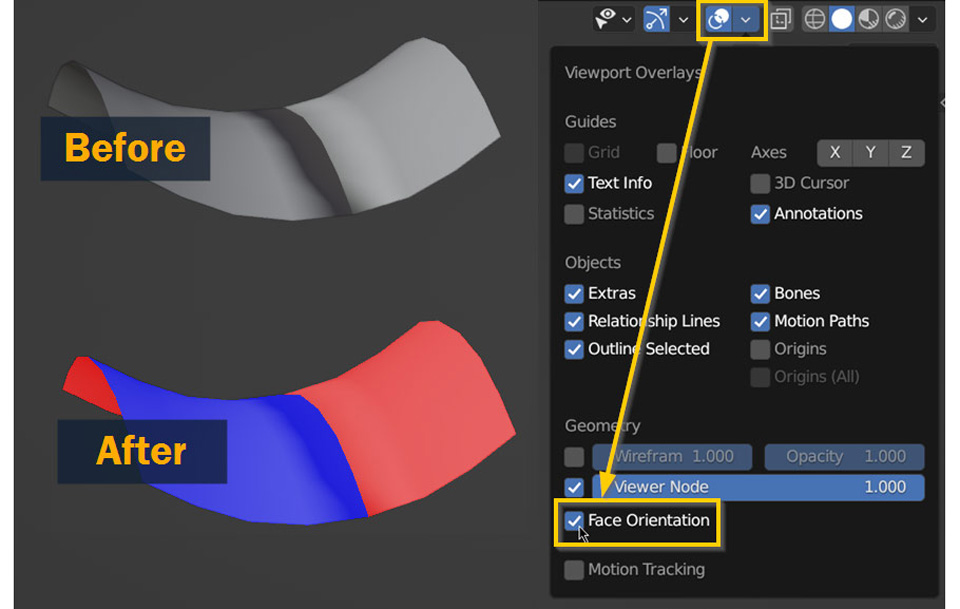
This feature is like the Face Normals overlay, instead of blue lines representing normal directions, it colors the faces as red and blue (the front of the face is Blue and the back is Red). This allows you to very quickly check the reverse faces on your model, you will just need to look for any outer faces showing red.
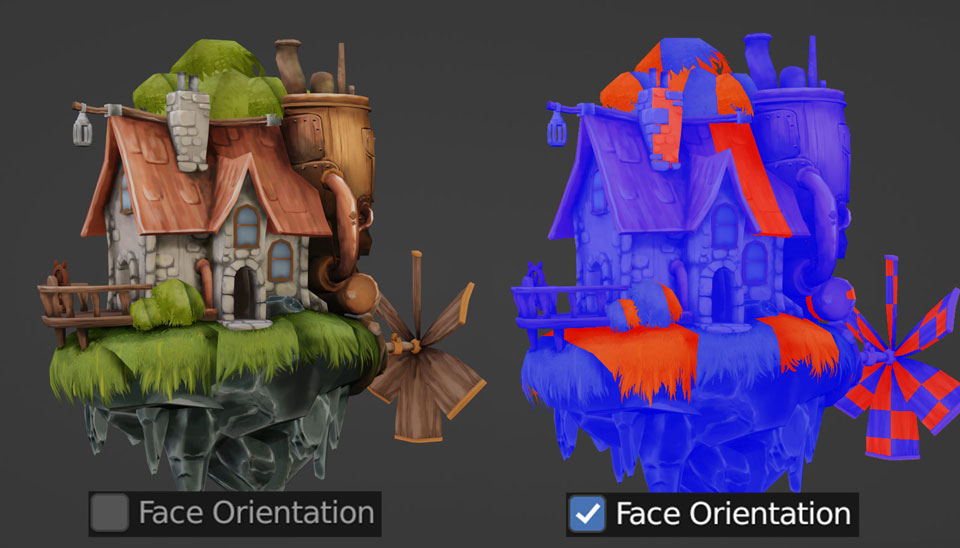
Looking at a slightly more complicated model, we see unusual black-shaded areas, as well as multiple inverted faces!
How to Recalculate Normals
To fix reversed normals, first, enter Edit Mode and select All. Next, use Alt/Option – N to access the Normals menu. Finally, choose Recalculate Outside. Blender will automatically fix the normals of all chosen faces.
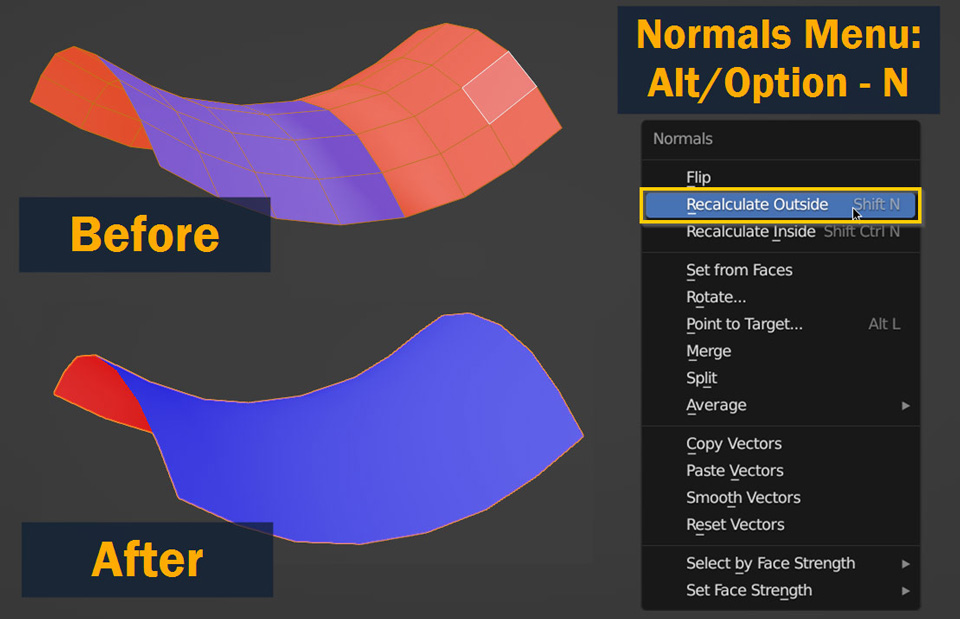
External recalculation can only guess which part of the model is supposed to be the external surface by taking into account how the model was created. For some models, such as recessed parts or room interiors, you will instead have to select Recalculate Interior, again using the Alt/Option – N keyboard shortcut.
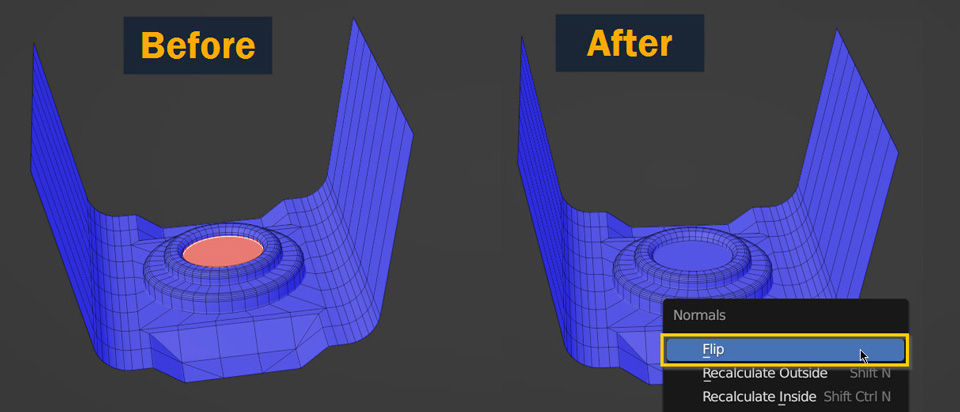
How to Flip Normals
To flip normals in Blender, you can follow these steps:
- Select the Object: Choose the object whose normals you want to flip by selecting it in Object mode.
- Enter Edit Mode: Switch to Edit mode by selecting the object and pressing Tab to enter Edit mode.
- Select Faces: Select the faces whose normals you want to flip. You can do this by right-clicking on the face(s) while holding down Shift to select multiple faces.
- Flip Normals: With the desired faces selected, press Shift + N to flip the normals of the selected faces. This action will reverse the direction of the normals for the chosen faces.
- Verify: After flipping the normals, you can verify the changes by checking the display of the normals in Blender or observing the shading and lighting on the model.
Some common problems with Normals
Auto Smooth/Recalculate Normals Not Working: To get rid of this baked-in normal data, go to Object Data Properties > Geometry Data and select Clear Custom Split Normals Data.This should reset any shading issues that were present.
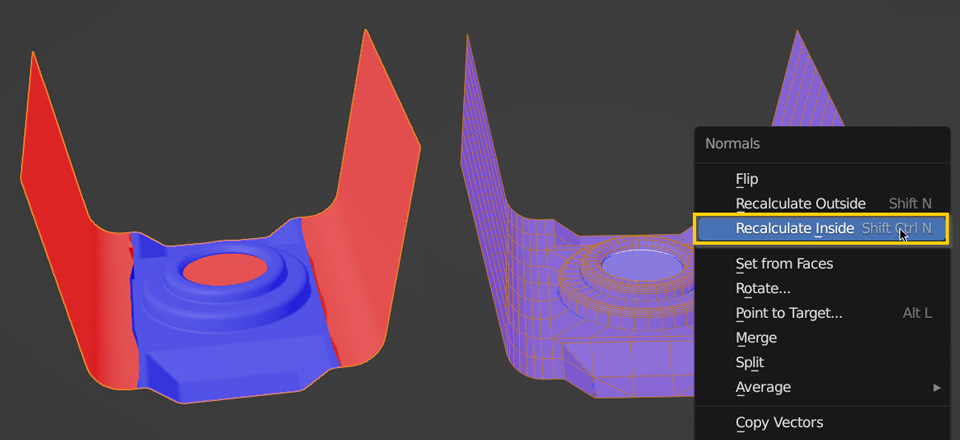
Blender Flips Faces the Wrong Direction: If Blender flips faces on your model in the wrong direction after choosing Alt/Option N and selecting Recalculate Outside, try Recalculate Inside instead; Blender may be unable to identify which side of your mesh is intended to be the outside. If this doesn’t fix the problem, try selecting the incorrect faces independently and pressing Flip.
Clearing Normal Data and Calculating Normals Not working: If you have tried recalculating the normals on your model without success, and Clear Custom Split Normals Data does not work. One method you can try is Merge by Distance; sometimes, due to modeling errors or even regular operations, you may end up with duplicate vertices sitting on top of each other, resulting in similar-looking shading effects. To remove these, click M to open the Merge menu and select By Distance. If Merge By Distance still does not work, check to see if any modifiers on your object are misbehaving; for example, Bevel modifiers can cause unexpected problems if the Amount is too high.
Conclusion
Hopefully, you now have a better idea of what normals are and how to deal with them. Even though normals in 3D are a complex topic, the issues they cause can usually be fixed pretty easily.
iRender - The Best Render Farm Provides RTX 4090 for Blender
GPU rendering is always the top choice for 3D artists. Because the rendering progress is fast, the results are realistic and the price is also reasonable. If you own an RTX 4090 card – the most powerful card line on the market today, your rendering speed will improve significantly. iRender is proud to provide a variety of servers from 1 to 8 RXT 4090/3090 cards – the most high-end cards. All servers at iRender are also equipped with AMD Ryzen™ Threadripper™ PRO 3955WX @ 3.9 – 4.2GHz or AMD Ryzen™ Threadripper™ PRO 5975WX @ 3.6 – 4.5GHz, 256GB RAM, 2TB Storage NVMe SSD. The high-end configuration is extremely suitable for complex Blender projects. Right now, we have pre-installed Blender 4.0 option when you create a machine, it means you won’t take time to install software.
Let’s see how our RTX4090 performs when rendering with Blender scenes:


The price is very flexible and suitable for Blender projects from small to large. Moreover, iRender always has a 24/7 online Support Team to help you handle problems immediately.
Right now, we have a promotion 100% bonus for the first transaction within 24h since your registration.
Check this video on how you can estimate the rendering cost for your projects with us.

Let’s create an ACCOUNT and try our render beast for your Blender projects. For further information, please do not hesitate to reach us at [email protected] or mobile/ WhatsApp: +(84) 916017116, Skype: Lina iRender.
iRender – Happy Rendering!
Reference source: Author Taliesin River from 3D models
Related Posts
The latest creative news from Blender Cloud Rendering.


