How to Create a Noise Output Override Node in Cinema 4D?
If you’ve ever worked with Maxon Noise Nodes in Cinema 4D, you may have encountered an annoying limitation. By default, inputs like contrast, brightness, high clip, low clip, or cycles will not accept variable values. Trying to plug in user data or another noise node often triggers the ‘This port needs a constant value’ warning. It can be frustrating when building complex node structures or trying to dynamically control noise parameters. In this tutorial, iRender will show you how to create a Noise Output Override node that allows variable input on all of these channels, bypassing the default restrictions. Let’s get started!
Why you need a Noise Output Override Node?
Maxon Noise is a procedural texture node in Cinema 4D’s Redshift renderer that generates high-quality, resolution-independent noise textures. It offers a variety of noise types and parameters, allowing artists to create organic textures, textures, and animation effects without the need for bitmap details.
The Maxon Noise Node is powerful, but it has strict limitations on the inputs that accept dynamic values. By default, only the seed and output sections are flexible. For example, if you try to control contrast with a user data node, it immediately turns red and displays the error ‘This port needs a constant value’.
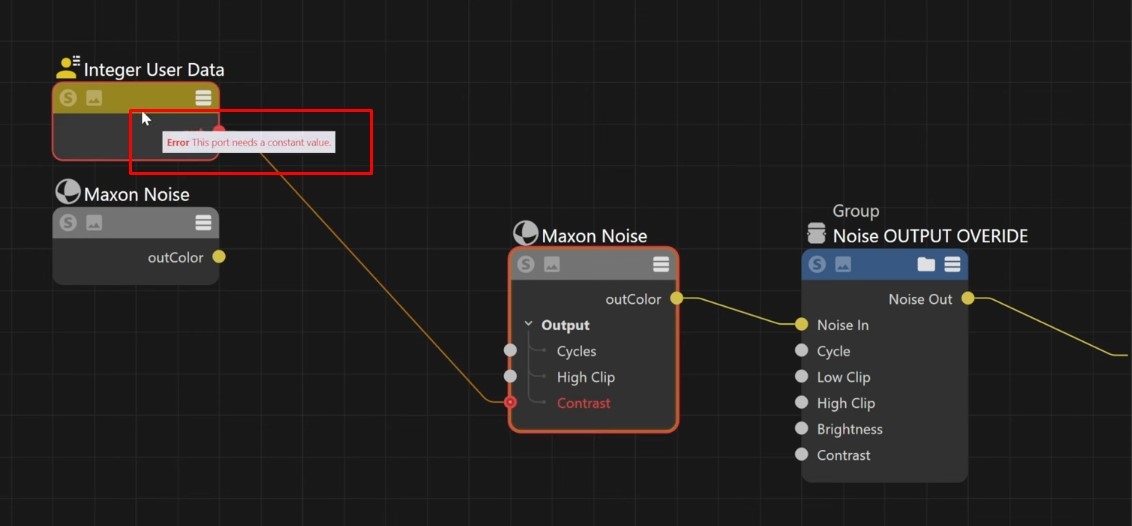
Without a workaround, you can’t properly integrate the Noise Node into procedural setups or animations that rely on dynamic input values. That’s where the Noise Output Override node comes in. This node mirrors all of the standard inputs of the Noise Node but allows you to use variables for each input:
- Contrast
- Brightness
- High Clip
- Low Clip
- Cycles
You can now combine multiple noise nodes, user data, or other variable sources without being restricted by constant values.
Step-by-step to create the Noise Output Override Node
Step 1: Create an Empty Group
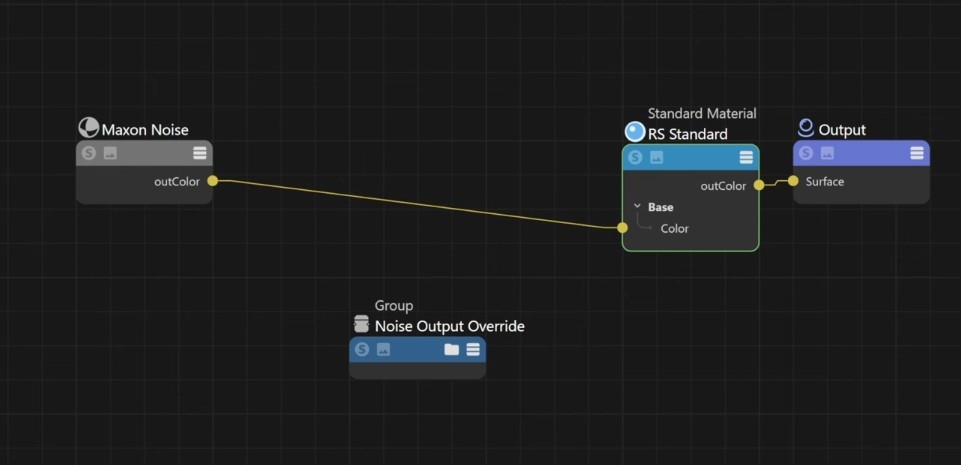
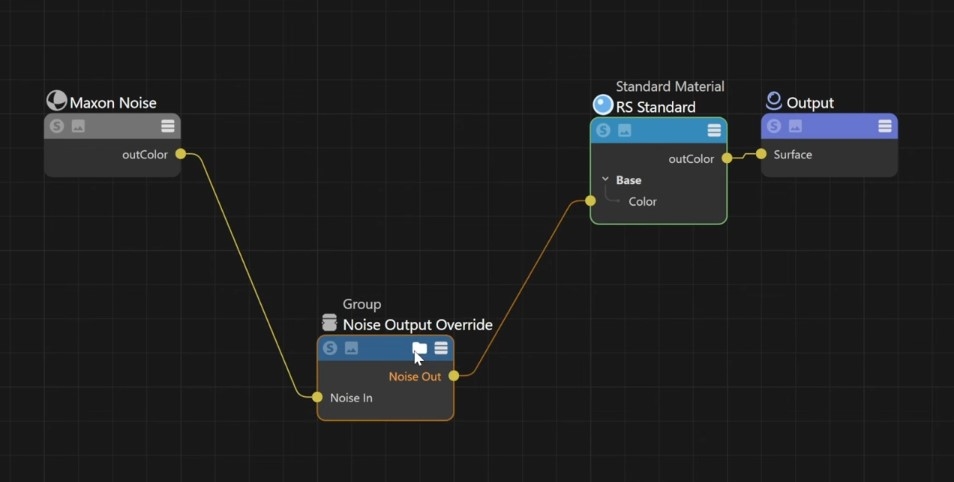
Here we have a simple material, and have plugged Maxon noise into the color channel. As explained, these channels do not allow variable inputs like noise or user data. So we will build an override node into these.
Right-click on the node editor and select Create Empty Group, name it Noise Output Override. You can assign a color to keep it organized visually.
Step 2: Add Input and Output Plugs
- Add an input plug named Noise In
- Add an output plug named Noise Out
These will connect the input noise and output the final result.
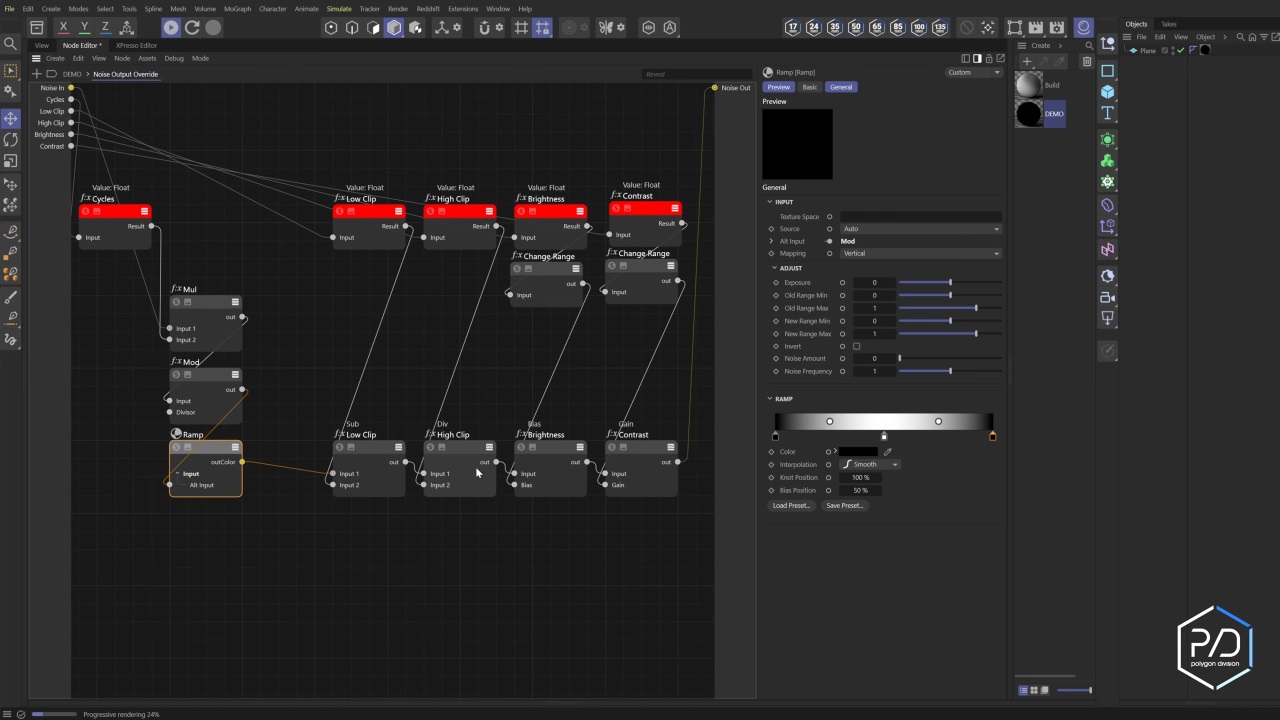
Step 3: Add Nodes for Each Parameter
Contrast
- Add a Gain node, then rename it to Contrast.
- Remap its range using Change Range from -1 to 1 to 0 to 1.
- Connect these nodes in a straight line so that they follow the flow from input to output.
Brightness
- Add a Bias node and name it Brightness.
- Place it before the Gain node so the brightness adjustments are applied first.
- Plug it into the chain.
High Clip/ Low Clip
- High Clip: use Divider Node to scale the value
- Low Clip: use Subtract Node to offset the value
So the way it works is High Clip is dividing, and Low Clip is subtracting. Plug these nodes into the chain appropriately so the adjustments are applied in the correct order.
Cycles
This part is a bit tricky, so if you don’t need it, you can skip it.
- Create a Modulo Loop for the cycle input using Multiply Node and Mode Node.
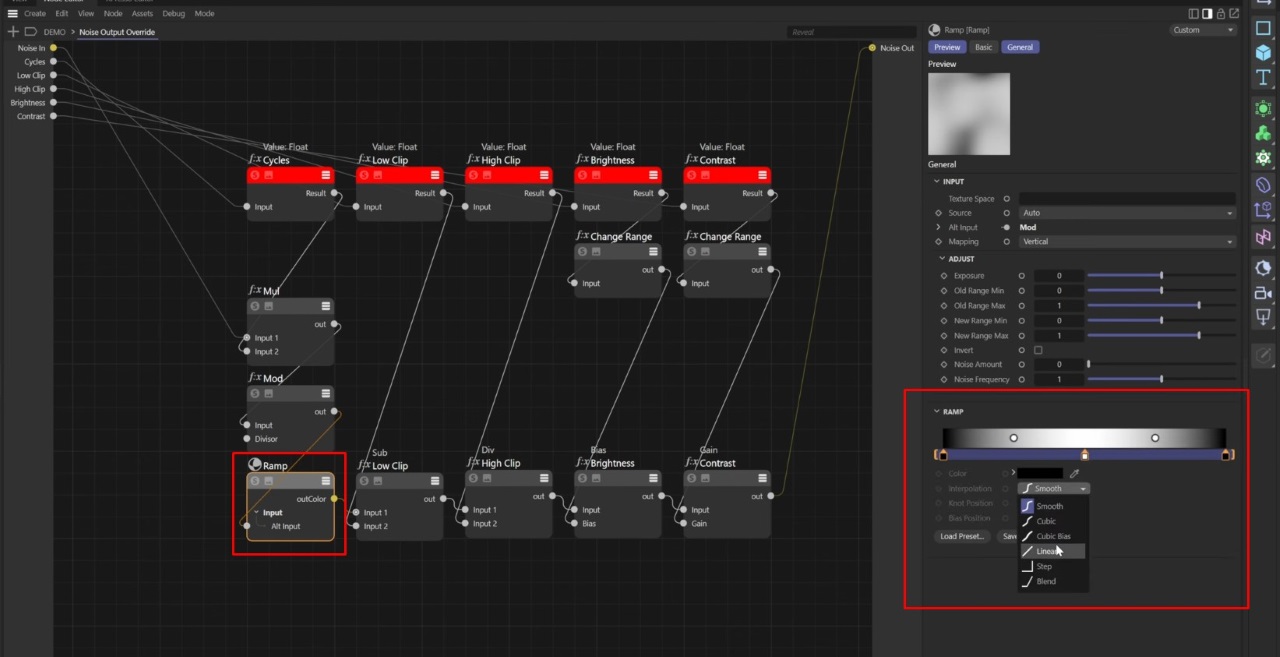
- Remap the value using Ramp Node to ensure a smooth loop and avoid banding.
- Connect the ramp at the end to the output.
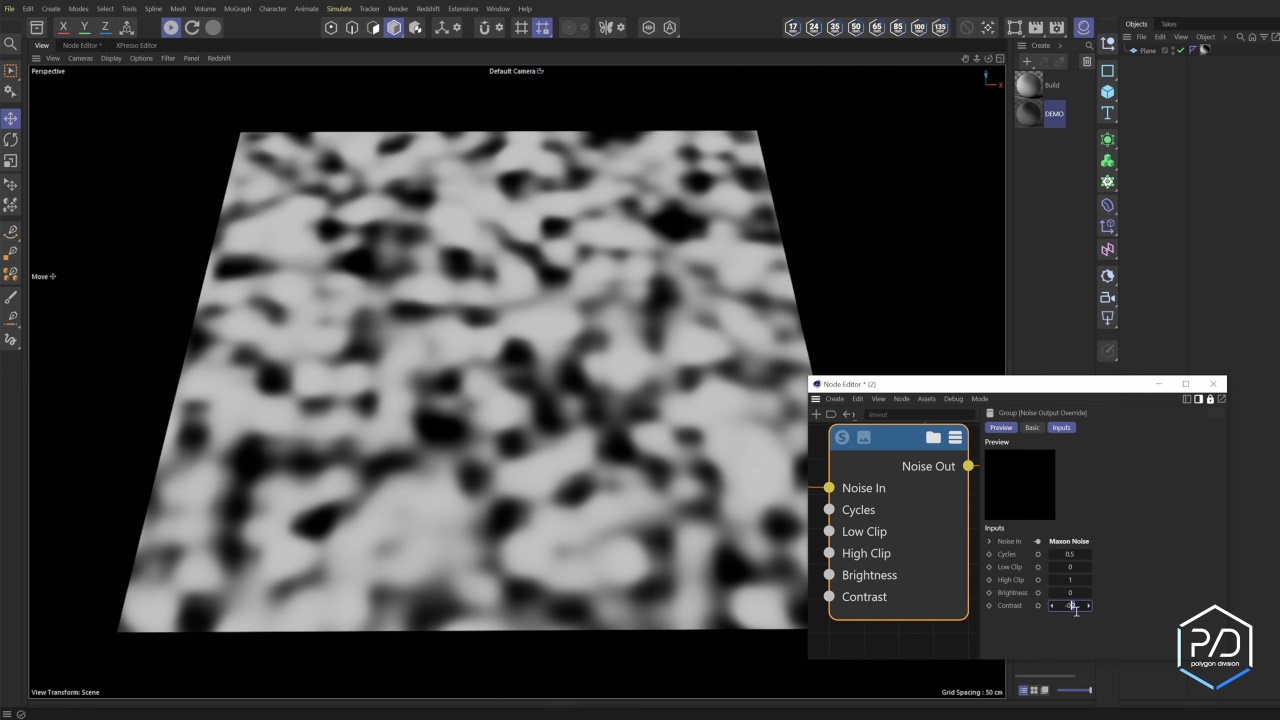
Step 4: Test Your Node
Once the node setup is complete, you can change the contrast, brightness, high clip, low clip, or cycles using user data or another noise node.
At this point, you should see the output update in real time without any errors. However, if you notice banding in the cycles, adjust the slope to linear interpolation to smooth out the results.
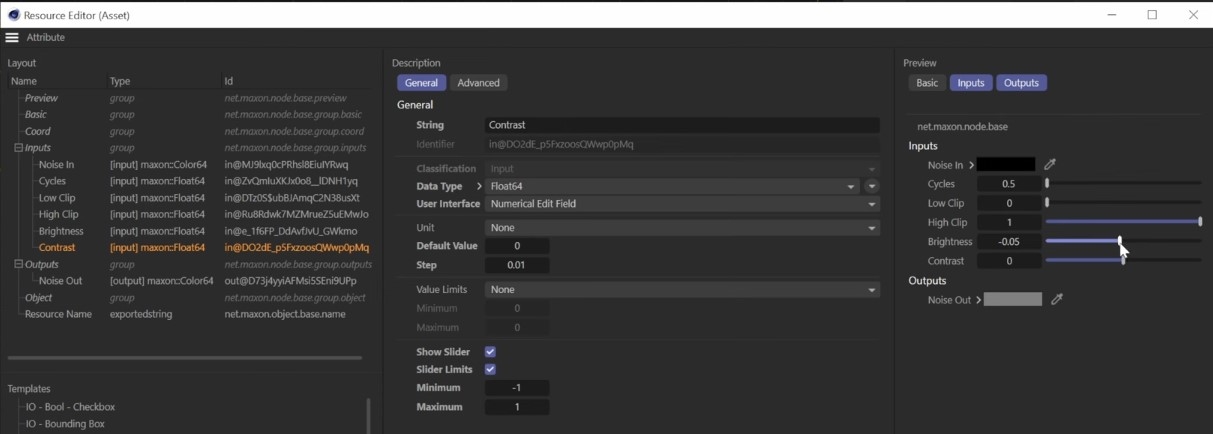
Step 5: Adjust UI Sliders
With so many nodes on the UI, you will want to clean it up for better visibility and control.
Right-click and select Edit Resources. With this scary dialog box, we will set default values, min/max limits, and step sizes for all sliders.
- Contrast: min -1, max 1, step 0.1
- Brightness: min -1, max 1, step 0.1
- High Clip: min 0, max 1, step 0.1
- Low Clip: min 0, max 1, step 0.1
- Cycles: min 0, max 5, step 0.1
So we have a controller that ensures consistent control when working on different projects.
Tips for best practices
Now you might notice a problem here. If we take this noise and plug it directly into the color input node and swap between that node and the override node, we get some noise. So let’s go ahead and fix that.
To fix this, we’ll select the ramp and select each of these nodes. Hold down the Shift key and select all three nodes, and we’ll switch to Linear mode. And that should fix the contrast issue we’re having.
The Noise Output Override node isn’t just limited to procedural noise processing. It can also act as a simple black and white correction node:
- Adjust brightness to lighten or darken.
- Adjust contrast to fine-tune midtones.
- Use high/low cut to trim off excessively bright or dark areas.
Here’s a simple way to correct a grayscale image directly in your node setup.
Also, when building the node, make sure the order of the parameters is: Brightness > Contrast > High/Low Clip > Cycles. You can also skip Cycles if you don’t need looping, and remove the modulo loop to simplify the node. Don’t forget to copy your node and convert it to an asset to reuse it in another project. Last but not least, always check the gradient interpolation to prevent banding in periodic noise samples.
FAQ Section
1. What is a Noise Output Override Node in Cinema 4D?
A custom node group that allows dynamic input for noise parameters like contrast, brightness, high clip, low clip, and cycles, bypassing Cinema 4D’s constant-value restrictions.
2. Why does Maxon Noise show the “This port needs a constant value” error?
Because Cinema 4D restricts noise parameters to constant values by default. Variable inputs require an override node.
3. Can a Noise Output Override Node be reused?
Yes, you can convert it to an Asset and use it across multiple projects.
4. Does this method work with Redshift?
Yes. Maxon Noise and the override node work fully inside Redshift materials.
Final Thoughts
Building a Noise Output Override Node is a simple yet powerful upgrade for anyone working with procedural systems in Cinema 4D. We hope you find this tutorial useful. Try it out and let us know how it goes.
If you want to experiment with these settings on high-performance hardware, check out iRender for fast, GPU-powered rendering.
Boost up Cinema 4D rendering with iRender render farm
iRender is the best render farm for Cinema 4D. We support all popular 3D software and render engines, including Cinema 4D and all render engines or plugins needed. We provide you with access to high-performance GPUs, allowing you to render faster and more efficiently, eliminating the need to upgrade your own hardware. All servers are equipped with:
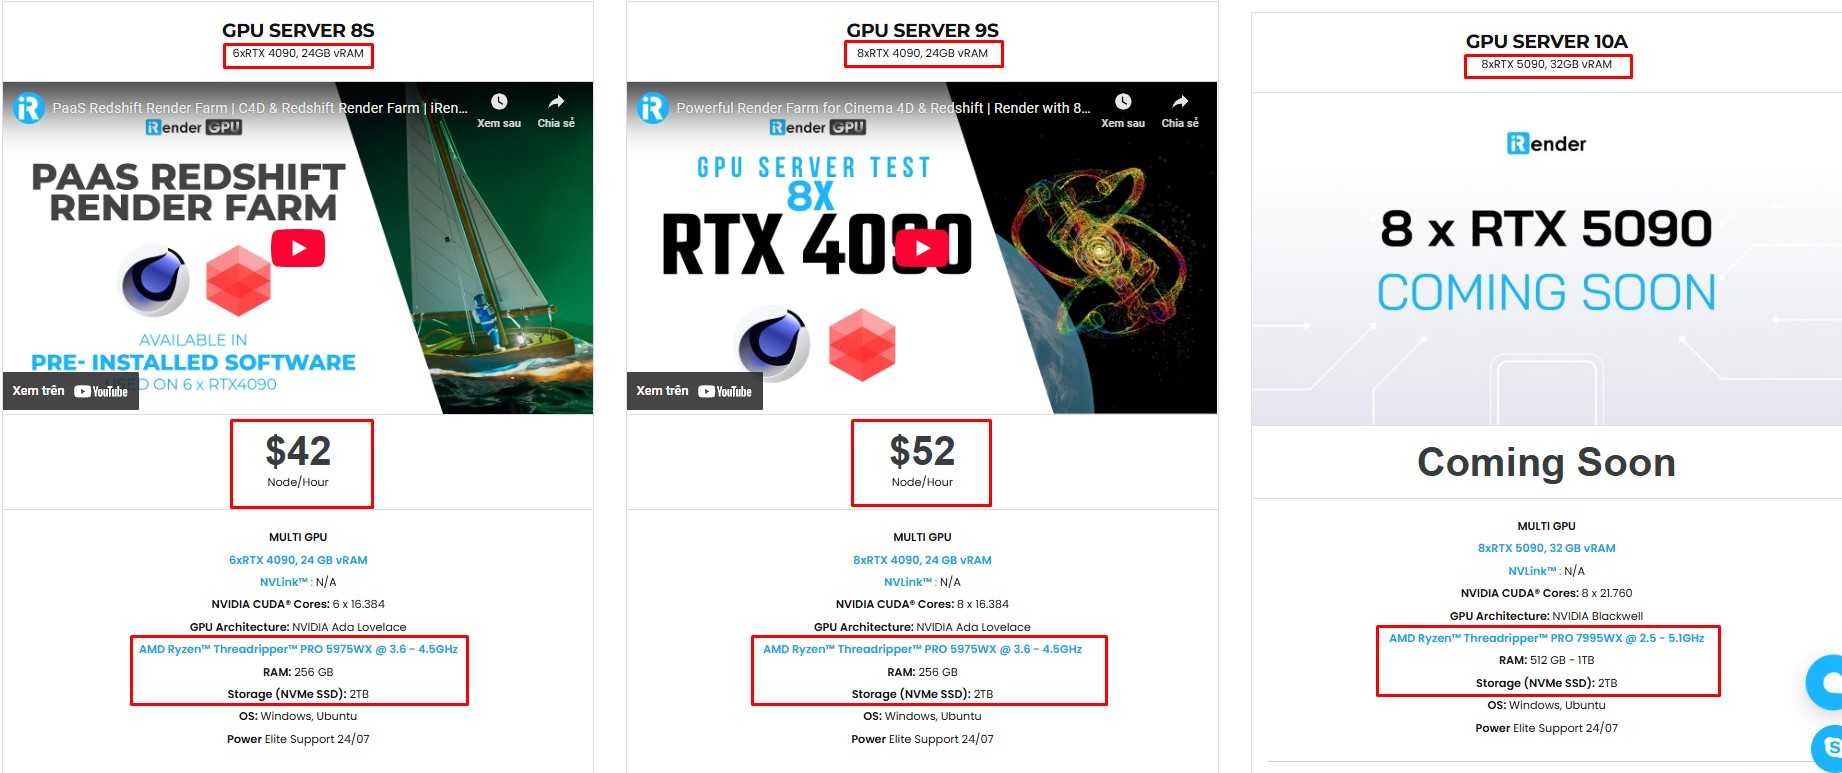
- AMD Ryzen™ Threadripper™ PRO 3955WX (3.9-4.2GHz) or
- AMD Ryzen™ Threadripper™ PRO 5975WX (3.6-4.5GHz)
- 1/2/4/6/8x – 4090
- 256GB RAM
- 2TB NVMe SSDs

Simple Your Workflow with Cinema 4D Preinstalled
Our servers have Cinema 4D and Redshift preinstalled. As an official partner of Maxon, each user can also use a combo C4D Redshift license for free from us. You just need to transfer your files, connect to the remote machine. Then you can render yourself like the way you do on your local PC. Setting up ONCE and your working environment will be saved and ready to use at any time.

Why choose iRender?
Unlike other services, iRender lets you upload and download files without starting the server, saving you both time and money. We offer a Desktop app for Windows with a full feature set and a simple Drive app for macOS for easy file transfers. Here’s why iRender is a top choice for your rendering needs:
- 100% Software Support: We support all 3D software, their plugins, and render engines.
- Full Control: Our service will give you full control over the servers you rent. Therefore, you are free to create your own working environment.
- Go Green: We are committed to using 100% solar renewable energy towards environmental sustainability.
- Real-human 24/7 Support: Our professional support agents and technicians guarantee to bring you the best rendering experience.
Let’s see our latest performance test for C4D on our servers, you’ll definitely see the difference!


If you still wonder if this is the right place for your project, REGISTER NOW to get a trial and receive a 100% bonus promotion for your first transaction with us.

For more detailed information, please contact us via Live chat 24/7 or WhatsApp: +(84) 912-785-500 or Email: [email protected]
iRender – Happy Rendering!
References: Polygon Division
Related Posts
The latest creative news from Cinema 4D Cloud Rendering , 3D VFX Plugins & Cloud Rendering.