How to illuminate HDRI in 3ds Max and Maxwell Render?
High Dynamic Range Imaging (HDRI) is a powerful tool for achieving realistic lighting effects in 3D scenes. When combined with advanced rendering engines like Maxwell Render in 3ds Max, HDRI can elevate the quality of your renders to breathtaking levels.
In this blog, iRender will delve into illuminating HDRI in 3ds Max and Maxwell Render and explore the steps to ensure stunning, lifelike results.
1. Prepare the Scene
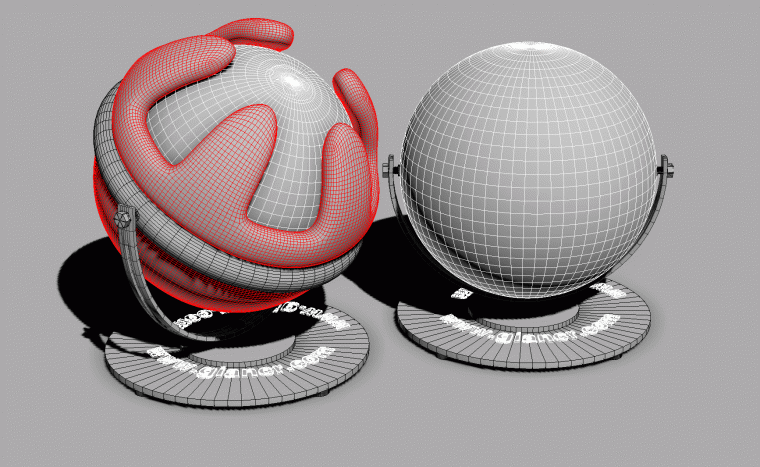
Before exploring HDRI lighting, you need to prepare a 3D scene. Actually, the scene is optional because, in 3ds Max, you only need to create a simple scene consisting of a geometry and a plane at the bottom of the geometry to see the shadows emitted by the HDRI. But it is better to have a complete, well-structured scene in 3ds Max.
2. Set the Render Engine - Maxwell Render
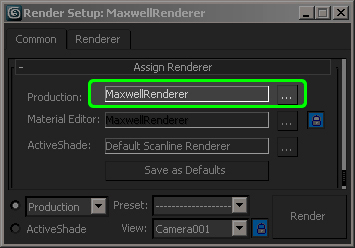
You need to set up 3ds Max to work with the Maxwell Render render engine by opening the Setup window (F10 or Rendering > Render Setup…) and attaching the common tab to the Maxwell render engine.
3. Deactivate Sky Type
In the Renderer > Environment Settings tab, disable Sky type to ensure there are no other lighting types other than HDR lighting. This doesn’t mean you can’t combine lighting, but for now, we only want HDR lighting.
4. Activate Image Based Environment
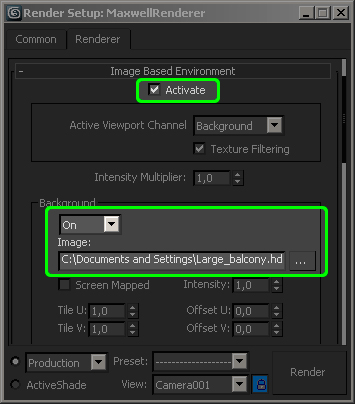
Under Image Based Environment, check Background and select Activate On. This setting will load in the HDRI Image field, causing the scene to automatically load the same HDR for lighting, reflections, and refractions. We’ll see how to control multiple HDRs separately later.
5. Setting Test
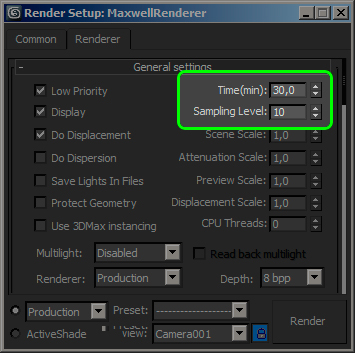
In General Settings, if you set 30 Time (min), you are saying that the render will take up to 30 minutes. In the Sampling Level section, 10 means performing 10 sampling levels (SL sampling level), which tells us how many interactions are going on in the lighting calculation to find the right solution.
Then, when the render starts, the engine will render up to one of the two values to complete even if one is missing.
6. Configure the Camera
The 3ds Max camera works great on Maxwell. Set the Target Distance to 55.25, this is important because in Maxwell the camera works like a real camera, creating an accurate depth of field with real life. This means that we will set the Target Distance to the focal point of your objects, but away from this point, they will fade out.
Below are the Maxwell Parameter controls for the camera, and we will set it to Manual Exposure Mode so we can have full control over the parameters.
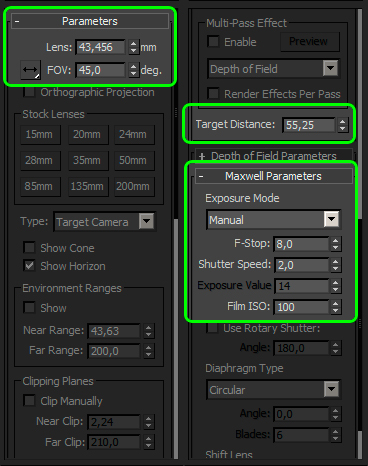
Here are some concepts you need to know to control the camera using Maxwell parameters, which are also applicable to professional cameras:
- Lens: Is the distance in millimeters from the optical center of the virtual camera lens to the focal point of the virtual lens mirror, or camera. Here, the Lens is 43.456 mm.
- F-Stop: Is the depth of field of the rendered image, set to 8.
- Shutter Speed: This parameter controls the shutter speed, i.e. the exposure when rendering, with a value of 2.
- Film ISO: The image in this parameter represents the sensitivity of the sensor, the chip sensor that falls where the light enters the lens and is responsible for capturing the photo. We set the value to 100.
7. First Render Test
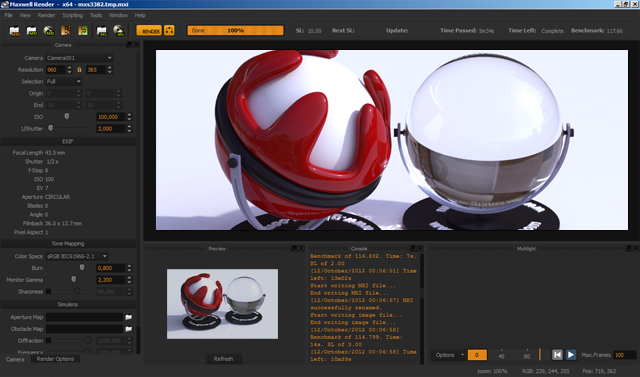
Now we can start rendering (Shift + Q or Rendering> Render), a new window (Maxwell Render) will open with many parameters because Maxwell Motor is not integrated into 3ds max. Rendering is complete when the top yellow bar reaches 100%. Here, we set the Sampling Level to 10.
8. Adjust Quality
Now, let’s focus on the final result. If Sampling Level 10 is not enough to get good quality, we can change it in Maxwell Render window at the bottom. Click on Render Options tab, which has Scene settings, and increase Sampling Level to 16, while keeping Time at 30 minutes.
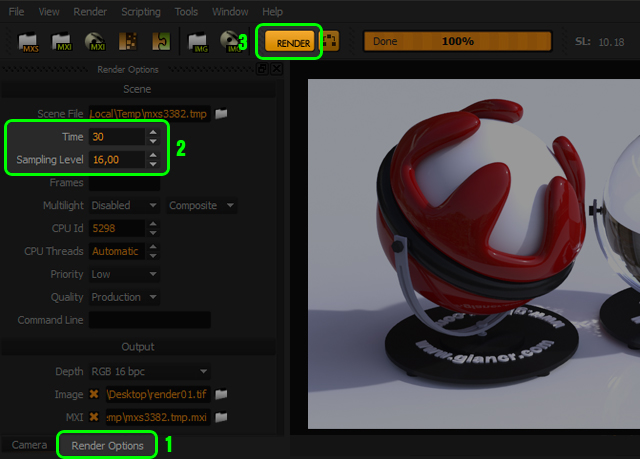
Select the yellow RENDER button and a window will appear giving you the option to start rendering from 0 (Start) or continue calculating where the render is finished (Continue). This is a big advantage of Maxwell, press Continue to save the time you had in the first test render. Now just wait and it’s done.
9. Final Render

Additional Notes
Here are some tips for better HDR handling.
-
Control different HDRs separately
In step 4 when you load HDR in Background > Image it will automatically load for Refraction, Reflection, and Illumination. Change this and load different resolutions for each HDR. This is important if you want more control over your scene because usually the same resolution of HDR is not used for everything. Usually for pixels in HDR, lower light, medium-high resolution for reflections, and ultra-high quality for backgrounds.
-
Change the direction of HDR
In the same window where you load HDR are the Offset U and Offset V options that change the direction of HDR. Where Offset U rotates the HDR horizontally and Offset V rotates it vertically, both values are in degrees in the range of 0° to 360º.
-
Change Settings from the Maxwell Render Window
One option with Maxwell as you saw in step 7 is that if you change the Resolution, Time, SL, and F-Stop measures, save the render from the same Maxwell Render window without having to go back to 3ds max.
But even better when doing render calculations, you can change the Shutter Speed and SL next time you visualize. And even when you are 100% done with the render, you can change the Shutter Speed and save. This saves a lot of time not having to render when you have to change the exposure.
-
Default Gamma 2.2
By default, Maxwell is installed and configured to save renders in Gamma 2.2. Check the Maxwell Render window, Camera tab, Tone Mapping drop-down, and Monitor Gamma option.
-
Image lacks depth of field
As mentioned before, Maxwell uses the camera as a real camera, so, inevitably, some objects will often be blurred due to the depth of field. To fix the blur, you should apply a technique called Stacking Focus (Stacking or Bracketing Focus method) which involves a series of renders varying the Target Distance and then merging those renders into a single render that shows the right side of each focus point.
Can I use iRender for 3ds Max and Maxwell rendering?
The answer is definitely YES.
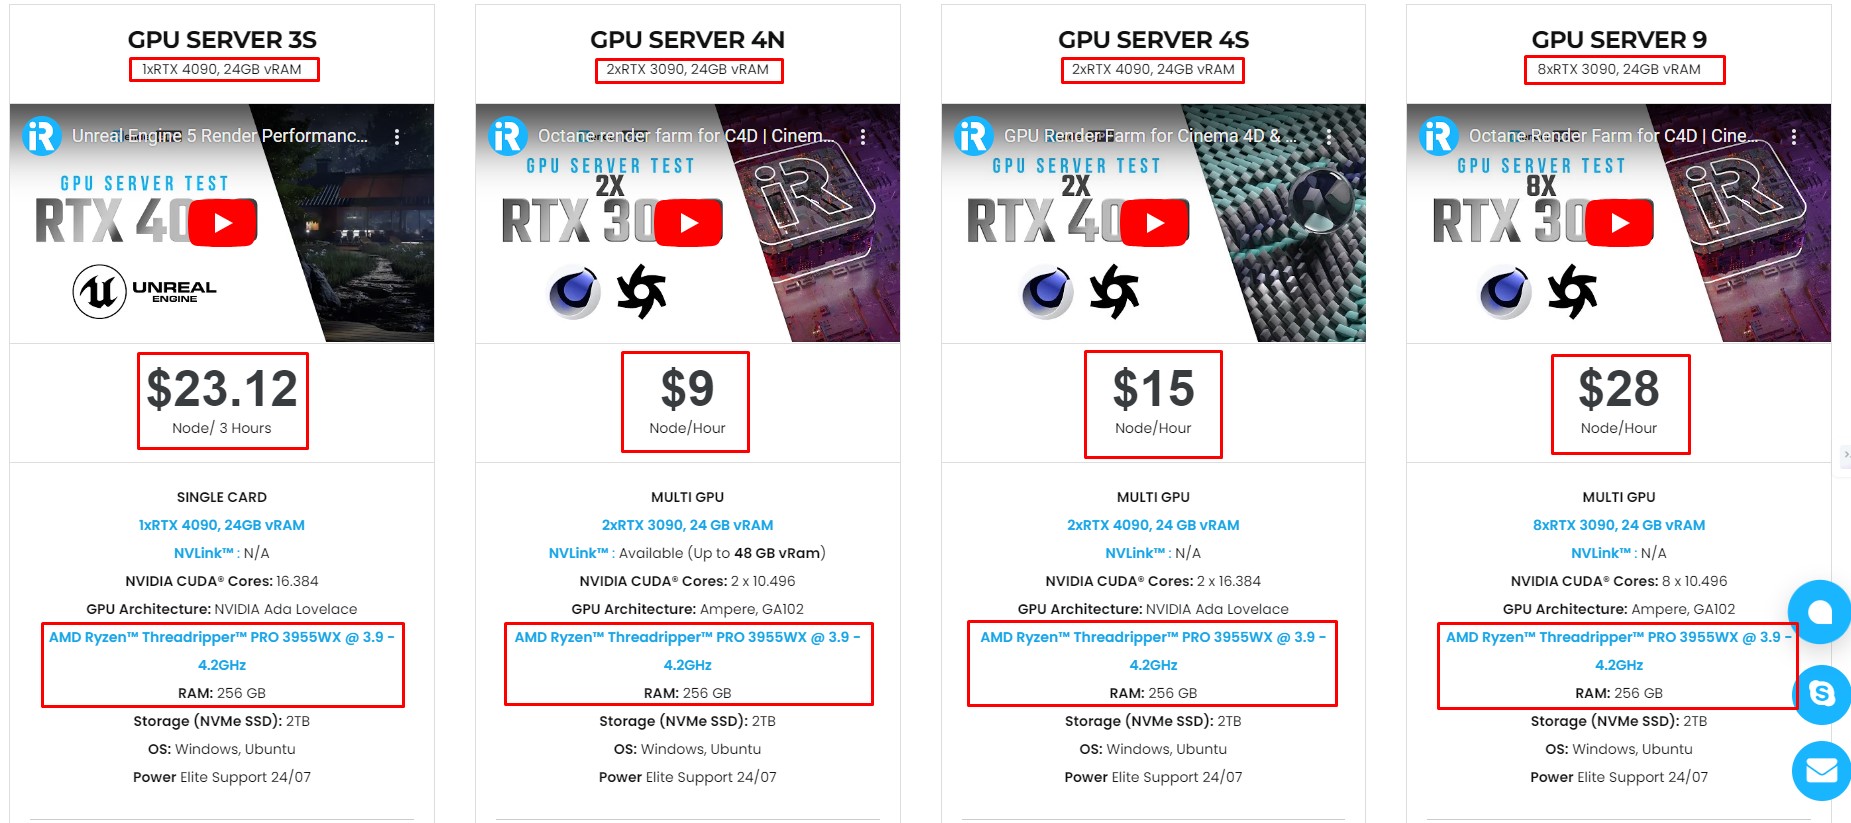
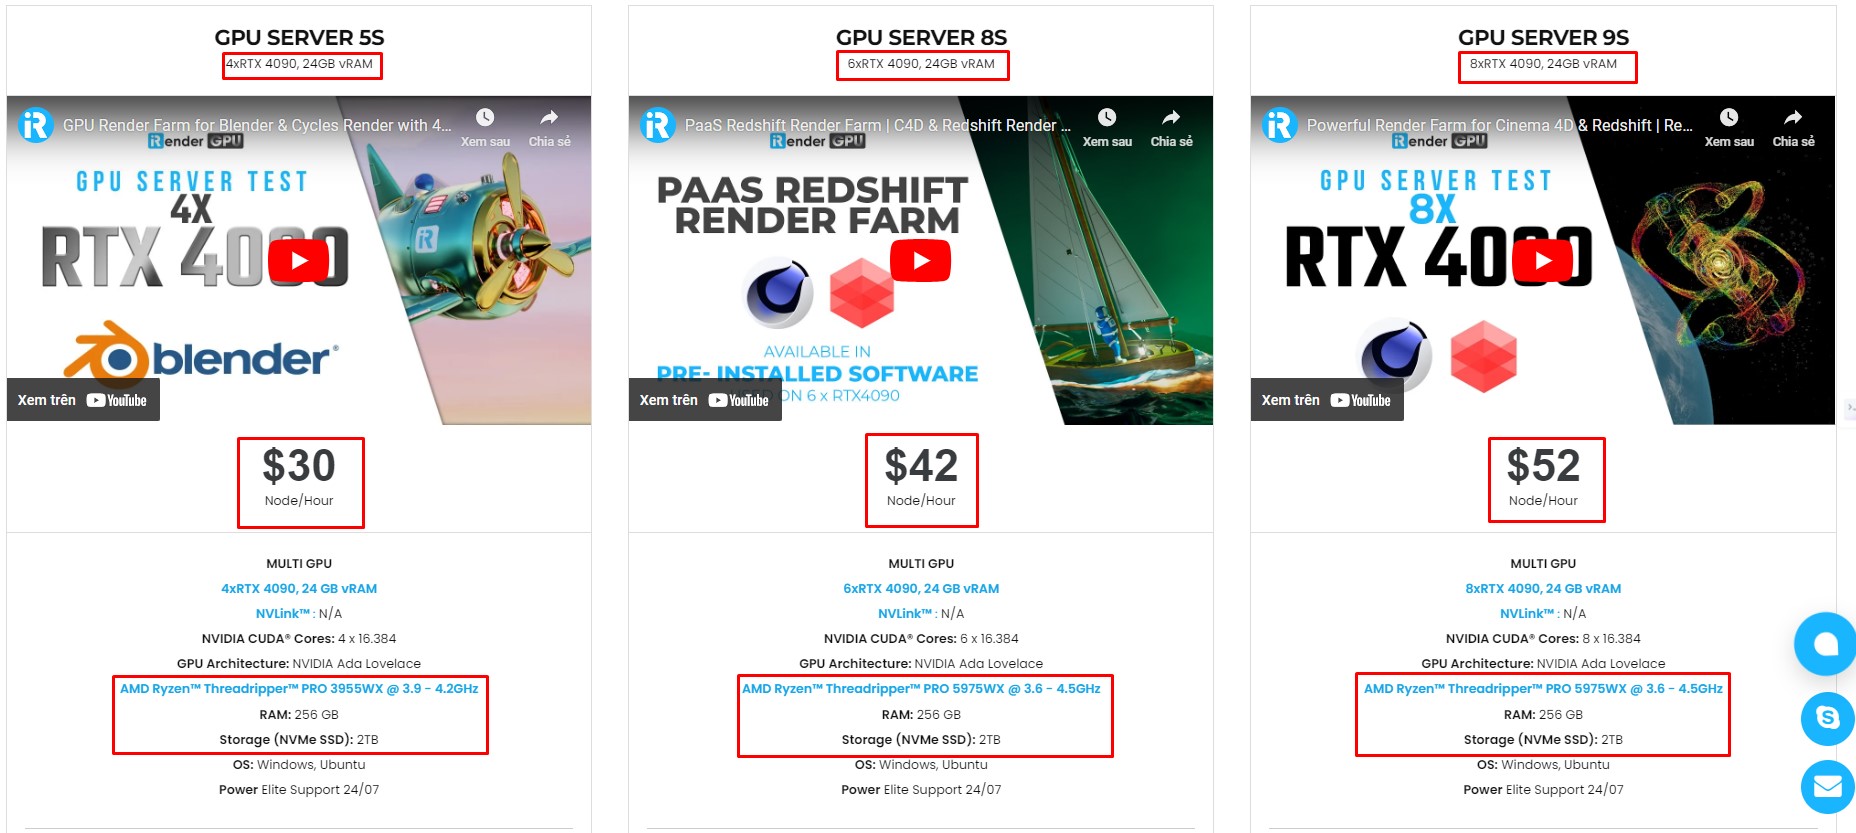
iRender – the best cloud rendering service, provides high-configuration servers that increase CPU and GPU rendering speeds. We offer the most powerful RTX 4090 configuration packages on the market, all equipped with AMD RyzenTM ThreadripperTM PRO 3955WX @ 3.9 – 4.2GHz and AMD Ryzen™ Threadripper™ PRO 5975WX @ 3.6 – 4.5GHz processors, 256GB RAM and 2T NVMe SSD hard drive capacity. With a wide range of GPU servers (1/2/4/6/8x) – RTX 4090, you can choose the server that suits your needs to start the rendering process.
Recently, we have newly released the most powerful ever server – 9S (8xRTX 4090) with CPU AMD Ryzen™ Threadripper™ PRO 5975WX @ 3.6 – 4.5GHz that will boost your rendering process to a new level.
Simple Workflow
You just need to transfer your files, connect to the remote machine, and install 3ds Max and Maxwell, as well as the necessary render engine and plugins with licenses. Then you can render yourself like the way you do on your local PC. Setting up ONCE and your working environment will be saved and ready to use at any time.
Why choose iRender?
Transferring data may cost time and money on the remote server. However at iRender, you can upload and download your files without booting the server, then you can save a lot of money.
We have an iRender GPU app for Windows PC which integrates all features and is easy to use, and an iRender Drive app for MacOS users to transfer data only. Moreover, there are many reasons why this is the best render farm for your project.
- 100% Software Support: We support all 3D software, their plugins, and render engines.
- Full Control: Our service will give you full control over the servers you rent. Therefore, you are free to create your own working environment.
- Go Green: We are committed to using 100% solar renewable energy towards environmental sustainability.
- Real-human 24/7 Support: Our professional support agents and technicians guarantee to bring you the best rendering experience.
If you still wonder if this is the right place for your project, REGISTER NOW to get a trial and receive a 100% bonus promotion for your first transaction within 24 hours of registration with us.

For more detailed information, please contact us via Live chat 24/7 or WhatsApp: +(84) 962868890 or Email: [email protected]
iRender – Happy Rendering!
Images and References: giancr.com
Related Posts
The latest creative news from Maya Cloud Rendering, 3ds Max Cloud Rendering , Redshift Cloud Rendering, Cinema 4D Cloud Rendering , 3D VFX Plugins & Cloud Rendering.


