
How to import Rigify models into Unity project?
Rigify is a free add-on for Blender that helps you generate rigs for characters and is available with Mecanim in Unity. This add-on is great for new and non-technical game developers. Rigify creates a full rig for your model and by using the armature as a template, you can forge it into a nice simple rig for humanoid characters.
In this article, iRender will guide you through rigging your 3D model using Rigify and importing it into Unity’s Mecanim.
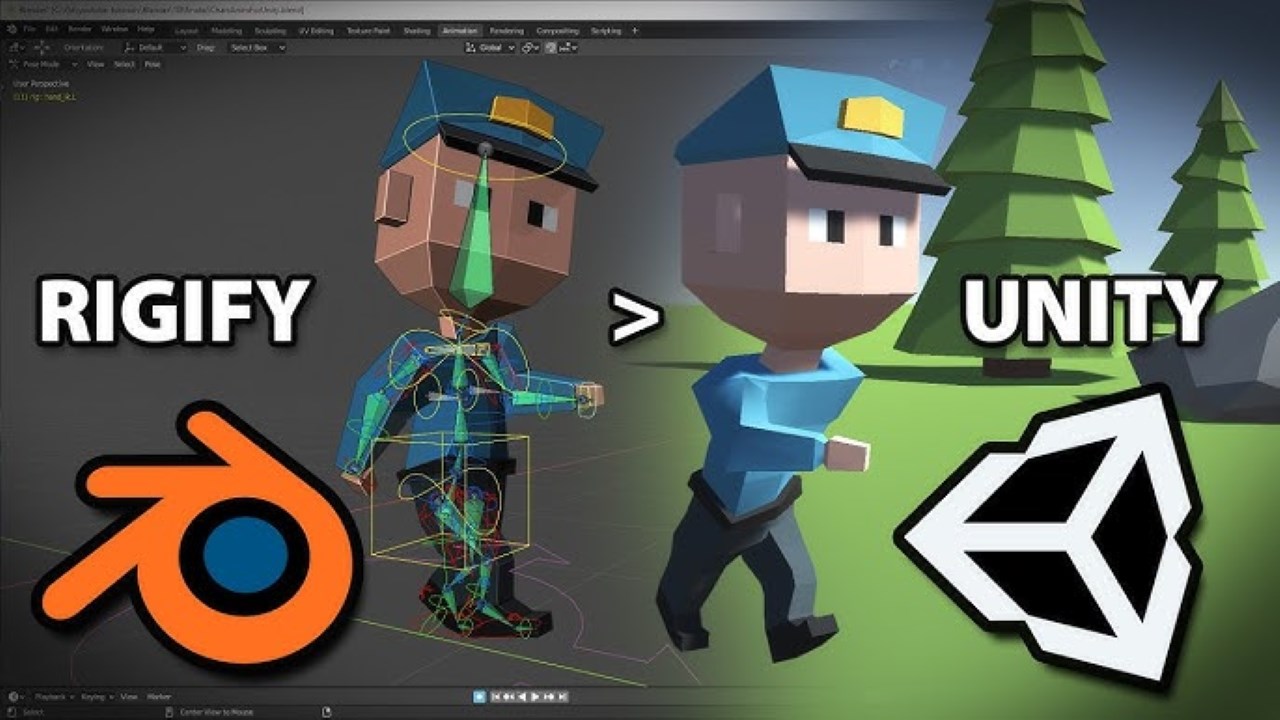
Image source: Imphenzia Youtube
1. Activate Rigify
Begin by activating Rigify in Blender to fully utilize its capabilities. After that, import your 3D model and ensure that your model and armature are correctly configured to prevent any unforeseen issues. Once this is established, you can position your bones and generate your primary rig. The most challenging aspect is constructing the mesh for the bones and ensuring they are adequately linked. After experimenting and achieving the desired outcomes, you can then import the rig into Unity.
Initially, it is essential to confirm that the Rigify add-on is installed and activated in Blender. Here’s how you can do it:
- Navigate to File > User Preferences.
- Choose the Add-ons tab, then scroll to the bottom and check the box next to “Rigify”.
- Click on “Save User Settings”.
By following these steps, you will enable the add-on, granting access to the required buttons and functionalities. Setting it as the default will incorporate this add-on into all your forthcoming projects.
2. Set up your Armature
Get a basic human rig that will serve as a template for Rigify. This rig is fundamental but facilitates Rigify’s construction around the relative bone positions. Here is how you can add a human rig and position the bones correctly:
- Add a human rig: Go to Add (SHIFT + A) > Skeleton (Human).
- Ensure both the rig and the model are centered at 0,0,0.
- If you adjust the scale or move the model, reset the scale and/or translation values of both the rig and the model.
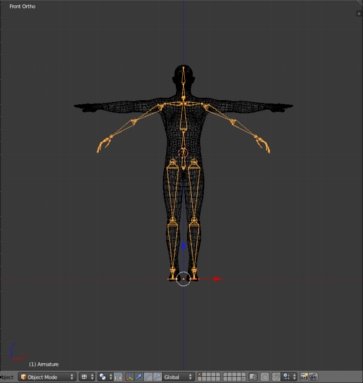
- Enter Edit Mode (Press Tab).
- Begin positioning the bones correctly on the model.
- Utilize “X-Ray” to view the bones through the model.
- Once you finish, return to object mode.
- Move the skeleton to the side to prevent obstruction. (If using Make Human, you might need to merge different meshes into a single complete mesh. Select all the meshes and press CTRL + J).
3. Generate your Rig
When choosing the armature, click on the Object Data tab located on the right side. Below the “Rigify Button”, select Create. Navigate to Pose mode and follow these steps:
- Press (A) to choose the armature, then press (H) to conceal unnecessary layers.
- Shift-click on the Armature layer below.
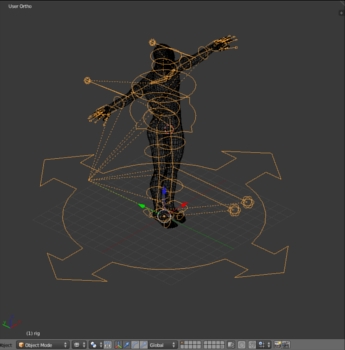
This action will display the modified bones, which are essential for skinning and weighting your mesh.
If you cannot see all the deformed bones, ensure to enable the “Automatically run Python scripts” setting in File > User Preferences > File and then regenerate them.
4. Delete WGT bones
You’ll notice several WGT bones at the top right of the scene hierarchy (WGT refers to Widget).
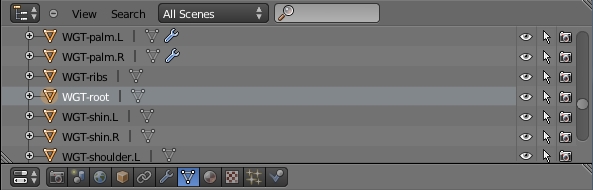
As these bones will not be incorporated into the mesh or utilized, it’s necessary to remove them to prevent any unassigned meshes in our Unity project. Right-click on the bone and choose “Delete”. Repeat this process for each WGT bone in the scene.
5. Skin the Rig to the Model
Skin the model to the deformed bone.
Begin by ensuring you are in object mode and have the mesh selected. Then, hold Shift and select the rig, press Ctrl + P, and choose Deform Frame > With Automatic Weights. This action assigns the mesh to the bone to create a vertex group, which is essential for the skinning process. Note that each deformed bone will utilize two bones for the upper and lower limbs. Avoid skinning the second bone and ensure they are connected for correct linking by Mecanim.
- Attach the Shoulders to “DEF-shoulder.R” + “DEF-shoulder.L” and confirm their parent bones are “ORG-ribs”.
- Link the Upper Arms to “DEF-upper_arm.R.01” + “DEF-upper_arm.L.01” and ensure their parent bones are “DEF-shoulder.R” or “DEF-shoulder.L” respectively.
- Associate the Forearms with “DEF-forearm.R.01” + “DEF-forearm.L.01” and make sure their parent bones are “DEF-upper_arm.R.01” or “DEF-upper_arm.L.01” respectively.
- Connect the Thighs to DEF-thigh.R.01 + DEF-thigh.L.01 and confirm their parent bones as “ORG-hips”.
- Join the Shins with DEF-shin.R.01 + DEF-shin.L.01 and ensure their bases are either “DEF-thigh.R.01” or “DEF-thigh.L.01” respectively. This process provides a skinned rig that aligns with the bones without an “X” through them. Under no circumstances should you skin the spare bones!

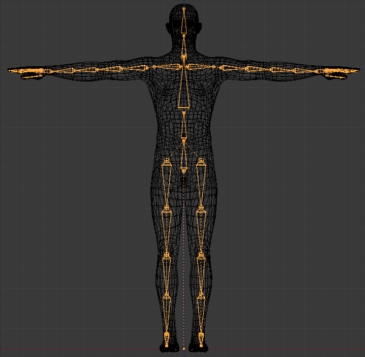
Apply the same process to the hands, while keeping in mind that Mecanim will only utilize the metacarpal bones and three bones for each finger and thumb. This implies that the model’s hands should be bound to the bones without any diagonal lines through them, as illustrated in the image below.
Similarly, ensure that the hands are linked to the appropriate bones. Bind your hands to “DEF-hand.R” + “DEF-hand.L” and confirm that their base connections are “DEF-forearm.R.01” or “DEF-forearm.L.01” respectively.
For each finger and thumb you will be using the following (left hand as an example):
- Thumb: “DEF-thumb.01.L.02”, “DEF-thumb.02.L”, “DEF-thumb.03.L”
- Index: “DEF-finger_index.01.L.02”, “DEF-finger_index.02.L”, “DEF-finger_index.03.L”
- Middle: “DEF-finger_middle.01.L.02”, “DEF-finger_middle.02.L”, “DEF-finger_middle.03.L”
- Ring: “DEF-finger_ring.01.L.02”, “DEF-finger_ring.02.L”, “DEF-finger_ring.03.L”
- Pinky: “DEF-finger_pinky.01.L.02”, “DEF-finger_pinky.02.L”, “DEF-finger_pinky.03.L”
It’s important to note that each finger bone should always be linked to the last bone, and the first bone must be connected to the hand, establishing a secure linkage that Mecanim can effectively interpret.
6. Export and Import
Export the model as a .fbx file and save it in a separate folder outside your project directory. To do this, go to File > Export > AutoDesk FBX (.fbx) > Export. After exporting, proceed with importing the model into Unity and connecting it to Mecanim.
- Open Unity and initiate a new project named “Rigify Test”. Once the project is open, drag and drop your model into the project window.
- Select the model’s prefab in the project window, navigate to the inspector, and click on Rig. Change the Animation Type to Humanoid and then click Configure.
- Ensure that all the bones are correctly positioned and that there are no errors present. This will ensure smooth linkage to Mecanim.
iRender - Best render farm for Blender and Unity
iRender – the best cloud rendering service supporting Blender and Unity with all versions and needed plugins.
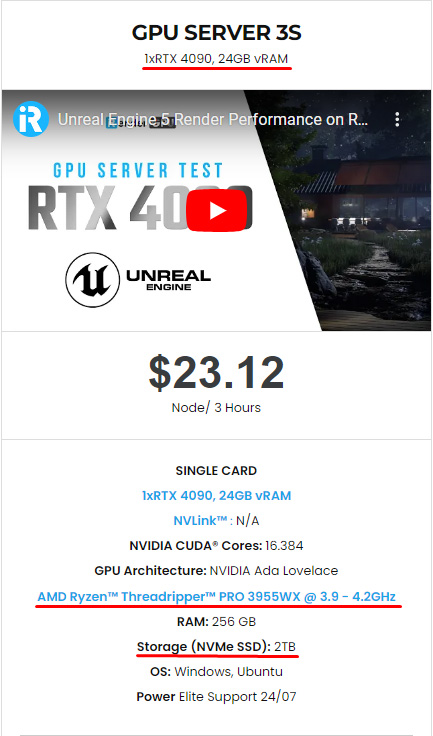
We provide high-configuration servers that increase CPU and GPU rendering speeds. We offer the most powerful RTX 4090 configuration packages on the market, all equipped with AMD RyzenTM ThreadripperTM PRO 3955WX @ 3.9 – 4.2GHz and AMD Ryzen™ Threadripper™ PRO 5975WX @ 3.6 – 4.5GHz processors, 256GB RAM and 2T NVMe SSD hard drive capacity. With a wide range of GPU servers (1/2/4/6/8x) – RTX 4090, you can choose the server that suits your needs to start the rendering process.
With Unity rendering, this 3S (1xRTX 4090) with strong CPU AMD RyzenTM ThreadripperTM PRO 3955WX @ 3.9 – 4.2GHz will be the best choice at the most affordable price.
Simple Workflow with Blender Preinstalled
Our servers have Blender LTS 4.2 preinstalled. You just need to transfer your files, connect to the remote machine and install Unity with your license. Then you can render yourself there like the way you do on your local PC. Setting up ONCE and your working environment will be saved and ready to use at any time.

Why choose iRender?
Transferring data may cost time and money on the remote server. However at iRender, you can upload and download your files without booting the server, then you can save a lot of money.
We have an iRender GPU app for Windows PC which integrates all features and is easy to use, and an iRender Drive app for MacOS users to transfer data only. Moreover, there are many reasons why this is the best render farm for your project.
- 100% Software Support: We support all 3D software, their plugins, and render engines.
- Full Control: Our service will give you full control over the servers you rent. Therefore, you are free to create your own working environment.
- Go Green: We are committed to using 100% solar renewable energy towards environmental sustainability.
- Real-human 24/7 Support: Our professional support agents and technicians guarantee to bring you the best rendering experience.
Check out how to estimate time and cost on our server:

If you still wonder if this is the right place for your project, REGISTER NOW to get a trial and receive a 100% bonus promotion for your first transaction within 24 hours of registration with us.
This October, let’s have a happy Halloween with ghoulishly great deals on your render!
- 50% BONUS for all transactions from $575
- 100% BONUS for all transactions from $1500

For more detailed information, please contact us via Live chat 24/7 or WhatsApp: +(84) 962868890 or Email: [email protected]
iRender – Happy Rendering!
Images and References: unity3d.com