How to make animation in Unreal Engine with iRender
Animation is a fundamental aspect of storytelling and gameplay in video games, allowing characters, objects, and environments to come to life. With its robust suite of tools and features, Unreal Engine has established itself as one of the leading platforms for creating stunning and immersive animations. Whether you’re working on character movements, highly detailed cutscenes, or dynamic game environments, Unreal Engine can bring your creative vision to fruition. In this guide, we will explore the process of making animations in Unreal Engine, from the initial setup and importing 3D models to creating intricate animations and blending them seamlessly. Whether you are a seasoned developer or a newcomer eager to delve into the world of game animation, this blog will offer you the insights and knowledge needed to enhance your projects with captivating animation.
Let’s discuss this with iRender!
Animation in Unreal Engine
Types of Animation
- Skeletal Animation: Typically used for characters and creatures, skeletal animations involve rigging a mesh with a skeleton structure. Animations are created by manipulating the bones of the skeleton to produce realistic movements.
- Vertex Animation: This technique involves animating the vertices of a mesh directly, without a skeleton. It is commonly used for unique effects, like animating facial expressions or environmental elements.
- Morph Target Animation: Often used for facial animations, morph targets allow for smooth transitions between different shapes of a mesh, enabling detailed expressions and movements.
- Procedural Animation: Instead of pre-defined keyframes, procedural animations leverage algorithms to create real-time movement, such as simulating physics or character movement based on input.
Animation Tools in Unreal Engine
- Animation Blueprints: These are specialized blueprints that manage the animations for a character or object. They allow for complex logic, blending, and transitions between different animations based on parameters such as speed or direction.
- Blend Spaces: A powerful feature that allows developers to blend animations based on inputs like movement direction and speed. This creates smooth transitions between animations, making characters feel more responsive.
- Sequencer: A cinematic tool that allows for detailed control of animations, camera movements, and timing. It is ideal for creating cutscenes, scripted events, and even complex animated sequences.
- Control Rig: A feature that enables animators to create custom rigging solutions directly within Unreal Engine, facilitating intuitive control over character animations without external software.

How to make animation in Unreal Engine
Animation implies motion, but it can consist of different kinds of motion. Anything that can move can be animated, but different types of movement/motion can vary in complexity and requirements. It is also possible to animate things that don’t move in real life.
Set up the Character
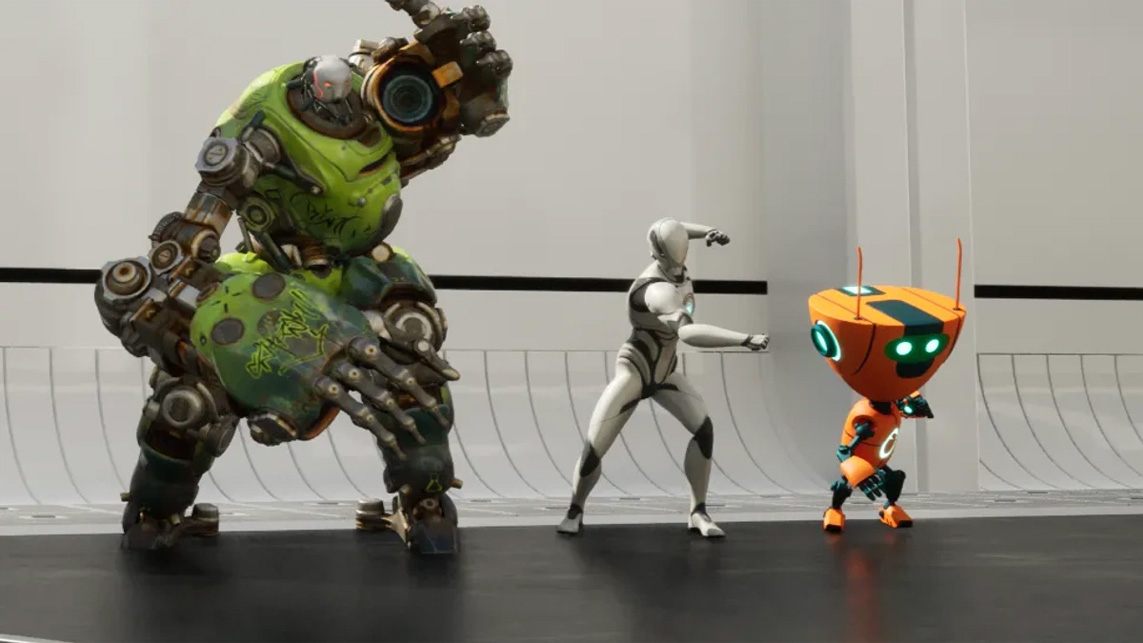
Character is one of the most common types of animation that brings humans, animals, and objects to life. This category can also include anything that moves like a human or animal, such as puppets, robots, and monsters. While character animation is probably the type you’ve seen the most, it can also be the most challenging to create. For one thing, a 3D representation of a living human or animal needs to deform (bend and stretch) at joints like elbows and knees, which usually requires an invisible skeleton to be placed inside the character to control it. The visible character is called a skin, and the skeleton and its controls are called a rig. Fortunately, skinning, rigging, and animation are much easier than they were five to ten years ago, with new tools being released regularly.
- Once your character model is imported, right-click in the Content Browser go to Animation and create an Animation Blueprint.
- Choose the skeleton associated with your character model when prompted.
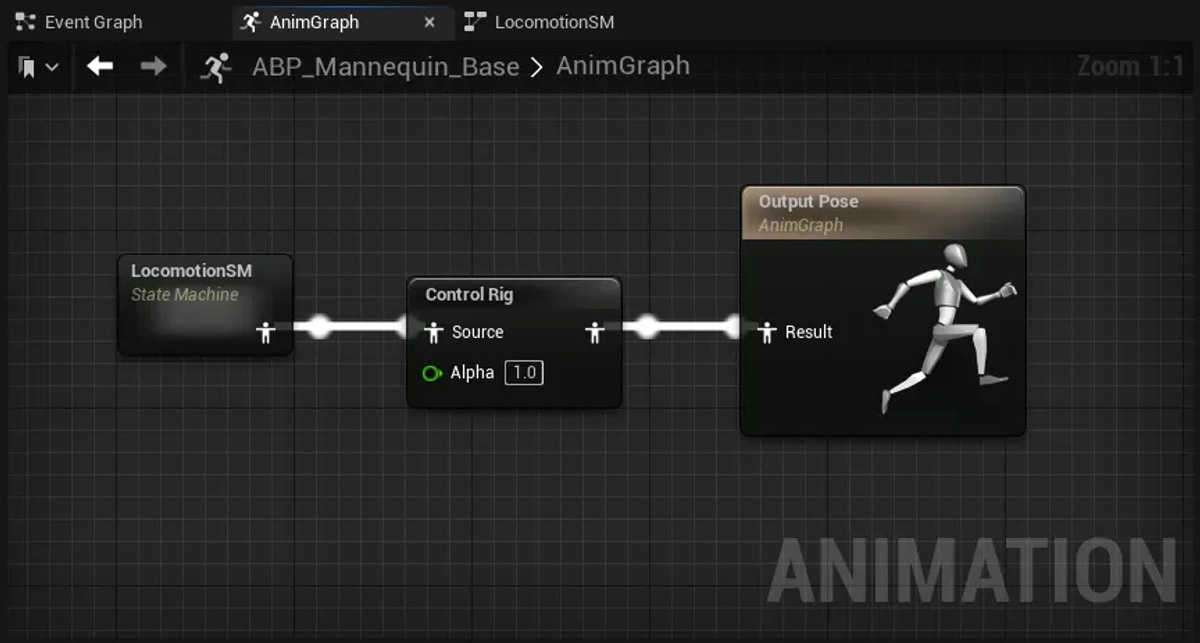
- Open the Animation Blueprint and set up the AnimGraph to define how animations will blend.
Import Assets
Before you import, ensure your assets are in an appropriate format, such as FBX, which is commonly used for skeletal meshes and animation data. If you are using a 3D modeling software (like Blender, Maya, or 3ds Max), make sure:
- The skeletal meshes are exported correctly with their skeletons and animations.
- The origin points are set up to align with Unreal’s coordinate system (Z-axis up).
- Proper naming conventions are used for easy identification later.
- Launch Unreal Engine and open your existing project where you want to import the assets. You can also create a new project if needed.
Creating an Animation Blueprint
Creating an Animation Blueprint in Unreal Engine is an essential step for controlling and managing character animations. Animation Blueprints allow you to implement complex animation behaviors, manage states, and blend animations based on character movement and actions.
- Right-click in the Content Browser and go to Animation > Animation Blueprint.
- Select the Skeleton for your character and click “OK”.
- Open the Animation Blueprint and you will find two main areas: the Anim Graph and Event Graph.
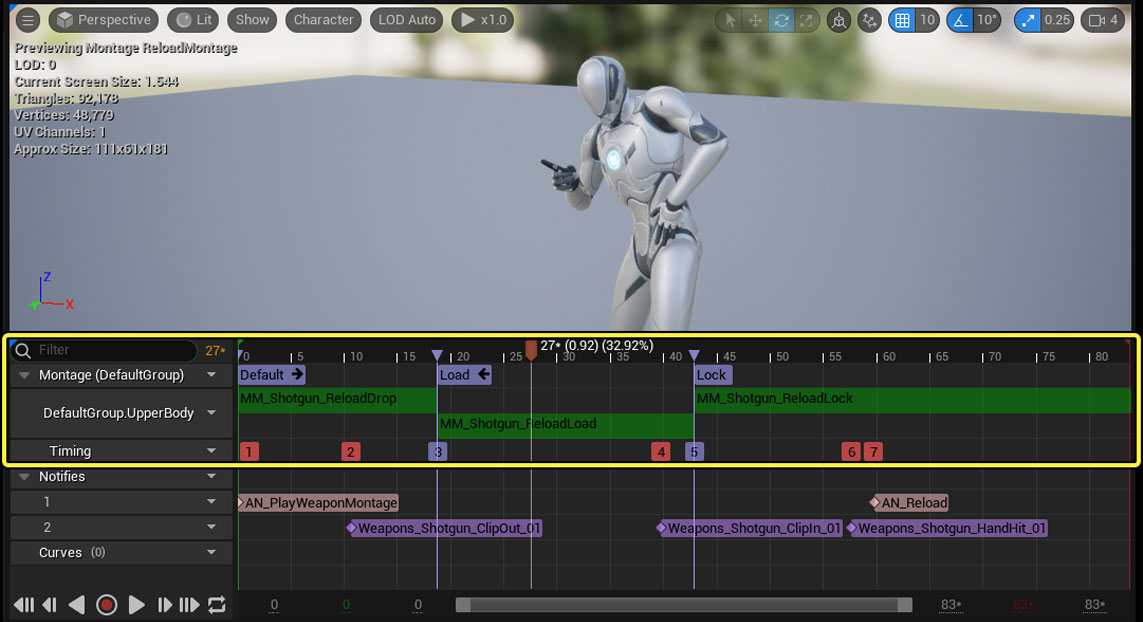
Creating Animation Montages
Animation Montages in Unreal Engine are powerful tools that allow you to manage complex sequences and specific actions for your characters, such as attacks, emotes, or any special animation that doesn’t fit into the regular blend of the Animation Blueprint or State Machine. Here’s a step-by-step guide on how to create and use Animation Montages in Unreal Engine:
- Step 1: Prepare Your Animations
- Step 2: Creating an Animation Montage
- Step 3: Configuring the Animation Montage
- Step 4: Adding Notifies (Optional)
- Step 5: Setting Up the Montage in the Character Blueprint
Start Animating and render your scenes
Now you’ve got everything you need to start working on your animation project in earnest. Set up your tools for your chosen frame rate and resolution, and get to work. Use your storyboards and reference materials to guide your work through the project. The usual method is to work on one scene at a time, and put it all together later, in the editing phase.
The use of 3D animation requires you to render each frame of your animation, which means turning what you see on the computer screen into individual image files that the computer can form into a movie. Depending on the software you use and the complexity of your scenes, this process can take anywhere from a few minutes to several days. Be sure to render out the scenes at the required resolution for your chosen platform.
Professionals usually render each frame to its own image file, then pull the frames together during the editing phase to form a movie. This practice means that if any one frame doesn’t turn out as expected in a traditional renderer, you just have to re-render that one frame after fixing the problem, rather than rendering the whole sequence again.
iRender - The Best Cloud Rendering Service for Unreal Engine
iRender is a perfect option to render projects in PC optimization for rendering tasks, CGI, and VFX with over 30.000 customers. To bring the best experiences for customers, iRender has been improving the quality and updating the newest technology every day. We provide high-configuration dedicated servers (physical computers/machines) specifically optimized for GPU rendering.
iRender provides high-configuration servers that increase CPU and GPU rendering speeds. We offer the most powerful RTX 4090 configuration packages on the market, all equipped with AMD RyzenTM ThreadripperTM PRO 3955WX @ 3.9 – 4.2GHz and AMD Ryzen™ Threadripper™ PRO 5975WX @ 3.6 – 4.5GHz processors, 256GB RAM and 2T NVMe SSD hard drive capacity. With a wide range of GPU servers (1/2/4/6/8x) – RTX 4090, you can choose the server that suits your needs to start the rendering process.
We have many server packages, from single GPU to multiple GPUs. For real-time rendering software like Unreal Engine, we suggest our server 3S with the high-end hardware such as CPU AMD Ryzen Threadripper Pro 3955WX at 3.9GHz clock speed, core 16, thread 32. RAM 256GB Storage NVMe SSD 2TB and Video card RTX4090.
Check out Unreal Engine’s rendering performance on our servers:

In case you have any problems or questions, don’t hesitate to contact the 24/7 support team. We will be happy to help you with your questions and problems at all times.
This month, we are running a SPECIAL OFFER: 100% Additional Bonus for new clients who register an account and make a top-up within 24 hours after their registration.
Moreover, iRender is running a promotion campaign:
- 100% bonus promotion for all transactions from $1500
- 50% bonus promotion for all transactions from $575
The promotion will be applied from 15th February to 28th February 2025. I hope you won’t miss this out so that we can keep working in the future.
Register an account today to experience our service or contact us via email at [email protected] or WhatsApp: at (+84) 912075500 for advice and support.
Happy Rendering!
Reference source: unrealengine
Related Posts
The latest creative news from Unreal Engine Cloud rendering.