How to optimize Render settings for Redshift
Even though Redshift is famous for its fast GPU rendering, we can further fine-tune the render settings for Redshift to make the rendering even faster. Let’s scroll down!
Comprehend the render settings for Redshift
To optimize the Render Settings for Redshift, it’s important to understand how each option impacts your final render.
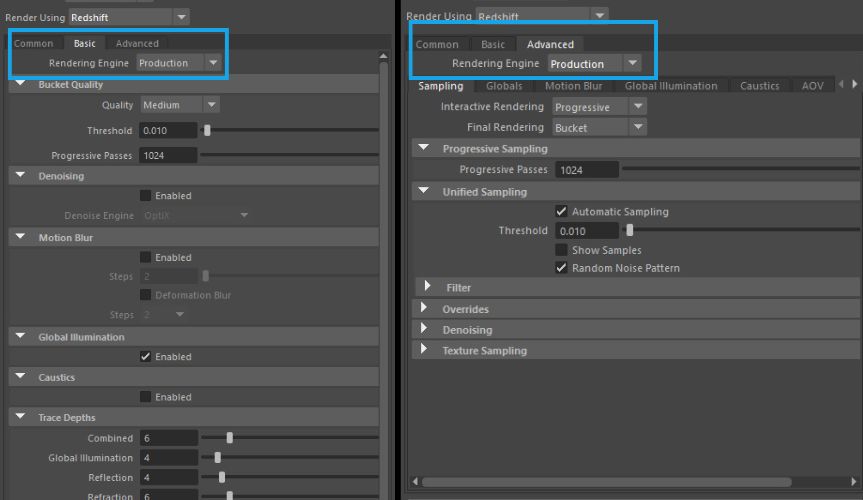
The Render Settings for Redshift will vary depending on the render settings mode and the rendering engine you choose.
For render settings modes, Basic mode offers a simplified list of commonly used settings, while Advanced mode gives you access to all available options for the selected engine.
Regarding the rendering engines, there are two options: Production and RT. Production is Redshift’s primary engine for high-quality final frame rendering, while RT (Real-Time) is Redshift’s fast, interactive engine designed for near-instant feedback. However, since RT is still in beta, it’s recommended to use Production for stability and reliability.
If you are new to Redshift or prefer a straightforward setup, Basic mode is an excellent way to adjust your render quality without getting overwhelmed.
Now, let’s explore how to optimize the Render Settings for Redshift using the Production engine in Basic mode.
Bucket Quality
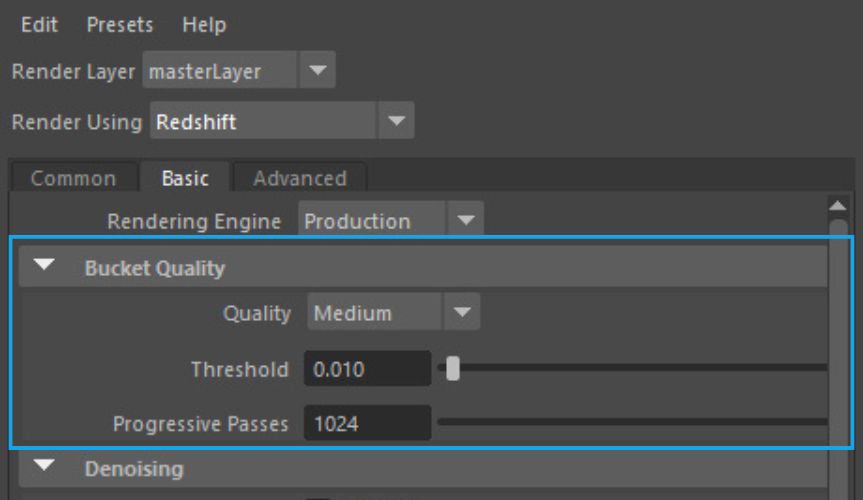
The first setting is Bucket Quality, which you can adjust from Low to Very High. Higher quality settings automatically lower the Threshold value, directly influencing the final image’s quality and noise levels.
In general, the higher the Bucket Quality (or the lower the Threshold), the better the render quality and the less visible noise, though this will also increase render times. You also have the option to manually adjust the Threshold if needed.
Denoising
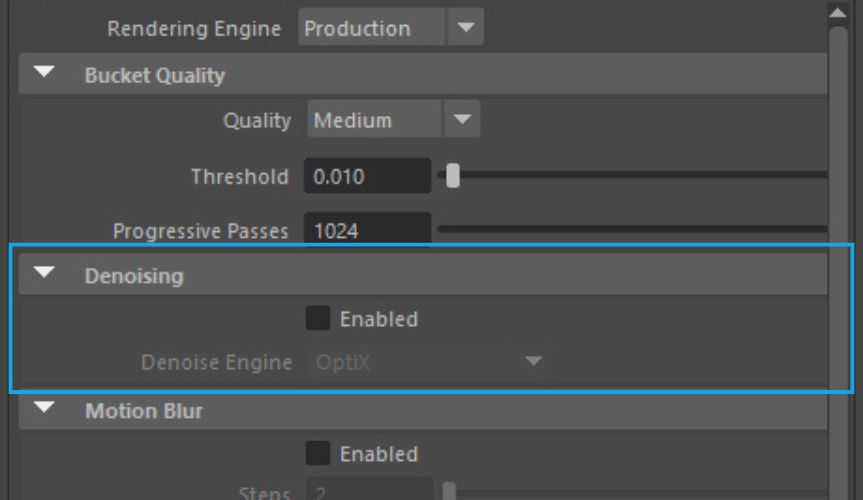
Denoising helps reduce noise in rendered images while preserving key details like edges and textures. It can speed up rendering times, but sometimes at the cost of slight accuracy loss. You can toggle Denoising on or off using the checkbox.
Below the checkbox, you can choose between different Denoising engines, each with its strengths:
- OptiX – Very fast and supports interactive rendering, but may not clean up noise as effectively as Altus.
- OIDN – Also fast and usable during interactive rendering, but similar to OptiX, it may leave a bit more noise compared to Altus.
- Altus Single – Slower (rendering the frame once before applying denoising) and non-interactive, but provides good results for final renders.
- Altus Dual – The slowest option (rendering the frame twice before denoising), but delivers the highest-quality results for final renders.
Motion Blur
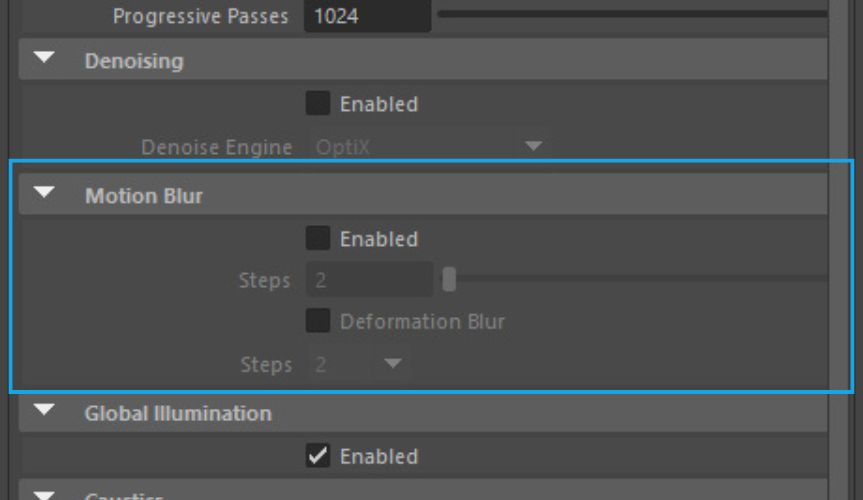
Motion Blur replicates the natural blur seen when objects or cameras move rapidly during a frame.
- Motion Blur Checkbox: Enable or disable motion blur.
- Motion Blur Steps: Defines how many linear steps Redshift uses to simulate the motion of objects, lights, and cameras. More steps result in smoother motion but require more memory.
- Deformation Blur: This toggle controls whether vertex-level deformation blur is included. Since Deformation Blur can consume a lot of memory, it’s best to leave it disabled if your objects don’t have animated deformations, to optimize performance.
Global Illumination

Global Illumination (GI) is a technique that simulates how light bounces and spreads across a 3D scene, helping achieve more realistic and natural-looking lighting.
You can enable or disable GI using the checkbox. For the most authentic lighting results, it’s best to keep GI enabled; however, this will increase your render times.
Caustics
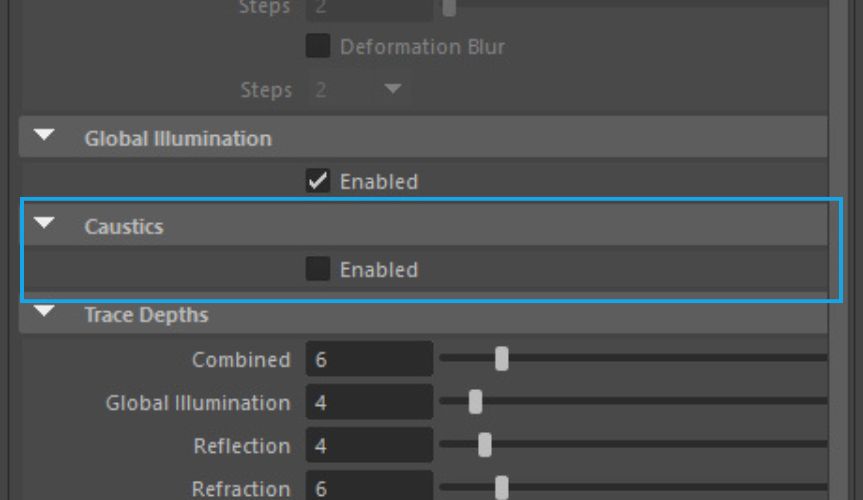
Caustics simulate the concentrated light rays that reflect off or refract through surfaces. While enabling caustics can add realism, it often introduces intense noise that’s harder to clean up.
Trace Depths
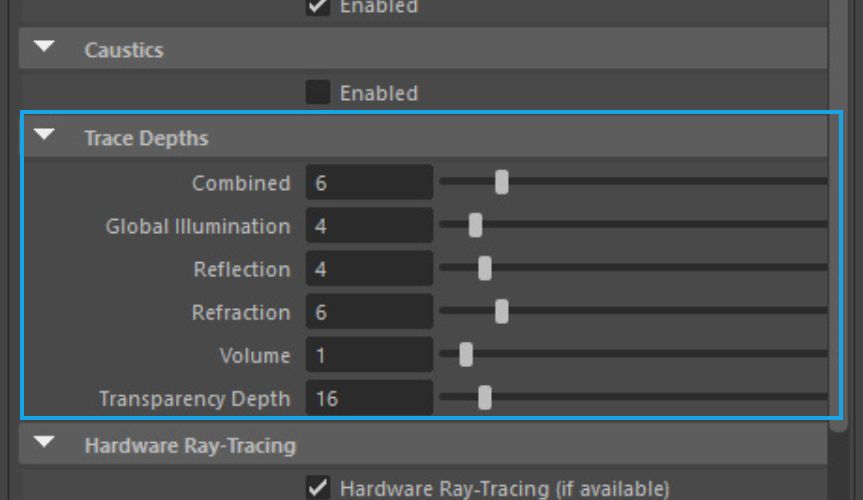
- Combined Depth: Sets the maximum number of times any ray (including GI, reflections, refractions, and volume scattering) can interact with the scene.
- Global Illumination Depth: Controls the number of times an indirect lighting ray bounces. Raising this value is useful for scenes like interiors where multiple light bounces create more realistic effects.
- Reflection Depth: Limits the number of bounces a reflection ray can perform.
Refraction Depth: Limits how many times a ray can pass through transparent or refractive surfaces. - Volume: Sets the limit for how many times a ray can scatter inside a volumetric object (like fog or smoke).
- Transparency Depth: Controls how many times a ray can pass straight through transparent objects.
Important Note: No matter how high individual ray type limits are set, the Combined Depth is the overall maximum. For example, if Reflection Depth and Refraction Depth are both set to 4, but Combined Depth is 6, a ray can only reflect and refract a total of 6 times combined.
While increasing depth values can improve realism, it will also significantly raise render times.
Hardware Ray-Tracing
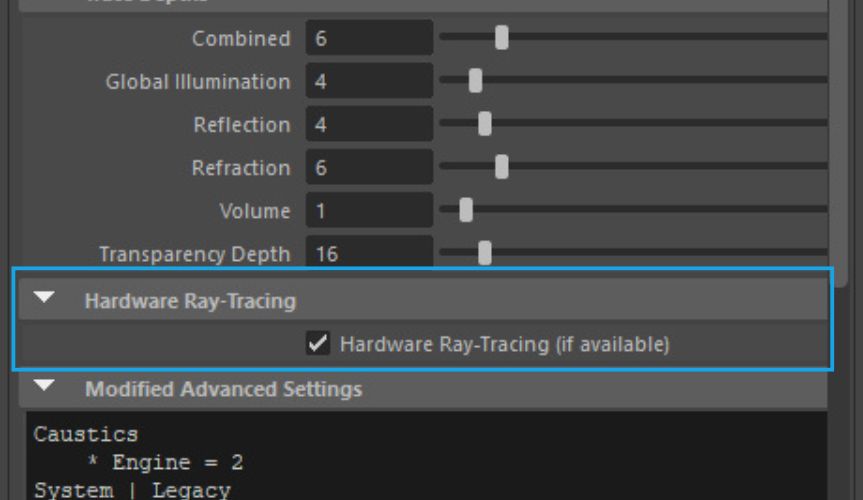
Enabling Hardware Ray-Tracing allows Redshift to use hardware-accelerated ray-tracing, provided you have compatible GPUs like Nvidia RTX series cards.
The performance boost from hardware ray-tracing depends on the scene; scenes that rely heavily on ray-traced effects will benefit the most. Keep in mind that non-ray-traced techniques like irradiance caches are not accelerated by hardware RT.
Tips to Optimize Render Settings for Redshift
- Always keep your 3D software, Redshift, and GPU drivers updated to the latest versions.
- Close any unnecessary applications to free up RAM and other system resources.
- Optimize your scene by lowering the polygon count and removing any unused objects and materials.
- Reduce Progressive Passes to 32 or 16 to help free up the GPU for other processes.
- Turn on Automatic Sampling to allow Redshift to manage sampling more efficiently.
- Minimize the use of heavy features like Motion Blur, Caustics, and unnecessary AOVs, as they can heavily impact performance.
- Enable Hardware Ray-Tracing to speed up rendering if your GPU supports it.
- Lower the Trace Depth for faster renders; just be aware this might slightly darken your scene.
- Increase the Thresholds to speed up renders—though this will add some noise, which you can counterbalance by raising sample rates or using denoising.
- Adjust the Bucket Size carefully. Avoid using very small (64) or very large (512) bucket sizes, as they can prevent the GPU from working efficiently.
- Tweak your Redshift Preferences: select only your GPU(s) for rendering. Avoid enabling CPU usage or Hybrid Rendering, as involving the CPU can slow down performance.
- Disable Material Previews during rendering to save resources.
- In addition to optimizing the render settings for Redshift, using multiple high-performance GPU cards like iRender’s nodes can greatly accelerate rendering speeds.
If you’re deciding between Octane, Corona, and Redshift, you might want to check out this article for a detailed comparison.
Utilize iRender powerful nodes to enhance the Redshift rendering
iRender offers high-performance machines equipped with premium specs such as the AMD Ryzen™ Threadripper™ PRO 3955WX (3.9–4.2GHz), along with options for 1, 2, 4, 6, or 8 RTX 4090 or RTX 3090 GPUs, 256GB of RAM, and 2TB NVMe SSD storage.
Additionally, iRender provides each user with a free Cinema 4D – Redshift license, eliminating the need to transfer your own license to our render nodes.
Why can iRender be a great render farm for you?
In addition to high-configuration servers, iRender provides many other utilities to provide the best user experience.
- Dedicated server for individuals: You have full control and access to the server you rent. The working environment (installed apps, files) will be stored for the next use.
- Easy and free file transfer between your computer and iRender’s server: The transferring task can be done via iRender GPU application for Windows and the iRender Drive application for MacOS.
- 24/7 assistance: iRender’s attentive agents are always ready to support all your queries.
- All software compatibility: iRender’s PCs are built to meet the configuration needs of all 3D software and rendering tools at a variety of cost levels for users to choose from.
Let’s see how fast Redshift renders on iRender’s nodes!


New users will get a 100% bonus for the first transaction within 24 hours of their registration. No minimum amount!! If you top up 50$, you will get 100 points in total to hire our machines.
If you have any questions, please get in touch with me through email [email protected] or our 24/7 support team for a quick response.
Thank you for reading
Source: Maxon, cgshortcuts
Related Posts
The latest creative news from iRender render farm for Redshift