Some advanced rendering techniques in SketchUp using best Rendering Software
In 3D modeling, SketchUp has established itself as a pivotal tool for architects, designers, and artists alike, thanks to its user-friendly interface and robust modeling capabilities. However, to fully realize the potential of SketchUp’s models, advanced rendering techniques are essential for producing stunningly realistic visualizations. While SketchUp provides a solid foundation for 3D modeling, the integration of high-quality rendering software can transform a basic model into a breathtaking representation of the project. Advanced rendering techniques leverage technology to simulate aspects of light, materials, and environments, culminating in images resembling real-life scenes. This not only aids in presenting design concepts more effectively but also enhances client engagement by providing a tangible preview of the outcome. In this blog, iRender explores some rendering techniques to improve your SketchUp projects, making them not only accurate but also breathtakingly realistic.
Overview of SketchUp and Its Importance in Architectural Visualization
SketchUp was created by Trimble Inc. and is known as a user-friendly 3D modeling software primarily used for architectural and interior design, urban planning, and landscape architecture. It is famous for its intuitive interface and ease of use, making it an ideal tool for beginners and professionals to create and visualize 3D models quickly. SketchUp is a powerful and user-friendly 3D design software widely used in architecture, interior design, construction, and graphics. With its intuitive interface and high flexibility, SketchUp allows users to create high-quality 3D models quickly and easily. Getting started with SketchUp is easy, and we want to ensure that everyone, regardless of their skill level, has all the information they need to create their awesome models.
It’s widely used in architecture, interior design, landscape architecture, and even film production. It’s important because of its ability to create 3D models quickly, which can then be transformed into lifelike images. This makes it an invaluable tool for presenting design concepts and visualizing finished projects.
With SketchUp, architects can quickly create models and iterate designs, making it an ideal tool for conceptualizing ideas and visualizing them in 3D. This rapid prototyping allows for testing different design options effectively. The software allows designers to explore various design options in real time. Its modeling capabilities enable architects to experiment with forms, materials, and spatial arrangements, fostering creativity and innovation.
The role of advanced Rendering Techniques for Realistic Visuals in SketchUp
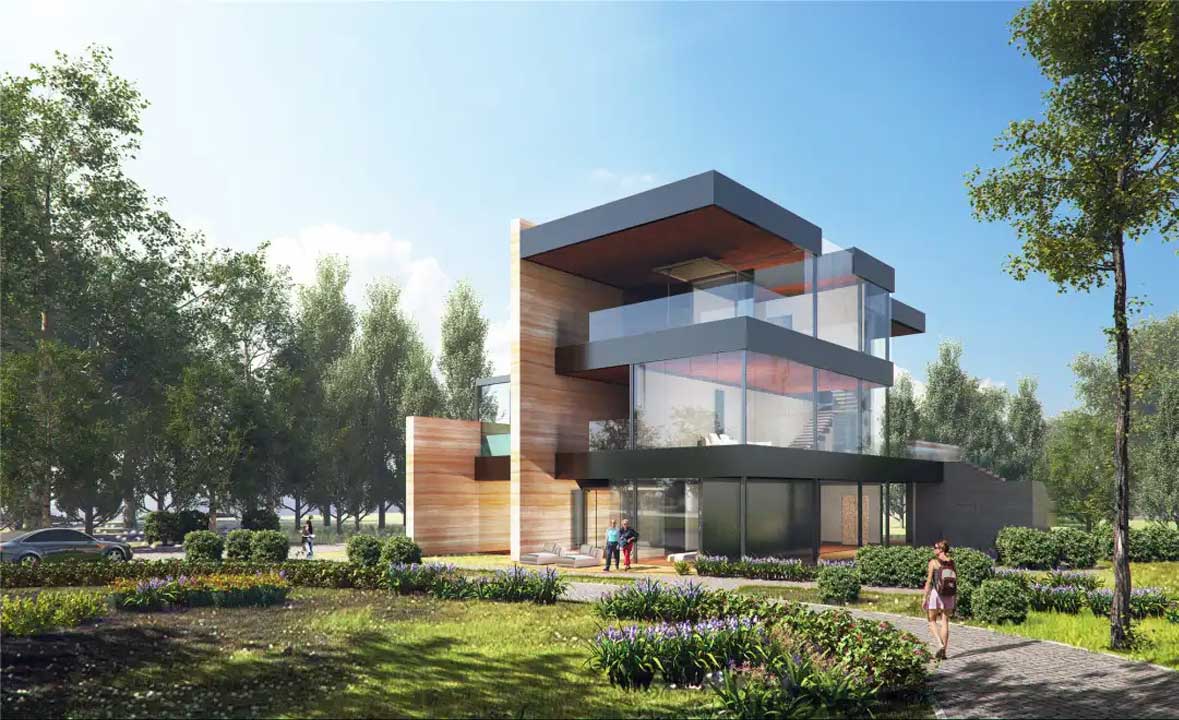
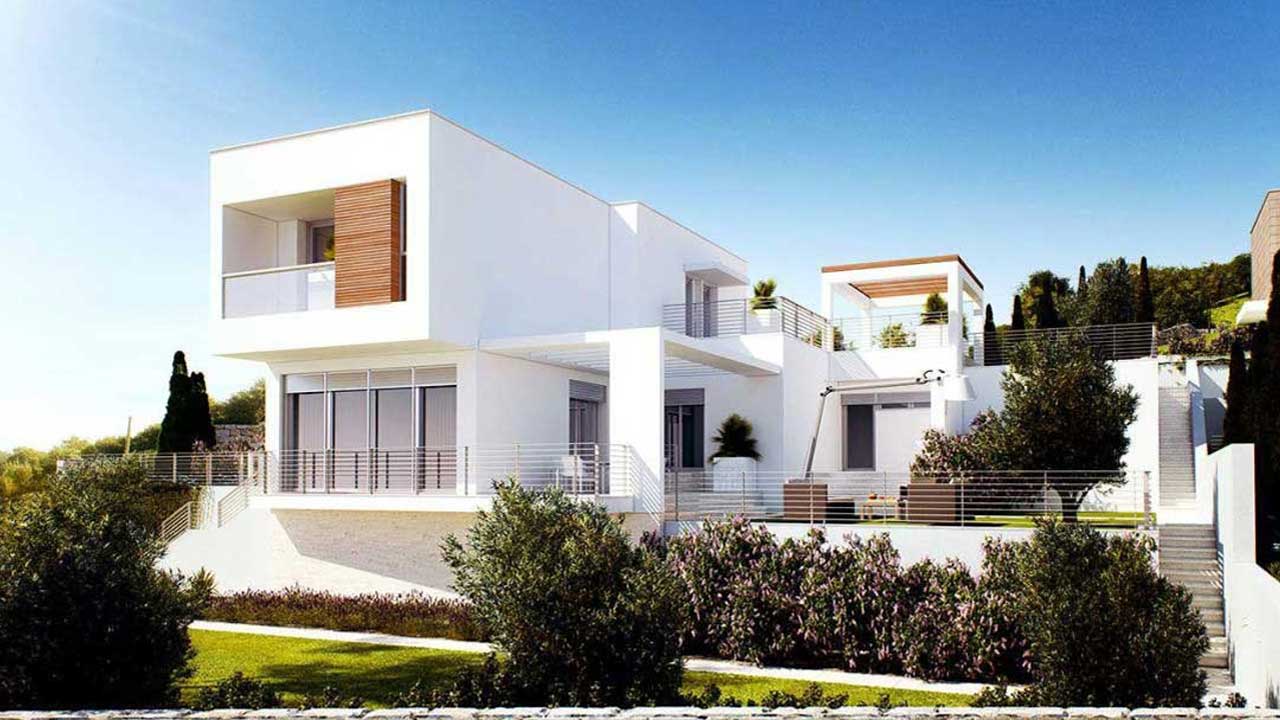
Advanced rendering techniques are crucial in SketchUp for producing realistic visuals that accurately represent architectural designs and improve client presentations. These techniques enhance the basic 3D models made in SketchUp, adding depth, realism, and nuanced detail that help various stakeholders better understand the design.
Enhanced Realism
-
Lighting and Shadows: Advanced rendering techniques simulate natural lighting and shadows, making a model look photorealistic. They account for light behavior, which changes how surfaces and materials appear, thus adding depth and realism to the scene.
-
Materials and Textures: High-quality rendering allows for the application of detailed textures and advanced material properties (like reflections, refractions, and bump mapping).
Accurate Environmental Context
-
Contextual Integration: Advanced rendering allows designers to place their models in realistic environments, considering factors like surrounding landscapes, weather conditions, and urban settings.
-
Sky and Atmosphere Simulation: Techniques such as atmospheric effects and sky domes can be used to simulate natural phenomena like clouds, sunlight, and dusk, further enhancing the authenticity of the visuals.
Refined Presentations
-
Client Communication: Realistic renderings are powerful tools for presentations, as they convey the final vision more effectively than basic model views.
-
Marketing and Promotion: Architects and designers use high-quality renderings in marketing materials and portfolios. Compelling visuals attract potential clients and showcase professionalism and competence.
Interactive Visualization
-
Virtual Reality (VR) and Augmented Reality (AR): Many advanced rendering solutions offer VR and AR capabilities, allowing clients and designers to experience spaces in an immersive way. This enhances understanding and provides a deeper emotional connection to the space.
-
360-Degree Views and Walkthroughs: Advanced rendering techniques allow for the creation of 360-degree views and animated walkthroughs, enabling clients to explore the design more interactively and intuitively.
Advanced Rendering Techniques
Advanced rendering techniques in SketchUp enhance the visual quality of models and allow for the creation of photorealistic images suitable for presentations and client communication. Below are some key advanced rendering techniques that can be employed within SketchUp, whether using native features or through plugins:
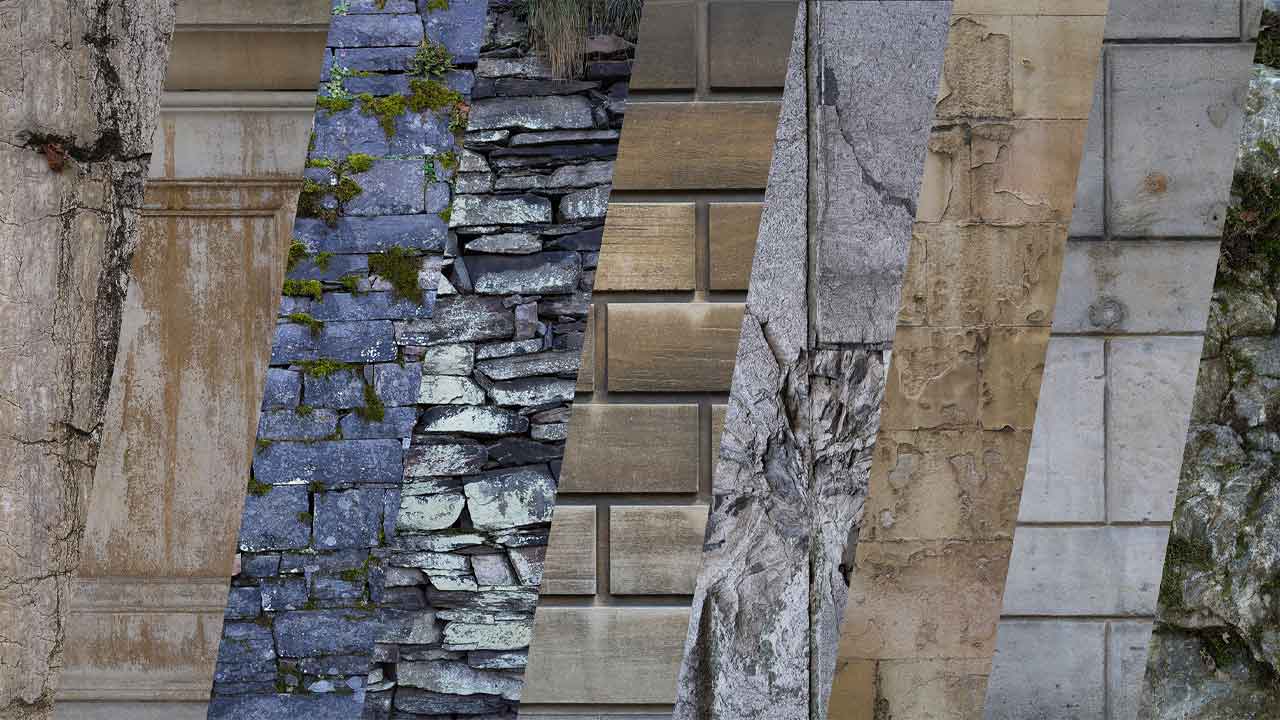
Use of High-Quality Textures and Materials
- Texture Mapping: Ensure that high-resolution textures are applied to surfaces. Use image editing software to create or modify textures, adjusting them for scale and alignment on the model.
- Bump and Displacement Mapping: In rendering plugins like V-Ray, use bump maps to add surface imperfections and details without increasing the polygon count. Displacement maps can create a more pronounced three-dimensional effect on surfaces.
- Material Properties: Use sophisticated material properties such as reflection, refraction, and transparency. Adjust settings like glossiness and roughness to achieve realistic looks for various materials (glass, metal, wood).
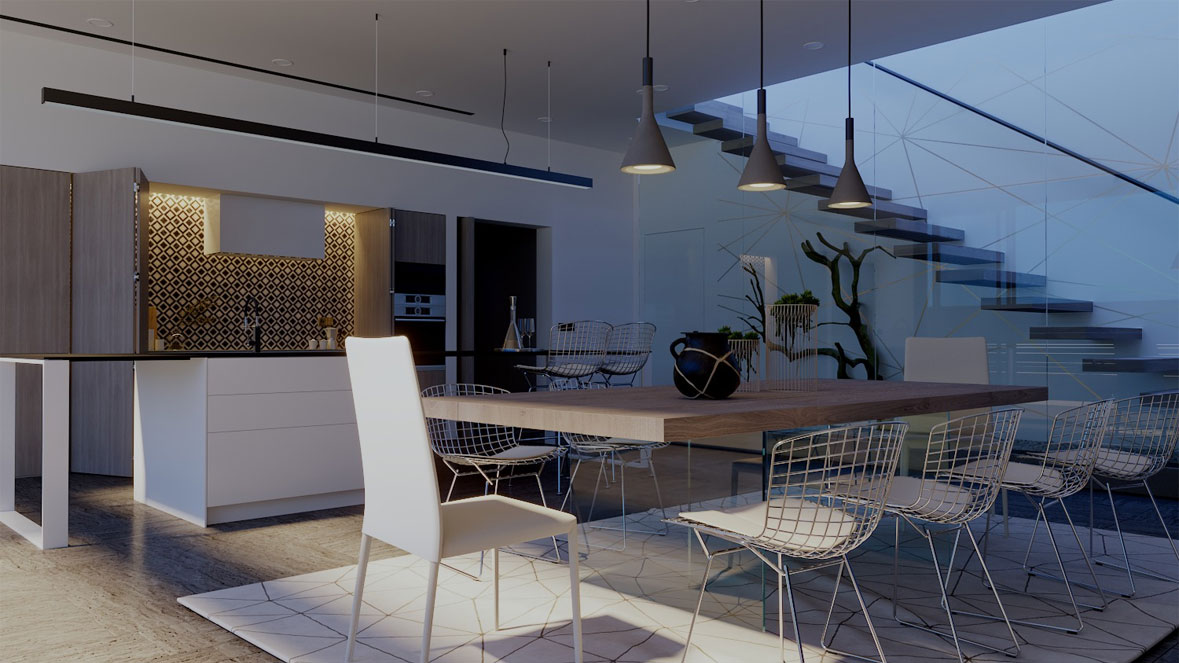
Using Advanced Lighting Techniques
- Global Illumination (GI): Utilize global illumination features in rendering software to simulate realistic light interaction. It enhances the relationship between light and surfaces, creating softer shadows and more natural illumination.
- HDRI Lighting: High Dynamic Range Images (HDRI) can be used as environmental lights or backgrounds. They provide realistic lighting effects and reflections, as well as an atmospheric context for the scene.
- Layered Lighting: Create a variety of light sources within the scene, including ambient lights, point lights, and spotlights, to add depth and realism. Adjust the intensity and color of these lights for effects.
Camera Settings and Composition
- Camera Angles: Experiment with various camera angles and perspectives to create dramatic or compelling views of your model. Use the “Camera” settings to establish focal lengths that mimic a real-world camera lens.
- Depth of Field: Use depth of field effects to focus on specific areas of the model, blurring others to create a more professional photographic quality. This effect mimics the way a camera picks up a subject and blurs the background.
- Framing and Composition: Apply principles of photography (like the rule of thirds) to arrange your elements attractively. Good composition can lead to more engaging visuals.
Advanced Rendering Techniques in Plugins
Enscape:
- LiveSync: This feature allows for real-time updates and adjustments as the model changes, ensuring immediate feedback on design modifications.
- Material Editor: Use the advanced material editor to create custom materials with realistic hues, gloss, and texture variations.
Lumion:
- Animate the Scene: Create animations that showcase the project through fly-throughs and walkthroughs, adding dynamic elements like moving people and vehicles.
- Weather Effects: Use tools to simulate rain, fog, or changing seasons to give the render a more dynamic feel.
V-Ray:
- Render Elements: Utilize render channels to separate different visual elements (like shadows and reflections) for post-processing flexibility.
- Physical Camera: V-Ray’s physical camera options allow for realistic exposure and lighting adjustments.
Post-Processing Techniques
- Photoshop and Other Editing Tools: After rendering, use software like Adobe Photoshop to make final adjustments. This can include color grading, adding overlays, or enhancing details to improve overall visual impact.
- Combining Render Layers: If you rendered in layers, composite them together in post-production to balance elements and create a polished final image.
Interactive Visualizations and VR
- Render to VR: Use plugins like Enscape and Twinmotion to create immersive virtual reality experiences. Stakeholders can explore designs in a fully engaging way, aiding in understanding space and layout.
- Walkthrough Animations: Craft animated sequences that allow viewers to experience a virtual tour of the model, showcasing different aspects and features dynamically.
Optimization and Performance
Rendering high-quality images can be resource-intensive. Balancing quality and performance involves optimizing settings to reduce rendering times while maintaining visual fidelity.
Techniques such as simplifying geometry, using lower resolution textures for distant objects, and optimizing lighting setups can significantly improve rendering performance without sacrificing quality.
Wrap Up
In conclusion, enhancing the visual quality of 3D models in SketchUp through advanced rendering techniques offers designers and architects a powerful way to communicate their concepts more effectively. By utilizing the best rendering software available, such as V-Ray, Enscape, Lumion, or Twinmotion, users can achieve photorealistic imagery that brings their designs to life. These software packages provide a range of advanced features, including global illumination, realistic materials, dynamic lighting, and immersive environments, which significantly elevate the output quality. As the field of architecture and design continues to evolve, staying updated with the latest rendering trends and software capabilities will be crucial for professionals aiming to produce stunning visualizations. Ultimately, leveraging advanced rendering techniques not only enhances the aesthetic appeal of designs but also plays a vital role in the decision-making process, helping stakeholders visualize and understand the project more deeply.
Speed up your SketchUp rendering with iRender
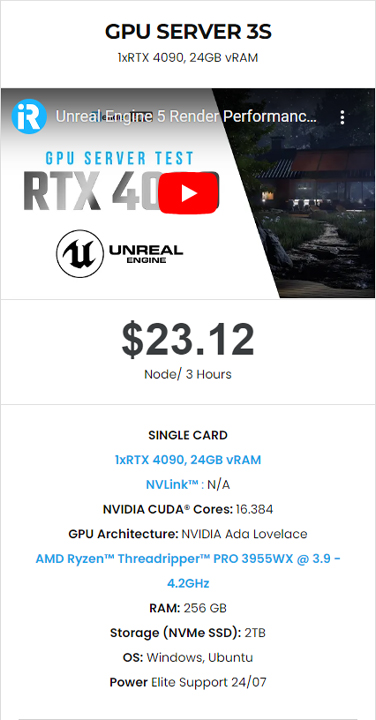
iRender – the best cloud rendering service, provides high-configuration servers that increase CPU and GPU rendering speeds. We provide the most powerful RTX 4090 configuration packages on the market, all equipped with AMD RyzenTM ThreadripperTM PRO 3955WX @ 3.9 – 4.2GHz and AMD Ryzen™ Threadripper™ PRO 5975WX @ 3.6 – 4.5GHz processors, 256GB RAM and 2T NVMe SSD hard drive capacity.
You just need to transfer your files, connect to the remote machine, and install SketchUp, as well as the necessary render engine and plugins then add your license and render yourself. Setting up ONCE and your working environment will be saved and ready to use at any time.
For SketchUp, we suggest the 3s server single card RTX 4090 for speeding up your rendering. You can see its configuration following:
Our iRender GPU app is all utilities in one, allowing you to use our service more efficiently. Here is our tutorial video to use the app.

Bonus and discount promotion
Currently, we are running a SPECIAL OFFER: 100% Additional Bonus for new clients who register an account and make a top-up within 24 hours after their registration. For educational projects, we offer 50% bonus for all transactions.
Futhermore, our price is flexible with hourly rental which has pay-as-you-go basis, daily/ weekly/ monthly subscription with discount from 10-20%.
Our support team 24/7
In case you have any problems or questions, don’t hesitate to contact the 24/7 support team. We will be happy to help you with your questions and problems at all times.
Register for an account today to experience our service, or contact us via email at [email protected] or WhatsApp at (+84) 912075500 for advice and support.
iRender-Happy Rendering!
Reference source: sketchup.com
Related Posts
The latest creative news from Maya Cloud Rendering, 3ds Max Cloud Rendering , Redshift Cloud Rendering, Cinema 4D Cloud Rendering , 3D VFX Plugins & Cloud Rendering.