Some Tips for Optimizing Your Blender Preference
Blender is becoming more and more popular among the world’s 3D artists because of its undeniable advantages. Blender is a good option for both novices and studio and professional 3D artists because it integrates into the 3D pipeline and supports a large variety of commercial applications and rendering engines. Therefore, to work with Blender effectively, in this blog, iRender will discuss some tips for Optimizing Your Blender Preference.
Overview of Blender
Blender is an open-source 3D animation software that may be used for all stages of the 3D pipeline, including motion tracking, rendering, compositing, modeling, rigging, animation, and simulation. 2D animation is also supported. Many different types of content can be produced with Blender, such as TV shows, animated feature films, and ads.
It also supports 2D animation. Blender can be used for various applications, including advertisements, animated feature films, TV series, etc. It provides several high-quality tools, like B-spline interpolated bones, envelopes, skeletons,s, automatic skilling, etc. All things considered, it’s a fantastic tool for 3D animation in movies and for creating animated 3D models for video games and other applications. The software supports full animation with Onion Skinning, layers, and colors for stroke and fill. You can even blend 2D and 3D directly in the viewpoint.
Some Tips for Optimizing Your Blender Preference
Open Blender Preferences
There are several ways to access Blender’s Preferences interface:
- Select the Preferences entry from the Edit drop-down menu.
- To access the search window, press the F3 key. Type “pref” until “Show Preferences” appears, then select it.
- Select Preferences from the pop-up menu by clicking on the Editor Type icon located in the top of any Blender viewport area.
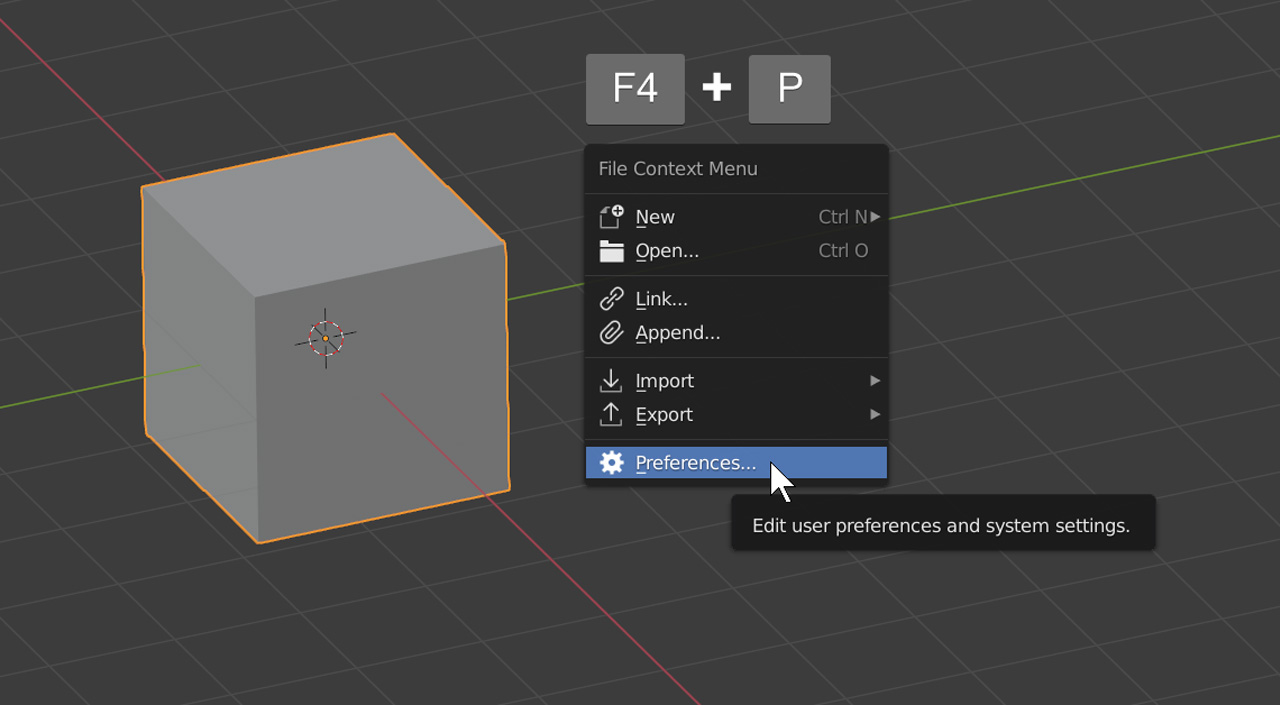
There is, however, a quicker way to access the Preferences menu: hit the F4 key to bring up the File Context Menu, then hit the P key to access the Preferences entry using the menu’s keyboard shortcut.
Turn off viewport navigation icons
For 3D view navigation, most Blender users use keyboard modifier keys and mouse gestures.
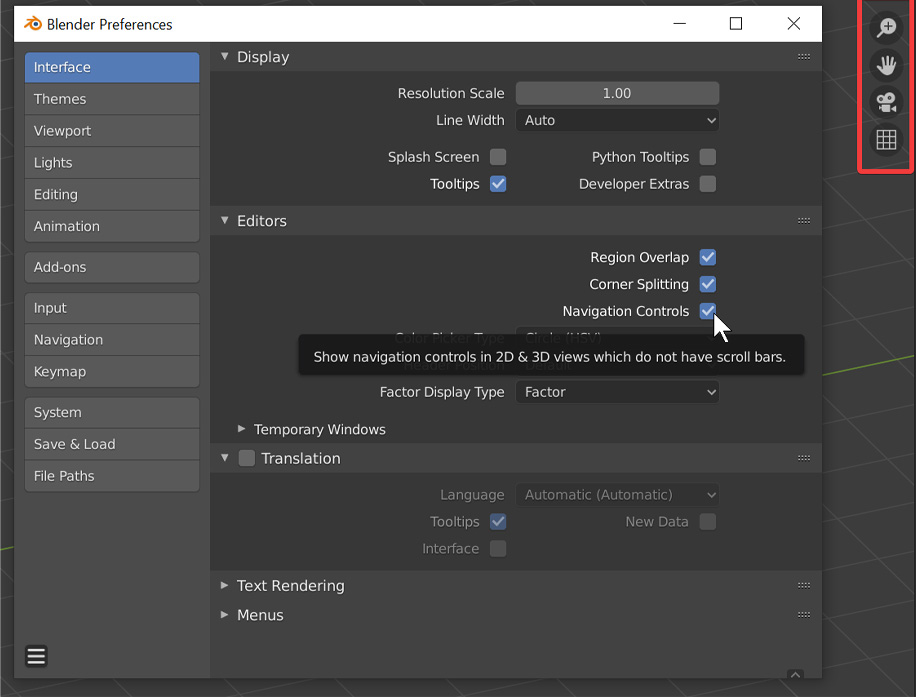
The viewport’s navigation icons become unnecessary UI clutter if you follow suit. So let’s keep them hidden!
To disable the icons, go to Interface ➥ Editors and deselect Navigation Controls. (This might need to be clarified since you might think it belongs in the Navigation section.)
Change render view and file browser display
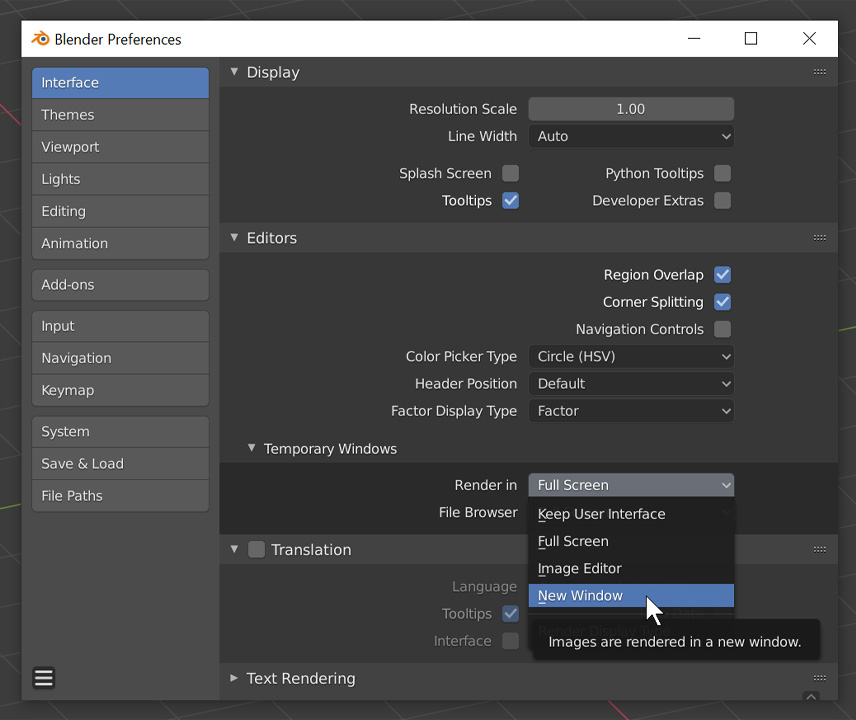
Slightly hidden in Interface ➔ Editors is an unfoldable Temporary Windows subsection containing two drop-down menus. You can adjust the render view and the file browser window’s appearance here.
You can instruct Blender, for instance, to render in the Image Editor or full-screen mode at all times.
Change the 3D viewport axis appearance
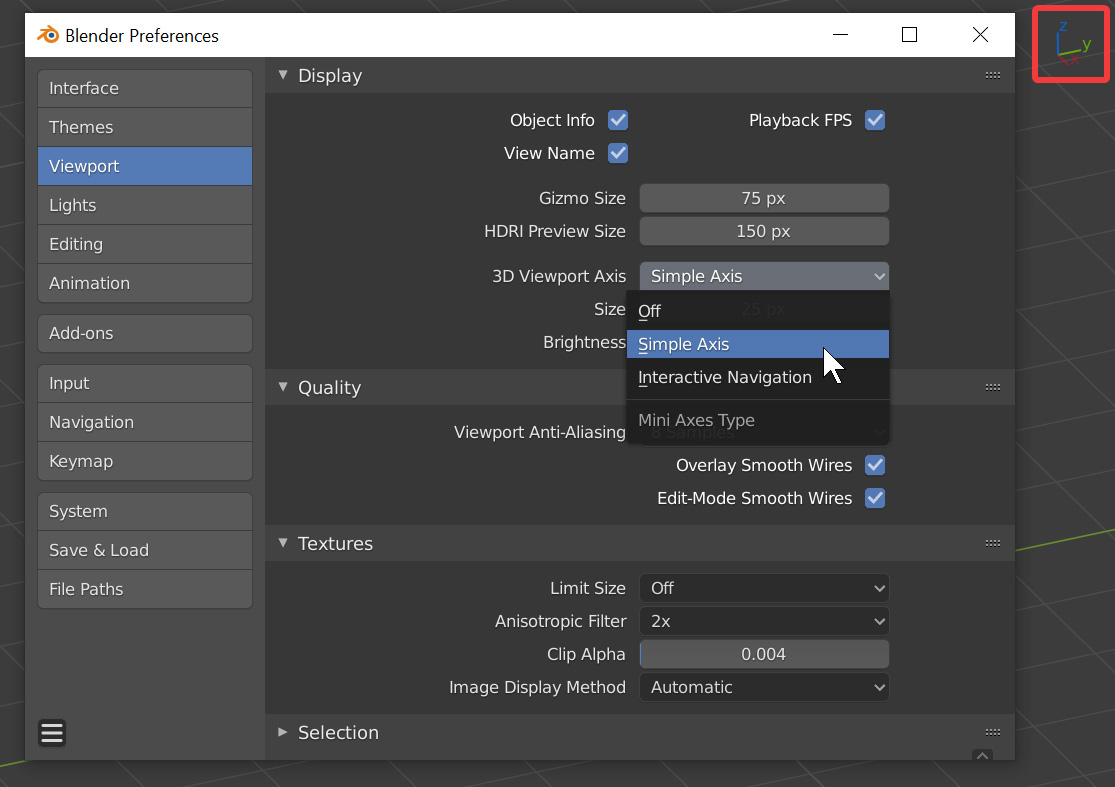
As in tip 02, if you’re a master of keyboard and mouse navigation and you don’t use the somewhat noticeable 3D viewport axis control device in the upper right corner of the 3D view, you can either minimize its appearance to a hardly noticeable 3D axis without controls, or you can turn it off entirely.
Select the option from the drop-down menu to Viewport ➔ Display ➔ 3D Viewport Axis.
Improve your viewport navigation
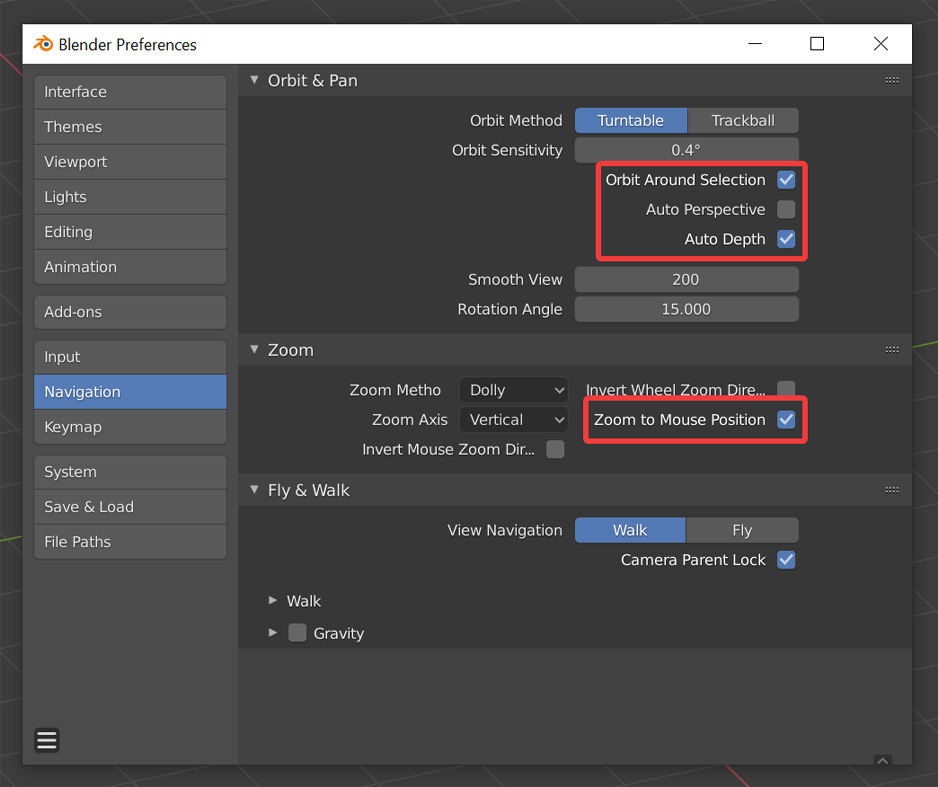
To make your viewport navigation better, there are several choices in the Navigation area.
- If you would like the center of the viewport to revolve around the selected object, check Revolve Around Selection.
- To prevent the viewport from switching to a perspective view each time you begin circling from a front, side, top, or other view, uncheck Auto Perspective if you prefer to continue working in an orthographic perspective.
- If you want to enhance your panning, rotating, and zooming, check Auto Depth to have Blender use the scene depth beneath the pointer.
- To make the center of the zoomed-in area your pointer, select Zoom to Mouse Position.
Easily transform gizmo switching using just 1 key
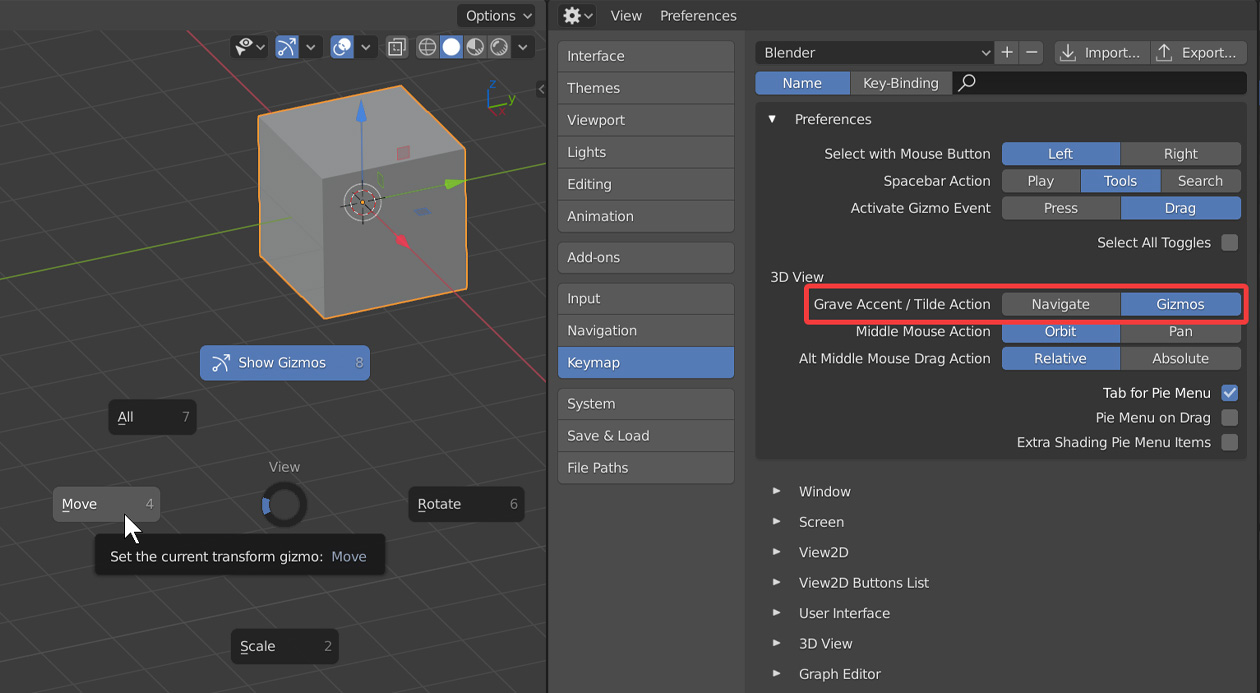
The Grave Accent / Tilde key opens a 3D view navigation pie menu by default.
You can choose to convert the Grave Accent / Tilde key to a convenient pie menu for quick access to the Move, Rotate, and Scale tool as well as for turning on and off the transform gizmo if you’re used to changing perspectives using the numeric keypad or by holding Alt while orbiting.
To activate the Gizmos button, navigate to Keymap ➔ Preferences ➔ 3D View ➔ Grave Accent / Tilde Action.
Single-click to open folders in the file browser
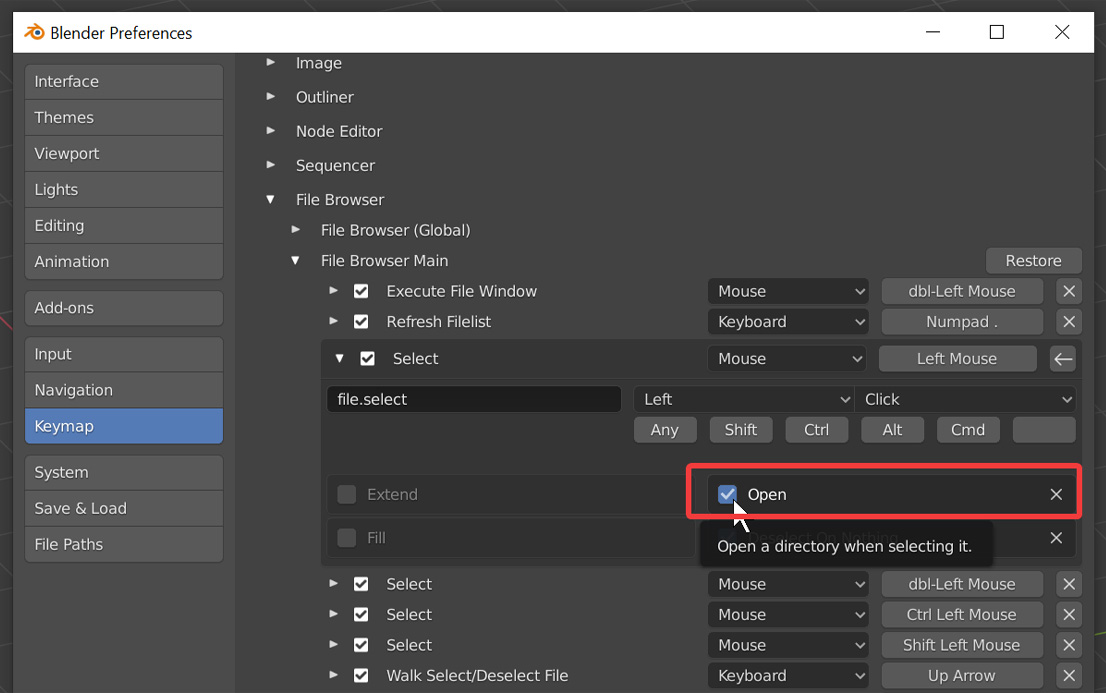
Versions of Blender older than 2.8 allowed you to easily browse to a highly nested subfolder by just doing a single-click on a folder. Using Blender with a tablet and pen is quite helpful in this regard.
Restoring the one-click functionality requires opening Keymap ➔ File Browser ➔ File Browser Main, expanding the first Select entry, and selecting the Open checkbox.
iRender - The Best Render Farm Provides RTX 4090 for rendering Blender Projects
iRender is proud to be one of the best GPU service providers on the market. You can find a lot of options suitable for your Blender project. We are releasing new servers for iRender’s users, which have powerful processing capabilities of AMD Ryzen Threadripper Pro 3955WX @ 3.90GHz- 4.2GHz and AMD Ryzen™ Threadripper™ PRO 5975WX @ 3.6 – 4.5GHz. Besides, they have multi-GPUs: 2/ 4/ 6/ 8 RTX 4090 24GB VRAM to boost performance in the rendering process. The high-end configuration is extremely suitable for complex Blender projects. Right now, we have pre-installed Blender 4.1 option when you create a machine, so you won’t take time to install software.
Let’s see how our RTX4090 performs when rendering with Blender scenes:
In case you have any problems or questions, don’t hesitate to contact the 24/7 support team. We will be happy to help you with your questions and problems at all times.
This month, we are running a SPECIAL OFFER: 100% Additional Bonus for new clients who register an account and make a top-up within 24 hours after their registration.
Register an account today to experience our service.
Or contact us via the email [email protected] or WhatsApp: (+84) 912075500 for advice and support.
iRender – Happy Rendering!
Reference source: cgcookie
Related Posts
The latest creative news from Blender Cloud rendering.


