Working with Displacement in Octane for Cinema 4D
There are currently two types of displacement in Octane. The original form was texture displacement; vertex displacement was introduced after. Although they work similarly at their core and share the same displacement node, in other respects, they are different. Also, Displacement in Octane is a somewhat advanced topic. In this article today, let’s work together with Displacement in Octane for Cinema 4D.
1. What is Displacement?
Polygons are used in 3D applications to define the geometry of the objects in a scene. A model becomes more efficient and easier to work with the fewer polygons it has, but getting fine detail on the surface becomes more challenging.
To add more surface detail to a model, you may either add more polygons or use textures to trick the eye into believing that there is more geometry than there is.
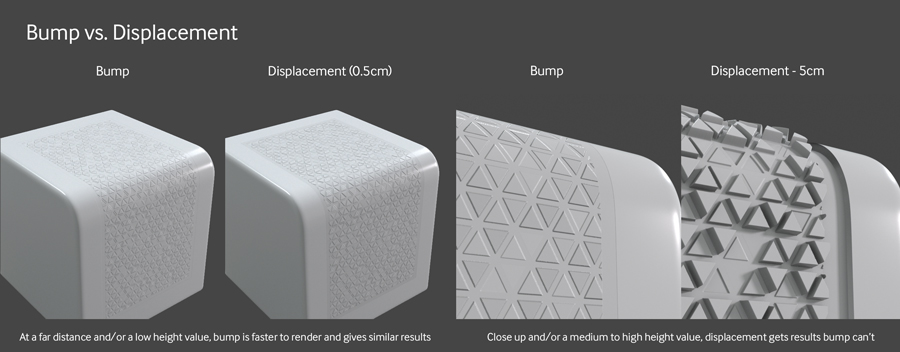
Displacement is kind of a middle ground. It works by moving specific polygons on your mesh in one way or another using the information from an image texture. When you click the render button (or launch the Live Viewer), the scene can be extremely lightweight and efficient but have a ton of high-quality detail because this is done at the material level, not in a separate tag or object, and it occurs at render time. Without changing the geometry, you may also easily and quickly edit the original image to add a logo or change the size of your greebles.
2. How does Octane's displacement work?
Octane has two types which are Vertex Displacement and Texture Displacement.
2.1. Vertex Displacement
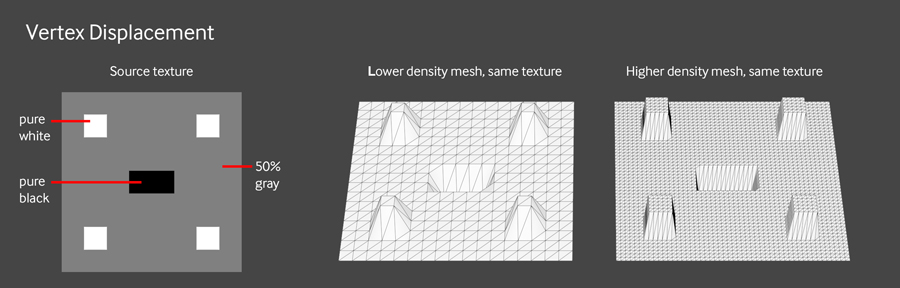
Vertex displacement is more easily understood. It decides how much and which way to push each polygon by first looking at how a texture from a source image is transferred onto the geometry to which it is applied. Pixels that are darker than 50% gray are pushed “down,” and those that are lighter than 50% gray are pushed “up.” Vertex displacement gives finer detail the more polygons in the model.
2.2. Texture Displacement
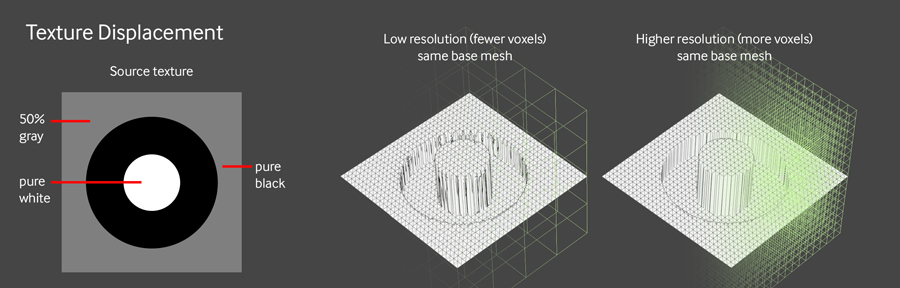
Texture displacement is more complicated. Based on the resolution you choose, it creates a voxel grid that overlays over the mesh’s UV map to decide which polygons need to be changed. After that, it calculates how far each new divided polygon is pushed using the texture you gave. Even though this method is older and has many more drawbacks, it still has some useful tricks up its sleeve and occasionally could even be faster and more efficient.
3. How to Use Displacement in Octane
In Octane, displacement exists on a material level. Through Octane’s node editor or the Material Editor interface in C4D, you can add it to an Octane material.
3.1 First, you need a displacement node
Each type of material has its displacement channel. For a displacement node to work effectively, it needs to be connected to the material’s displacement input.
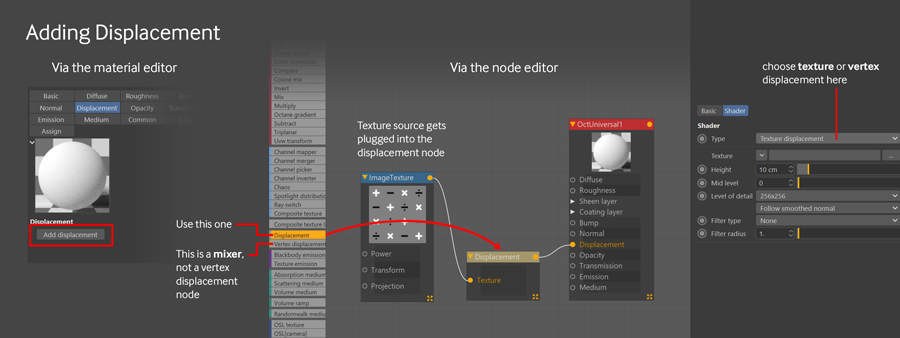
You can manually add this node using any of the many node editor methods, or by going to the displacement channel in the C4D material editor interface and selecting the “Add Displacement” button. This will enable you to set up and connect the displacement node.
When working in the node editor, you’ll see a node named “Vertex displacement” on the list on the left; this is the vertex displacement MIXER. Simply drag out the standard displacement node and select Vertex from the type selection in that node’s settings to switch from texture displacement to vertex displacement.
3.2. Next you need a source texture
Octane gets information from the displacement node’s texture input on which parts of the mesh to push in which direction and how much (up to the displacement node’s maximum height). The material editor in C4D can be utilized for this, but the node editor makes setting it up much easier.
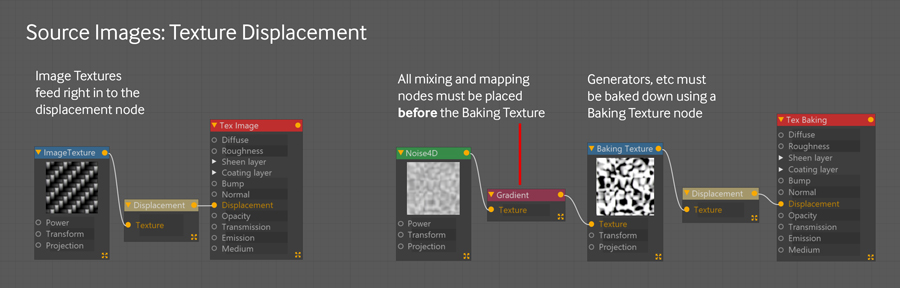
This requires an image to enable texture displacement. This implies that you can feed an Image Texture node with a PNG, EXR, PSD, or any other octane-supported image type into the displacement node (avoid JPEG though).
You can put almost anything into the texture input if you’ve chosen vertex displacement. Baking Texture is not necessary. OSL textures work well, and generators like Noise and Checker can be fed in directly.
3.3. Finally, you can set some options
Below are some options you can set:
- Set the height: The height value determines the TOTAL amount of units (default is cm) that displacement can push polygons one way or the other.
- Set the mid level: Because it depends on your textures being in the correct color space, this one can be difficult. The image texture node has your input texture set to non-color data, and it is in a linear color space.
- Set the amount of detail: The amount of detail depends on actual geometry subdivisions when utilizing vertex displacement. It would help if you chose the area where the subdividing will take place. On the other hand, try to get the resolution dropdown as close to your source resolution as you can if you’re utilizing texture displacement. This can be increased higher.
Conclusion
These are some shares about how to work with Displacement in Octane for Cinema 4D. iRender hopes you will have a more objective view of this feature and help you achieve the best rendering results.
Leverage The Cloud Rendering Service for Cinema 4D and Octane
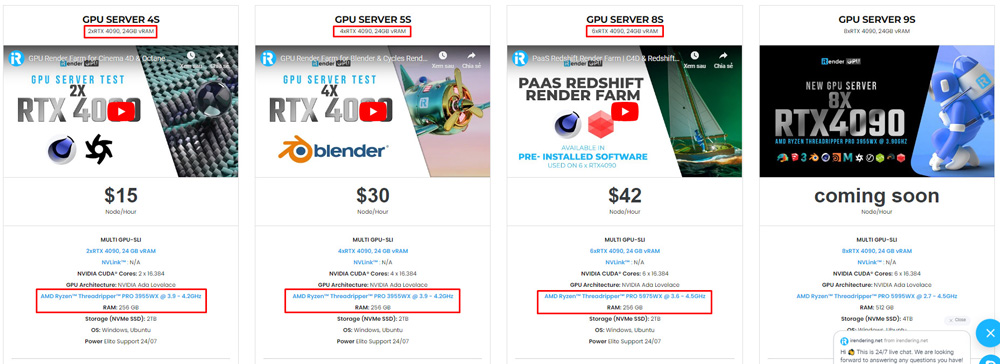
iRender has high-end configuration servers
iRender is a Professional GPU-Acceleration Cloud Rendering Service provider in HPC optimization for rendering tasks, CGI, VFX with over 20.000 customers and being appreciated in many global rankings (e.g. CGDirector, Lumion Official, Radarrender, InspirationTuts CAD, All3DP). We offer you high configurations machines with high-end specifications like AMD Ryzen™ Threadripper™ PRO 3955WX @ 3.9 – 4.2GHz or AMD Ryzen™ Threadripper™ PRO 5975WX @ 3.6 – 4.5GHz, RAM 256GB, Storage NVMe SSD 2TB. Most importantly, we always update to the latest GPU technology, with 1/2/4/6/8 x RTX3090/RTX4090.
iRender provide pre-installed and Free License Redshift - Famous Render Engines for Cinema 4D
As an official partner of Maxon, we provide pre-installed (and licensed) C4D and Redshift machines. Each user can use 1 our Redshift/ Cinema 4D license. For Prime Customers, they can use combo C4D + Redshift. You can watch our the workflow via this video:
Also, we can provide you one Octane license if your total recharge account from 1500$.
Video test C4D rendering speed
Let’s check our video test C4D and Octane on server 6xRTX4090:

Try our RTX 4090 machines and boost your rendering now! If you have any comments about our article, please do not hesitate to reach us at [email protected] or Whatsapp: +(84) 916017116.
iRender – Happy Rendering!
References Source: help.otoy.net
Related Posts
The latest creative news from Cinema 4D Cloud Rendering , Redshift Cloud Rendering, Octane Cloud Rendering, 3D VFX Plugins & Cloud Rendering.