Blender Cycles Optimization Tips for Low-end PC (2025)
Blender’s Cycles produces stunningly realistic renders, but that realism comes at a cost. Running it on a low-end PC can feel like trying to run a marathon in flip-flops. Laggy viewports, crashes, and endless render times are common struggles, but there’s hope. With the right settings and workflow adjustments, Blender Cycles runs surprisingly well, even on outdated or budget hardware. This guide’ll walk through practical Blender Cycles optimization tips tailored for low-end PCs in 2025. An artist just got his render time from 50 minutes to 40 seconds per frame on his 8-year-old GTX 1050, and here’s how he did it. Let’s learn more about them!
Enable Persistent Data
When rendering animations in Blender using Cycles, you may notice a short pause at the beginning of each frame, where textures and other assets appear to reload before the actual rendering begins. This pre-processing stage can take several seconds, especially in complex scenes, which happen repeatedly for each frame.
This is where Persistent Data comes in. When enabled, Blender keeps certain data, such as textures, geometry, and shaders, in memory across multiple frames. This means that Blender doesn’t have to reload everything from scratch each time, which can significantly speed up render times, especially for animations.
While the benefits may be less noticeable on slower machines due to hardware bottlenecks, enabling Persistent Data can make a significant difference on more capable systems or even modest setups when rendering multiple frames.

To enable, go to Render Properties > Performance > Persistent Data.
Adjust Light Bounces
When you start exploring Cycles, one of the first performance-related settings you’ll come across is Light Bounces. These settings control how many times a light ray can bounce off a surface before Blender stops calculating. By default, Blender sets it at 12 bounces to ensure physically accurate lighting and realistic results.
Of course, you might think that reducing the number of bounces would result in faster rendering, and you’d be right. But here’s the thing: when we tried reducing the maximum number of bounces, the scene rendered much faster, but the overall lighting looked unnaturally flat and dark. It’s a clear trade-off between speed and image quality.
Therefore, in scenes where indirect and reflected light play a large role, such as interiors or reflective materials, reducing the number of light bounces can significantly degrade the final image. However, in simpler setups or scenes where the light is more direct, reducing Light Bounces can be an effective way to shorten render times without sacrificing too much quality.
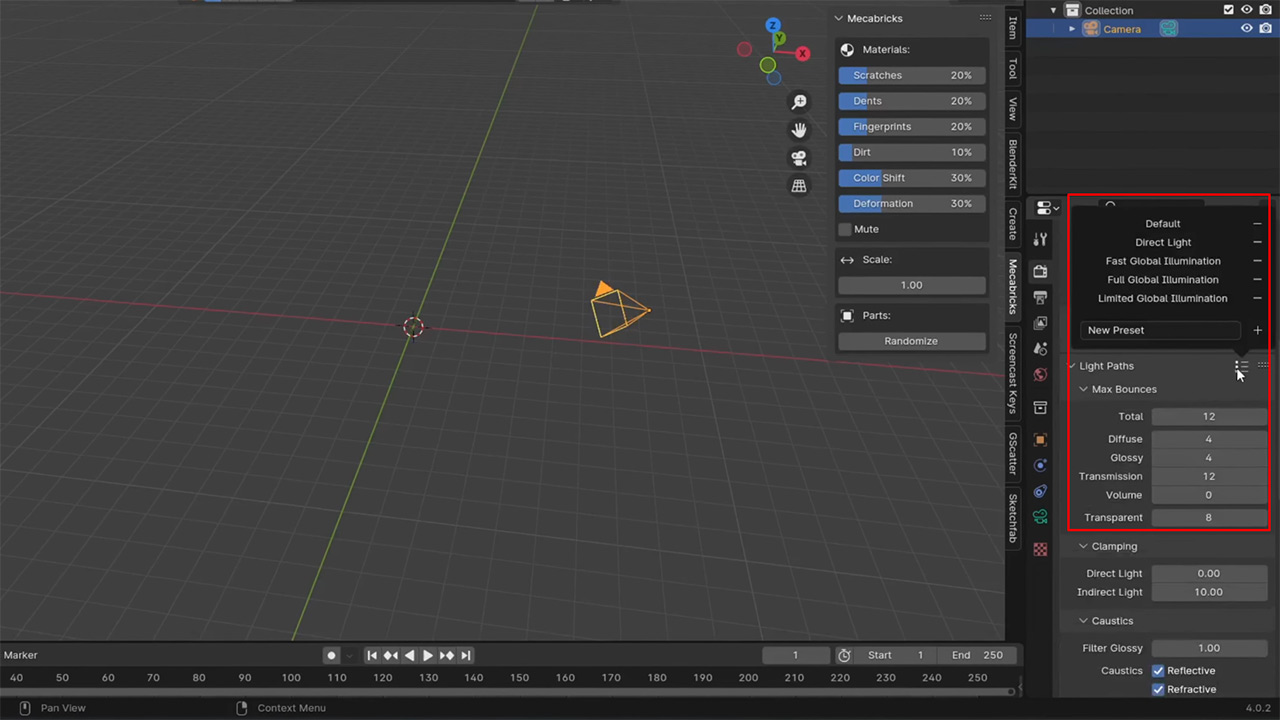
To adjust, go to Render Properties > Light Paths and experiment with reducing values such as Max Bounces, Diffuse, and Glossy bounces to see how it affects both render times and image fidelity.
Optimizing Tile Size
One of the most frustrating issues many Blender artists encounter when rendering with Cycles is the dreaded ‘Out of GPU Memory’ error. This error pops up frequently, especially in complex scenes, interrupting the render process and slowing down my workflow. At first, you can close background applications to free up resources.
However, what makes a noticeable difference is adjusting the Tile Size, a setting that controls how much of the image Cycles renders at a time. Initially, the tile size is set to 148, meaning the GPU has to process large chunks of the image in each run. This puts a lot of pressure on the limited VRAM, causing it to crash frequently.
After increasing the tile size to 512, the system performs best with older GPUs with 4GB of VRAM. By rendering each tile larger, the GPU can process each block more efficiently without running out of memory. As a result, not only will the memory errors stop, but the render time will also decrease by about 10%.
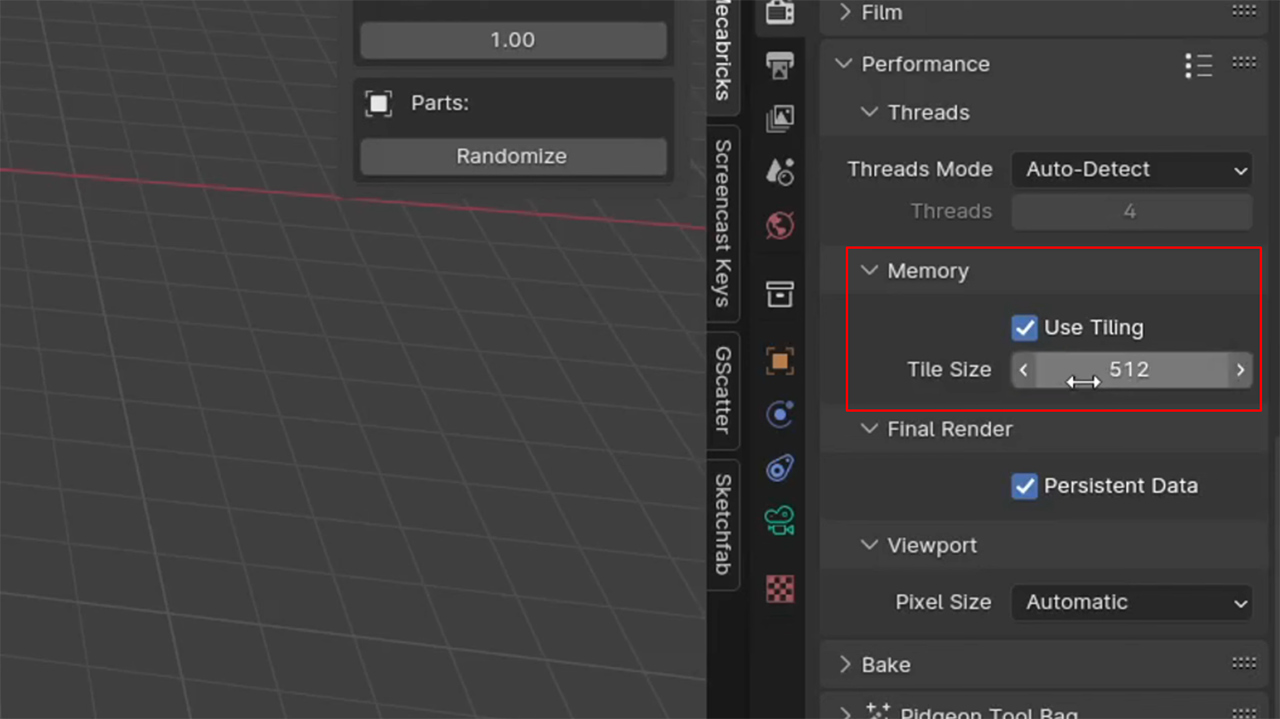
To adjust this setting, go to Render Properties > Performance > Tiles and experiment with different tile sizes.
Note: For GPU rendering, larger tiles (e.g., 256 or 512) generally work better, while smaller tiles are more efficient for CPU rendering.
Adjust the Pixel Size
If you’ve ever rendered a complex 3D scene in Blender and noticed that the final image looks a little blurry or lacks sharp detail, the Pixel Size setting may be the problem. By default, this value is usually set to 1.5 pixels.
Try reducing the pixel size to 1.0. This forces Blender to calculate each pixel more accurately, resulting in sharper edges, clearer textures, and a more polished overall render. That little tweak brought back the clarity and detail with just one simple adjustment.
You can find this setting in the Render Properties under the Sampling or Output section, depending on your version of Blender.
Turn off Light Tree
If your render times are still unusually long, even after tweaking your general settings, there’s one more feature worth checking out: Light Tree. Introduced in Blender 3.5, this option is designed to optimize lighting by managing multiple light sources more intelligently. However, in practice, especially for scenes with many lights, this option often adds unnecessary overhead without significantly improving image quality.
You can turn off Light Tree, many users have reported significant performance gains. In one case, disabling it reduced render times from 8 minutes to just 2 minutes per frame without any noticeable loss in quality. If you are working on a low-end PC and your scene does not rely on complex lighting behavior, you should turn it off.
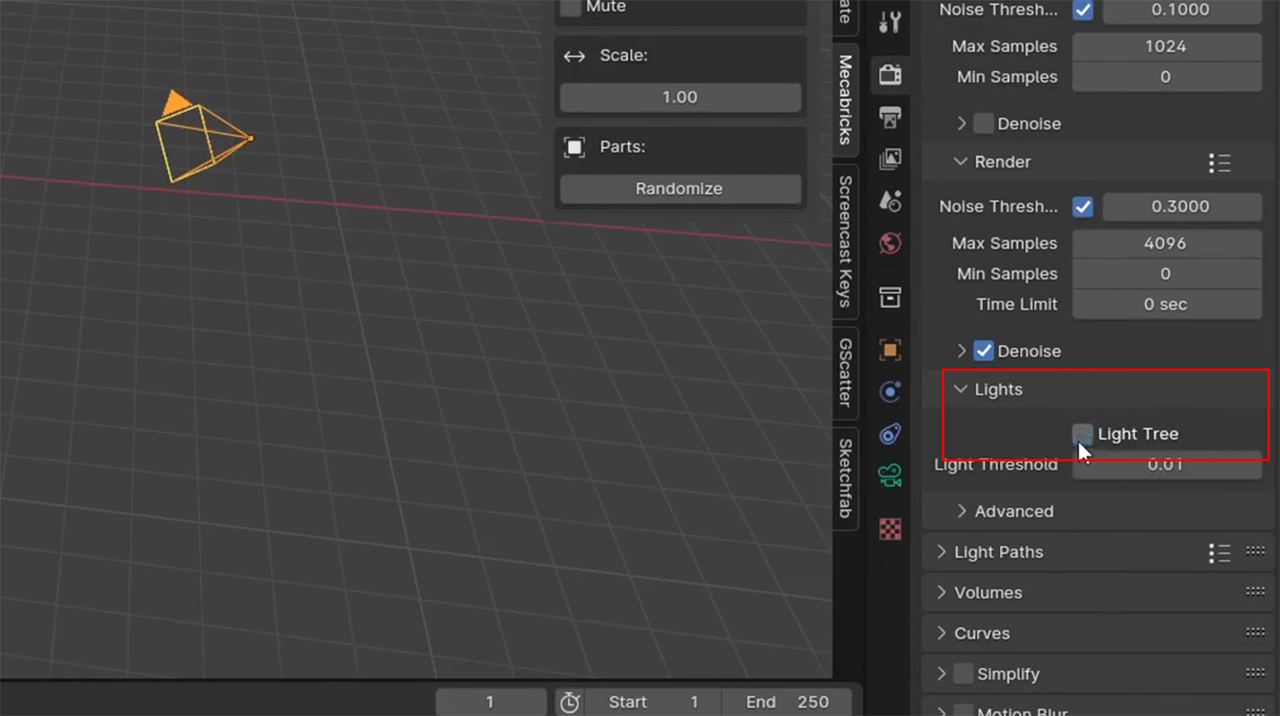
You’ll find this setting under Render Properties > Sampling > Light Paths. By default, it’s enabled.
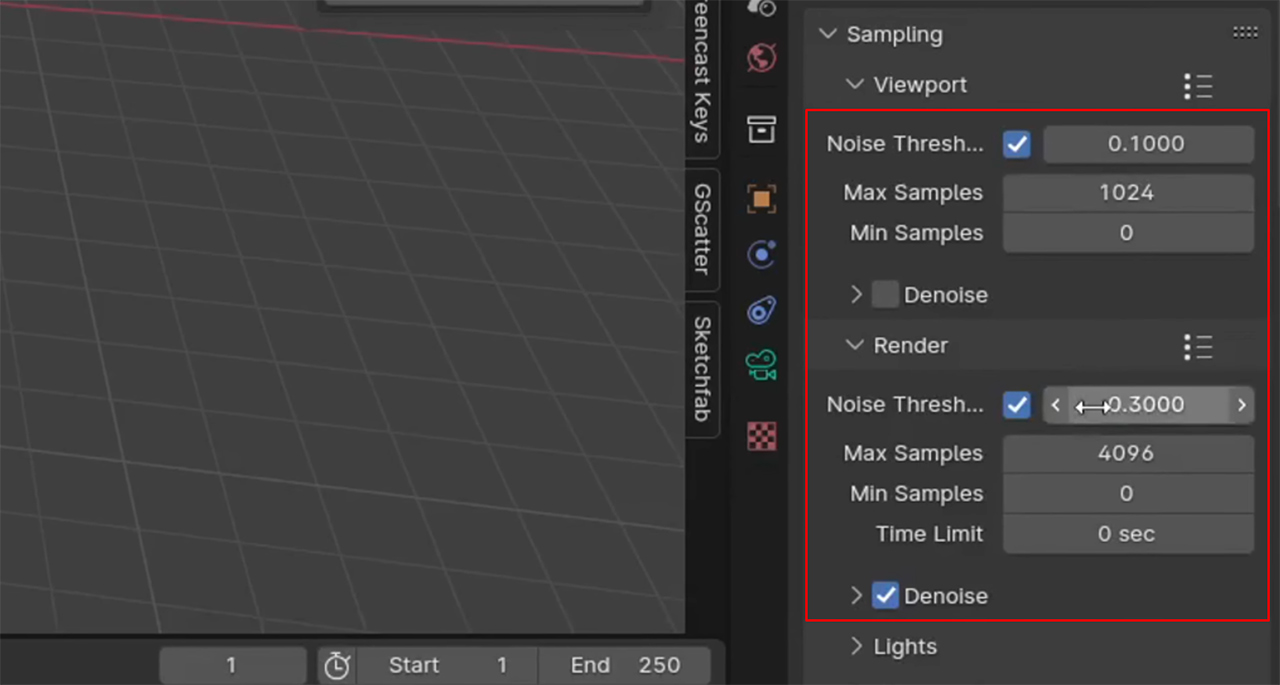
Using Samples, Noise Thresholds, and Denoising
In Blender, samples determine how many light rays are calculated per pixel. While higher sample counts can improve image quality, they also result in significantly longer render times.
To optimize performance, try working with a lower sample count, ideally between 50 and 100. But instead of manually adjusting it for each scene, you can use the Noise Threshold setting to handle sampling smarter. This feature adjusts the number of samples per pixel based on the noise level in specific areas of the image. For example, darker or more complex areas will receive more samples, while simpler areas will receive fewer samples.
By default, the Noise Threshold is set to 0.01. Reducing the threshold to 0.1 or even 0.5 can significantly reduce render times with minimal impact on image quality. A threshold of 0.5 is usually the sweet spot for low-end PCs.
The final piece is denoising. This feature uses algorithms to clean up noisy renders, allowing you to work with fewer samples, sometimes as few as 30, while still achieving clean, professional results. In many cases, a denoised render with 30 samples will look better than an undenoised render with hundreds of samples.
To summarize:
- Set the sample count to a low base (around 50)
- Adjust the noise threshold to 0.5 or 0.1
- Enable denoising in both the viewport and the final render
These small tweaks can easily cut your render times by 2-5x without sacrificing image quality.
4K Resolution
The most impactful change for Blender Cycles optimization is that you can improve the detail and quality of your renders by increasing the resolution, especially when moving from HD to 4K (Ultra HD). This upgrade gives you four times more pixels, which means much sharper details and a more vibrant overall image.
While higher resolution will increase render times, it is often more cost-effective than increasing the number of samples. Even 30 samples in 4K with denoising can look better than 100 samples in HD. Plus, denoising works more accurately at higher resolutions, removing noise with better accuracy.

Image source: reddit.com
If your image doesn’t have enough detail, simply increase the resolution. This is the simplest and most effective way to increase quality.
Frame Interpolation
If you’ve already optimized your render settings, here’s an even more powerful trick to speed up animation rendering: use AI frame interpolation.
Say your animation has 300 frames at 30fps; that’s a lot to render. But you can cut that time in half simply by rendering frame by frame. Then, instead of sacrificing smooth motion, use an AI tool like Flowframes.
Flowframes analyzes the motion between frames and automatically fills in the missing frames using deep learning. And you’ll get smooth, natural-looking animation that looks as if you’d rendered every frame in a fraction of the time.

Image source: blenderartists.org
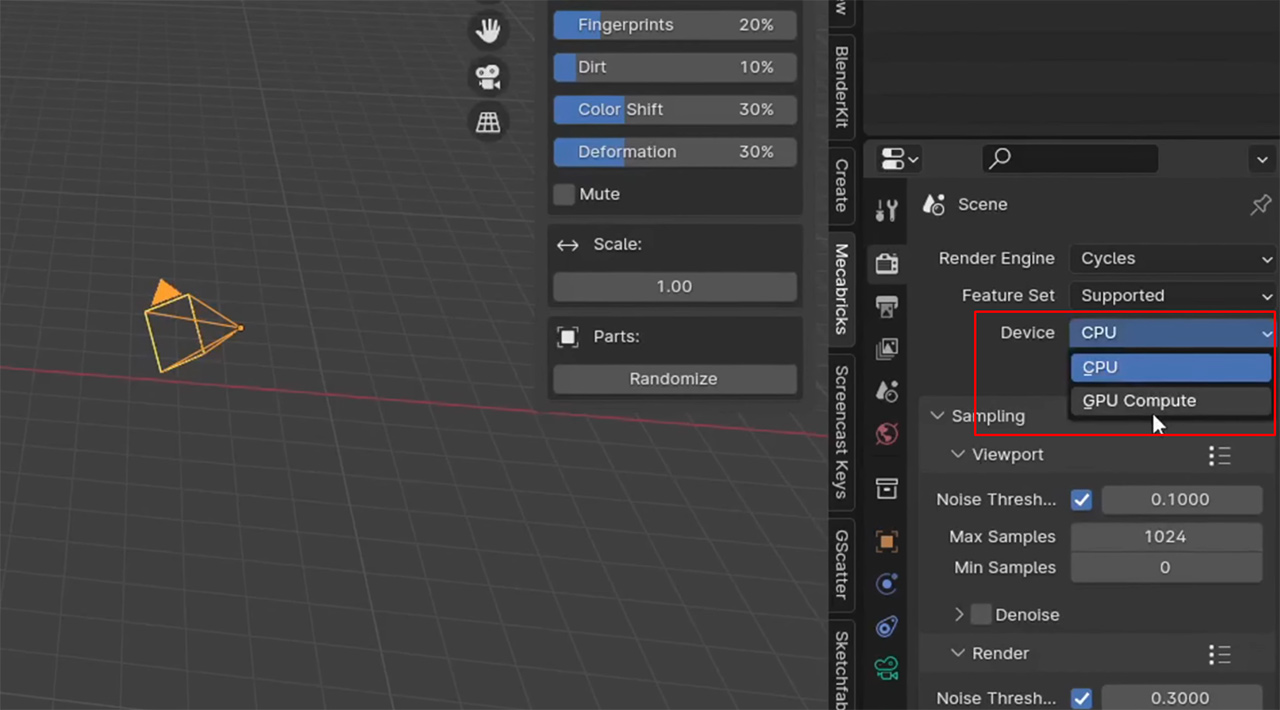
Choosing the Right Hardware (GPU vs CPU)
One of the most effective ways to speed up your rendering in Blender is to use the right hardware settings. In Render Properties, you can choose to render using the CPU, GPU, or both. While it may seem logical to have both enabled, the reality is that using only the GPU is often significantly faster, especially for Cycles.
To apply this, simply go to Edit > Preferences > System and make sure your GPU (CUDA, OptiX, or HIP, depending on your hardware) is selected. In Render Properties, change the Device to GPU Compute instead of CPU. This small change can significantly reduce render times, especially on machines with dedicated graphics cards.
Use Older Blender Version
Another way of Blender Cycles optimization that may annoy some people, but it’s the most important when trying to get Blender to run smoothly on a low-end PC. If your device doesn’t meet the minimum requirements for the latest Blender version, the best solution is often to install an older Blender version. All previous versions of Blender are available on the official website. Once you’re on the site, click on Download, then select Previous Versions, and you’ll see a full list of releases.
It’s recommended to try Blender 2.8 first before going further back, so you can still take advantage of many newer features while improving performance.
Optimize Your Blender Cycles with iRender’s Powerful Servers
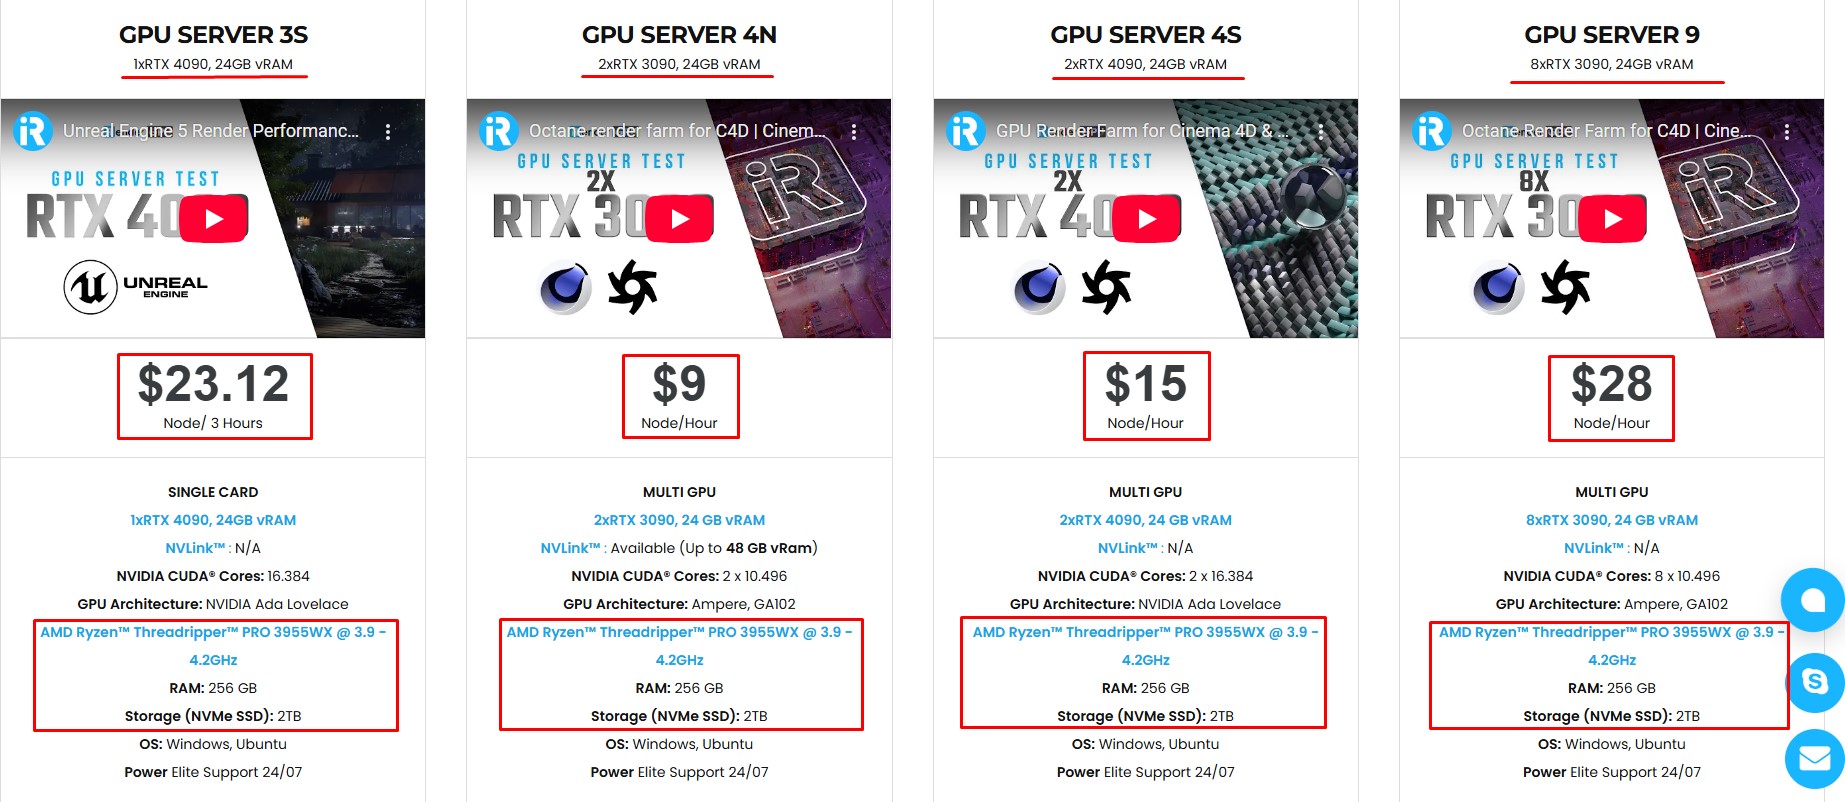
If your current setup struggles with heavy scenes, one of the smartest Blender Cycles optimization tips is to offload your renders to a cloud-based solution like iRender. We give you access to high-performance GPUs, so you can render faster and more efficiently, no need to upgrade your own hardware.
iRender offer the most powerful RTX 4090 configuration packages on the market, all equipped with AMD RyzenTM ThreadripperTM PRO 3955WX @ 3.9 – 4.2GHz and AMD Ryzen™ Threadripper™ PRO 5975WX @ 3.6 – 4.5GHz processors, 256GB RAM and 2T NVMe SSD hard drive capacity. With a wide range of GPU servers (1/2/4/6/8x) – RTX 3090/4090, you can choose the server that suits your needs to start the rendering process.
We are proud to support all popular 3D software, including Blender Cycles, with all versions.
Simple Your Workflow with Blender Preinstalled
Our servers have Blender 4.4.1 preinstalled. You just need to transfer your files, connect to the remote machine. Then you can render yourself like the way you do on your local PC. Setting up ONCE and your working environment will be saved and ready to use at any time.
Why choose iRender?
Unlike other services, iRender lets you upload and download files without starting the server, saving you both time and money.
We offer a Desktop app for Windows with a full feature set and a simple Drive app for macOS for easy file transfers. Here’s why iRender is a top choice for your rendering needs:
- 100% Software Support: We support all 3D software, their plugins, and render engines.
- Full Control: Our service will give you full control over the servers you rent. Therefore, you are free to create your own working environment.
- Go Green: We are committed to using 100% solar renewable energy towards environmental sustainability.
- Real-human 24/7 Support: Our professional support agents and technicians guarantee to bring you the best rendering experience.
Let’s see our latest performance test for Blender Cycles on our servers, you’ll definitely see the difference!

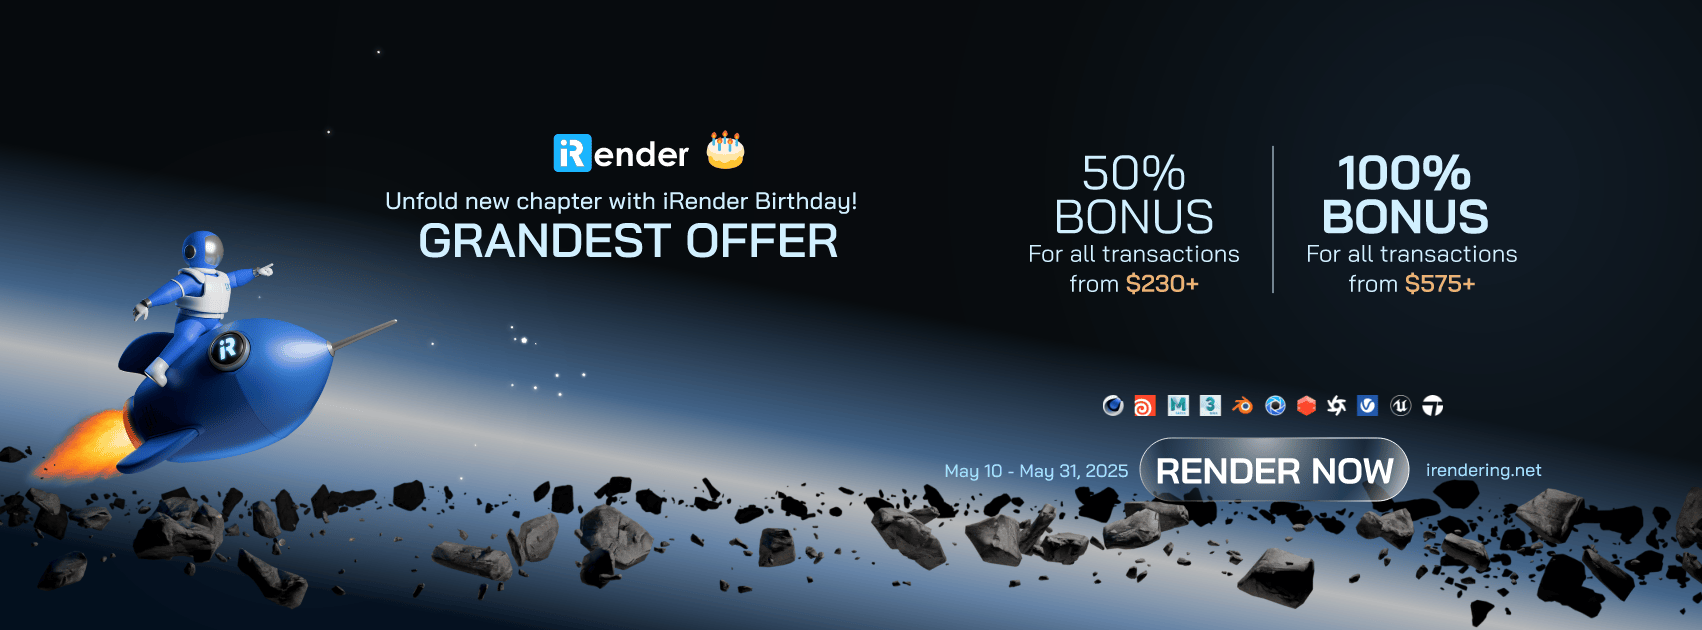
If you still wonder if this is the right place for your project, REGISTER NOW to get a trial and receive a 100% bonus promotion for your first transaction within 24 hours of registration with us.
This May, let’s celebrate our 6th anniversary with the biggest offer ever!
For more detailed information, please contact us via Live chat 24/7 or WhatsApp: +(+84) 912-785-500 or Email: [email protected]
iRender – Happy Rendering!
References: BadgerBricks
Related Posts
The latest creative news from Blender Cloud Rendering.