Create perfect shadows on your model with the Vray Sun
In this article, you’ll discover how to set up your sun and shadow settings in V-Ray and SketchUp, as well as how the shadows and sun orientation in VRay sun corresponds to the sun orientation in SketchUp.
1. Set up your Shadows toolbar
To get started, we’ll utilize a VRay sun and sky. The SketchUp shadows and sun are linked to the VRay sun. Toggle on the Shadows toolbar by going to “View”, then “Toolbars”. You’ll see it shows in the upper right-hand corner once you’ve done that.
By clicking the shadow symbol in the shadows toolbar, you may zoom in and turn on your shadows. You can see that you have control over where the sunshine comes from when you do this.

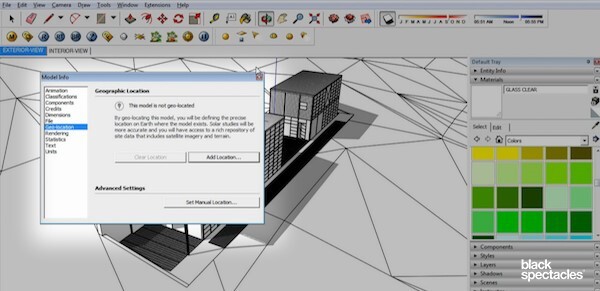
2. Choose a location for your model.
There’s a location feature in SketchUp that lets you select where you want your model to be.
Go to “Window”, then “Model Info”, then “Geo-location” to view that as well. You may use this section to add a location to your model. When you click “Add Place”, a box appears where you may provide a specific location for your model, such as Chicago, IL or wherever you want it to be.
That’s essentially how you’ll find the north orientation and place your model accurately in space. The V-Ray sun will utilize this information to help you orient yourself.
3. Activate the V-Ray Sun
So, if you turn on your shadows and set your settings to Fall – between September and October – and the time of day to afternoon. Then, using the V-Ray sun, you press “Render”, and the shadows will match.
However, make sure that the VRay sun is switched on first. To do so, first turn off the shadows.
Then, in the V-Ray Render Option Editor, expand the “Environment” area by clicking on it. Check the box next to “GI” (skylight) to ensure it is switched on. Then you notice a large “M” and a little “M”. There is no texture or other tools associated to it, as shown by the minuscule “M”. If the huge “M” is checked, it signifies it has a task assigned to it.
A new window will open when you click on the huge “M”. Select “TexSky” from the dropdown menu, which is essentially a V-Ray skylight system. Then it will present you with several alternatives. Select “Sun 1” from the selection in the Default Sky Options at the top – this is the SketchUp sun. Then go to the Sun section and check the “Enabled” box to make sure it’s turned on. All of the other default settings are, for the most part, excellent. Because it’s adjusted for our physical solar system, keep the intensity at 1.
One thing to remember is the size as the sun is setting. It’s now set to 1; when rendered, it’ll be extremely little, practically pixel-sized. And it’s from there that all the light comes. As a result, if the size is 1, the ground will have extremely sharp and strong shadows. When you increase the size to 3 or 5, the actual surface where the sunlight is coming from becomes larger, the edges get a little blurrier, and the overall effect becomes more realistic. But bear in mind that, depending on the impact you desire, the size of the sun in these settings may be adjusted. For the time being, keep it at 1.
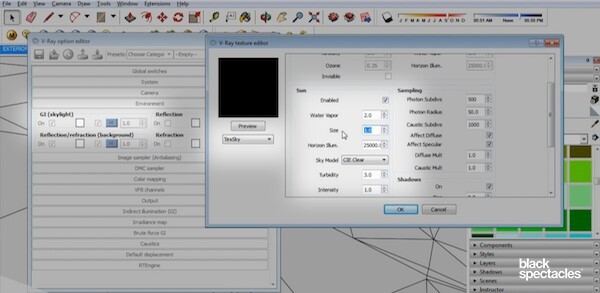
Click “Ok”, then “Reflection/refraction (background)” and finally the huge “M”. All you have to do now is match what you placed on the GI (skylight)
4. Render the model
Now, when you render, you can see how the shadows are oriented, and how the sun is oriented in SketchUp.

If you wish to modify it, simply control it in SketchUp, and the V-Ray sun will adjust accordingly.
iRender - Vray's Best Cloud Rendering Service
If you’re a Vray fan who wants to learn and use the latest features, but your computer configuration is still limited, don’t worry; iRender will provide you with a solution that will completely address your problem. iRender offers a choice of server packages ranging from single GPU to multi GPU RTX 3090, allowing you to pick the best server package for your renderer.
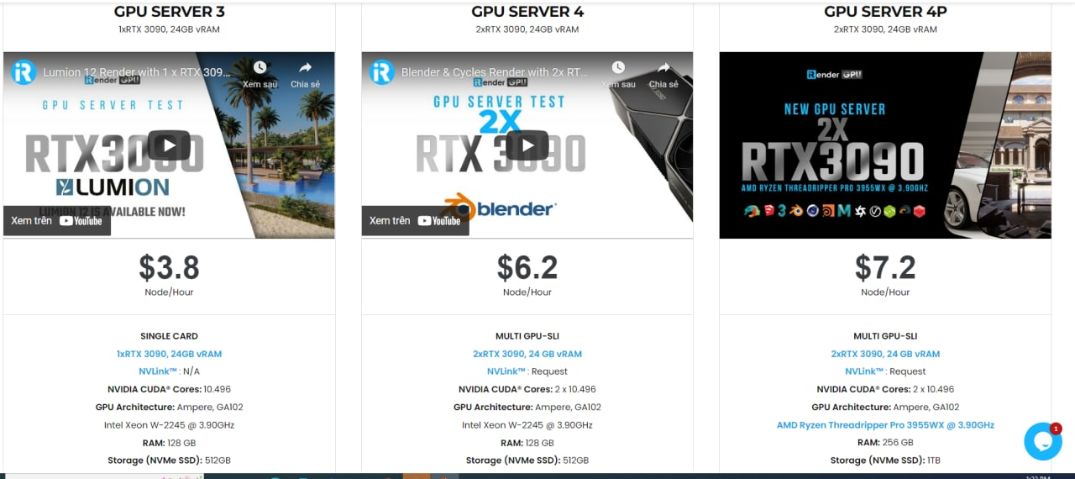
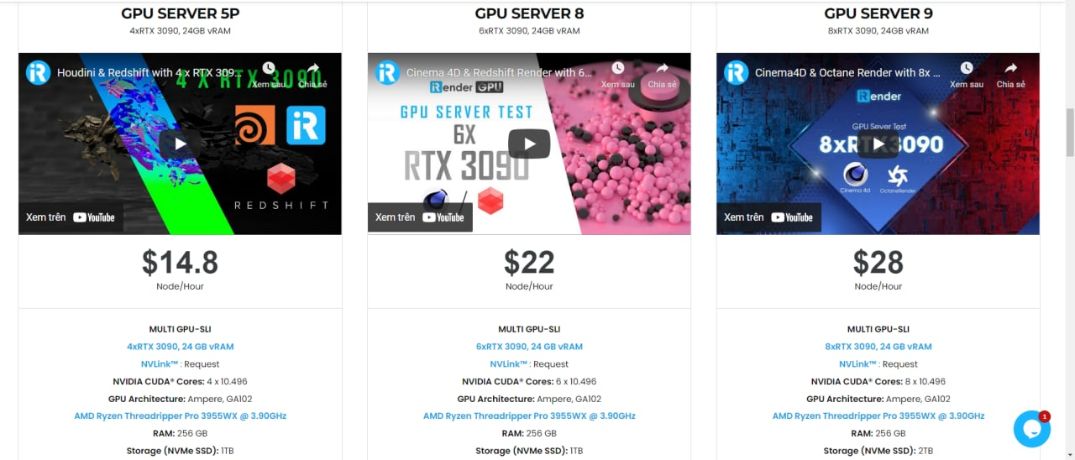
iRender makes rendering enjoyable and quick. A unique feature is that you will connect to the iRender server and utilize it as your own computer, with total control over setup and capacity. Our server supports any applications; you may install the program you need only once, and everything will be kept for future use. If you’re concerned about security, be assured that the safety and security of your data is our first priority. No one, including iRender, will have access to any of your data. The privacy policy of iRender may be found here.
iRender is committed to providing you with a rendering experience unlike any other. iRender, in particular, is running a fantastic deal for you: new clients will receive a 20% bonus on their first purchase within 24 hours of enrolling.To learn and enjoy more, please create an account here.
iRender – Happy Rendering!
Source: go.blackspectacles.com
Related Posts
The latest creative news from V-Ray Cloud Rendering , SketchUp Cloud Rendering , Enscape Cloud rendering, Lumion Cloud rendering, Twinmotion Cloud Rendering , 3D VFX Plugins & Cloud Rendering.