Discover helpful shortcuts for workflow in Unreal Engine 5.3
One of the great things about high-end app like Unreal Engine is that you can use shortcuts to save time and improve your cinematic animation productivity, therefore make your work easier. In this article, let’s find out some helpful shortcuts for workflow in Unreal Engine 5.3 with us.
5 helpful shortcuts for workflow in Unreal Engine 5.3
1. Middle-mouse scrubbing
If you want to set additional bracketing keyframes at the same value but at different times, you can click middle mouse and drag in the timelime. When doing that, you don’t need to worry about causing updates or evaluations to occur. The color of playhead will change to yellow to indicate the sequence is not evaluating.
2. Adding Actors to Sequencer
When dragging new Actors into your Level from the Content Browser, if you want to add them to Sequencer, pressing certain key like Ctrl or Shift will add the Actor as either a spawnable or possessable.
-
-
-
- Holding Ctrl if you want to add the new actor to Sequencer as a possessable.
- Holding Shift if you want to add the new actor to Sequencer as a spawnable.
-
-
3. Default Tracks
When adding certain Actors to Sequencer, tracks are automatically created with them. For example:
-
-
-
- Static Mesh Actors will automatically create a Transform Track.
- Skeletal Mesh Actors will automatically create a Transform Track and an Animation Track.
- Cine Camera Actors will automatically create a Transform Track and a Camera Component with Aperture, Focal Length, and Focus Distance property tracks.
- Light Actors will automatically create a Light Component with Intensity and Light Color property tracks.
-
-
This occurs because of the Tracks Settings located in the Sequencer Plugins Project Settings. You can locate these settings by opening the Project Settings window, and locating Level Sequencer in the Plugins category.
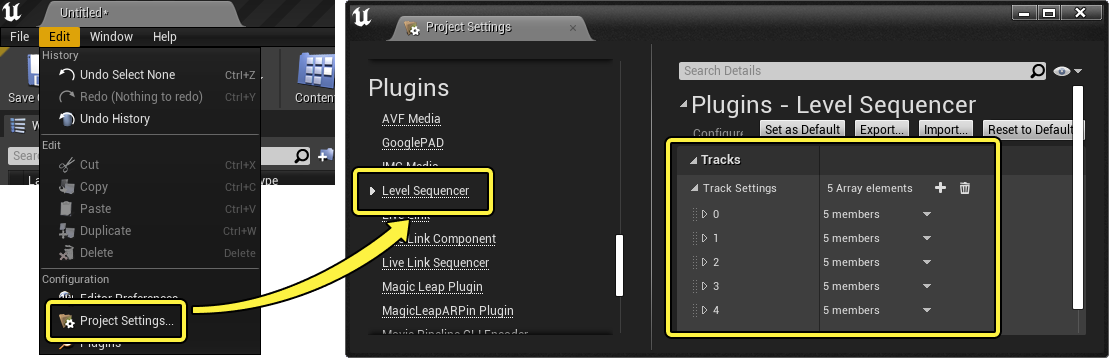
The Track Settings array is populated by default with settings for the previously mentioned tracks. You can click the Add (+) button to add a new array item, and each array has the following categories:
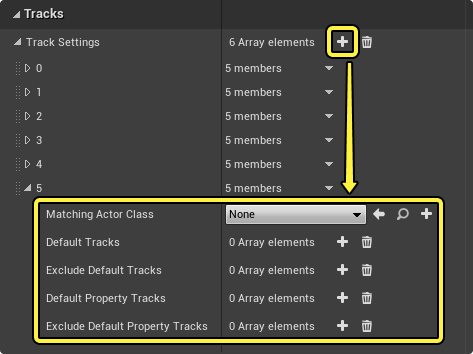
Description of some arrays:
-
-
-
- Matching Actor Class: This is where you specify the Actor class to automatically create tracks for when adding it to Sequencer.
- Default Tracks: This array is where you specify the tracks that are added when the Matching Actor Classis added to Sequencer. Click the Add (+) button and click the dropdown menu to browse Sequencer’s track types.
- Exclude Default Tracks: This array is where you specify tracks you don’t want added for this Actor class. You may want to use this if you are specifying different tracks to add, such as when your class is inheriting from a parent class which also has its default tracks specified here.
- Default Property Tracks: This array is where you specify the property tracks that are added when the Actor is added to Sequencer. Click the Add (+)button to add a new property item to the array. Component Path is where you specify the Actor’s component you want to add the property from. Property Path is where you specify the property name you want to automatically add.
- Exclude Default Property Tracks: This array is where you specify property tracks you don’t want added for this Actor class. You may want to use this if you are specifying different tracks to add, such as when your class is inheriting from a parent class which also has its default property tracks specified here.
-
-
4. Auto Size Shots
When adjusting start and end times of shots internally, if you want to automatically match the parent shot section to these edits, just right click the shot > Edit > Auto Size. It’s useful for retiming your shot and match the shot section, without needing to re-trim manually.
5. Shift Snapping and Alignment
Sometimes you want to drag section assets onto Sequencer tracks, such as audio, subsequence, or animation tracks. Just holding Shift will snap the dropped section to the Playhead location.
You can still align the Playhead to keyframes if Snap to the Pressed Key is disabled. Just holding Shift and clicking the keyframe. This makes it easy to perform subsequent actions, such as changing the value of this keyframe, or aligning other keys to it.

Final thoughts
Working with Unreal Engine or any 3D software is a constant learning journey, sometimes it can be stressful. But once you get to know it and keep practicing, exploring, it will become a wonderful tool for your 3D works. Hopefully the above 5 helpful shortcuts for workflow in Unreal Engine 5.3 will help you work with Unreal more easily.
If you want to find a render farm for your customized pipeline with Unreal Engine 5.3, iRender is the best choice. At iRender, we provide a remote workstation(s) where you can use it like your own computer. Therefore, you can install any software you want, add your license and render or modify your project by yourself.
We have many server packages, from single GPU to multiple GPUs. For real-time rendering software like Unreal Engine, we suggest our server 3S with the high-end hardware such as CPU AMD Ryzen Threadripper Pro 3955WX at 3.9GHz clock speed, core 16, thread 32. RAM 256GB Storage NVMe SSD 2TB and Video card RTX4090.
Let’s see how Unreal Engine performs on our server 3S (single RTX4090):

Not only those powerful configurations, iRender also provides you more services. Free transferring tool named iRender drive for macOS or Linux users. For Windows users, we recommend using our all-in-one application iRender GPU to work, and you don’t need to come to our website. Our price is flexible with hourly rental which has pay-as-you-go basis, daily/ weekly/ monthly subscription with discount from 10-20%. Plus, you have 24/7 support service with real human who will support you whenever you encounter an issue.
Register an account today to experience our service. Or contact us via WhatsApp: (+84) 916806116 for advice and support.
Thank you & Happy Rendering!
Source and images: docs.unrealengine.com
Related Posts
The latest creative news from Unreal Engine Cloud Rendering