How to enhance your wood texture using V-Ray for 3ds Max?
Wood textures play a crucial role in architectural renderings. They enable designers to tell stories by infusing realism and expressing various moods through features such as wear, dust, and dirt, all while providing a visually captivating experience for the audience.
In this tutorial for V-Ray in 3ds Max, we will guide you through creating a realistic and aesthetically pleasing wood material. Begin with a basic wood material, then add details like scratches and wear. Finally, we’ll mix elements such as soil and dust to enhance the authenticity further.
Let’s jump in with iRender!

Create a Base Wood Texture for 3ds Max
1. Source Wood Images
Start by locating a high-quality image of real wood online or using your own photograph. You can also explore various wood textures available in Chaos Cosmos, downloading and importing them directly into your scene. Make sure to acquire both a diffuse texture and a normal map for the wood.
2. Connect the Normal Map
Attach the normal map to the bump channel and increase its value to 100. This step will enhance the depth and texture of the wood material.
3. Apply the Diffuse Texture
Insert the diffuse texture into the diffuse slot. This will define the color and pattern of your wood material.
4. Control Wood Grain Direction
Utilize a V-Ray UVW Randomizer node to manage the orientation of the wood grain, adding a more realistic appearance.
5. Adjust Colors as Needed
If desired, apply color corrections to the wood material. Use a color correction node to modify the gamma and saturation. Decreasing the gamma will darken the texture while lowering the saturation will make the colors less vivid.
6. Enable Reflections
Turn the reflection color to white to allow for reflections. Adjust the glossiness value to control the sheen of the material. Since real wood surfaces have varying levels of glossiness, consider creating a specific glossy texture in an image editing program. Use the original diffuse map to generate this glossy texture, then plug it into the reflection glossiness map slot. Set the color space type to None to prevent gamma correction from affecting the texture.
7. Vary Glossiness Levels
Ensure that the wood grains display different levels of glossiness. This variation will contribute to a more natural and visually intriguing surface.

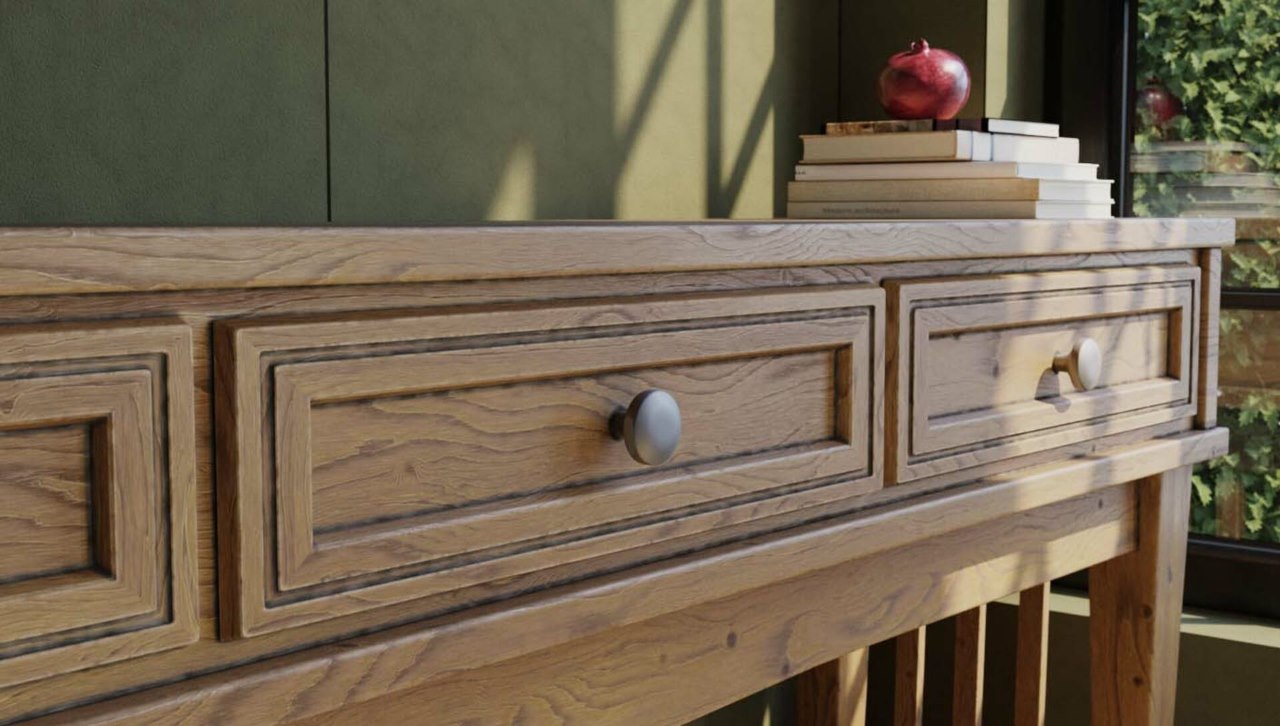
Adding Scratches and Wear to Your Wood Texture
1. Create a Worn and Scratched Version of the Wood Material
Now you can duplicate the wood material to represent a weathered and scratched surface. You can adjust the tiling settings in the V-Ray UVW Randomizer to achieve narrower wood grain. Keep in mind that the effectiveness of this adjustment depends on the texture you are using; changes in tiling may not yield narrower grains with different textures. Additionally, to make the damaged areas appear brighter, you can tweak the gamma settings in the color correction node to suit your preferences.
2. Introduce a Scratch Texture
To give the surface a more rugged look, incorporate a scratch texture. Insert this scratch texture into the bump map slot and adjust the strength and direction settings to achieve the desired effect. Utilize a V-Ray randomizer node to modify the tiling and scaling of the scratches, and reduce the reflectivity of the material to further emphasize the worn appearance.
3. Blend Materials with VRayBlendMtl
Use the VRayBlendMtl to combine the primary wood material with the scratched version. Connect your main wood material to the base material slot of the V-Ray Blend material. In the coat 1 slot, temporarily use a dummy material to facilitate the setup of the mask.
4. Create a Mask Using the V-Ray Curvature Node
Utilize the V-Ray Curvature node to create a mask that identifies the edges of your object. Set the mode to convex to focus on the edges instead of the crevices. Adjust the output maximum color value to enhance the visibility of the mask, ensuring that the scratched areas are clearly defined.
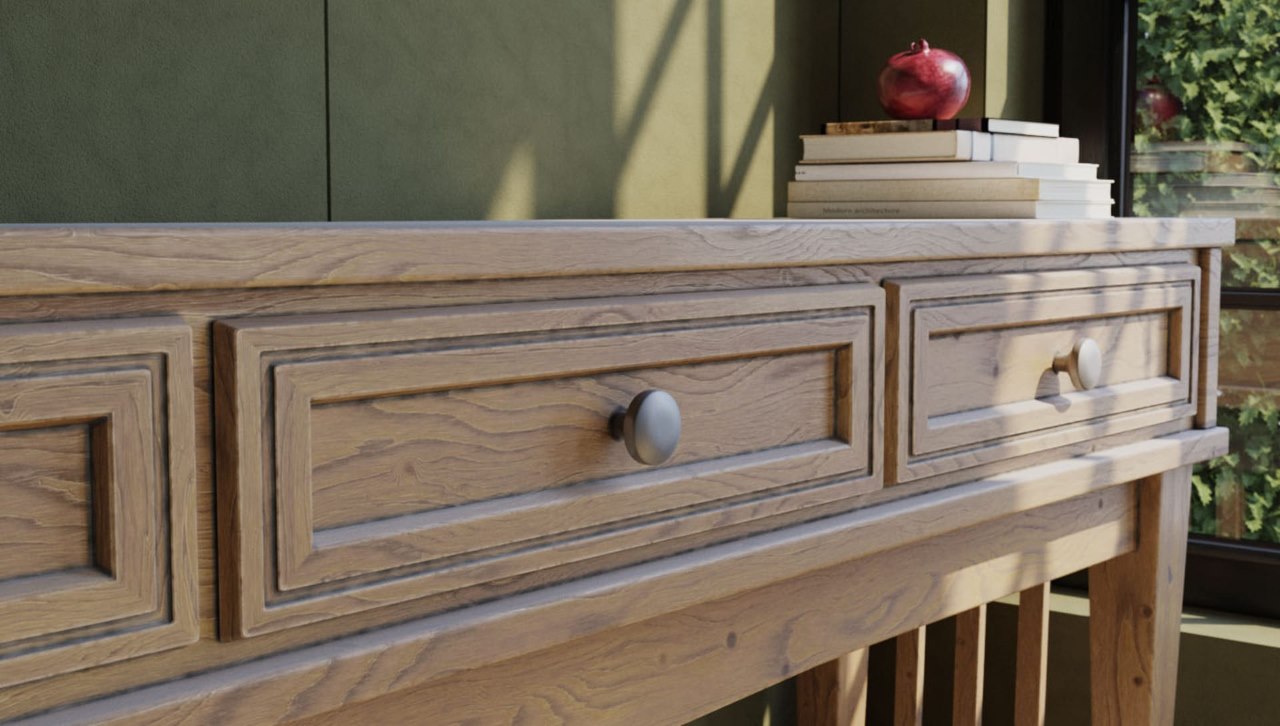
Applying Dirt to Your Wood Texture
1. Modify the Main Wood Material for a Dirty Appearance
Modify the main wood material to give it a dirty look. Desaturate the diffuse texture and blend it with a noise texture to simulate the appearance of dirt. Apply a noise node to introduce detail, adjusting the size and contrast to refine the noise effect. For a realistic dirt color, select a dark shade of green to represent grime and streaks.
2. Reduce Reflectivity
Lower the material’s reflectivity to better capture the characteristics of dirty surfaces, giving it a more authentic look.
3. Set Up a Mask for the Dirt Using the V-Ray Dirt Node
To effectively mask the dirt, use the V-Ray Dirt node. Enable the “consider only the same object” option to ensure that the ground is excluded from the mask. Tweak the occluded color and RGB multiplier to enhance the mask’s intensity. Fine-tune the distribution and bias parameters to achieve your desired effect. Additionally, you can incorporate a texture map to introduce variation in the mask and adjust its contrast as needed.
Apply a Light Layer of Dust
Utilize a falloff node to generate a mask for the object’s upper surfaces.
- Configure the falloff direction to align with the world axis and invert the mask colors.
- Modify the falloff type and mix curve to adjust the shape and contrast of the mask.
- Change the mask color to a medium gray.
Decrease the reflectivity and introduce a subtle sheen to the material to accentuate the dusty look.
Create a mask for the dirt using the V-Ray Dirt node.
- Activate the “consider only the same object” option to keep the ground out of the mask.
- Modify the occluded color and RGB multiplier to enhance the mask’s strength.
- Refine the distribution and bias settings to reach the preferred outcome.
- Incorporate a texture map to introduce variation to the mask and adjust the contrast as needed.
Final Thoughts
In conclusion, enhancing wood textures using V-Ray for 3ds Max can significantly elevate the realism and visual appeal of your 3D models. We encourage you to explore and experiment, as mastering these methods can transform your 3D visualizations and captivate your audience.
Speed up V-Ray and 3ds Max rendering with iRender
We proudly support all 3D software including V-Ray and 3ds Max with any version and plugins needed.
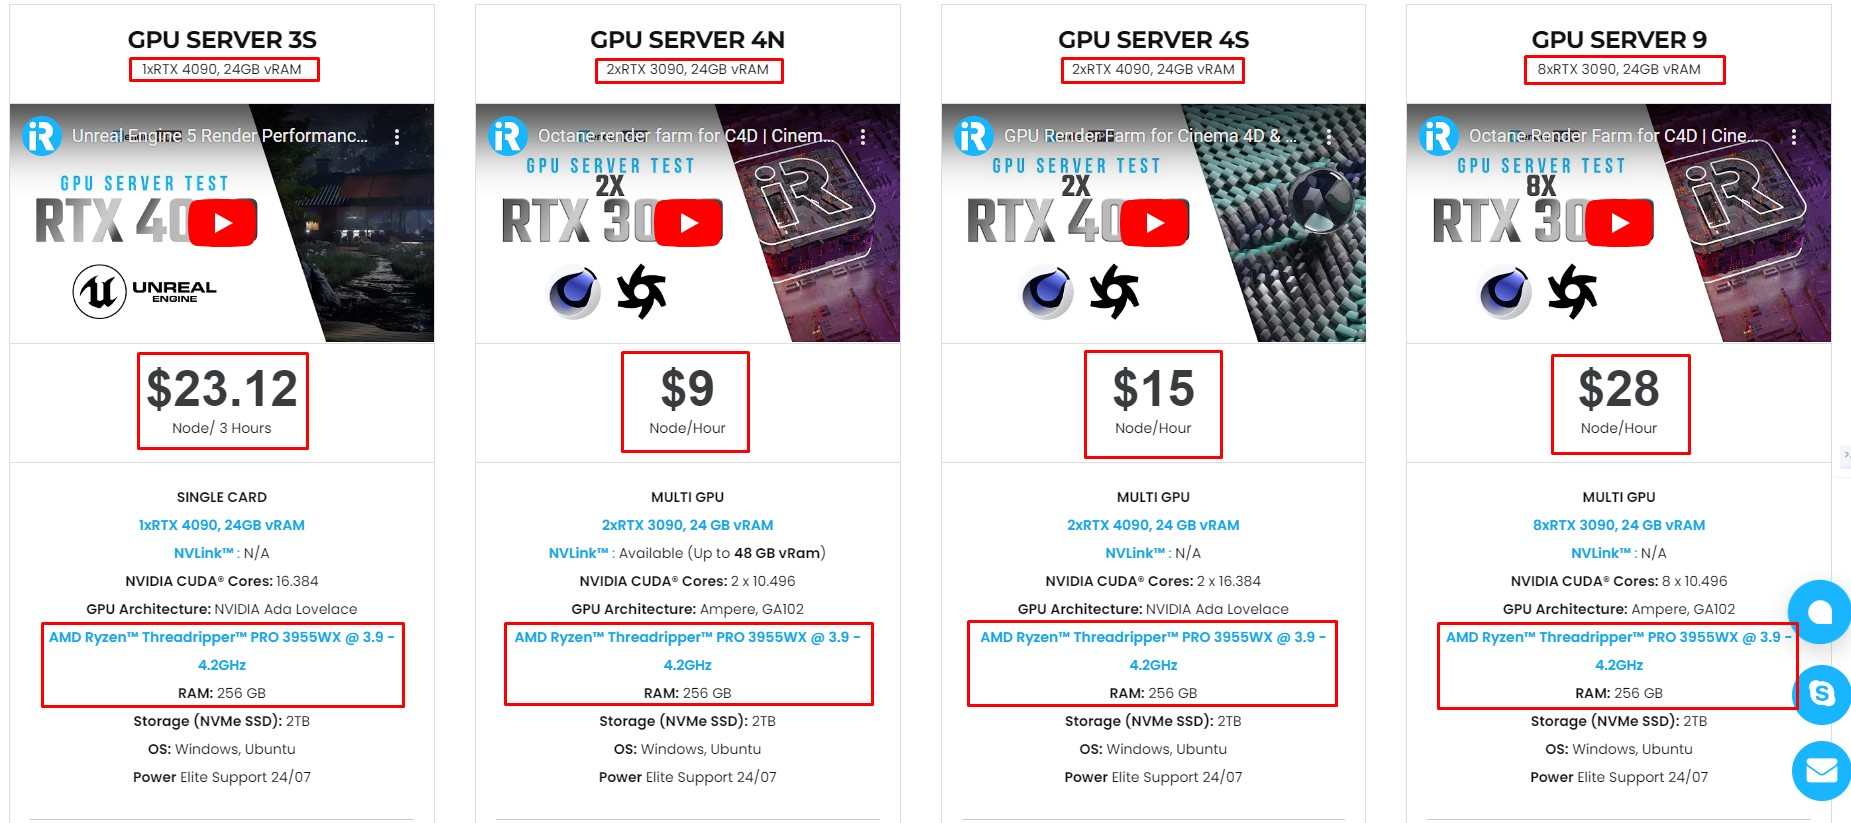
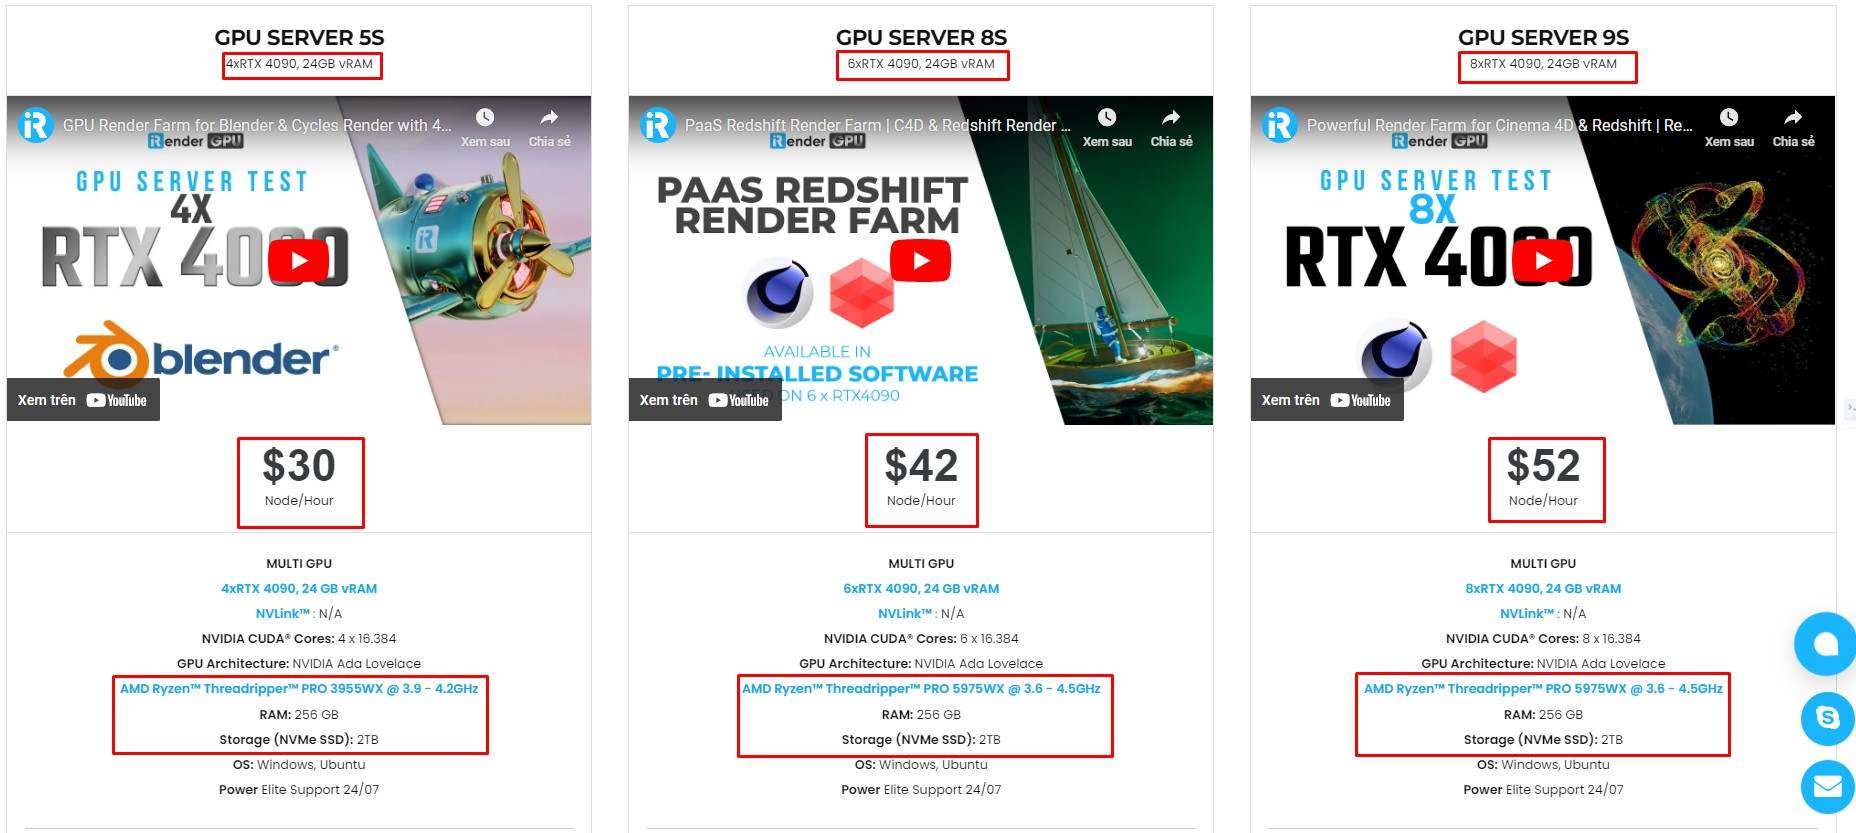
iRender – the best cloud rendering service, provides high-configuration servers that increase CPU and GPU rendering speeds. We offer the most powerful RTX 4090 configuration packages on the market, all equipped with AMD RyzenTM ThreadripperTM PRO 3955WX @ 3.9 – 4.2GHz and AMD Ryzen™ Threadripper™ PRO 5975WX @ 3.6 – 4.5GHz processors, 256GB RAM and 2T NVMe SSD hard drive capacity. With a wide range of GPU servers (1/2/4/6/8x) – RTX 4090, you can choose the server that suits your needs to start the rendering process.
Even if you use V-Ray CPU or GPU, our servers can meet your needs!
Simple Workflow
You just need to transfer your files, connect to the remote machine and install V-Ray and 3ds Max with your license. Then you can render yourself there like the way you do on your local PC. Setting up ONCE and your working environment will be saved and ready to use at any time.

Why choose iRender?
Transferring data may cost time and money on the remote server. However at iRender, you can upload and download your files without booting the server, then you can save a lot of money.
We have an iRender GPU app for Windows PC which integrates all features and is easy to use, and an iRender Drive app for MacOS users to transfer data only. Moreover, there are many reasons why this is the best render farm for your project.
- 100% Software Support: We support all 3D software, their plugins, and render engines.
- Full Control: Our service will give you full control over the servers you rent. Therefore, you are free to create your own working environment.
- Go Green: We are committed to using 100% solar renewable energy towards environmental sustainability.
- Real-human 24/7 Support: Our professional support agents and technicians guarantee to bring you the best rendering experience.
Check out how to estimate time and cost for your project on our servers

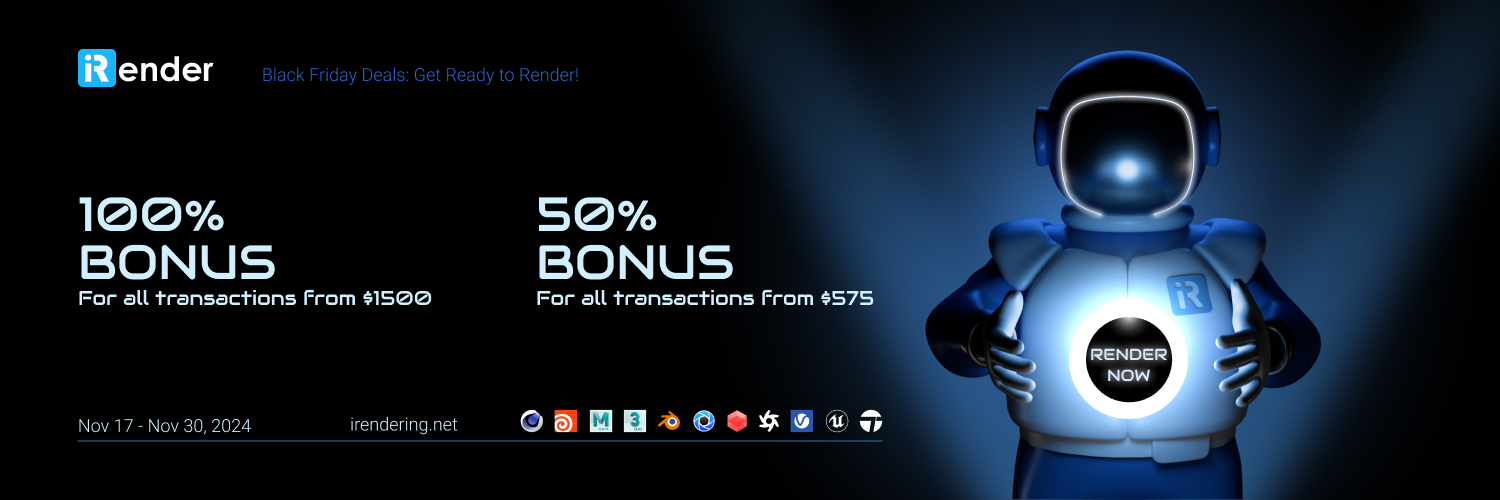
If you still wonder if this is the right place for your project, REGISTER NOW to get a trial and receive a 100% bonus promotion for your first transaction within 24 hours of registration with us.
This November is a great time to quickly finish your project and get it rendered. Enjoy our Black Friday deal!
- 100% bonus for all transactions from $1500
- 50% bonus for all transactions from $575.
- From November 17th to 30th.
For more detailed information, please contact us via Live chat 24/7 or WhatsApp: +(84) 962868890 or Email: [email protected]
iRender – Happy Rendering!
Images and References: chaos.com
Related Posts
The latest creative news from V-Ray Cloud Rendering , 3ds Max Cloud Rendering , 3D VFX Plugins & Cloud Rendering.