Generate images faster in Stable Diffusion with NVIDIA TensorRT
Stable Diffusion, mainly used to generate images from text prompts, has grown rapidly with numerous new interfaces emerging quicker than people can keep up with. In addition to third-party packages meant to distribute Stable Diffusion widely, GPU manufacturers are also contributing greatly to deliver huge gains in Stable Diffusion speed. This article will introduce the NVIDIA TensorRT extension and explain how it can double the speed of Automatic 1111 Stable Diffusion Web UI, one of the most common implementations of Stable Diffusion. Let’s explore!
GPUs are required for efficient generative AI
Stable Diffusion is a deep learning model utilizing diffusion processes to generate images from text or image prompts. It delivers benefits for creative workflows but is computationally intensive. Generating a small batch of four images can take minutes on nonspecialized hardware like the CPUs, which disrupts workflows and limits developers’ creativity.
CPUs alone struggle with Stable Diffusion because they are not inherently designed for the highly parallel computing required by neural networks. Instead, they are optimized for general-purpose tasks. Stable Diffusion demonstrates the need for specialized hardware like GPUs to power AI applications efficiently. Without GPUs, AI features are generally slow.
NVIDIA TensorRT accelerates Stable Diffusion performance
GeForce RTX GPUs excel at parallel computing necessary for generative AI models. They also contain specialized Tensor Cores that accelerate matrix operations for AI uses. The optimal method to leverage these enhancements is via the NVIDIA TensorRT SDK, which is a high-performance deep learning inference optimizer.
NVIDIA TensorRT provides layer fusion, precision optimization, kernel auto-tuning, and other features that extensively boost efficiency and deep learning speed. This makes TensorRT indispensable for real-time use and demanding tasks like Stable Diffusion.
The figure below compares the performance of Stable Diffusion when using NVIDIA TensorRT vs PyTorch xFormers and CoreML.
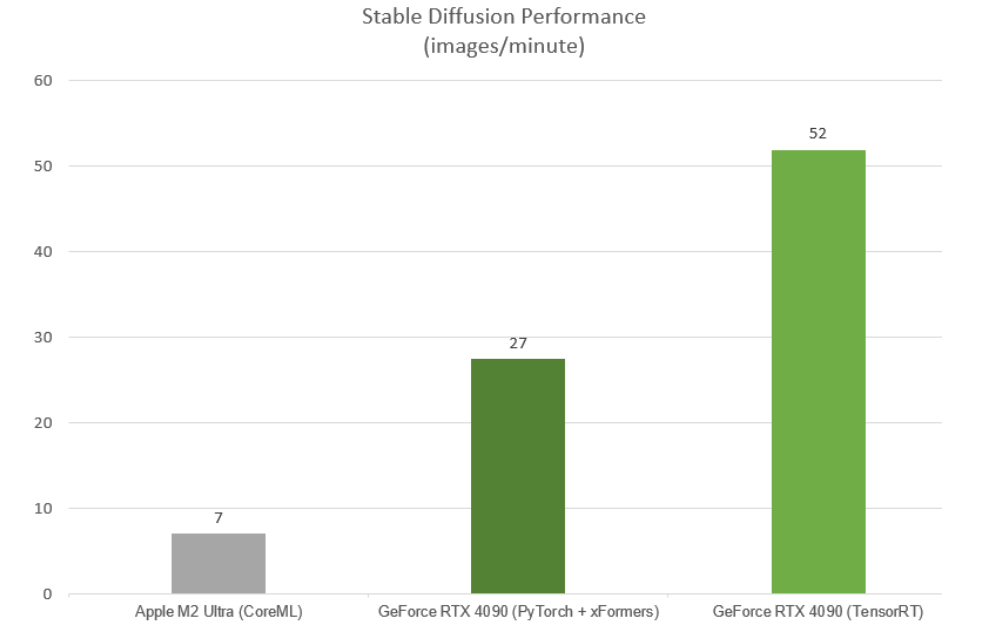
Source: NVIDIA
The test used:
- Stable Diffusion Web UI from Automatic1111 (for NVIDIA) and Mochi (for Apple)
- Image generation: Stable Diffusion 1.5, 512 x 512, batch size 1
- Hardware: GeForce RTX 4090 with Intel i9 12900K & Apple M2 Ultra with 76 cores
When applied to Stable Diffusion Web UI image generation, TensorRT substantially accelerated performance. It doubled the number of images generated per minute compared to previously employed PyTorch optimizations.
Implementing NVIDIA TensorRT in a Stable Diffusion Pipeline
NVIDIA has shared a Stable Diffusion TensorRT demo. It provides developers with a guide on preparing diffusion models and accelerating them using the NVIDIA TensorRT extension. This serves as the base for expediting inference in pipelines and software.
By building upon the foundation, the optimizations in the TensorRT pipeline were then applied to a commonly used project by Stable Diffusion developers. Adding TensorRT to the Stable Diffusion Web UI made generative AI more accessible to more people. This expanded the reach and impact of the generative model.
Source: NVIDIA
The introduction of a TensorRT Python package for Windows made the installation process much simpler. This lowered the technical barrier so those with less expertise could readily install and use NVIDIA TensorRT.
Once TensorRT is installed, it provides an intuitive interface that handles the ahead-of-time compilation for TensorRT models. A caching system notably cuts compilation time. These simplifications allow users to concentrate on the core tasks. The integration is flexible too, with dynamic shapes allowing the rendering of various resolutions with little impact on performance. Overall, this extension provides developers with a useful tool to boost their own Stable Diffusion workflows.
Getting started with NVIDIA TensorRT for your Stable Diffusion
To download the Stable Diffusion Web UI TensorRT extension, visit NVIDIA/Stable-Diffusion-WebUI-TensorRT on GitHub. Check out NVIDIA/TensorRT for a demo showing the acceleration of a Stable Diffusion pipeline.
Let’s look more closely at how to install and use the NVIDIA TensorRT extension for Stable Diffusion Web UI using Automatic1111.
Step 1: Install Stable Diffusion web UI from Automatic1111
If you have installed the Stable Diffusion Web UI from Automatic1111, skip to the next step.
These instructions will use the standalone installation.
-
- Download sd.webui.zip
- Move sd.webui.zip to a location on your local device with enough hard drive space (20GB or more).
- Extract the sd.webui.zip file.
- In the extracted folder, click on the update.bat file which will update the web UI to the latest version (Note: after clicking on the update.bat file, you may see a warning pop-up from Windows. If so, choose More info >> Run Anyway.)
- Close the command prompt window once the files have been updated.
- Click on Run.bat. The installation process will start (the necessary files will be downloaded and installed on your computer.) This process can take a few minutes, and it will also download Stable Diffusion 1.5 (~4GB).
-
- Repeat the above process if the Windows warning appears.
- The installation finishes when you see this message in the console “Running on local URL: http://127.0.0.1:7860.” A webpage that looks like this will also appear. If it doesn’t appear, you can manually open a browser and go to this URL: http://127.0.0.1:7860.
-
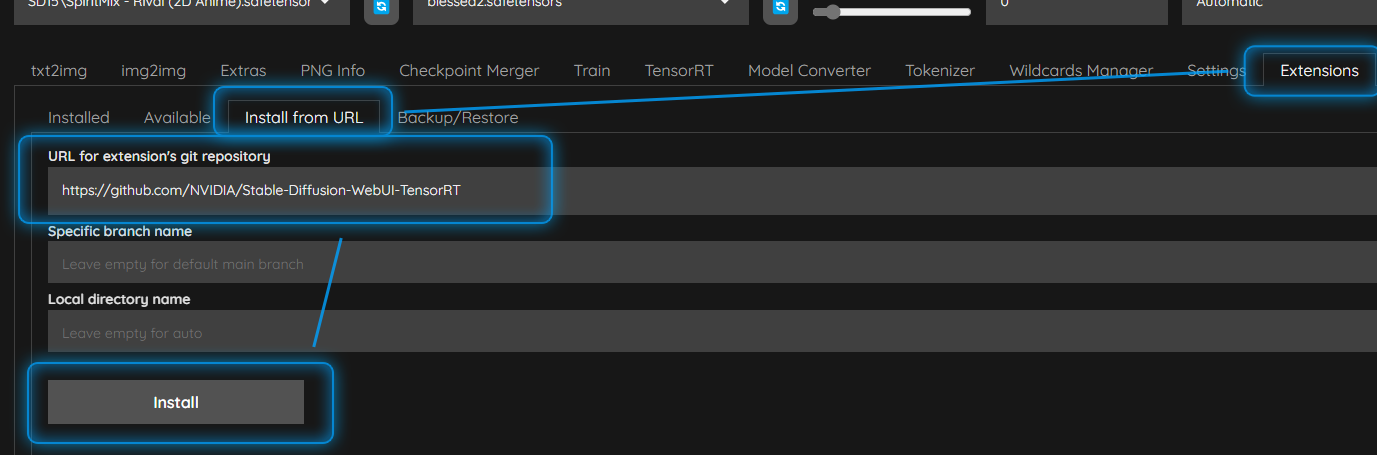
Step 2: Install the TensorRT extension for Automatic1111
Next, we install the NVIDIA TensorRT extension into our Automatic1111 installation.
Source: CIVITAI
-
- On the main UI tabs, go to Extensions >> Install from URL:
- In the URL for the extension’s git repository text box, import this URL https://github.com/NVIDIA/Stable-Diffusion-WebUI-TensorRT and click Install. The installation will download and install the necessary files. It will take a few minutes depending on your internet connection.
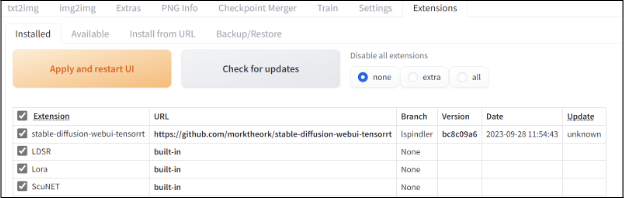
- When the installation is complete, go to the Installed tab, make sure that the TensorRT extension box is checked >> choose Apply and restart UI button. The UI will refresh for about 2 minutes.
Source: NVIDIA
-
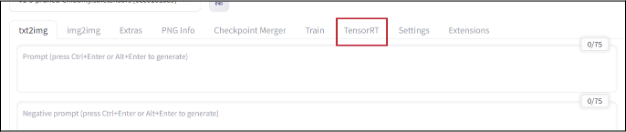
- After the UI restarts, there will be a new tab for TensorRT tab as follows:
Source: NVIDIA
Step 3: Build TensorRT Engines
TensorRT is the quickest way to run AI on NVIDIA RTX GPUs. It can generate specific optimizations for your exact GPU for the AI model you want to run. These optimizations are called TensorRT Engines. Let’s apply some more steps so that you can generate a generic one or create other custom ones.
Source: CIVITAI
-
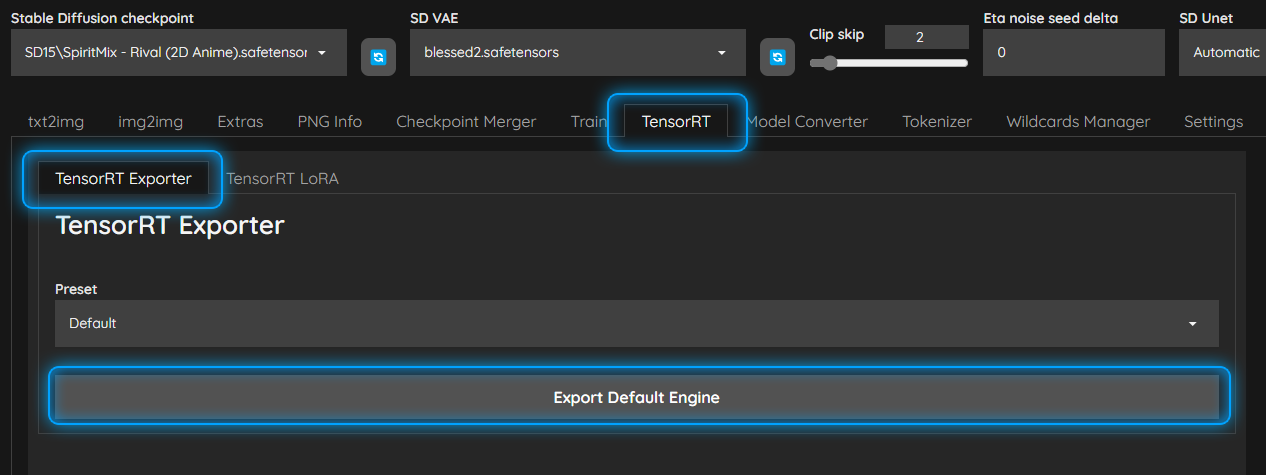
- Go to TensorRT tab.
- The default engine will be selected automatically in the Preset dropdown menu. Select Export Default Engine. This process will take from 4 and 10 minutes, depending on your GPU.
-
- This will create a TensorRT Engine for Stable Diffusion 1.5, for image sizes between 512×512 and 768×768, and for any batch size from 1 to 4.
- Note that: the first time you run this process, the extension will generate a TensorRT optimized ONNX model. This has to be done just once.
- The Output section in the bottom part of the screen will show status information on the build process.
- You can check the console output to see the exact status.
-
- When the process completes, you can generate other engines that you want. The extension will automatically use the best one from the available ones. Therefore, you can generate as many as you want. Just note that each engine is ~2GB.
-
-
-
- Note: There are Static and Dynamic presets. Static presets provide better performance, but only work on the exact settings they are optimized for. Dynamic ones also consume more VRAM.
- You can see the engines which have been previously at the bottom of the page, under the Available TensorRT engine-profiles section. Click on the checkpoint you want to check the available engines.
-
-
Note: this section just updates upon a web UI start. In case you just generated engines, you will need to restart the web UI.
Also, one important note is that TensorRT engines are unique per GPU architecture. When switching between GPU architectures, engines will need to be rebuilt for the different architectures.
Step 4: Activate TensorRT Image Generation
Source: CIVITAI
-
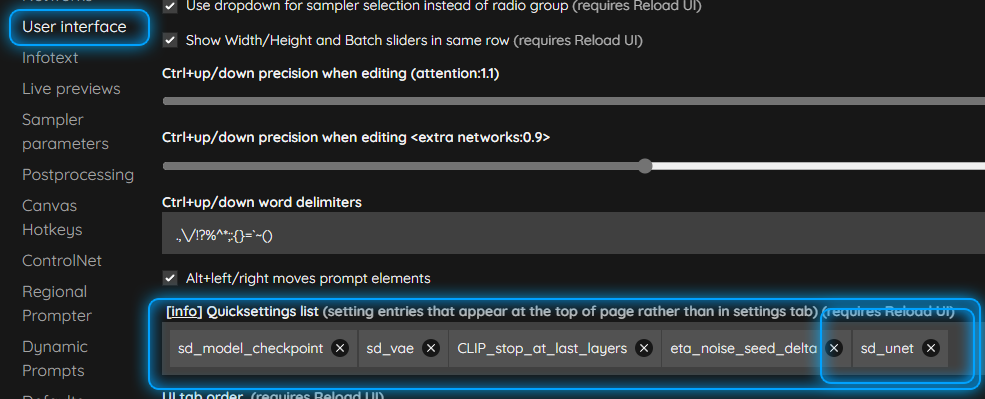
- On the Main UI tabs, go to Settings >> User Interface.
- Add sd_unet to the list of Quick Settings. This will allow us to select the new TensorRT pipeline to create images:
-
- Select Show all pages >> locate the [info] Quicksettings list
- Click in the Quicksettings list area >> type: sd_unet
- Click on the sd_unet item displayed to add it to the Quicksettings.
- At the top of the Settings page, choose Apply Settings and Reload UI.
- The top area of the UI will now have a new dropdown for SD Unet. Click on the refresh button to load your new engines.
-
- In the new SD Unet dropdown, choose the [TRT] v1-5-pruned-emaonly engine listed in the dropdown.

Source: CIVITAI
-
-
-
- The engine name shows the Stable Diffusion checkpoint this engine is generated for. You should always verify that the TRT engine matches your currently loaded checkpoint.
- When choosing the TRT SD_Unet from the dropdown menu, the extension will automatically pick the best TensorRT engine you have built as long as at least one engine exists that matches your output configuration settings.
-
-
All are finished! Now, you can go to the text2img tab and start rendering images with optimized performance!
iRender - The best cloud rendering services for Stable Diffusion
Stable Diffusion is primarily designed for single GPU usage; however, with some additional software and configuration, it can take advantage of multiple GPUs. By splitting the work across multiple GPUs, the overall iteration speed can be increased. While most Stable Diffusion implementations are designed to run on a single GPU by default, one commonly used implementation which is Automatic1111 has options to enable multi-GPU support with minimal additional configuration.
Regardless of which implementation of Stable Diffusion you utilize, you can still benefit from iRender’s high-performance GPU machines to accelerate image generation.
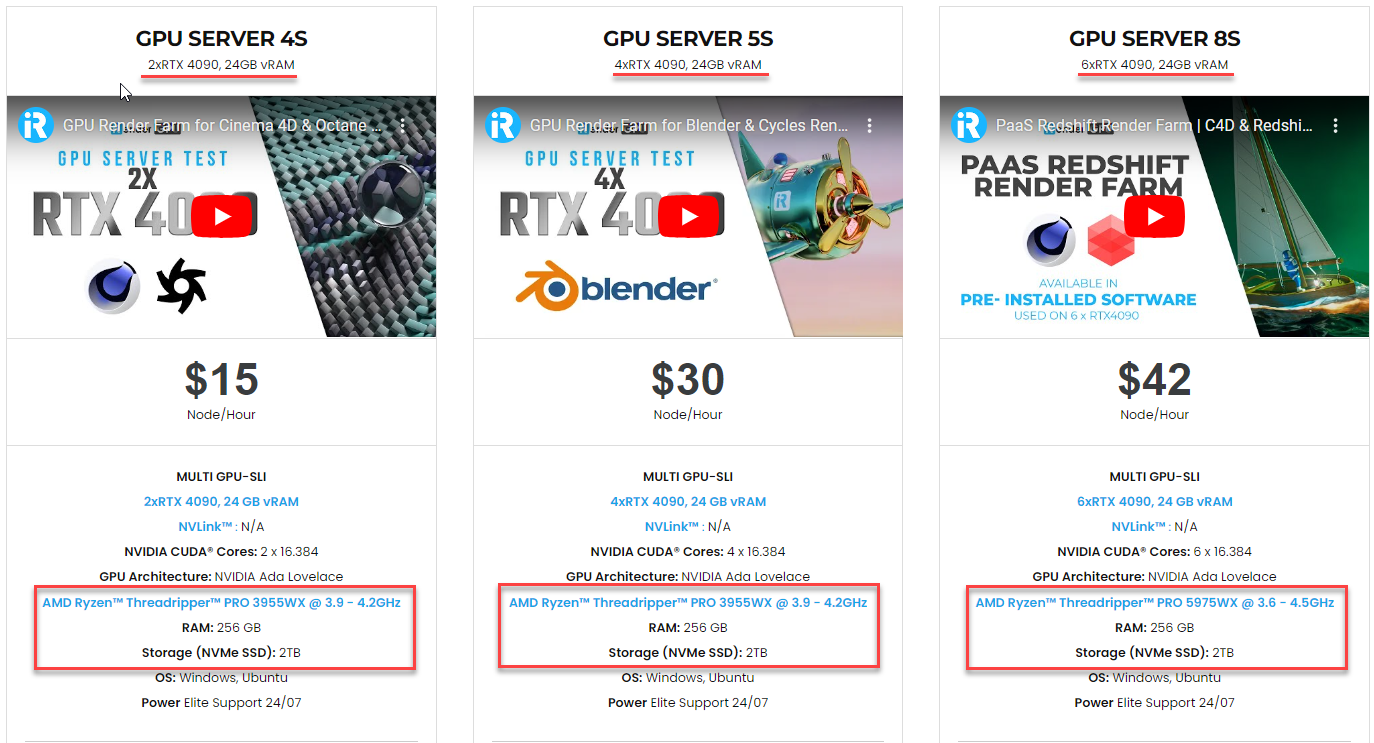
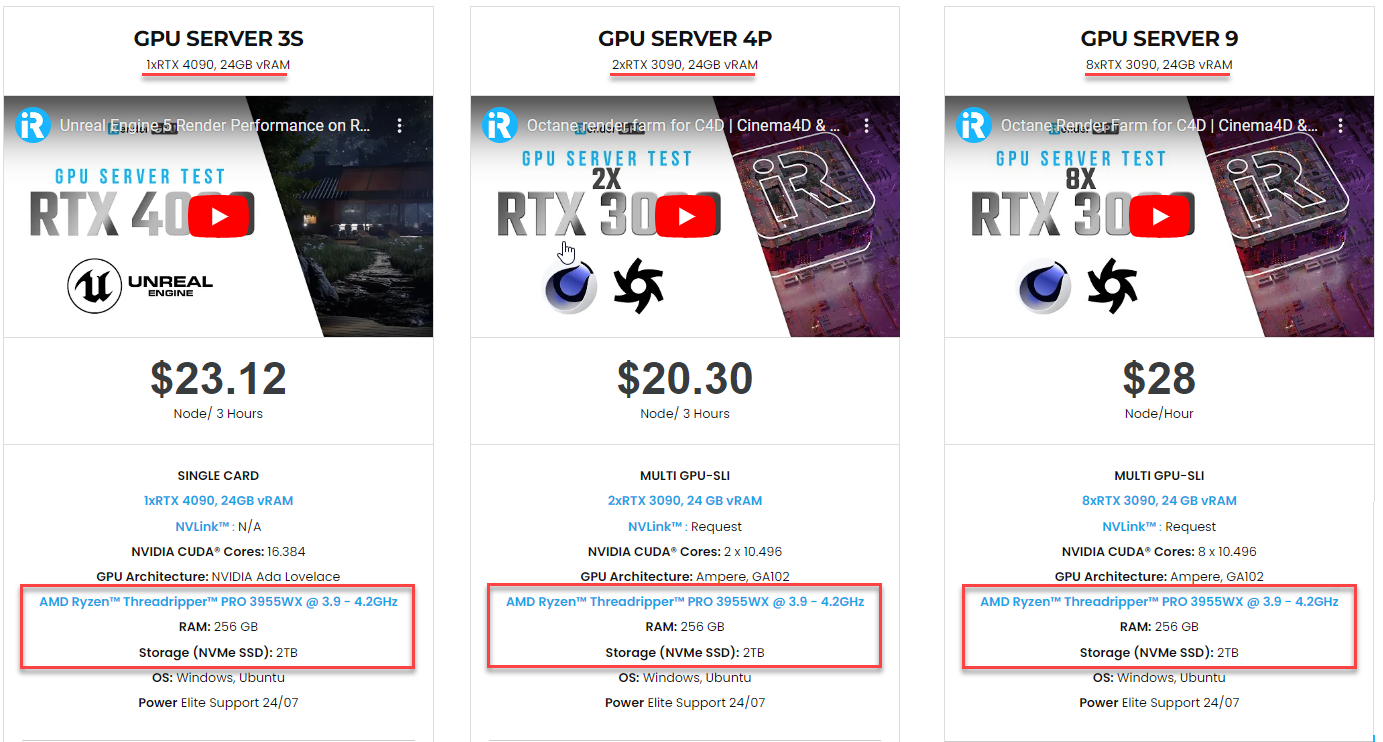
We offer flexible configurations of 1, 2, 4, 6, and 8 GPU machines using the top-tier RTX 4090 and RTX 3090. Built with powerful AMD Ryzen Threadripper PRO CPUs with up to 64 cores, 256GB RAM, and 2TB NVMe SSD storage, our machines are capable of generating the most challenging AI arts in Stable Diffusion quickly.

Let’s enjoy our 100% Bonus Program today and generate your Stable Diffusion images faster!

iRender – Happy Rendering, Happy Training
Reference source: NVIDIA, CIVITAI
Related Posts
The latest creative news from Cloud Computing for AI,