How to Create High Quality Lumen Reflections in Unreal Engine 5.5?
If you’ve been exploring lighting and reflections in Unreal Engine 5.5, you’ve probably noticed that getting high-quality Lumen reflections can be tricky. Some settings look great in real-time but don’t perform well for pre-rendered sequences, while others give amazing visuals at the cost of performance. In this guide, we’ll go step-by-step through the process of creating realistic Lumen reflections in Unreal Engine 5.5 and also fix common issues like flickering lights, pixelated shadows, and poor environment shading.
5 steps to create Lumen Reflections in Unreal Engine 5.5
1. Create the Mirror Material
We call “Mirror_Mat” for mirror material. The first thing we’re going to do is set this not to opaque, but to translucent.
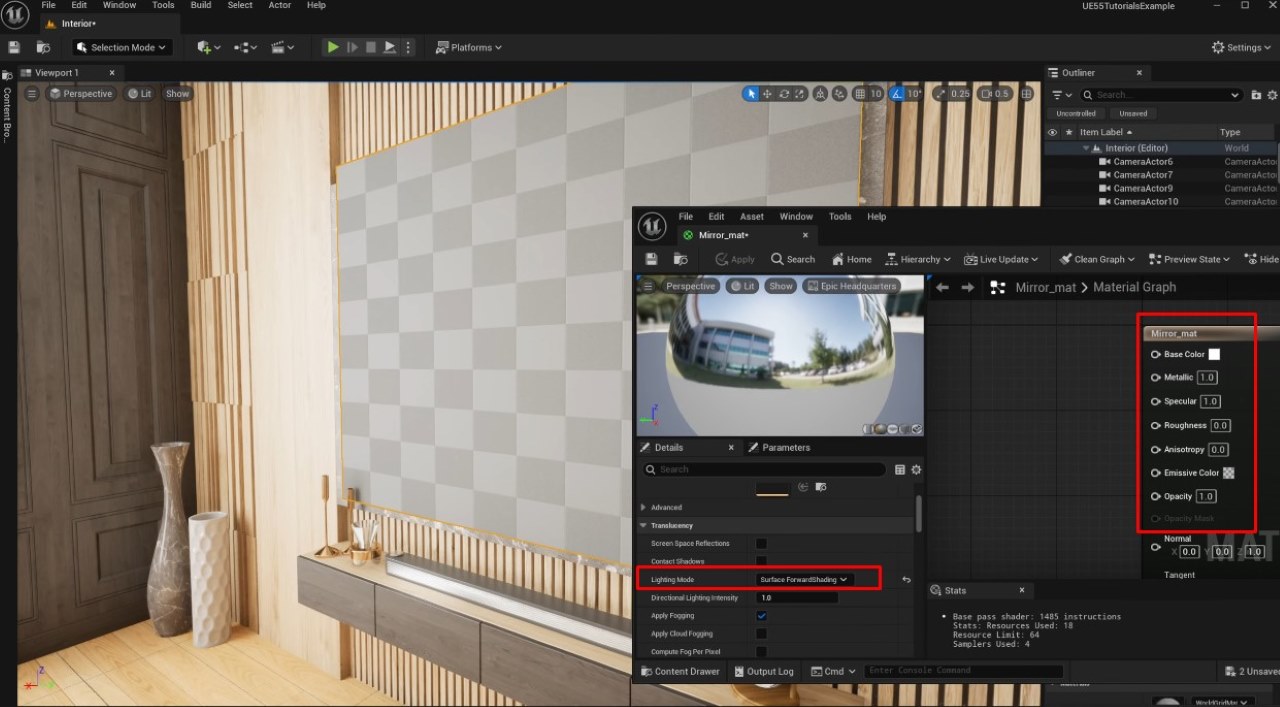
Here’s another tip for Lumen reflections: in the material settings, if this is set to opaque, you can clearly see the area lights visible here, and the reflections look lower quality. So, what you do is select ‘Translucent’ and hit ‘Apply’. This will hide the area lights in the environment and make the reflections look a bit better.
Keep in mind that this also affects performance quite a bit. We’re now under about 30 FPS. We’re going to make it translucent, go down to the lighting mode, and set it to surface forward shading.
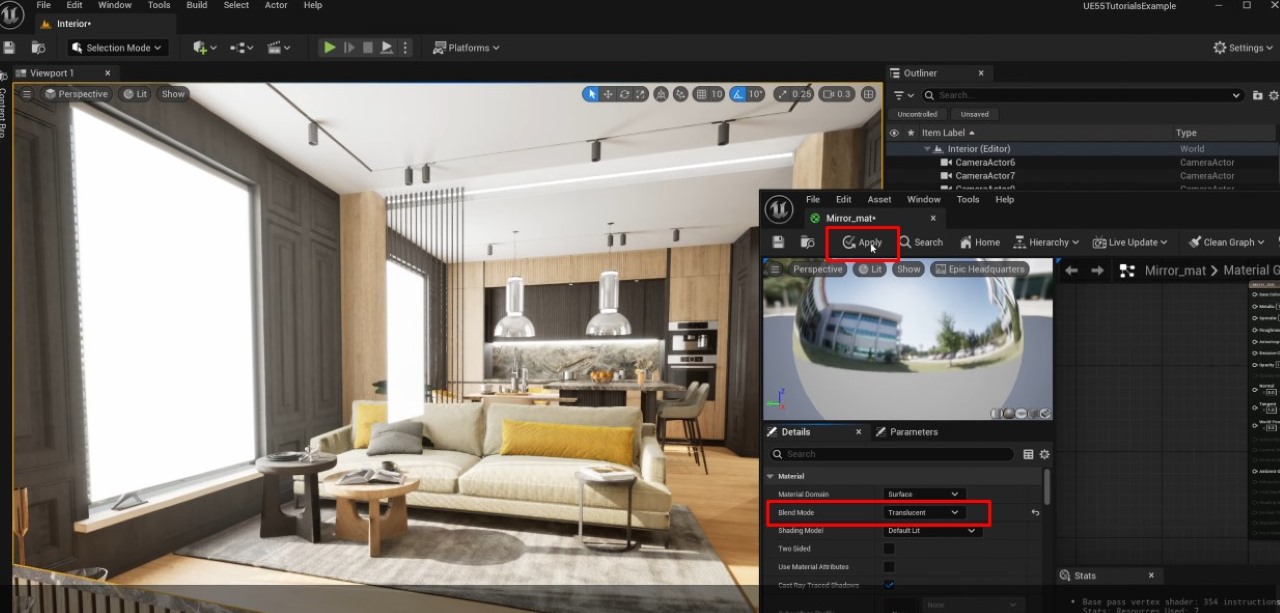
After that, we set the Base color to white, Metallic to 1, Specular to 1, and Roughness to 0, basically like a chrome mirror material. Then we apply the Mirror_Mat, and put it in the scene.
2. Adjust Project Settings
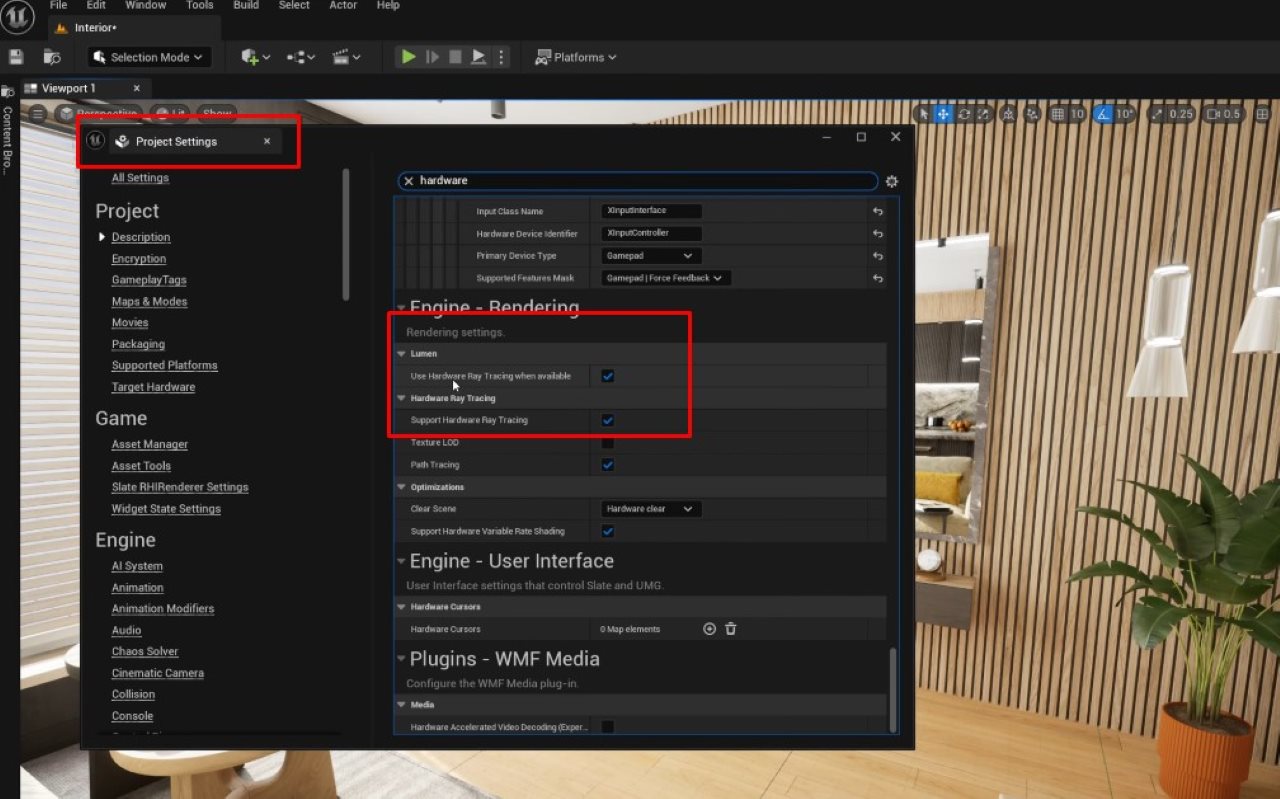
Go into your Project Settings and make sure “Lumen – Use Hardware Ray Tracing When Available” is checked. If this is unchecked, it’s going to look really bad. You should have a ray-tracing-capable GPU in your computer, and that should work well with this. You can also check “Support Hardware Ray Tracing” and “Ray-Traced Shadows” for more realistic results.
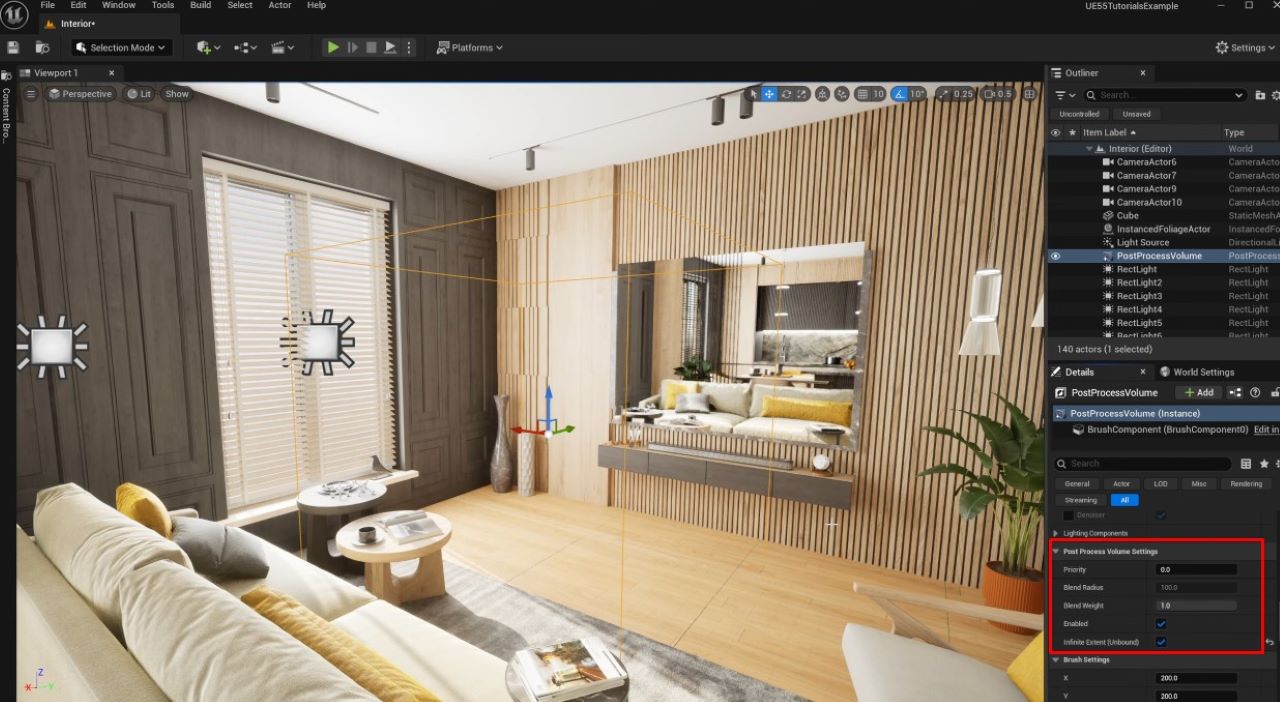
3. Post Process Volume
We don’t have a Post Process Volume, so let’s make one.
We go to Create > Visual Effects > Post Process Volume. You can fill the scene if you just want this to affect a specific area, but we’re going to scroll down to the Post Process Volume settings and enable “Infinite Extent (Unbound)” so it affects the entire level.
4. Lumen Global Illumination
In the Post Process Volume, go down to Global Illumination. Set the method to Lumen. For the lighting mode, we select Hit Lighting for Reflections. The Lumen Lighting Quality should be above 0.25. If we set it to 0, it becomes flickery and unstable. So, we want this to be at least 1, maybe 2 or 3.
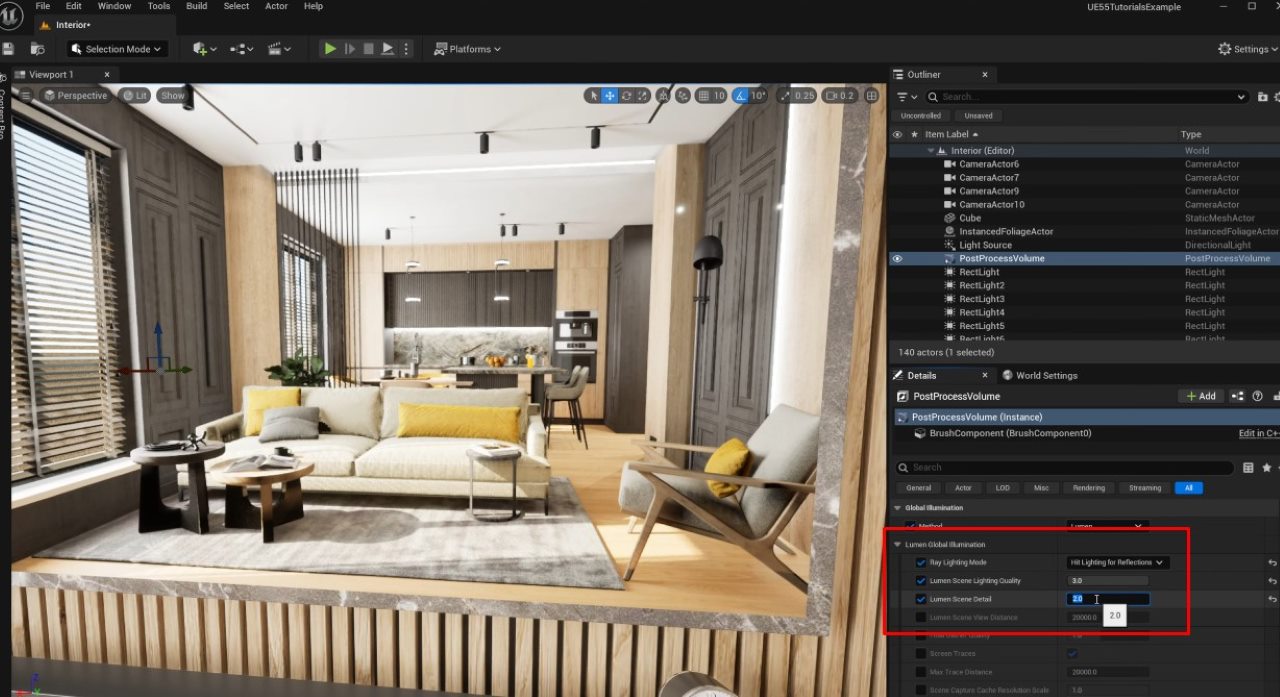
As you can see, the reflections look very good because they’re ray-traced. But there’s one issue: this book on the table isn’t shaded properly, and the area looks too dark. To fix that, increase Lumen Scene Detail to 2 to make it properly shaded and more realistic.
5. Lumen Reflections
Now we go to Reflections, and set Method to Lumen. Then we do these steps:
- Quality: set to 1 or 2. You shouldn’t set 0 because it’s noisy.
- Screen Traces: enable this so Lumen mixes screen-space traces with ray sampling for more accurate reflections. Disabling it often turns reflections off or makes them much less accurate.
- High-Quality Translucency Reflections: enable this if you use translucent mirror materials. It improves the result for the translucent approach above.
- Max Reflection Bounces: set to 2 to allow reflections to capture more of the environment; increasing bounces improves realism at a performance cost.
- Max Refraction Bounces: change from 0 to 1, or 2 if needed, so glass and other refractive objects appear in reflections. Without reflection, bounces, transparent lamps, or glass won’t show up in the mirror.
- Max Roughness: higher values increase quality, but they reduce performance.
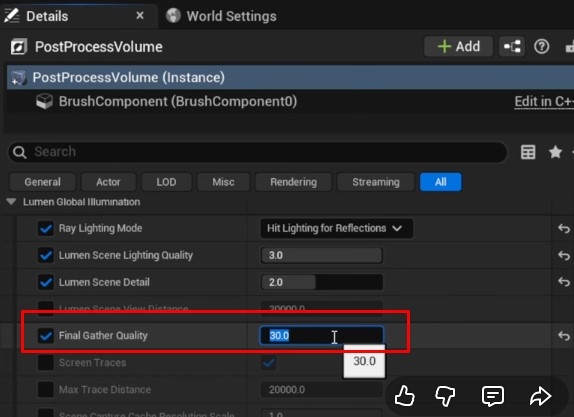
- Final Gather Quality: increasing this, e.g., up to 20-30 to clear noise and artifacts, but it is very heavy on performance.

Remember to monitor FPS when tuning. But you need to expect tradeoffs: higher quality means lower FPS. Use final gather and higher quality for final frames or offline renders.
Fixing Common Lumen Reflection Issues
Ceiling Lighting Flickering
If you see noisy flicker from emissive materials or area lights, convert emissives to actual lights where possible. Emissive materials often create unstable sampling noise in Lumen reflections. In my scene, moving area lights into the interior instead of keeping them outside produced a much cleaner result and reduced noise.
Also, increasing Final Gather Quality smooths flicker, but at a significant performance cost. You should find a balance by moving lights to sensible positions, reducing reliance on emissives, and increasing final gather only for final renders.
Moving Reflections Errors
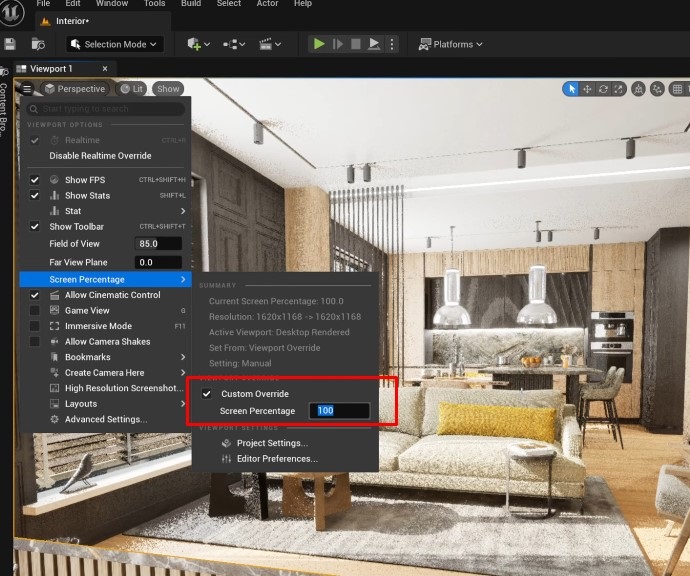
When the camera moves, you might notice ghosting or blurring in reflections. Improve moving-reflection fidelity by increasing Screen Percentage in the viewport: open the viewport menu, enable Custom Override for Screen Percentage, and try 100% for maximum clarity. That reduces blur but is heavier on performance. 70% can be a good compromise for interactive preview, it gives better quality while keeping acceptable FPS around 30-40, depending on hardware.
For final output, we set full resolution and higher Lumen quality values before rendering.
Environment Shading
If some walls or objects appear darker or shaded incorrectly, a very small transform tweak on the mesh sometimes forces the renderer to recalculate local shading and can clear up artifacts. In one test, slightly rotating an environment element fixed a dark polygon without rebaking lighting. This is a quick, pragmatic fix for odd shading artifacts that appear only in reflections or baked lighting views.
Note: this is a practical workaround, not always ideal if you rely on strict baked lighting workflows. Use it when rebaking is costly and the tweak doesn’t impact composition.
Pixelated Shadows
Blocky or pixelated shadows from a sofa pillow or similar small region often happen because the whole object is a single combined mesh. If the engine tries to approximate shadows for a large combined mesh, it can produce low-res shadow artifacts on small areas.
You can enter Modeling Mode, use the Tri-Select Tool, select the troublesome area or sub-part, and choose Separate. Making that piece a standalone mesh lets Unreal compute shadows and shading at the correct local scale, removing pixelation. Then, apply the same approach to window blinds or other composite assets, separating parts improves both shading and Lumen reflection fidelity.
More Environment Shading
Where color or shading looks off across multiple elements, try separating complex combined meshes into smaller pieces and re-check Lumen Scene Detail and GI quality. Smaller meshes and higher scene detail allow Lumen to sample lighting more precisely, yielding better environment reflections and less banding or color anomalies.
Final Thoughts
There may be additional settings to push Lumen reflections further, but following these steps will get you to a solid, high-quality baseline in Unreal Engine 5.5. We hope this helps you improve your project.
If you are looking for a render farm to render your project, check out iRender.
iRender - The Best Render Farm for Unreal Engine 5
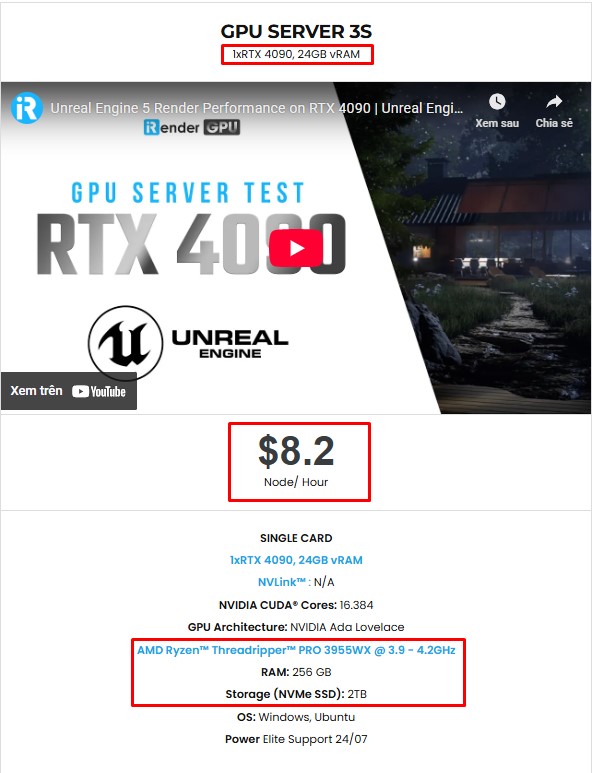
If you need more power than your local machine can handle, especially for large scenes, high-resolution screenshots, or heavy cinematic rendering, iRender is here to help. As one of the best cloud render farms for Unreal Engine, iRender offers high-performance RTX 4090 and CPU servers optimized for real-time workflows. All servers are equipped with:
- AMD Ryzen™ Threadripper™ PRO 3955WX (3.9-4.2GHz) or
- AMD Ryzen™ Threadripper™ PRO 5975WX (3.6-4.5GHz)
- (1/2/4/6/8x) – RTX 4090
- 256GB RAM
- 2TB NVMe SSDs
With Unreal Engine 5, a 3S (1xRTX 4090) server is the best choice with the most affordable price. You have full control over a powerful remote machine, with support for UE5 and all its plugins, so you can render faster, scale larger, and focus on being creative.
Why choose iRender?
Unlike other services, iRender lets you upload and download files without starting the server, saving you both time and money. We offer a Desktop app for Windows with a full feature set and a simple Drive app for macOS for easy file transfers. Here’s why iRender is a top choice for your rendering needs:
- 100% Software Support: We support all 3D software, their plugins, and render engines.
- Full Control: Our service will give you full control over the servers you rent. Therefore, you are free to create your own working environment.
- Go Green: We are committed to using 100% solar renewable energy towards environmental sustainability.
- Real-human 24/7 Support: Our professional support agents and technicians guarantee to bring you the best rendering experience.
Let’s see how Unreal Engine performs on our servers. You’ll definitely see the difference!


If you still wonder if this is the right place for your project, REGISTER NOW to get a trial and receive a 100% bonus promotion for your first transaction with us.

For more detailed information, please contact us via Live chat 24/7 or WhatsApp: +(+84) 912-785-500 or Email: [email protected].
iRender – Happy Rendering!
References: killshot2596
Related Posts
The latest creative news from Unreal Engine Cloud rendering.