How to Optimize Your Scene for Faster Rendering in V-Ray
Every 3D artist has faced the same frustration that is waiting for hours just to see a single frame finish rendering. Even with powerful machines, scenes packed with heavy models, complex materials and multiple light sources can slow down production dramatically.
That’s why optimizing your scene is just as important as creating it. V-Ray is known for its ability to produce stunning, photorealistic results, but if your workflow isn’t optimized, you’ll never get the performance it’s truly capable of.
In this guide, we’ll walk you through four practical ways to optimize your scene for faster rendering in V-Ray, based directly on Chaos’s official recommendations. You’ll learn how to balance geometry, shading, lighting and render settings to achieve clean, professional-quality outputs without sacrificing time or image fidelity.
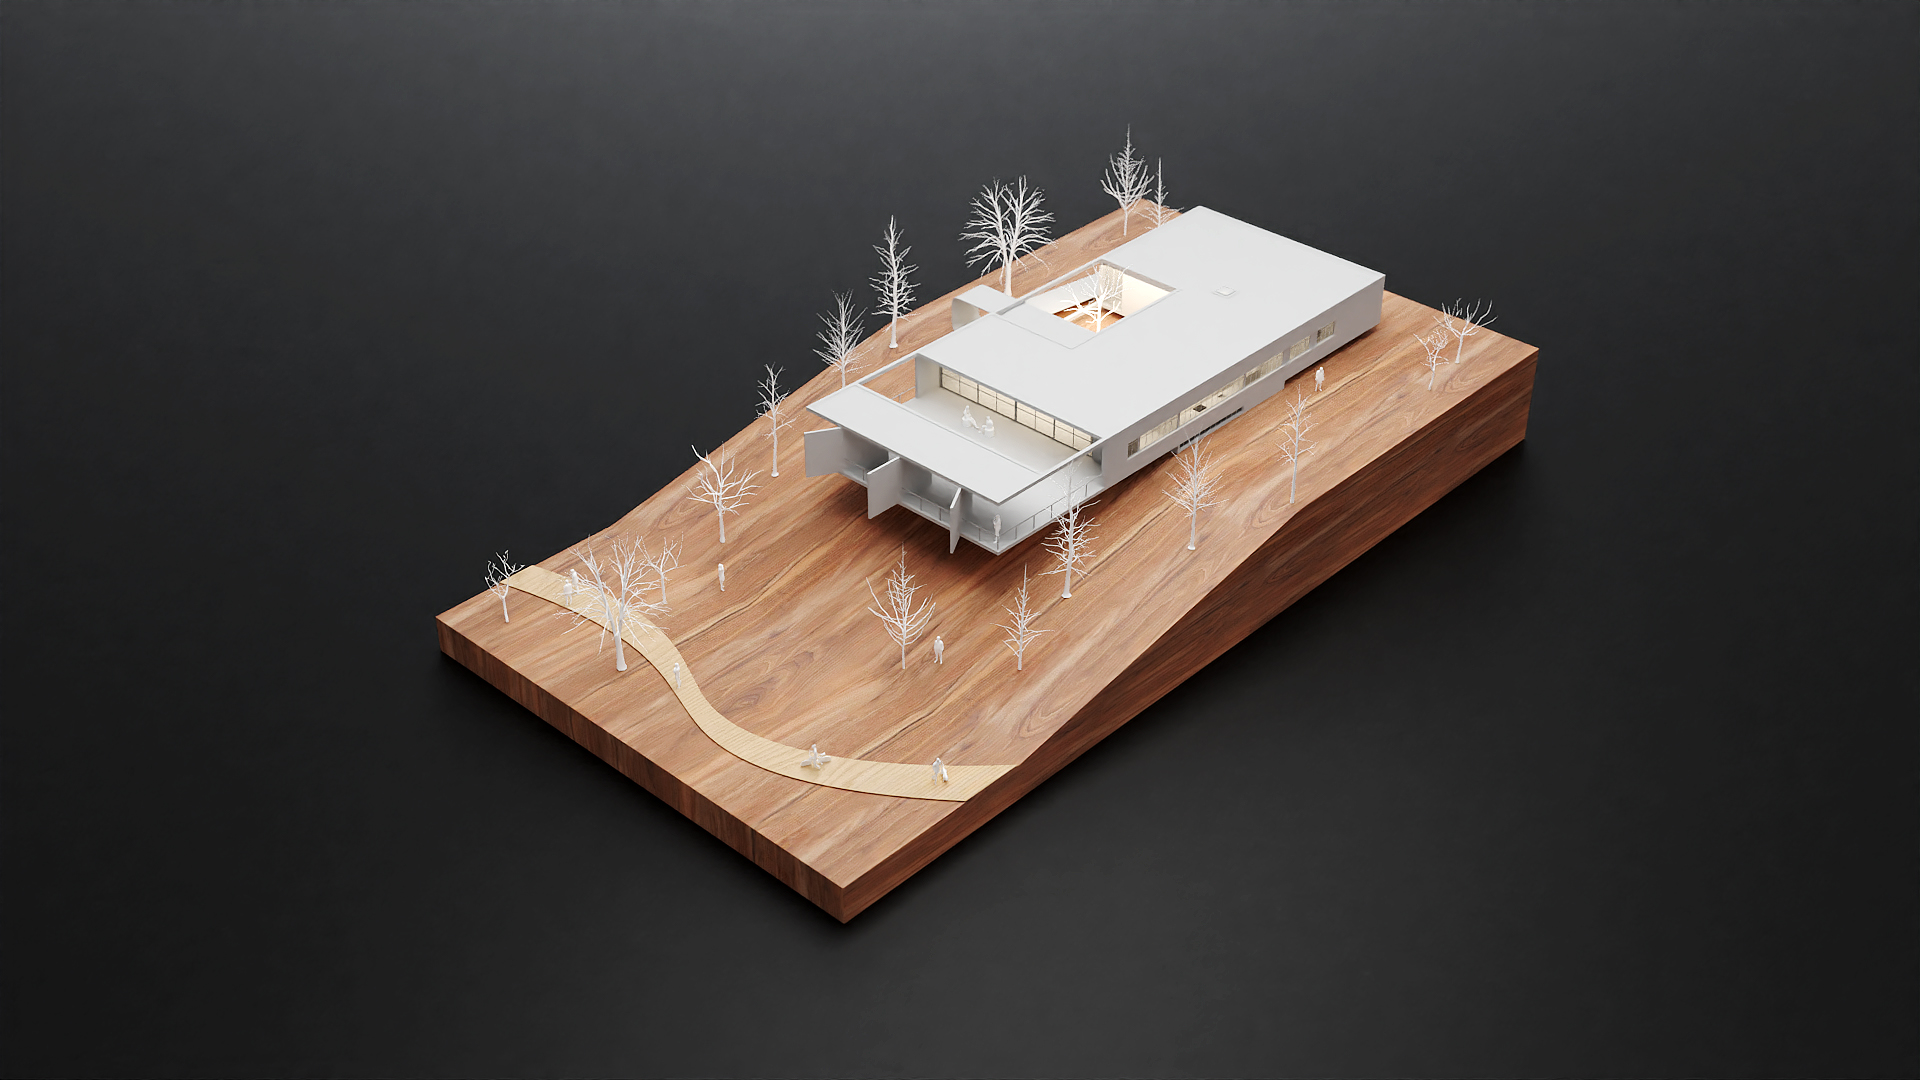
1. Modeling
The complexity of your 3D models can make or break your render time. Not every object in your scene needs the same level of detail. For example, a chair that’s close to the camera can stay detailed, but a chair in the background should use a simpler mesh. Reducing unnecessary polygons can save you minutes or even hours when rendering.
Sometimes, though, heavy models are unavoidable, especially when they appear close to the camera or in animation. In those cases, V-Ray Proxy objects are your best friend. They load only during rendering, which means your scene will use far less RAM while still keeping everything visible when needed.
Always make sure your models are clean and free of errors. Overlapping faces, broken geometry, or loose vertices can cause rendering issues and slowdowns. And when using pre-made assets, pick them from a reliable source like Chaos Cosmos, which offers optimized models and materials ready for rendering.
Smart modeling goes a long way. Use instances instead of duplicated geometry to improve performance and reduce memory load. For fine details like patterned walls or furniture, try V-Ray Enmesh instead of fully modeling those shapes. Enmesh adds intricate patterns efficiently with minimal impact on RAM and render time, even less than displacement maps.
2. Shading
If you’ve worked with Chaos Cosmos or other commercial material libraries, you’ve probably enjoyed how convenient they are. These ready-made materials save you hours of setup by providing high-quality shaders and custom texture maps that would take a long time to create from scratch.
However, these complex materials can also be a hidden reason for longer render times. Some of them include multiple reflection or refraction layers, displacement maps, or unnecessary effects that don’t always appear clearly in the final render, especially if the object is small or far from the camera.
To optimize your scene, always check the material setup before rendering. Look for unnecessary glossy reflections, missing maps, or overly complicated shader trees. Simplifying materials wherever possible will help reduce render time without compromising visual quality.
Another common issue is oversized textures. Using an 8K reflection map on a small object might look impressive in the material editor, but in reality, it can consume a huge amount of RAM and drastically slow down both loading and rendering. Often, you can safely replace those large maps with smaller versions (2K or 4K) and see no visible difference in the final result.
3. Lighting
Lighting is often the part that decides whether your render feels truly alive or just technically correct. In V-Ray, lighting control is not only powerful but also flexible, especially with tools like Light Mix, which lets you adjust brightness, color and contribution of every light after rendering is done. That means you can refine your scene freely without having to start another render session.
Even though V-Ray can easily handle hundreds or even thousands of light sources, adding too many often slows down performance and muddies the scene. A good rule of thumb is: keep it simple. A few carefully positioned lights will always look cleaner and render faster than a crowded lighting setup.
Another important tip is to avoid lights that are too bright. Overexposed areas not only look unrealistic but also make the renderer work harder, since it needs to calculate a large amount of light data. Instead, keep intensities moderate and balance each light using Light Mix to ensure your final image feels cohesive and natural.
For overall illumination, try using a V-Ray Dome Light. Whether paired with an HDRI map or the Sun & Sky system, dome lights are lightweight, stable and require minimal setup. You won’t need portals or complex tricks to achieve soft, realistic environmental lighting, which is perfect for both interiors and exteriors.
4. Rendering
Even after optimizing your geometry, materials and lighting, there’s still one more step: fine-tuning your render settings.
V-Ray can already deliver great results with its default configuration, but if you want to push your speed further, small adjustments can make a huge difference.
The image sampler plays a key role here. It controls how V-Ray measures image quality based on noise levels. In general, higher subdivisions mean cleaner renders and lower noise thresholds reduce visible grain but both increase render time. Instead of cranking these settings to the maximum, try finding a balance: test different values in various regions of your image until you reach a point where the quality looks good enough without unnecessary waiting. A slight tweak in the noise threshold can often cut your render time in half while still producing excellent results.
Next, take advantage of the V-Ray Denoiser. This smart tool analyzes noise in your image and smooths it out automatically, giving you a clean result much faster than increasing samples would. It’s especially useful for scenes with complex lighting or high levels of reflection.
However, balance remains the keyword. The noisier your original render is, the harder it is for the denoiser to recover fine details. So, don’t rely on it alone; instead, combine careful sampling with moderate denoising for the best outcome.
Conclusion
Optimizing your scene in V-Ray isn’t just about getting faster renders, it’s about working smarter. By refining your geometry, simplifying materials, adjusting lighting and fine-tuning your render settings, you can dramatically reduce render times while keeping the same photorealistic quality that makes V-Ray stand out.
The key takeaway is balance. There’s no need to overload your scene with ultra-high-resolution textures or maxed-out sampling values. Small, thoughtful adjustments often make the biggest difference – saving you hours without compromising the final look.
With these practices, your workflow becomes smoother, more predictable and much more efficient. Whether you’re preparing an architectural visualization or a product animation, optimizing your scene ensures that every minute you spend rendering truly counts.
iRender - Powerful Render Farm for V-Ray
At iRender, you can install and run any 3D software or render engine you need, including V-Ray, on our high-performance remote servers. Whether your workflow relies on CPU or GPU power, iRender gives you the flexibility to choose the right configuration for your projects.
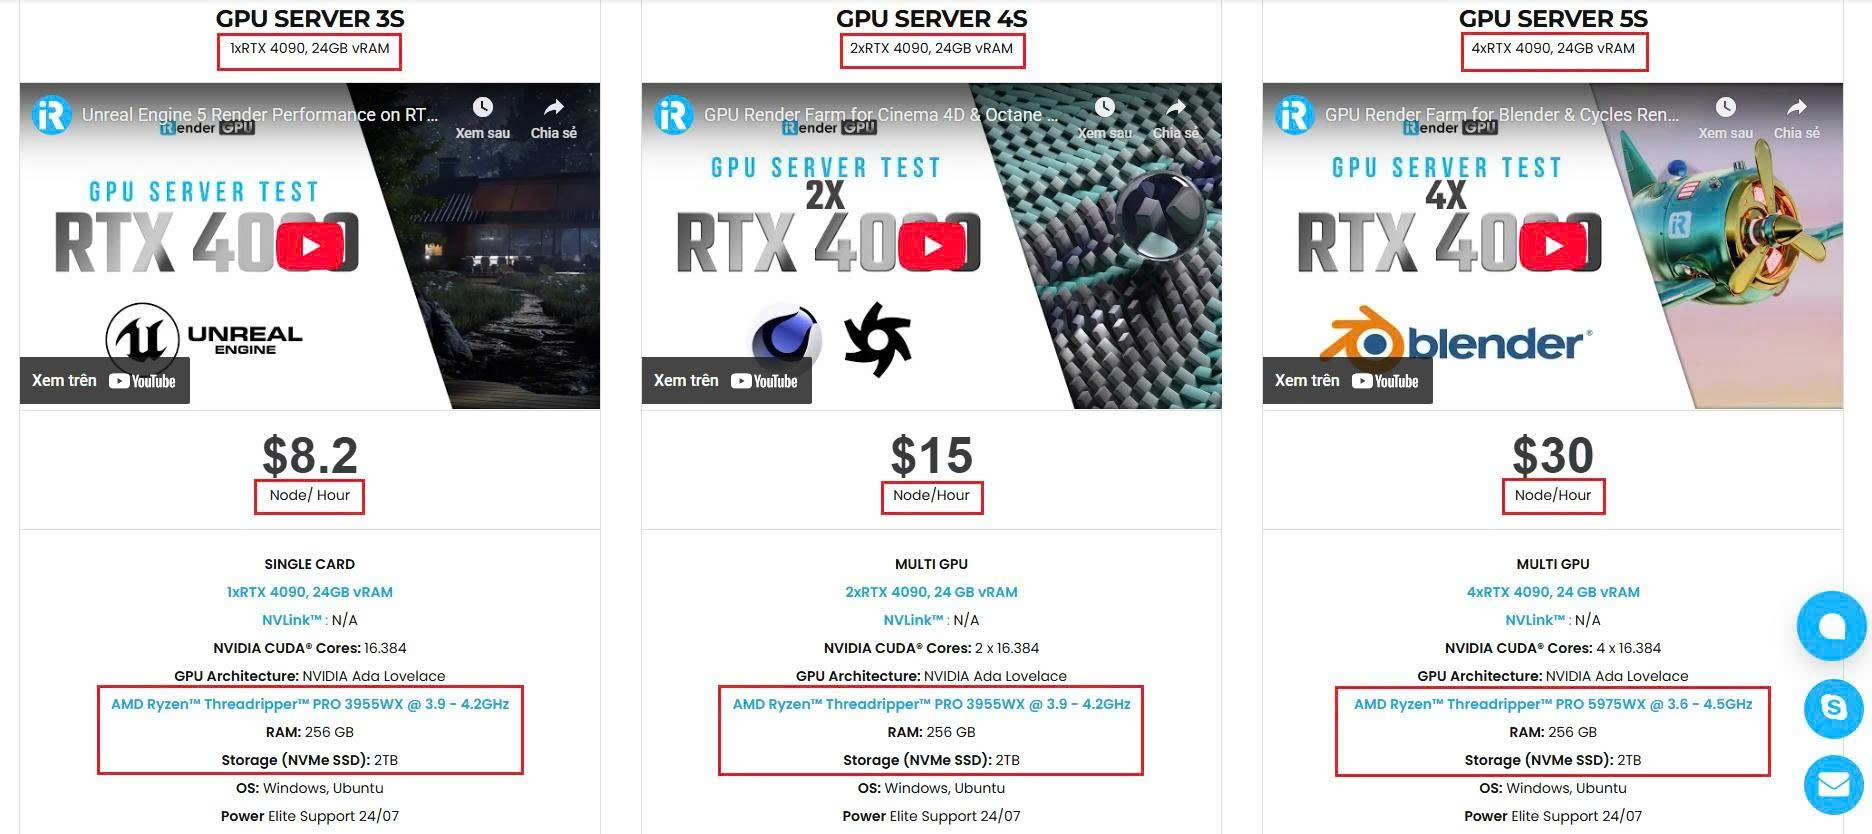
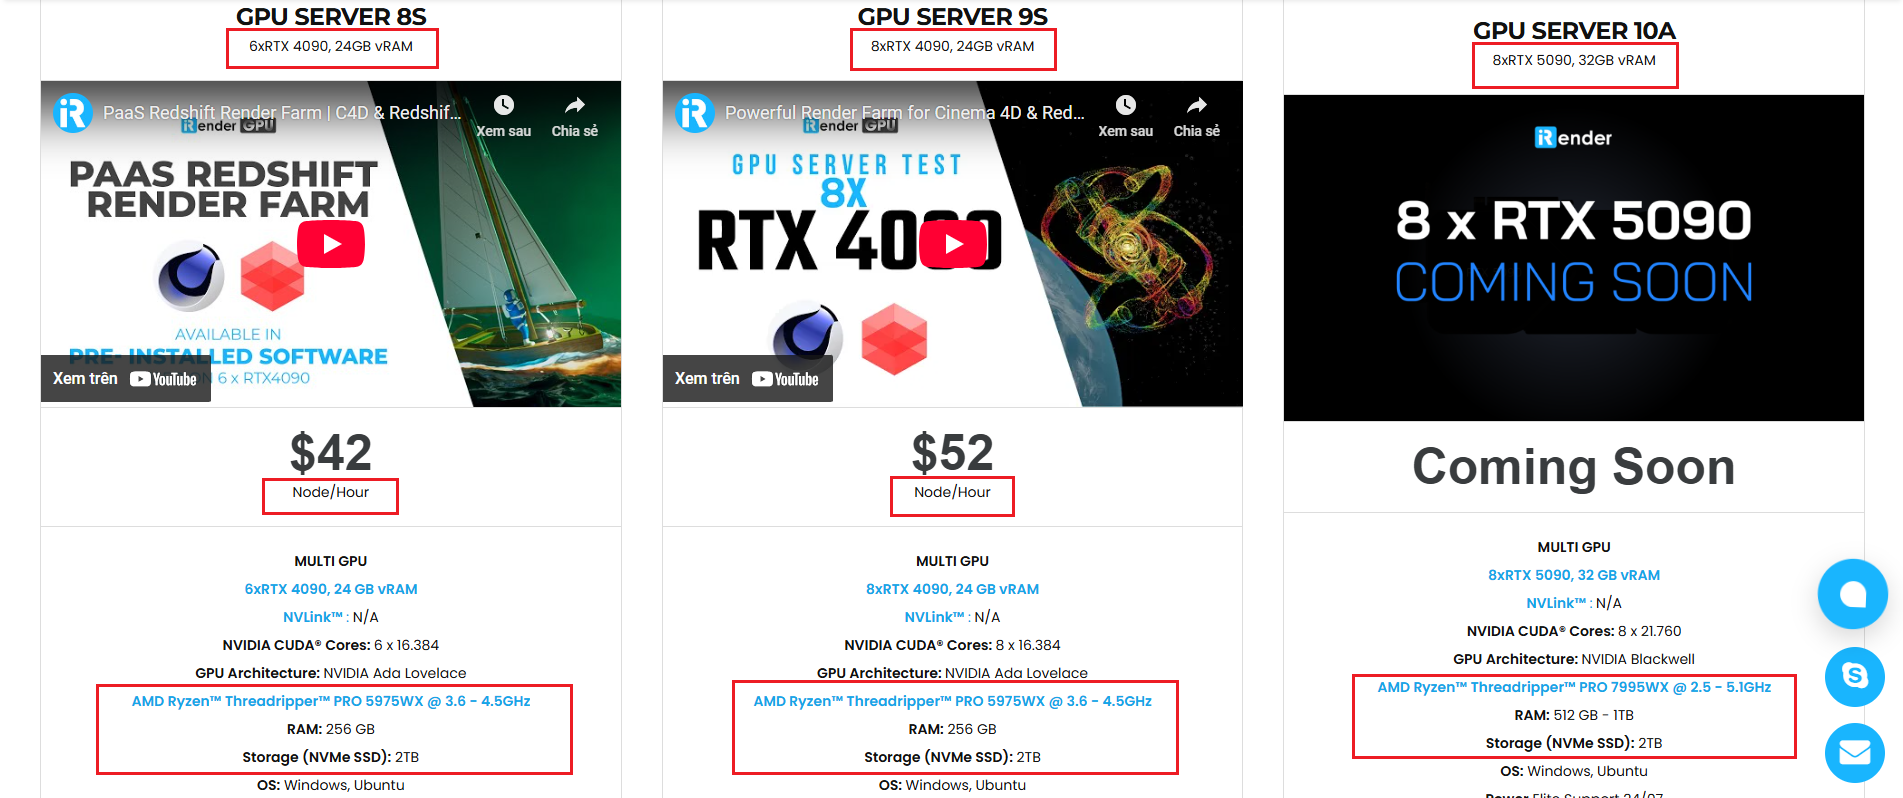
With access to powerful hardware such as the RTX 4090 GPUs and high-core CPUs (CPU AMD Ryzen Threadripper Pro 3955WX @ 3.90GHz – 4.2GHz and AMD Ryzen™ Threadripper™ PRO 5975WX @ 3.6 – 4.5GHz), you can:
- Render faster without being limited by your local workstation
- Scale your projects seamlessly, whether you’re working on small interiors or large architectural scenes
- Enjoy the freedom to set up your preferred tools, add your licenses and work as if it were your own computer only faster and more reliable
Watch a video testing V-Ray on our remote server:

Here is all our servers with detailed information:
Why choose iRender?
When projects become bigger and deadlines become tighter, finding a suitable and optimized renderer is no longer optional, it’s crucial. iRender’s mission is to help you make all your ideas become final products in a faster, stronger and more efficient way.
- Powerful performance: GPU RTX 4090 workstations, compatible with almost 3D/AI software. Moreover, iRender’s remote servers also provide CPU AMD Ryzen Threadripper Pro 3955WX @ 3.90GHz – 4.2GHz and AMD Ryzen™ Threadripper™ PRO 5975WX @ 3.6 – 4.5GHz, RAM 256GB and 2TB SSD NVMe Storage
- Flexible usage: Use the remote server anytime you want
- Secure & Privacy: Guarantee for your data safety and privacy
- Fast support: A customer support team ready to assist 24/7
- Cost-effective: Pay-as-you-go, pay for the time used
If you are still wondering, register now to get a free trial and receive a 100% iRender bonus points for your first transaction within 24 hours of registration.

For more detailed information, please contact us via Live chat 24/7 or WhatsApp: +(84) 962 868 890 or Email: [email protected].
iRender – Happy Rendering!
Source: blog.chaos.com
Related Posts
The latest creative news from V-Ray Cloud Rendering , 3D VFX Plugins & Cloud Rendering.