How to recover data after crashes in Blender?
Worried that potential crashes in Blender while you’re working on a project will wipe out all your hard work? Use the methods below before you panic!
Crashes in Blender
According to the developer, crashes in Blender are mainly due to the following reasons:
- Memory exhaustion
- Hardware or graphics driver issues
- Software errors
When crashes happen, there are some workarounds you could do:
1. Check the Graphics driver
You can use the shortcut Windows + R, choose dxdiag, and click OK to check the system hardware and graphics driver. If it’s an old version, download the latest one from the website of the card manufacturer.
If you use iRender farm computers, all the newest versions of NVIDIA drivers can be found easily on the X drive. You only need to open to Studio folder and copy the installer to the desktop to install it.
2. Check the Blender’s memory usage
For Windows users, use Task Manager and sort by Memory.
For macOS users, open Activity Monitor.app and select Memory tab, or run top -o MEM.
For Linux users, run top -o MEM.
You can lessen the memory usage by reducing the Undo steps on Blender’s Preferences or not using multisample anti-aliasing.
3. Reinstall Blender
Reinstalling the software with a newer or older version might fix the crashes in Blender.
4. Reinstall the operating system
If the issue persists after doing the three methods above, you may want to reinstall the operating system. Windows, in particular, tends to have potential problems due to constant updates and leftover software.
5. Report to Blender
When a crash occurs, Blender will generate a Crash Log with important information to find the cause of the issue. If you are unable to resolve the problem using the workaround, submit a report along with the Crash Log.
6. Update your hardware
If your project is too big, requiring a more powerful GPU with more VRAM and RAM, the only way to avoid crashes in Blender is to upgrade to better hardware.
iRender offers RTX 4090, RTX 3090 computers with 24GB VRAM and 256GB RAM. No more worry about hardware insufficiency.
Data Recovery
By default, Blender provides some useful features to avoid data loss and recover as much of your data as possible in case of a crash, power outage, or forgotten save. These are located in the ‘Preferences’ tab and are editable. Let’s take a look at each feature.
1. Save Prompt
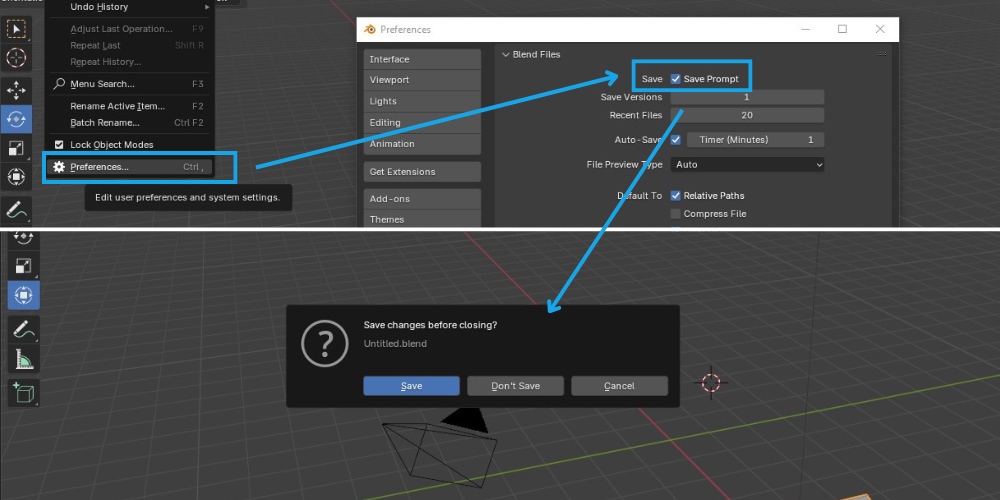
Have you ever felt annoyed by the confirmation step every time you close Blender? This is sometimes considered annoying, but it is still an essential method to prevent you from accidentally closing the application without saving your work.
With the Save Prompt enabled, Blender will ask you to confirm before closing or opening a new blend file while the current one is not saved. And, you can still disable this feature in the ‘Preferences’ tab if you want.
2. Save Versions
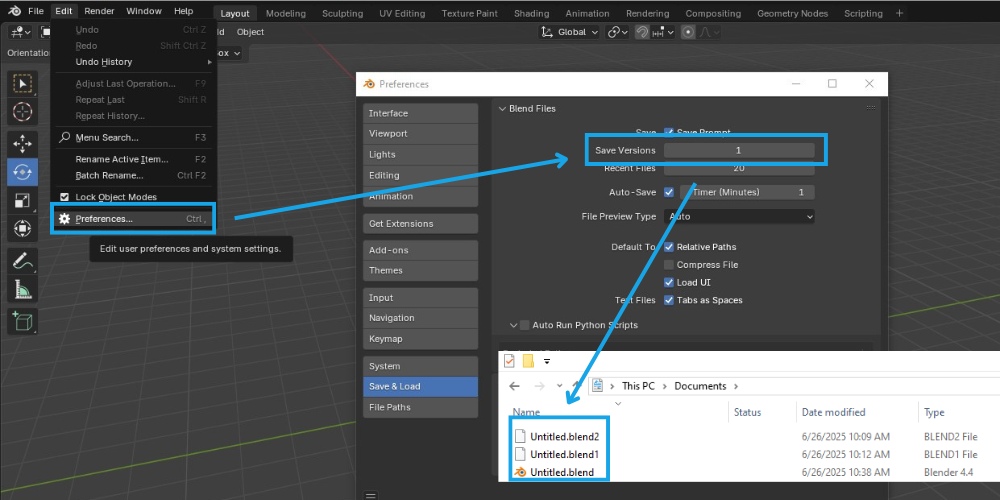
By default, when you save a new edit to an existing file, Blender saves the edited version to that file while keeping the older version as the .blender1 extension. The number of saved extensions can be specified. The higher the file number, the older the version.
For example, let’s say you set the Saved Version to 2, then open a file called Untitled.blend, edit it, and save it twice before closing Blender. All of the versions will be displayed like this list in the same folder:
- Untitled.blend – The second or the latest edit saved
- Untitled.blend1 – The first edit saved
- Untitled.blend2 – Original file
3. Auto Save
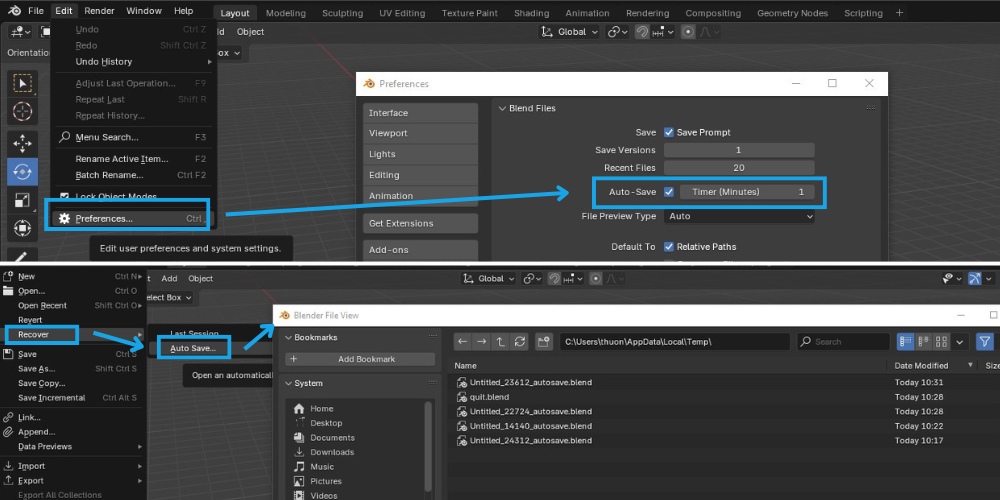
By default, Blender automatically saves your work-in-progress files every two minutes. This way, even if there are crashes in Blender, you can always restore the most recent Auto Save version of your work.
In the ‘Preferences’ tab, you can set the interval between Auto Save files, from 1 to 60 minutes.
To recover your data, navigate to the ‘Recover’ option in the ‘File’ tab, click ‘Auto Save’ to open the ‘Temp’ folder, which lists the Auto saved files along with their time and date. Please note that using Auto Save cannot bring back the edits made after the last Auto Save file.
4. Last Session

A Blender session is defined as the time from when you open Blender until you close it. If you quit the software without saving, or crashes in Blender happen, you might restore your last edits using the ‘Restore Last Session’ option in the ‘File’ tab.
Please note that the quit.blend file that Blender uses to restore the last session may be lost when your computer restarts.
Fast rendering with Blender on iRender’s servers
iRender provides private high-configuration machines with upmarket specifications that excel in rendering, like AMD Ryzen™ Threadripper™ PRO 3955WX @ 3.9 – 4.2GHz or AMD Ryzen™ Threadripper™ PRO 5975WX @ 3.6 – 4.5GHz, 1/2/4/6/8 x RTX4090 or RTX3090, RAM 256GB, Storage NVMe SSD 2TB.
Why can iRender be a great render farm for you?
In addition to high-configuration servers, iRender provides many other utilities to provide the best user experience.
- Dedicated server for individuals: You have full control and access to the server you rent. The working environment (installed apps, files) will be stored for the next use.
- Easy and free file transfer between your computer and iRender’s server: The transferring task can be done via iRender GPU application for Windows and the iRender Drive application for MacOS.
- 24/7 assistance: iRender’s attentive agents are always ready to support all your queries.
- All software compatibility: iRender’s PCs are built to meet the configuration needs of all 3D software and rendering tools at a variety of cost levels for users to choose from.
Let’s see how fast Blender renders on iRender’s machines!


New users will get a 100% bonus for the first transaction within 24 hours of their registration. No minimum amount!! If you top up 50$, you will get 100 points in total to hire our machines.
If you have any questions, please get in touch with me through email [email protected] or our 24/7 support team for a quick response.
Thank you for reading
Sources: Blender
Related Posts
The latest creative news from iRender Cloud Rendering for Blender