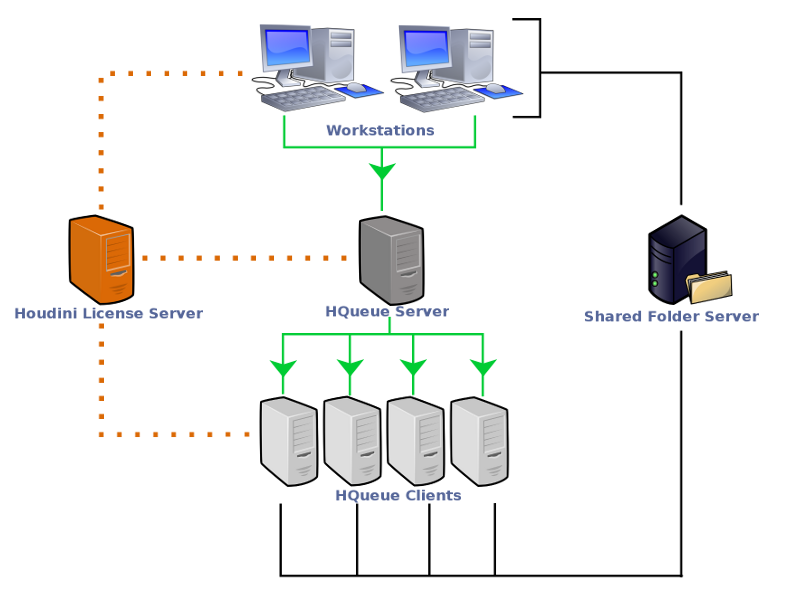
How to set up a basic HQueue farm
HQueue is Houdini’s free distributed render and simulation manager. In the previous article, we have explored what HQueue is, how it works, and what it can do for you. Today, let’s set up a basic HQueue farm with iRender.

“Alien Souvenirs” Series – Part 01: Awaken – Armin Lotfi
Before you begin
The following items are required before how to set up a basic HQueue farm:
Network connectivity
-
Machines must be able to “see” or ping each other by their domain (DNS) names or by their IP addresseses.
-
Client machines must be able to connect to the server machine through port
5000. The server machine must be able to connect to client machines through port5001. This may require opening ports in any local firewalls.
Shared network folder
-
The servers and clients must be able to access a shared network filesystem, for example an NFS mount of SMB share.
-
The shared folder must be mounted at the same location on every machine, for example /nfs/storage/ on Linux, or \\bigdisk\hq on Windows.
Houdini
-
Install Houdini on every client machine in the same install directory.
Mac: On macOS, the default Houdini installation path is /Applications/Houdini/HoudiniX.Y.ZZZ.
Windows: On Windows, the default Houdini installation path is C:/Program Files/Side Effects Software/Houdini X.Y.ZZZ.
Linux: On Linux, the default Houdini installation path is /opt/hfsX.Y.ZZZ.
-
Houdini licensing must be set up correctly on each client machine as well, so the client software can launch licensed executables such as
hythonandmantra.
Installing HQueue
Set up a basic HQueue farm involves installing the HQueue server, registering a network folder with HQueue and adding client machines to the farm.

Install the HQueue Server
1. Choose a machine, say serverMachine, to run the HQueue Server.
2. On the machine, download and run the Houdini Launcher.
3. In the Launcher, select HQueue on the left-hand side and then click on the Install HQueue button on the right.
4. When prompted to choose a version, select Choose Another Version.
5. Select a version that has a py2 Build Type (i.e. Python 2) and then click Install.
6. In the HQueue Install Options dialog, check on the HQueue Server component and uncheck the HQueue Client component.
7. Complete the installation in the Launcher.
- Mac: the Launcher installs the server to /Library/HQServer and creates a new com.sidefx.hqserver.plist service file in /Library/LaunchDaemons.
- Windows: On Windows, the Launcher installs the server to C:/HQueueServer and creates a new HQueueServer service in Windows Services.
- Linux: On Linux, the Launcher installs the server to /opt/hqueue.
8. You can open a web browser and navigate to http://serverMachine:5000 to confirm that the HQueue server is running.
Register the network folder with HQueue
1. Open a web browser and go to the HQueue web interface. For example, http://serverMachine:5000.
2. Hover the mouse over the “triple bars” icon in the top-right corner and then select Network Folders.
3. In the Network Folder 1 box, set the fields that apply to the desired operating system.
- Mac: set the
on macOSfield to where the network folder is mounted on macOS machines (i.e. /Users/Shared/myShare). Leave all other fields at their default values. - Windows: set the
Hostfield to the machine name or IP address hosting the network folder. Then set theon Windowsfield to the network folder’s share name and finally set theMap tofield to the drive letter that the network folder is mapped to on Windows machines.
For example, suppose your network folder is served on a machine named myFileServer, its share name is myShare, and your machines map X: to \\myFileServer\myShare, then set Host to myFileServer, set on Windows to myShare and set Map to to X:.
Leave all other fields at their default values.
- Linux: set the
on Linuxfield to where the network folder is mounted on Linux machines (i.e. /mnt/myShare). Leave all other fields at their default values.
4. Save the changes.
- Mac: References to $HQROOT in HQueue jobs and Houdini parameters will now resolve to the value of the
on macOSfield on macOS machines. - Windows: References to $HQROOT in HQueue jobs and Houdini parameters will now resolve to either the drive letter specified by the “Map to” field or the UNC path produced by the Host and “on Windows” fields on Windows.
- Linux: References to $HQROOT in HQueue jobs and Houdini parameters will now resolve to the value of the
on Linuxfield on Linux machines.

“Alien Souvenirs” Series – Part 02: Emergence – Armin Lotfi
Add a client machine
1. Run the Houdini Launcher on the machine that you want to add.
2. In the Launcher, select HQueue on the left-hand side and then click on the Install HQueue button on the right.
3. When prompted to choose a version, select Choose Another Version.
4. Select a version that has a py2 Build Type (i.e. Python 2) and then click Install.
5. In the HQueue Install Options dialog, check on the HQueue Client component and uncheck the HQueue Server component. Then set the HQueue Server URL field to point to your HQueue Server. For example, http://serverMachine:5000.
6. (optional, Linux and macOS only) Change the user account that runs the HQueue Client and jobs by changing the Client User field. By default, the Launcher creates a new hquser account to run the HQueue Client.
7. (optional) Change the HQueue Client install location by changing the Install Directory field. This is required on Linux if you also changed the user account. By default, the Launcher installs the HQueue Client into the hquser‘s home directory on Linux.
8. Complete the installation in the Launcher.
- Mac: the Launcher installs the HQueue Client to /Library/HQClient and creates a new com.sidefx.hqclient.plist service file in /Library/LaunchDaemons.
- Windows: the Launcher installs the HQueue Client to C:/HQueueClient and creates a new HQueueClient service in Windows Services.
- Linux: the Launcher installs the HQueue Client to the client user’s home directory, $HOME/hqclient. For example, the HQueue Client is installed to /home/hquser/hqclient by default.
9. Go to the Clients page in the HQueue web interface to confirm that the machine was successfully added to the farm.
The Best Cloud Rendering Service for Houdini
iRender is a GPU-Acceleration Cloud Rendering Service for Single-GPU and Multi-GPU Rendering with Powerful Render Nodes: 2/4/6/8x RTX 3090. We provide high computing performance on the model of IaaS (Infrastructure-as-a-Service). There is a variety of servers from recommended system requirements (1/2 x RTX 3090) to high-end options (4/6/8 x RTX 3090), you can easily choose one suitable package for your project demands to speed up your rendering process many times.
Let’s see rendering tests with Houdini & renderers (Vray, Redshift) on iRender servers:


However, we are more than just powerful configurations. With a reasonable price, a variety of useful features (Fixed Rental, Clone, NV Link, APIs, etc) and dedicated support from our team, we want to bring to you not only the best quality products but also the most comfortable render time and experience.

Thank you & Happy Rendering!
Source and image: sidefx.com
Related Posts
The latest creative news from Houdini Cloud Rendering , Cinema 4D Cloud Rendering , Redshift Cloud Rendering, Octane Cloud Rendering, 3D VFX Plugins & Cloud Rendering.