5 tips to render faster with Maxwell Render
Maxwell Render is a physically accurate, unbiased engine, developed by Next Limit Technologies in Madrid, Spain. This standalone software is used in the film, animation, and VFX industry, as well as in architectural and product design visualization. Maxwell Render offers various plug-ins for 3D/CAD and post-production applications: Maya, Houdini, 3ds Max, Cinema 4D, Revit, After Effects, etc.
To avoid excessive render times and bad-looking renders, Next Limit strongly recommended four tips as four important rules to start in Maxwell Render. Moreover, there is one tip recommended by us – iRender Cloud Rendering.

1. Scene scale
Because Maxwell Render uses real-world units for lighting and camera settings, the size of your scene objects must also have a real-world scale. For example, if you wish to render a building, but that building was exported to Maxwell as having a size of 1 meter, it will be rendered it as if it was a miniature building – a maquette. The lighting and depth of field will not match your intentions.
If you are working with the plugins – they will take care to export the objects in your scene to the scale you modeled them in. But you have to make sure in your host application that the scale you model in, is the scale these objects would have in reality.
If you are not sure the scale is correct when looking at the render (an indication would be that the depth of field effect is too pronounced if you intended your objects to be very large), you can always examine the .MXS file by opening it in Maxwell Studio and checking the scene scale.
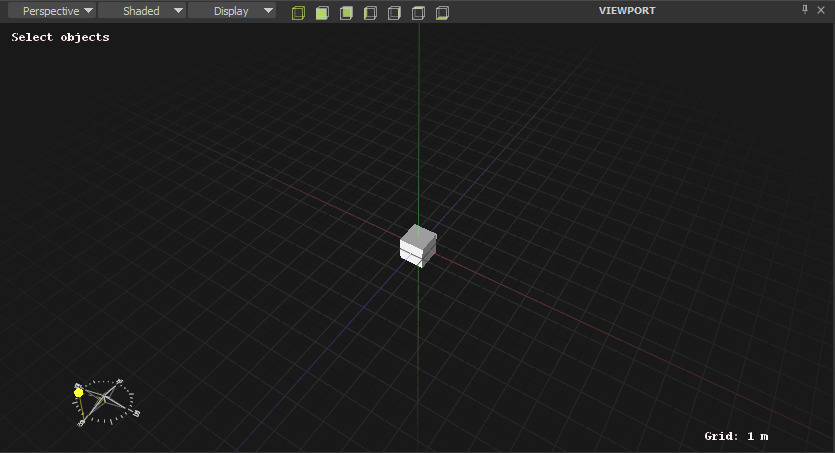
To do this:
- Open the .MXS from File > Open
- Using the grid in the 3D viewport, examine the size of your objects to make sure they are the correct scale
In the example below, the cube is supposed to be 1m in size, and comparing with the grid – it looks correct. Notice the grid indicator at the lower right of the viewport, it will tell you what the current grid unit is between each grid line (the thin grey lines in the image, not the thick grey lines).
Absolute and Adaptive grids
There are two kinds of grids in Studio:
- Absolute: You specify in the Studio prefs the exact size of each grid unit and the total size of the grid.
- Adaptive: When zooming in and out of the viewport, the grid units will adapt and the grid indicator will change, letting you know what the current size of each grid unit is.
It is up to you to decide which type of grid is suitable. It might be easier when checking the size of your objects to use the Absolute grid settings.
The example above used the absolute grid. You can find its settings in the Studio preferences window. (Edit > Preferences > Viewport Rendering):
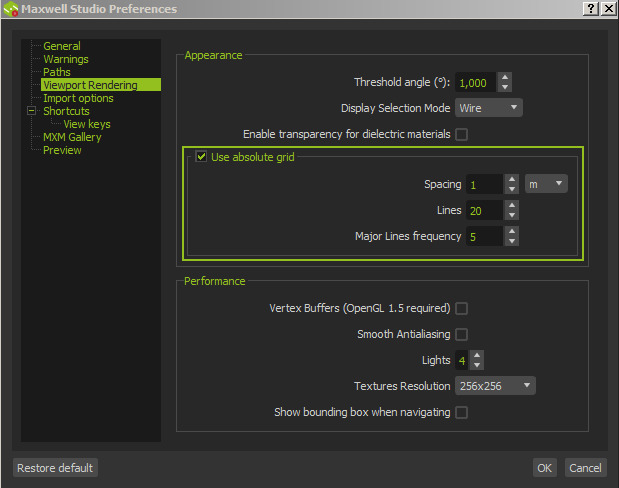
| Parameter name | What it controls |
| Spacing | The size of each grid unit (the thin lines) |
| Lines | The total size of the grid. In this case, since Spacing is set to 1m and Lines to 20, the total size of the grid will be 20m. |
| Major Lines frequency | How often a thick grid line will appear. In this case, a thick line will appear every 5m. |
You can change the colors of the grid lines from the Preferences window, in the General Section (under Appearance).
2. Realistic material reflectance
Avoid setting the Reflectance 0° color too bright. Setting it to 255 for example means this material will reflect back all the light it receives, which does not happen in the real world.
Maxwell Render still keeps the amount of light reflected/absorbed within physical limits but the result with such high Reflectance values means the light will keep bouncing around in your scene with very little loss in energy, which will produce noisier renders and a washed-out look with very little contrast.
A reasonable setting even for very bright materials would be around 225-230. For example, the Reflectance value of a white piece of paper, when converted to RGB, is around 225. Please note that this only matters for the Reflectance 0° color. The Reflectance 90° color can be left at fully white (RGB 255).
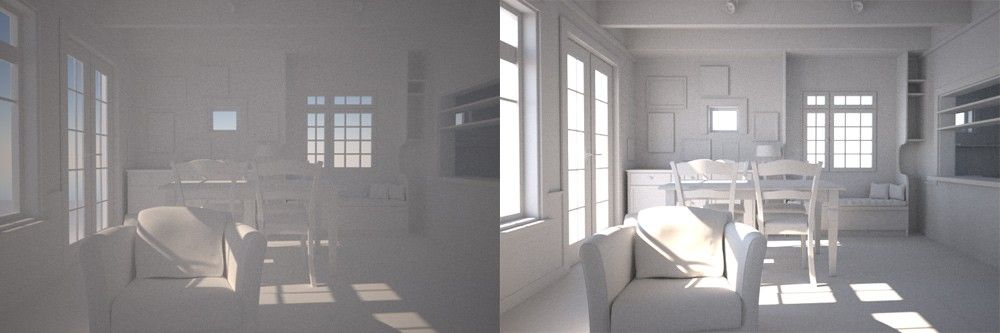
3. Realistic light intensities
It is generally a good idea to always use realistic emitter intensities for your emitters. Easiest way is using the emitter presets such as the incandescent 60W light bulb preset. If you feel the emitters in your scene don’t emit enough light to properly expose the render, it is tempting to raise the emitter intensity unrealistically to compensate, but very high emitter intensities may result in more noise and “spots”. Instead you should change the camera settings that affect exposure (f-Stop, Shutter Speed, ISO).
For example if you are rendering with Physical Sky, then switch it off and want to do a night time render with only emitters, it is normal for the render to look very dark if you don’t change the camera settings. Daylight is MUCH stronger than normal indoor/outdoor lighting and in the real world you would have to use very different exposure settings.
As a general rule, to have a properly exposed typical indoor render lit only with artificial light the camera settings would be: f-Stop 2.8, Shutter Speed 1/30th of a second, ISO 400.
4. Realistic camera settings
f-Stop range
A real camera lens has a minimum and maximum f-Stop range of about f1.2 – f22. The Maxwell camera doesn’t have this limitation but it is still recommended to keep the f-Stop range within realistic limits. When rendering very small objects such as jewelry you might set the fstop very high (f100) to avoid any blurring due to depth of field. This however means you have to make your emitters extremely bright to compensate the much lower exposure, which could lead to problems in noise and unexpected behavior with emitters of several hundred of thousands of watts in power. It is suggested instead to use a more realistic f-Stop range and raise the ISO and/or increase the size of your object if it’s really small. Such small changes in size will have a minimal impact on the shading of the object. Starting with Maxwell V3, you also have the option to use the “Pinhole” type lens which does not produce any depth of field effect at all, no matter the fStop setting of the camera.
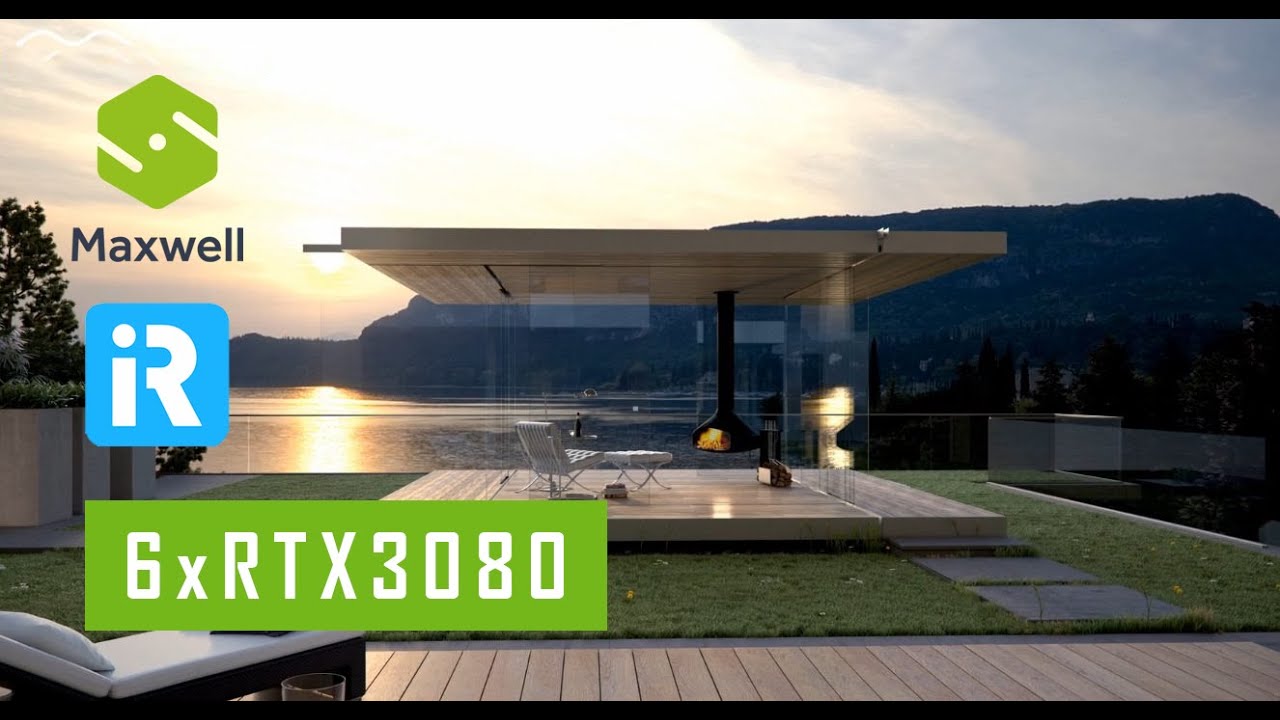
5. Use iRender’s Maxwell Cloud Rendering Service
iRender, a Vietnamese-based software company, provides high computing performance on the model of IaaS (Infrastructure-as-a-Service), with thousands of CPUs & GPUs for 3D rendering, processing Big Data or any other intensive tasks. We provide CPU Server and 6 GPU Cloud Rendering packages with 1/2/4/6 card(s) RTX 2080Ti/3080/3090, which suit all your project demands and will speed up your rendering process many times. Maxwell users can easily choose their machine configuration from recommended system requirements to high-end options.
To reduce the rendering time more, Maxwell users can run multiple machines at the same time, separately, or connect them with network rendering.
Let’s see rendering tests with Maxwell on server 6 (6x RTX 2080Ti), server (6x RTX 3080) and server 8 (6x RTX 3090) at iRender:


In addition, you will enjoy more benefits than just the powerful machines.
- Free and convenient transferring tool
iRender offers a powerful and free file transfer tool: Gpuhub Sync. With fast file transfer speed, large data capacity, and completely free. You can transfer all the necessary data into our Gpuhub Sync tool at any time without connecting to the server. The data will be automatically synchronized in the Z drive inside the server, ready for you to use.
- Flexible price
You will be charged on a per-minute basis. However, you can always save up to 50% with our Fixed Rental feature. For those who are in need of the server for more than a day, or have extremely large projects, we advise choosing daily/weekly/monthly or even yearly rental packages. The discount is attractive (20% for daily packages, 40% for weekly and monthly packages, 50% for yearly packages). Besides, you don’t have to worry about over-charging if you forget to shut down the server.
- Real human 24/7 support
Our support is always online 24/7, helping you to handle the problem quickly, effectively, saving you both time and money.
Conclusion
With the above advantages and the machine configuration package that iRender offers, we believe that Maxwell users will have the most comfortable, quickest, and most effective rendering time.
So, do not hesitate anymore, let’s REGISTER for an account today to get a FREE COUPON to experience our service and reach a new level of cloud rendering. Or contact us via WhatsApp: +(84) 912875500 for advice and support.
Thank you & Happy Rendering!
Source: Maxwell Documentation
Related Posts
The latest creative news from Maxwell Cloud Rendering , Cinema 4D Cloud Rendering , 3D VFX Plugins & Cloud Rendering.