MOPs for Houdini: Beyond Motion Graphics
MOPs for Houdini, which is short for Motion OPerators, is a set of tools for SideFX Houdini. It helps artists to simplify and automate common motion graphics processes in Houdini. What is so special about it? Find out with iRender in this article.
Back to basic 101 – 20220202 by Hoang Anh Nguyen – visual effects artist, art director, and the founder of Freaky Motion
What is MOPs?
MOPs is a free, open-source suite of Houdini Digital Assets (HDAs) built to help motion designers and visual effects artists animate things more easily and intuitively.
In other words, MOPs is a toolkit that’s all about making it easy to move things around in Houdini. The main goal of MOPs is to take conceptually simple operations and make them simple in practice. For example, “rotate a bunch of things around their local axes” or “move things along a curve and loop when the end is reached”. It will enable you to focus on the important things, like animating or lighting or going home in time for dinner.
System requirements
System requirements
- Houdini 16.5 or higher (any license type)
- MOPs Plus requires Houdini 18.0 or higher (any license type).
Important: Houdini 18.5 builds after 18.5.351 have an error that prevents packages from loading properly. If you are using Houdini 18.5, you must either download build 18.5.415 or later, or use the Houdini.env installation method.
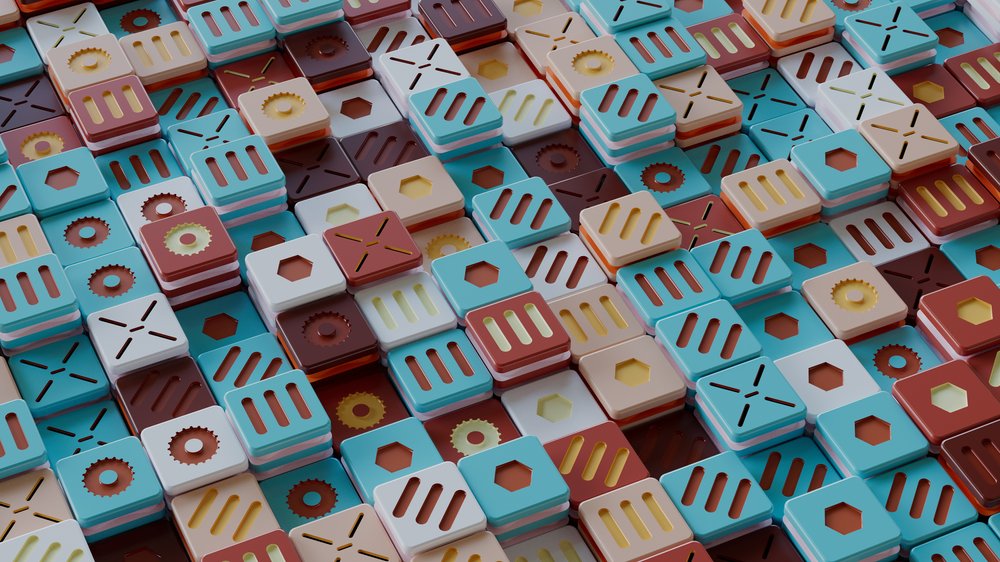
Artwork by Carlos Dordelly using MOPs
Installation
Step 1: Downloading MOPs
You need to download MOPs from GitHub and then save them somewhere on a local drive or network share. It’s important that you do not install MOPs directly into your $HOME/houdiniXX.X directory, or else it may not properly be loaded when you start Houdini.
Option 1 (users who are familiar with Git): Navigate to the folder you want to contain MOPs, and from BASH / Git BASH type: git clone https://github.com/toadstorm/MOPS.git
Option 2 (what’s Git?): Download the desired release directly from the releases page and extract it to your hard drive or network share.
Step 2: Configuring your Environment
Option 1: Plugin (17.5+ only)
For those of you running Houdini 17.5 or later, you have an option for a much easier install. Simply create a folder inside your Houdini preferences directory (where the houdini.env typically is) called “packages”, and place the MOPS.json file from the MOPs download into that package folder. Your preferences directory on Windows is typically in My Documents\houdiniXX.X. In OS X it’s in ~Library/Preferences/Houdini.
Then edit MOPS.json and change the “MOPS” variable to match the MOPs install path you chose in step 1 (the directory that contains “otls”, “scripts”, and so on). That’s it!
To verify your install, open Houdini and drop down a Geometry container, then dive inside. If you see MOPs nodes in the Tab menu, the installation was successful. You can also check the “+” button next to the Shelf menu and look for a shelf called “MOPs” to verify your installation.

Artwork by Carlos Dordelly using MOPs to drive Vellum constraints
Option 2: Edit Houdini.env
You need to add the MOPS installation directory to your Houdini environment file. Edit your houdini.env file and create a variable called MOPS that points to the new folder you just extracted MOPs to. The folder you point to should be the one that contains “otls”, “scripts”, and “toolbar”: MOPS=”/path/to/MOPS”
Finally, add $MOPS to your HOUDINI_PATH: HOUDINI_PATH=$HOUDINI_PATH;$MOPS;&
If you already have a HOUDINI_PATH defined, you can simply append $MOPS to that existing HOUDINI_PATH. For example, if you’re using both MOPs and QLib:
- MOPS=”/path/to/MOPS”
- QLIB=”/path/to/qlib”
- HOUDINI_PATH=$HOUDINI_PATH;$QLIB;$MOPS;&
Note: On Linux and OSX, use : instead of ; to separate your paths.
It’s important that your HOUDINI_PATH always ends in ;&. You can append any other paths you like, but the last path should be &. This will ensure that Houdini’s built-in operators work normally.
iRender - Powerful Cloud Rendering for Houdini & MOPs
Next week, we will test MOPs to see if we install it correctly, and learn how to use this toolkit.
In case you need to render faster, or render off-site, especially for a deadline, iRender comes up with a solution to help you speed up your render and optimize the workflow in Houdini, that is GPU Cloud Rendering. We support both Single-GPU and Multi-GPU Rendering with Powerful Render Nodes: 1/2/4/6/8x RTX 3090 for all your project demands. Let’s see how the performance is on our server:

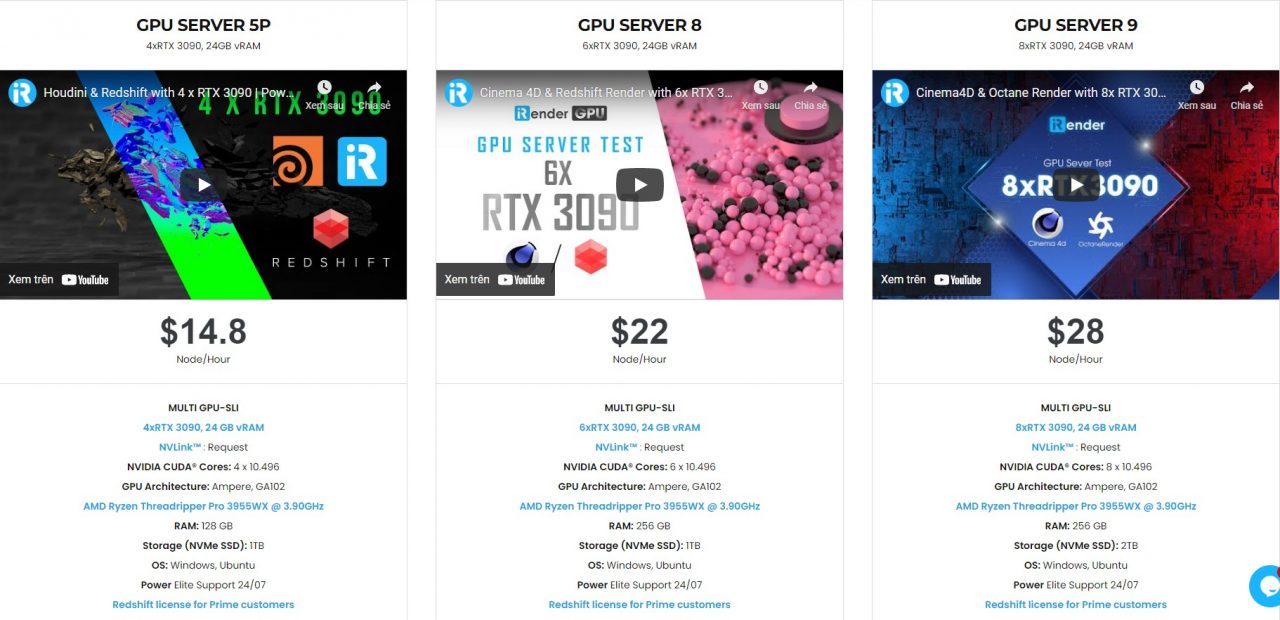
High-end configuration: NVIDIA RTX 3090 and AMD Ryzen Threadripper Pro 3955WX @ 3.90GHz, and with reasonable price. However, we are more than that. With a variety of useful features (Fixed Rental, Clone, NV Link, APIs, Process monitoring, etc) and dedicated support from our team, we want to bring to you not only the best quality products but also the most comfortable render time and experience.

Thank you & Happy Rendering!
Related Posts
The latest creative news from Houdini Cloud Rendering , Cinema 4D Cloud Rendering , Redshift Cloud Rendering, Octane Cloud Rendering, 3D VFX Plugins & Cloud Rendering.