Quick Tips for Faster Redshift Rendering
Redshift rendering can be time-consuming, but small tweaks to your workflow and settings can yield big improvements in speed. In this article, we will explore some quick tips for faster Redshift rendering in Cinema 4D. Let’s dive in!
Quick Tips for Faster Redshift Rendering
Update Cinema 4D, Redshift, and GPU driver
The first and foremost tip is to update your software and hardware. Make sure Cinema 4D, Redshift, and your GPU driver are all updated to the latest versions. Update your C4D, Redshift using the Maxon App and use the Nvidia GeForce Experience App to update your GPU drivers.
Close other unnecessary apps
Next, close all other unnecessary programs that can eat up RAM and drain the computer’s resources.
After Effects and web browsers such as Chrome eat up a lot of RAM and drain computer resources. Make sure to close After Effects and don’t forget to purge all Memory & Disk Cache before closing it to free up RAM and get rid of any unnecessary files. Shut down Chrome (and your web browsers) or at least try to close as many of the tabs as you can.
Optimize C4D scenes
You should optimize your Cinema 4D scenes as building them. The more optimized they are, the faster they’re going to be rendered. To optimize your scene, follow these steps:
-
- Keep the Polygon count as low as possible
- Cache, bake or convert Dynamics to Alembic files
- Don’t use super high-resolution textures
- Remove unused objects and materials
- Store all assets locally and not on a server or within the Asset Database.
Use and optimize the RenderView
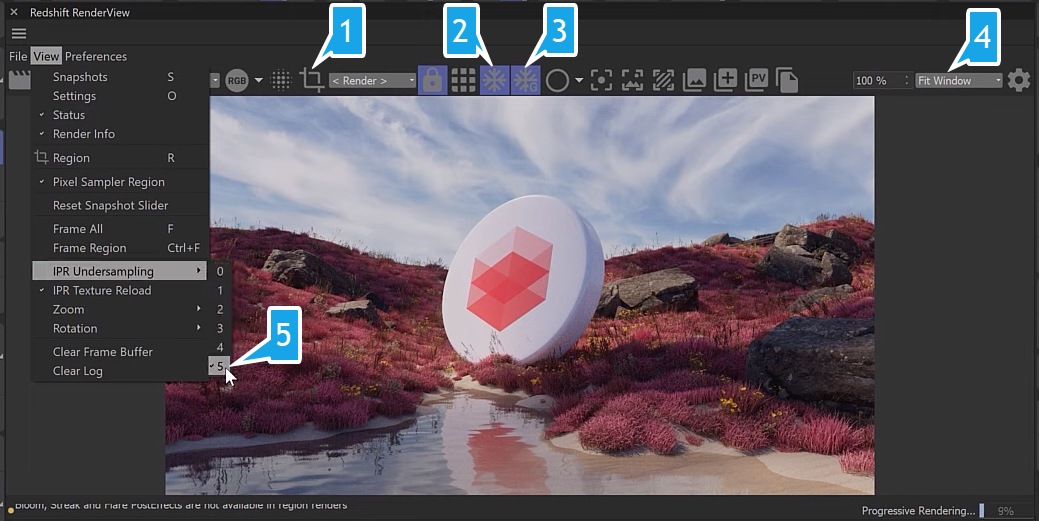
We mainly use the Progressive renderer in the Redshift RenderView (don’t use the IPR) while working on your scenes before the final render.
To optimize the RenderView, we can make use of:
-
- The Render Region Tool (holding Shift and Clicking & dragging across the image to isolate the render to just that area; this will render much faster than rendering the whole image)
- Freeze Tesselation
- Freeze Geometry Updates
- Set the window scale to Fit Window, and render the smallest window you can
- Under ‘View’, set the IPR Undersampling to 5 to increase responsiveness
Source: CG Shortcuts
Reduce Progressive Passes
In the Redshift Render Settings (Ctrl B) >> Interactive Rendering, if you reduce the Progressive Passes (1024 by default) to 32 or 16, your render will finish calculating much faster. This will free up the GPU for other tasks. Due to the lower sample count, your image will be a little noisy. However, you can use denoising to clean up the preview image.
Source: CG Shortcuts
Use Denoising
In the Progressive mode, enable Denoising and you can use OPTIX and OIDN engine to clean up noise. Then reducing the Overhead down to 0 will defer the denoising operation until after the frame has fully completed rendering (which is the fastest way).
Source: CG Shortcuts
Increase Unified Sampling value
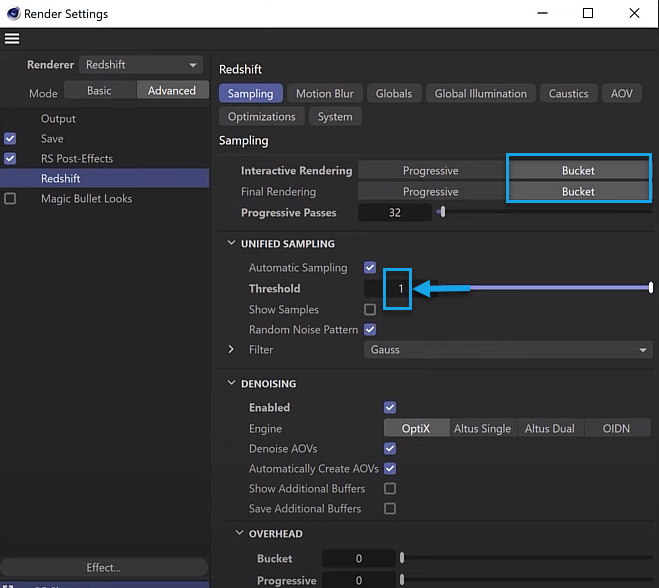
In bucket rendering mode, increasing the Unified Sampling threshold to 1 or beyond will decrease the render quality, but speed up your previews (with a little more noise). This is great for setting up your materials and lighting for more interactive rendering.
Source: CG Shortcuts
However, make sure to set it back to the default 0.01 or lower for your final render to clean up all the noise and produce a sharper image.
Enable Automatic Sampling
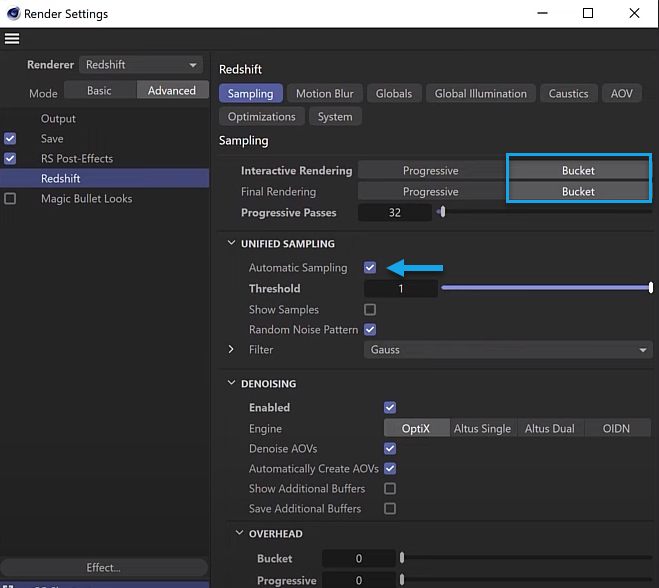
In the past, we needed to set up overrides and manually tweak sample values until finding the right balance of noise to render time. Today, the Automatic Sampling algorithm can handle this for us and will often do a better job.
Enable Automatic Sampling will help you save a lot of time and hassle.
Source: CG Shortcuts
Avoid using Motion Blur, Caustics, and unneeded AOVs
Some effects like Motion Blur and caustics will slow your renders as these effects are quite computationally heavy. Only use them if you have to. Otherwise, you can add Motion Blur in post. If you’re rendering AOVs for post-production, only render what you need because your render passes will also add to render time.
Enable Hardware Ray-Tracing
Source: CG Shortcuts
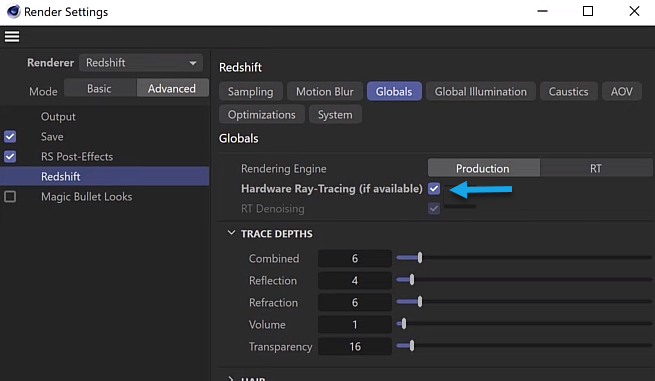
If you have an Nvidia RTX GPU (such as an RTX 4090), you can enable Hardware Ray-Tracing under the Globals menu. Using it will help speed up your renders.
Decrease Trace Depth
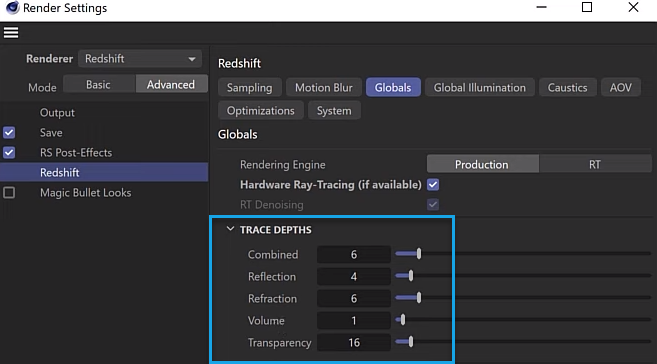
You can decrease the Trace Depth values to limit the number of bounces calculated by the various ray types. This usually results in a faster render, but a slightly darker scene. Turn off any rays you don’t need like Volume and Transparency and see if you can get by with less Reflective and Refractive bounces.
Source: CG Shortcuts
Increase Cut-off Thresholds
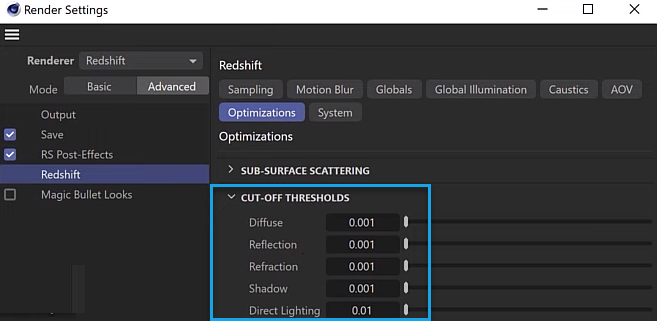
Under the Optimizations tab, try increasing Cut-Off-Thresholds to terminate the rays sooner. This results in faster renders but leads to noisier renders. You can compensate for the noise by increasing samples or denoising.
Source: CG Shortcuts
Increase the Bucket Size
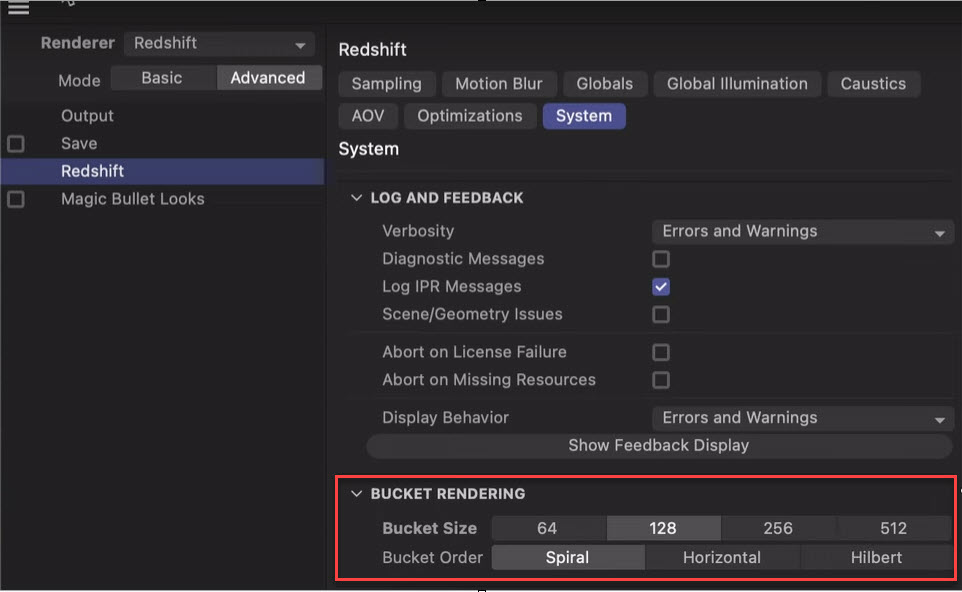
Increasing the bucket size can speed up your renders, but this will also require more VRAM. If you want to try increasing bucket size, make sure your GPU can handle it. Maxon suggests not using the smallest Bucket size of 64 or the largest size of 512 for GPU rendering because it will fail to utilize the GPU processor effectively.
Optimize Redshift Preferences
In Redshift Preferences >> SYSTEM >> COMPUTER DEVICES, select only your GPU(s). Don’t select CPU and do not use Hybrid Rendering as sharing the load with your CPU will slow your renders down.
Material Previews can also slow things down, so be sure to turn it off as well.
Boost Redshift rendering to the fastest with iRender
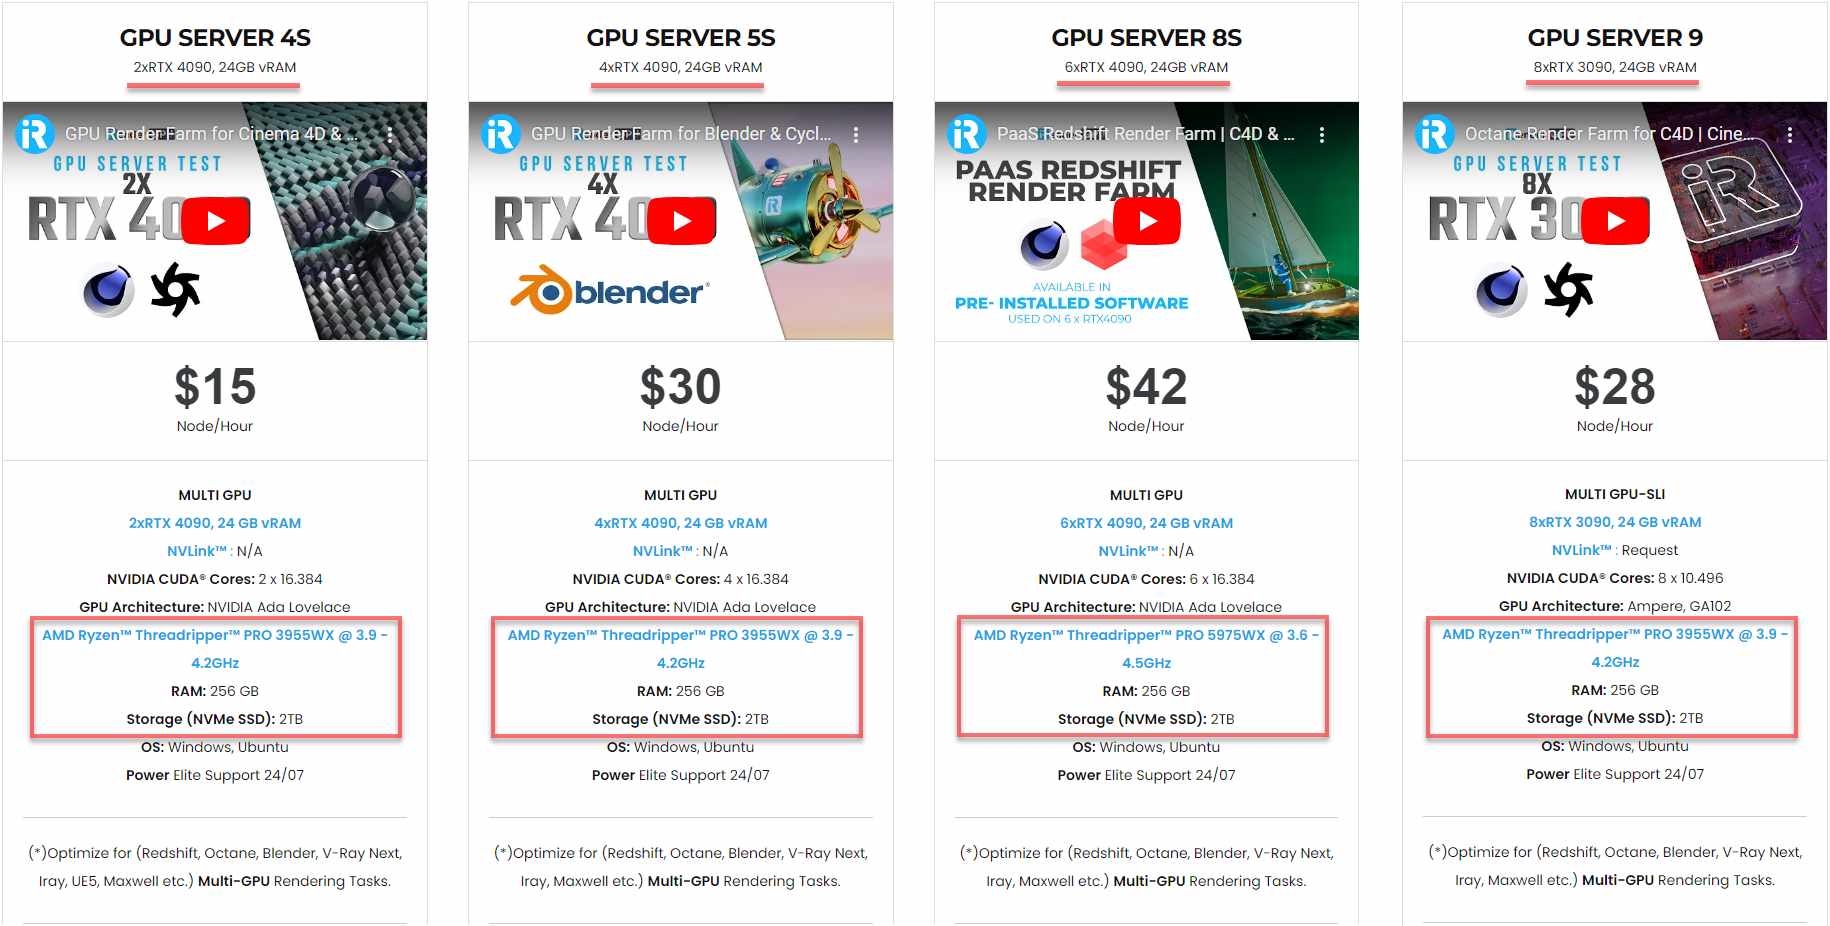
iRender powers up your creativity with unlimited GPU rendering resources. Our GPU render farm houses the most powerful 3D rendering machines. Configure from 1 to 8 GPU with top-tier RTX 4090/RTX 3090, Threadripper Pro CPUs, 256GB RAM, and 2TB SSD storage – iRender’s machines can handle any 3D project demands.
Once renting our machines, you will own them as your personal workstations. Therefore, you can install and use C4D, Redshift, plugins, and/or any other 3D software of any version (even the newly released ones).
As an official partner of Maxon, we currently provide pre-installed C4D and Redshift machines to streamline your pipeline further! Let’s explore how to use our C4D and Redshift machines through our Desktop app.
New user incentives
This March, we are offering an attractive 100% Bonus Program for our new users making the first deposit within 24 hours of registration.
Enjoy our FREE TRIAL to try our RTX 4090 machines and boost your Redshift rendering now!
For additional information, please do not hesitate to contact us at [email protected] or mobile: +84915875500.
iRender – Thank you & Happy Rendering!
Reference source: cgshortcuts.com
Related Posts
The latest creative news from Redshift Cloud Rendering.


