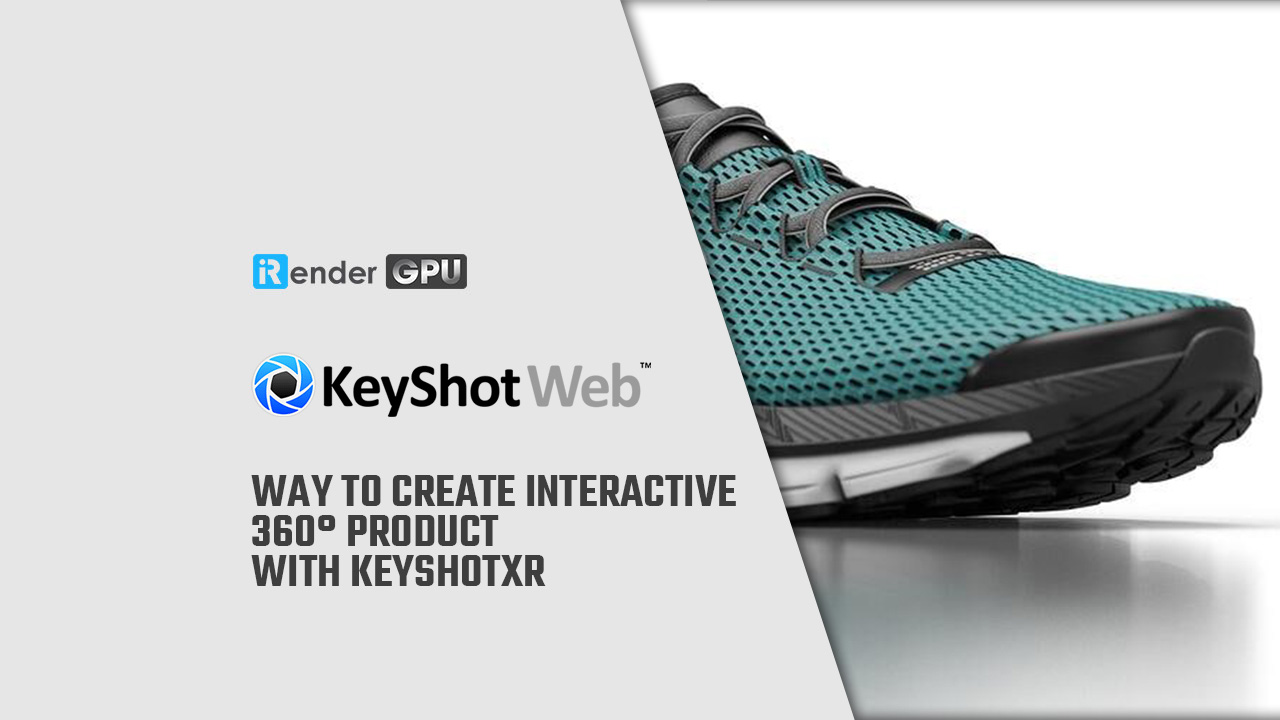
Way to Create Interactive 360° Product with KeyshotXR
We all know that eye-catching images are key to driving online sales. What if they could be interactive as well? Read on to learn how KeyShotXR can help you to create Interactive 360° Product with KeyshotXR for your e-commerce store or website with iRender today!
Interactive 360° Product with KeyshotXR
KeyShotXR gives you the ability to turn your 3D renderings into interactive visuals. With KeyShotXR, you can create and present high-quality, touch-enabled, 3D content in any web browser. The content can be viewed using touch-enabled devices (or mouse) and does not require a browser plugin to work.
While the KeyShotWeb module allows you to not only produce Product Configurators and share your scenes on KeyShot Cloud, but unlocks the ability to create touch-enabled, 360-degree viewing experiences with KeyShotXR. Creating a KeyShotXR is relatively straightforward, but there are a few considerations when prepping your files for your eCommerce platform.

Prepping Your KeyShot Scene for KeyShotXR
Before you create Interactive 360° Product with KeyshotXR, make sure to do the following:
- Set the scene background to pure white.
Product visuals tend to work better with a transparent background. This is the most common background color for websites and will provide more flexibility when adding the visuals to your product page. Start by opening the Environment tab in the Project window and open the Ground section to make sure the Ground Shadows checkbox is unchecked. Then, make sure the background Color is set to white under the Background section. (You can also set this in the Project, Image tab with the Photographic option, going to Layers and changing the Background Color to white.
- Check the eCommerce platform’s image size & resolution
It’s always best to go by the e-commerce platform’s image requirements, but one option that will provide the widest array of uses for your visuals is a 1:1 aspect ratio with a minimum width/height of 1500 pixels and a maximum of 2500 pixels. Now, let’s create a KeyShotXR.
1. Select the KeyShotXR Type
Select KeyShotXR on the Toolbar, hit the X-key, or select Window, KeyShotXR to open the KeyShotXR Wizard.
When the KeyShotXR Wizard opens, it will prompt you to select KeyShotXR type. For most ecommerce applications, selecting a simple turntable is a good option. This option will produce a KeyShotXR with a smaller file size, reducing the bandwidth used on your website. Check with your website administrator or site host to discuss hosting your KeyShotXR.
2. Select the KeyShotXR Rotation Center
Once you’ve selected the KeyShotXR type, hit the Next button to select the rotation point. For your KeyShotXR to spin around its center point, the model itself should be modeled with the pivot at absolute zero.
If your object’s pivot point is not set at zero, you have two options. Go back into your modeling software and add a piece of geometry at absolute zero or add a sphere/cylinder (Edit, Add Geometry…) at absolute zero (Position, 0, 0, 0) then select that geometry through the Custom option.
If your model’s pivot point is correct, you can select Object and move on to set the Initial KeyShotXR View settings.
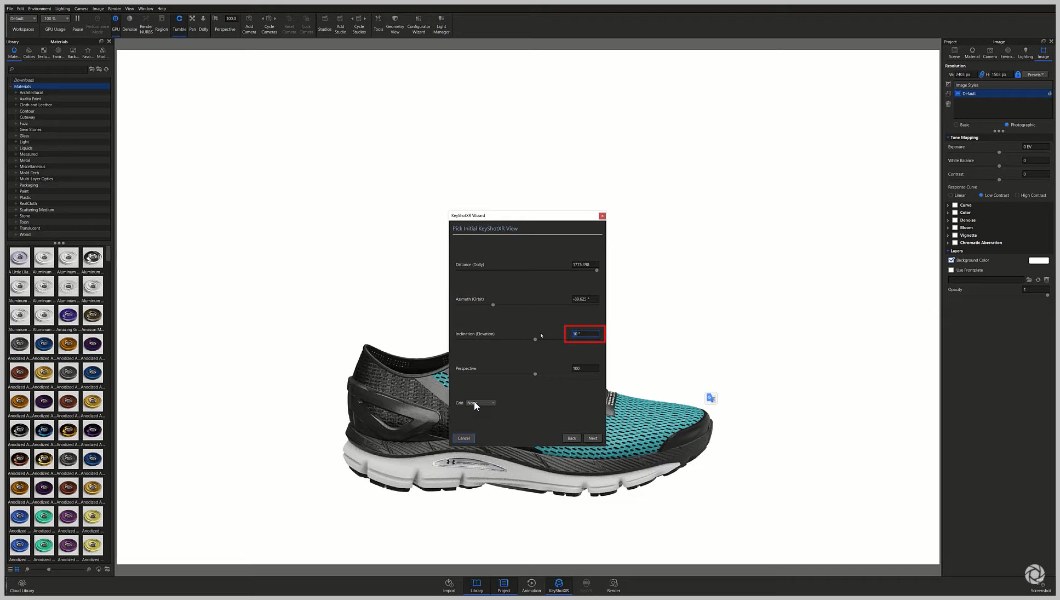
3. Select KeyShotXR Initial View
These settings will reflect the current settings of the Camera tab, so if you already have your Camera view, you only need to adjust the Inclination (Elevation).
Your product or preference will dictate the view orientation but, generally, an elevation somewhere between 10-30 degrees works well. Again, check your ecommerce platform’s requirements image specifications.
You can then fine-tune the rest of your camera’s settings if necessary or hit the Next button to continue.
4. Select Smoothness Control and Render Settings
Smoothness Control is the smoothness of the (mouse or touch) rotation with more frames providing a smoother experience but potentially longer load times. You can try the default setting or test a higher number (like 24, 48 or 72) to achieve the desired smoothness. On the next page you can change your output settings and hit Render Now or click Render Options to adjust the render settings as you typically would. Just make sure that KeyShotXR is selected along the top of the Output window before rendering.
5. Share Your Creation
Once your KeyShotXR is rendered, go to your KeyShot Resources, Renderings folder. Here, you’ll find a sub-folder for the KeyShotXR that contains your KeyShotXR html file. A folder of rendered frames, and an instructions.html document with an embed code for your website.
From here, you can add the KeyShotXR folder to a shared company drive to share with others. Host it on your own website, or use the individual frames of the KeyShotXR for more product shots on your e-commerce website. For more information about create Interactive 360° Product with KeyshotX. Go along with a guide on how to embed a KeyShotXR in WordPress, visit the KeyShot Manual.
Hopefully, this instruction has helped you to create an interactive 360° Product with KeyshotXR to impress your customers. And do not forget to stay tuned for our helpful tips and tricks every day!
Unmatched multi- GPU servers at iRender Cloud Rendering
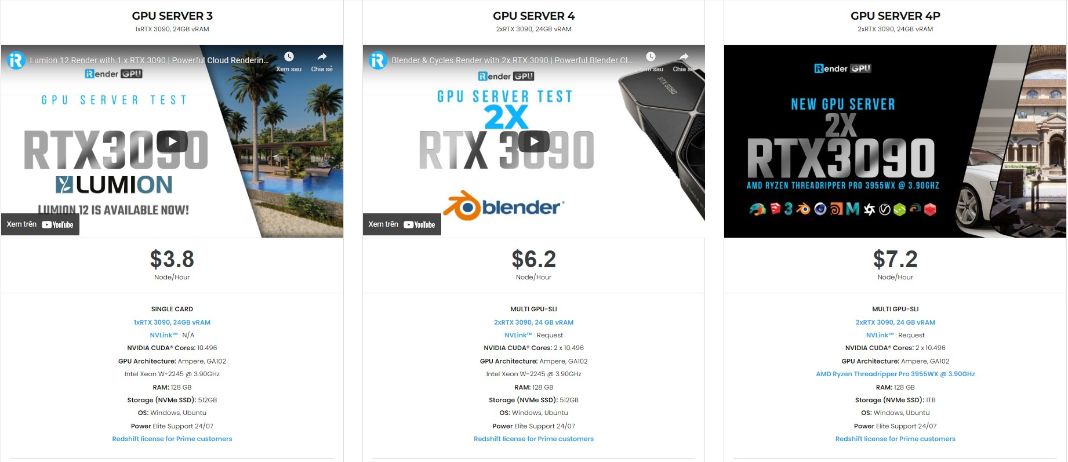
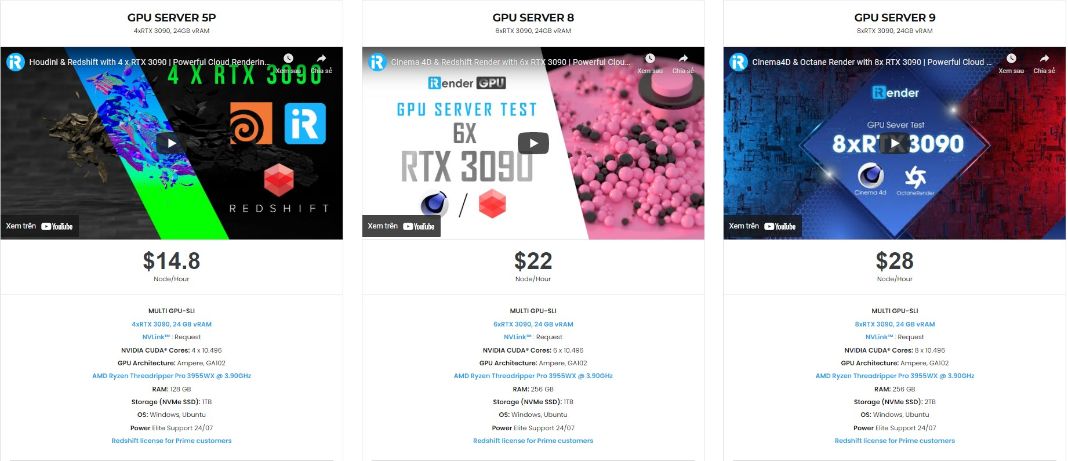
iRender is a GPU-Acceleration Cloud Rendering Service which provides high computing performance on the model of IaaS (Infrastructure-as-a-Service). Users will remotely connect to our server, install any version of Keyshot only one time and easily do any intensive tasks like using their local computers. So if you are having troubles in selecting a render farm for Keyshot? And you don’t know what is the best cloud render farm for your needs. Let’s iRender give you the answer. iRender provide various types of single/ multi-GPU-servers ranging from 1/2/4/6/8 RTX 3090 which are the most effective for Keyshot rendering in GPU, coming with the following specifications:
These servers are the ultimate online solution for KeyShot rendering, help you to create Interactive 360° Product with KeyshotXR , or you can control the power and performance for the highest level customization and configuration in application resource usage. These servers are the premier solutions to maximize your advantage when you need it most – to win the project, to meet the impossible deadline, or pivot your visual direction with unparalleled speed.

Some other outstanding features iRender provide
Friendly user interface
We believe that ‘less is more’, so the user’s interface is designed easily to use. It takes just a few steps to get started. First, register to the service, then create a new work environment or better known as a system image.
This work environment will be saved and automatically loaded for the user as soon as logging into the account. After that, a remote desktop connection will be set up, and the user will be provided with a file with login credentials. The file transfer process is unique, it can transfer files even when the server is turned off, so the users can make changes any time and it’s free to transfer. Furthermore, major cloud transferring platforms like Dropbox, Google Drive are also supported. Additionally, multiple servers can also be used, and the system image can automatically be generated, thus providing usefulness to the users.
Flexible Pricing
You will be charged on a per-minute basis. Depending on the type of server you choose, we will issue you an invoice once you shut down the servers, so that you will control your balance easily. Moreover, you can always save up to 20% with our Fixed Rental feature.
For those who’re in need of a server for more than a day, or have an extremely large project, we advise to choose a daily/ weekly/monthly rental package. The discount is attractive and help to save more for your render. We accept payment through PayPal, Onepay, bank transfer, or credit card, And of course, we sometimes provide promotions for customers on special occasions. Staying connected with us to keep updating these programs.
24/7 Real Human Support
If you choose to render your projects with iRender, you can feel extra safe that we have a dedicated CPU & GPU infrastructure and enthusiastic technical supporters available 24 hours a day, 7 days in a week to answer any queries you might have regarding your rendering jobs.

At iRender, we try our best every day to offer our beloved customers the power and expedience they need to put the project, concept, or presentation together quickly and beautifully. Keeping that in mind, iRender aims to facilitate such people by providing our own cloud render services for everyone. Even a low-performance computer can turn into a supercomputer using the cloud services by iRender. You don’t need to buy expensive computers and then install heavy software, just make use of the services by iRender and start creating.
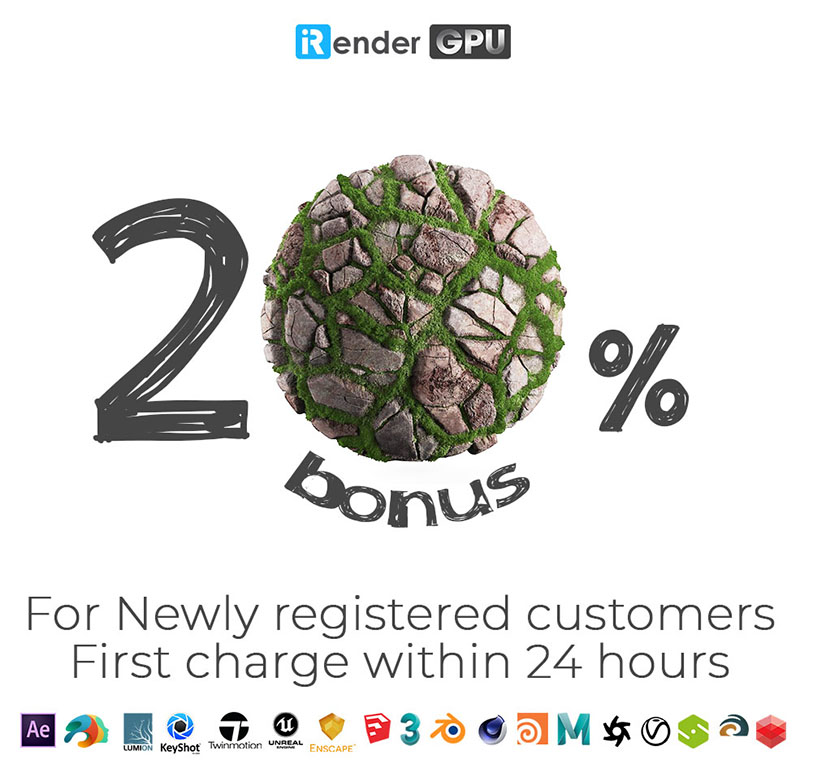
If you are a new iRender user, just register HERE to get FREE COUPON to test our servers with your Keyshot scenes and stay tuned for more interesting and useful articles related to rendering everyday. SPECIAL OFFER for this February: Get 20% BONUS for all newly registered users. Let’s CHECK IT OUT!
Thank you & Happy Rendering!
Source: blog.keyshot.com
Related Posts
The latest creative news from KeyShot Cloud Rendering , Cinema 4D Cloud Rendering , 3D VFX Plugins & Cloud Rendering.