Add Fingerprint in Keyshot Using Roughness Textures
Whether you’re trying to create weathered effects, wear marks, or fingerprints, controlling surface roughness using an image texture in KeyShot will help add a new level of realism and greater flexibility to your projects. Today, we’re going to add fingerprints to a surface using one of KeyShot’s included fingerprint textures.
Why using Roughness Textures to add Fingerprints?
Though some may question the reason for adding fingerprints to a product shot, you may be surprised at the images you’ve seen where surface dust, subtle smudges, or fingerprints have been added. There may be times when these textures are needed for a more convincing appearance for countertops, stainless steel surfaces, or other reflective, often fingerprint-attracting material. With this method, you can add any amount of smudge, smear, or fingerprint you need. Let’s take a look.
1. Open Material Graph & Add Fingerprint Texture
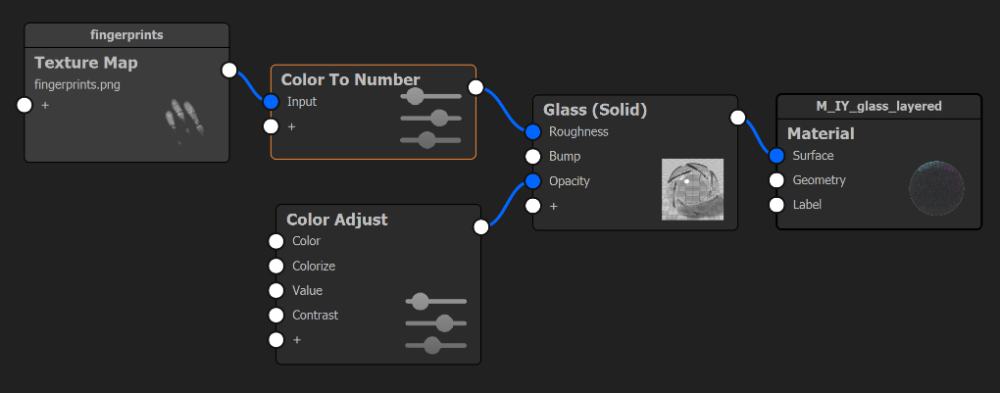
In order to add Fingerprint in Keyshot, let’s start by opening the model, double-clicking the surface where you want the fingerprint, and click Material Graph on the Project, Materials tab. You can find a fingerprint texture in the Library window, under the Textures tab. Drag and drop the fingerprint texture into the Material Graph workspace and connect the texture to the Roughness input of the corresponding material.
2. Add a Color To Number Node to add Fingerprint in Keyshot
Immediately, you’ll notice that the fingerprint texture appears on the surface but if you look closely, the fingerprint appears very smooth, while the rest of the surface is slightly rougher. Since fingerprints are typically rougher than the surface, invert the effect by selecting the connector between the texture and material node, then right-click and choose Utilities, Color To Number. Here’s what it looks like in the Material Graph.
Pro Tip: Use the C-key to color preview the texture and get a better look at what you’re working with. Notice that the background appears black while the fingerprints themselves appear white or light gray. This is important since Roughness in KeyShot is controlled by color values between black and white. A pure white turns off the roughness effect while a pure black turns the roughness effect on. You will see no roughness wherever there is white. The Color To Number node allows you to reverse this.
3. Invert the Roughness to add Fingerprint in Keyshot
To make the fingerprints look rough, instead of the surface, double-click the Color To Number node. Then invert the Output From and Output To values so that the background becomes white, and the fingerprints become gray. Then adjust the Input To value down until the fingerprints become visibly black. Exit the Color preview by hitting the C-key again and you will see that the roughness is inverted.
At this point, you can dial in the fingerprint and background roughness by adjusting the values to match your vision for effect. Although this example demonstrates explicitly how to create fingerprints using roughness, the same principles apply to any texture. Understanding how values and roughness work together in KeyShot gives you further control over any roughness effect you need.
You can learn more about the KeyShot Material Graph and the Roughness parameter in the KeyShot Manual.
iRender - Best cloud Rendering for Keyshot users
Hope that today’s article helps you to know the way to add Fingerprint in Keyshot easily to create a more rea look for your products. And if you are looking for a Cloud Rendering Service to boost your render speed on Keyshot. Let’s explore iRender service!
iRender is a GPU-Accelerated Cloud Rendering Service providing high computing performance for designers worldwide to boost their render speed. Users will connect to our server online, install any version of Keyshot that they are using, and interestingly that only one time and easily do any intensive tasks like using your own local computers. And if you are having trouble in selecting a good render farm for Keyshot? And you are still asking yourself what is the best cloud render farm for your needs. Let’s straight to iRender. Here we provide various types of single/ multi-GPU-servers ranging from 1/2/4/6/8 RTX 3090. They are the most effective for Keyshot rendering in GPU, coming with the following specifications:


Using multiple video cards gives fantastic rendering performance so using many computers having multi GPUs at the same time gives far better performance. Let’s have a look at some testing videos on our server here:


Some other outstanding features at iRender

At iRender, we always care about customers’ experience to offer our beloved customers the power they need. Even a slow computer can turn into a supercomputer using the cloud rendering services by iRender. You don’t need to buy expensive computers and spend hours loading that heavy software, just makes use of our services and start creating right away
If you are a new here just register HERE to get FREE COUPON to test our servers with your Keyshot scenes and stay tuned for more interesting and useful articles related to rendering every day. SPECIAL OFFER for this month: You will Get 20% BONUS for all newly registered users. Let’s CHECK IT OUT!

Thank you so much and Happy Rendering!
Reference Source: keyshot.com
Related Posts
The latest creative news from KeyShot Cloud Rendering , Cinema 4D Cloud Rendering , 3D VFX Plugins & Cloud Rendering.