
AI tools for faster rendering in Octane
Octane Render utilizes several AI tools that provide significant speedups to the rendering process while maintaining high image quality. The built-in denoiser and upsampler leverage artificial intelligence (AI) to reduce noise and increase resolution intelligently. When used appropriately, these tools can shave substantial time off render schedules by allowing fewer samples or a lower native resolution. In this article, iRender will dig into how to best utilize these two AI tools for faster rendering in Octane.
Octane’s Denoiser
Octane’s denoiser is superb at removing noise. It allows for drastically lower samples and thus quicker renders. Yet the denoiser cleans images up seamlessly, making low sample renders appear noise-free. We can call it a “magic” tool.
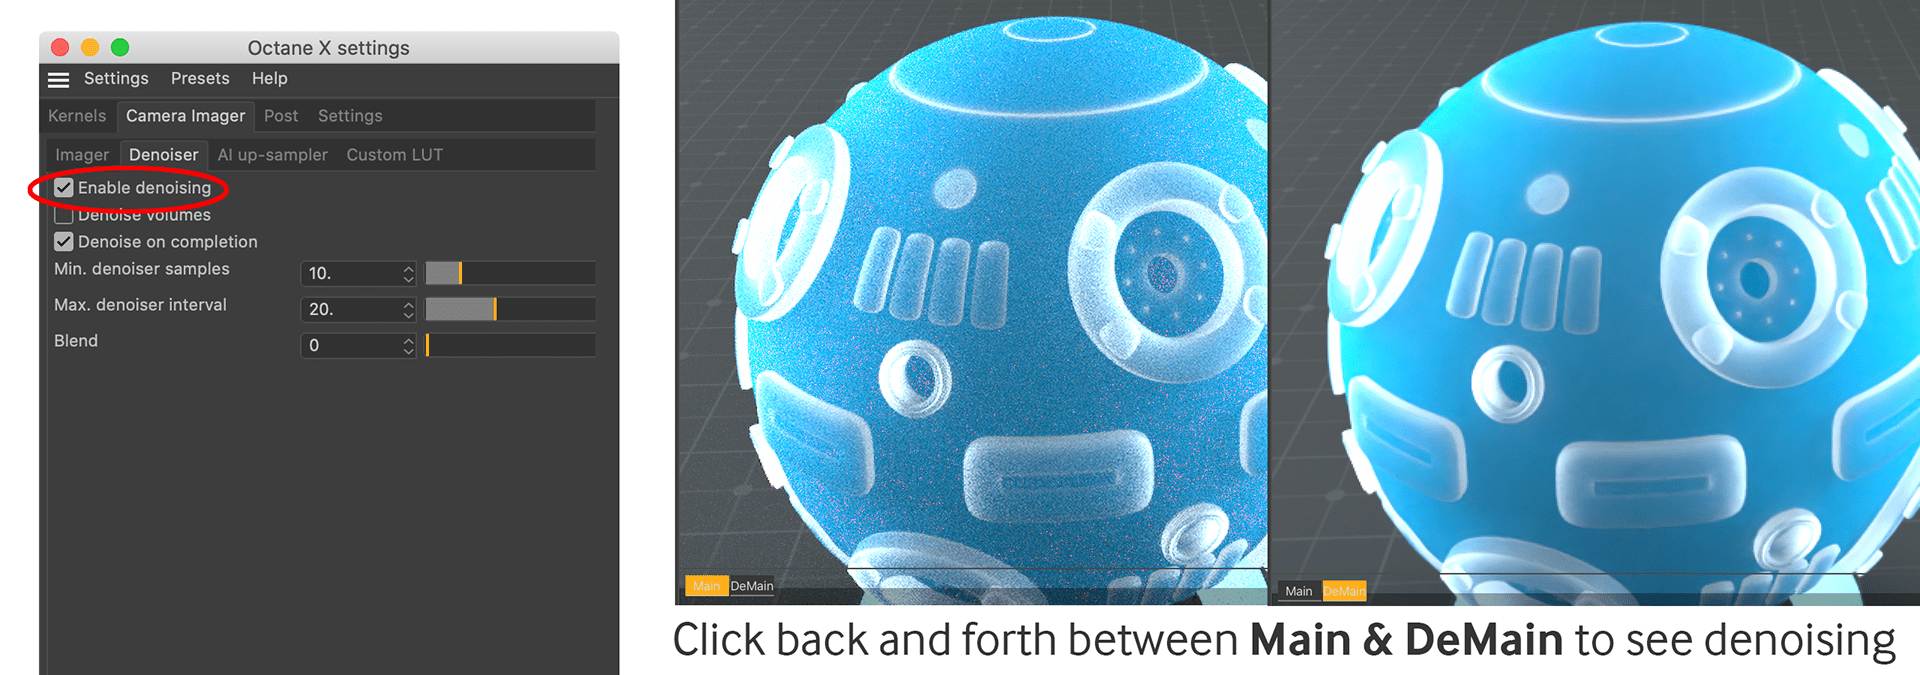
To start with the Denoiser, navigate to the Octane settings and select the Camera Imager tab. Then open the Denoiser tab. Check the box labelled “Enable Denoising” to activate it. Within this tab, there are a few settings that typically work well left at their default values.
The Live Viewer window will then display two tabs at the bottom – Main and DeMain (Denoised Main). The Main tab shows the unprocessed render, while DeMain shows the result after denoising. Through these tabs, you can evaluate the denoiser’s effectiveness by toggling between the pre- and post-denoising views in real time.
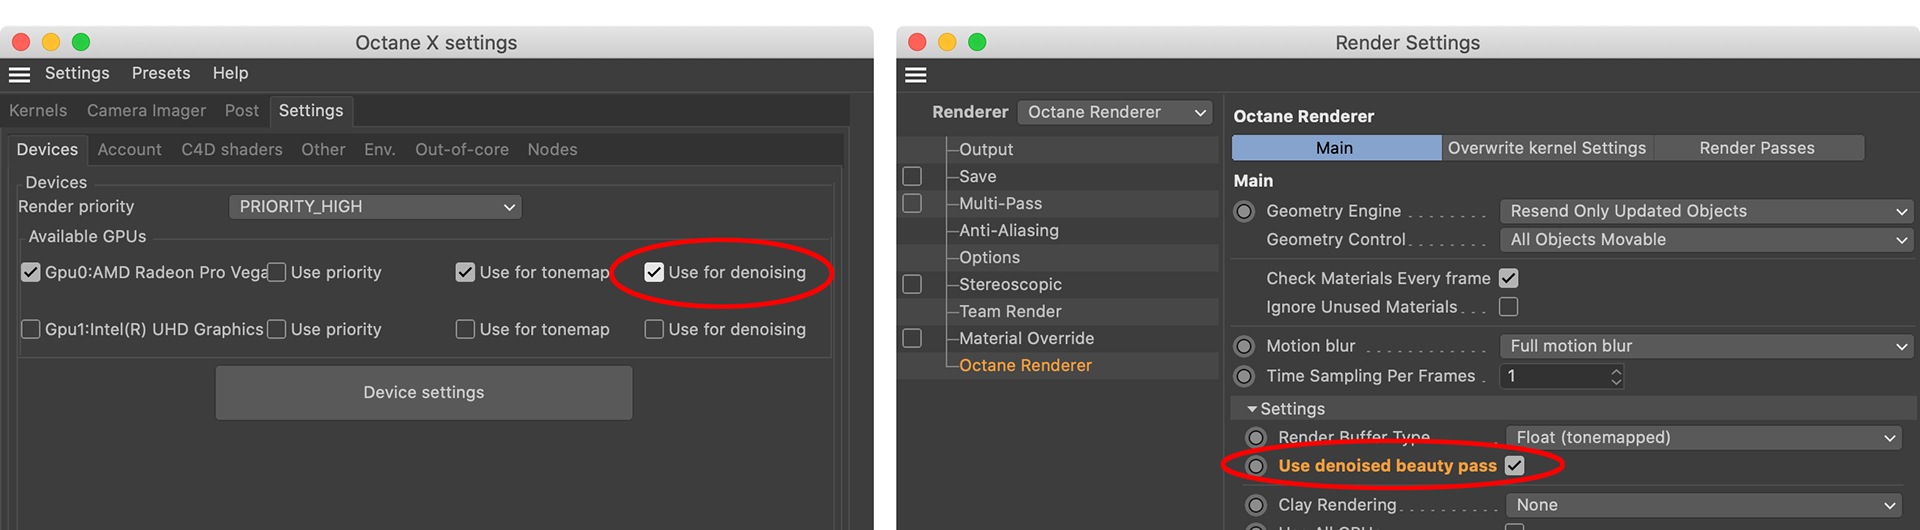
There are two more settings that you should notice. Within the Octane settings’ Devices tab, there is an option to utilize your GPU(s) for denoising rather than solely the CPU. Sometimes, it’s off by default. Depending on your hardware, testing both the CPU and GPU for denoising tasks could reveal better performance or stability.
Additionally, C4D’s Render Settings (not Octane Settings) contain an Octane Renderer section having a checkbox named “Use denoised beauty pass.” If you are not going to use Render passes to composite later, you should turn this setting on. Otherwise, your image will be denoised in the Live Viewer, not in the Picture Viewer when you do your final render. This setting option will override denoiser settings in Octane. Therefore, even when it’s off in the Octane settings, if you turn on the “Use denoised beauty pass” in C4D’s Render Settings, you will get a denoised render.
That’s enough information. Now, it’s time to experiment hands-on and witness the denoiser’s capabilities firsthand!
Denoising - Scattering
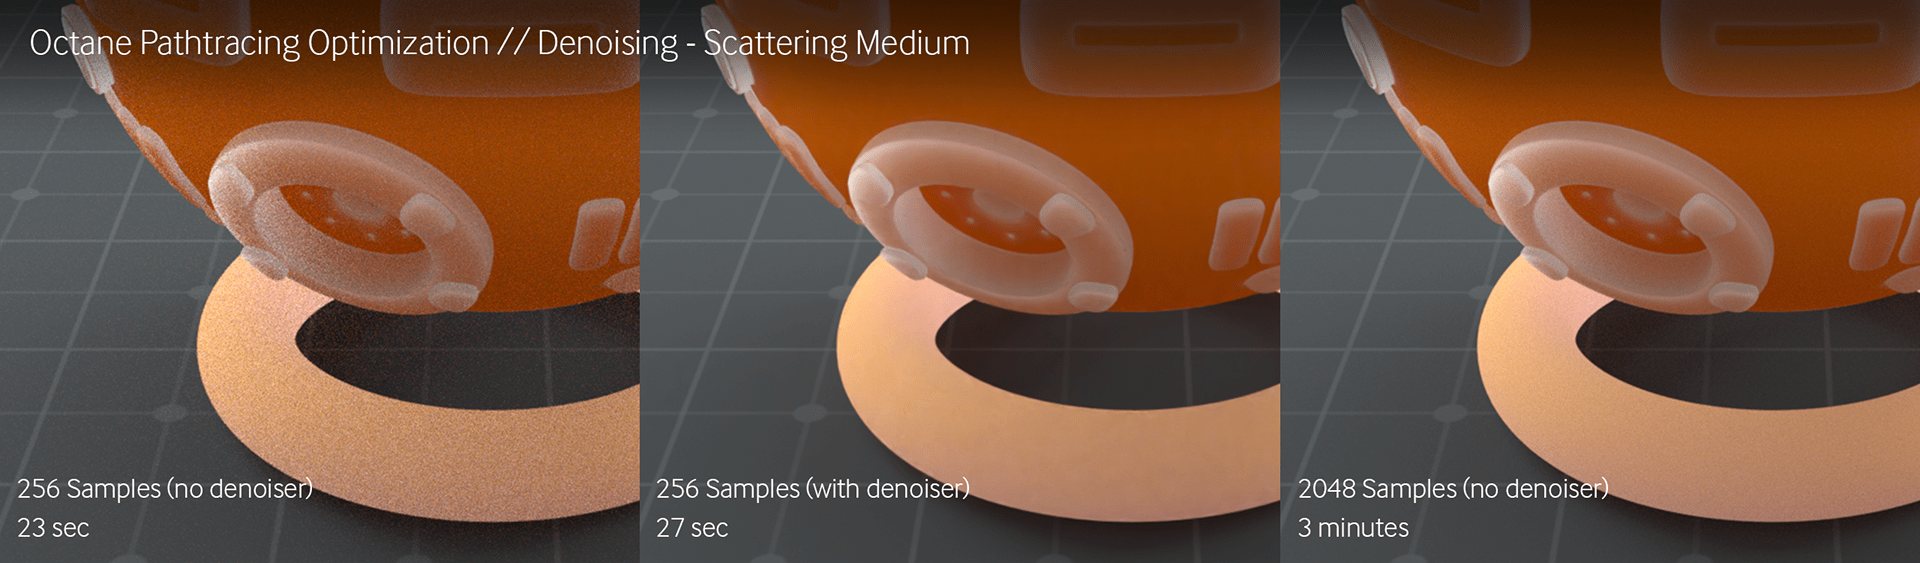
Scattering is a pretty GPU-intensive task. When using the same settings, you can see that it needs a lot of samples, and thus a lot of render time, before it gets smooth itself. Without denoiser and with a high number of samples (2048 samples), 3 minutes gives a barely acceptable image. With the denoiser on, 256 samples look totally fine in 27 seconds.
Denoising - Diffraction

Here is another example, an object with diffraction. Diffraction is a very GPU-intensive effect. Like scattering, the denoiser once again creates usable render results in a much faster timeframe. Nonetheless, if you look closely at the above image, you will see that the denoised versions blur a bit and start to lose some of the fine detail. This is one of the caveats to the Denoiser. It can not create information out of anything; therefore, for every pixel it builds, it has to look around at its neighbours and copy their homework. The tradeoff is a potential loss of fine details. Whether it is worth the speed increase is up to you.
Denoising - Diffuse
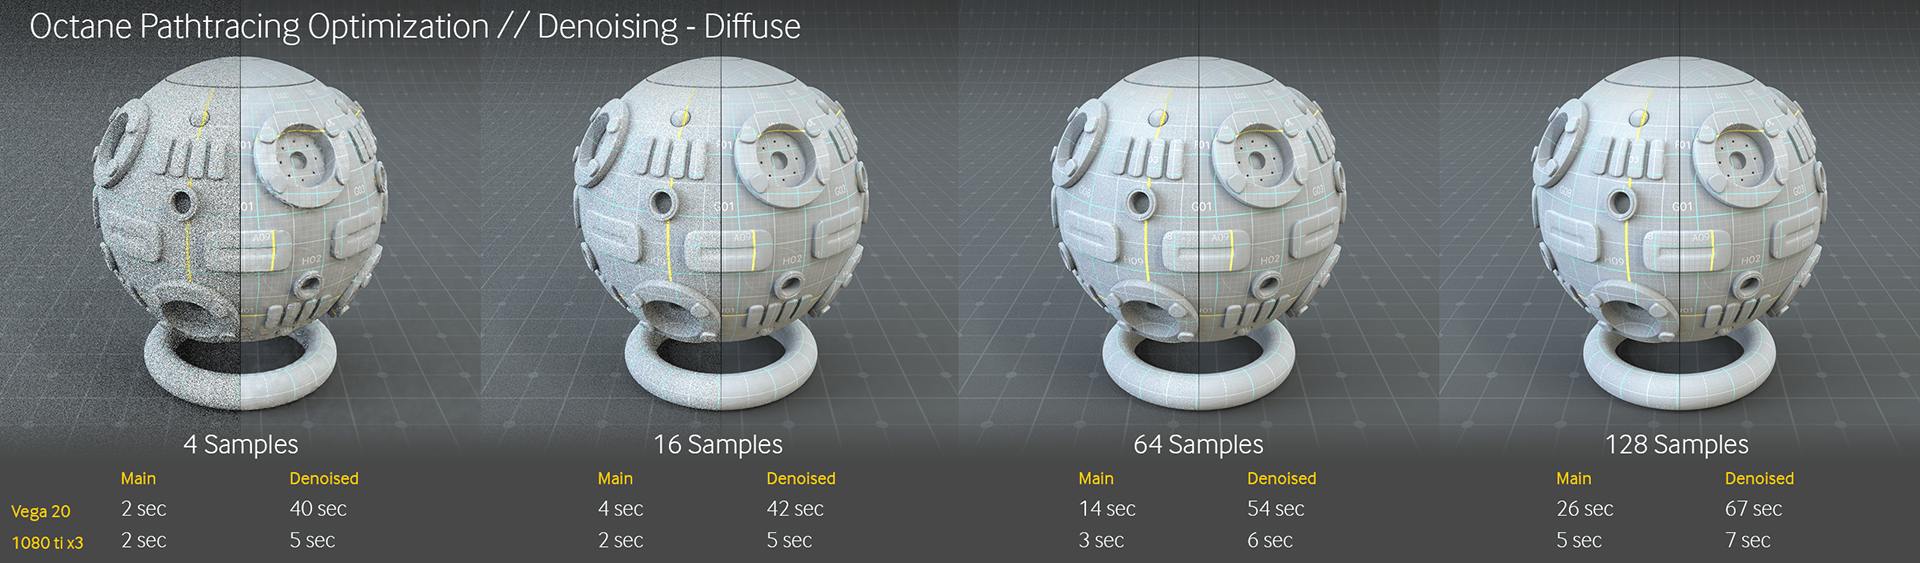
Finally, for some scenes (especially those scenes that are going to render quickly anyway), denoising can actually be slower.
Denoising is not instant. It will introduce some overhead. In the example above, you can see that on a Mac running an i7 and Vega 20, denoising adds a considerable piece of time – it is almost 40 seconds! If a clean render can finish in under 40 seconds on that hardware, denoising provides no benefit and only increases time costs. Even with powerful machines, 3 seconds of denoising overhead combined with a brief 2-second render amounts to the same total time as a higher sample render without denoising processing.
The Denoiser is one of the great post-production AI tools to help cut your render times down and clean up your images faster. However, you must have your foundation set (get your Kernel settings dialled in) to get the most out of it.
AI Upsampler
The upsampler works similarly to other upscaling programs like Alien Skin Blowup or Topaz Gigapixel. It renders scenes at a lower resolution, such as half or quarter size, then applies an upsampling algorithm right at the end to increase the final output resolution. Like the Denoiser, the upsampler benefits from optimized renderer settings to provide high-quality source images. It works best for scenes that do not require pixel-perfect sharpness.
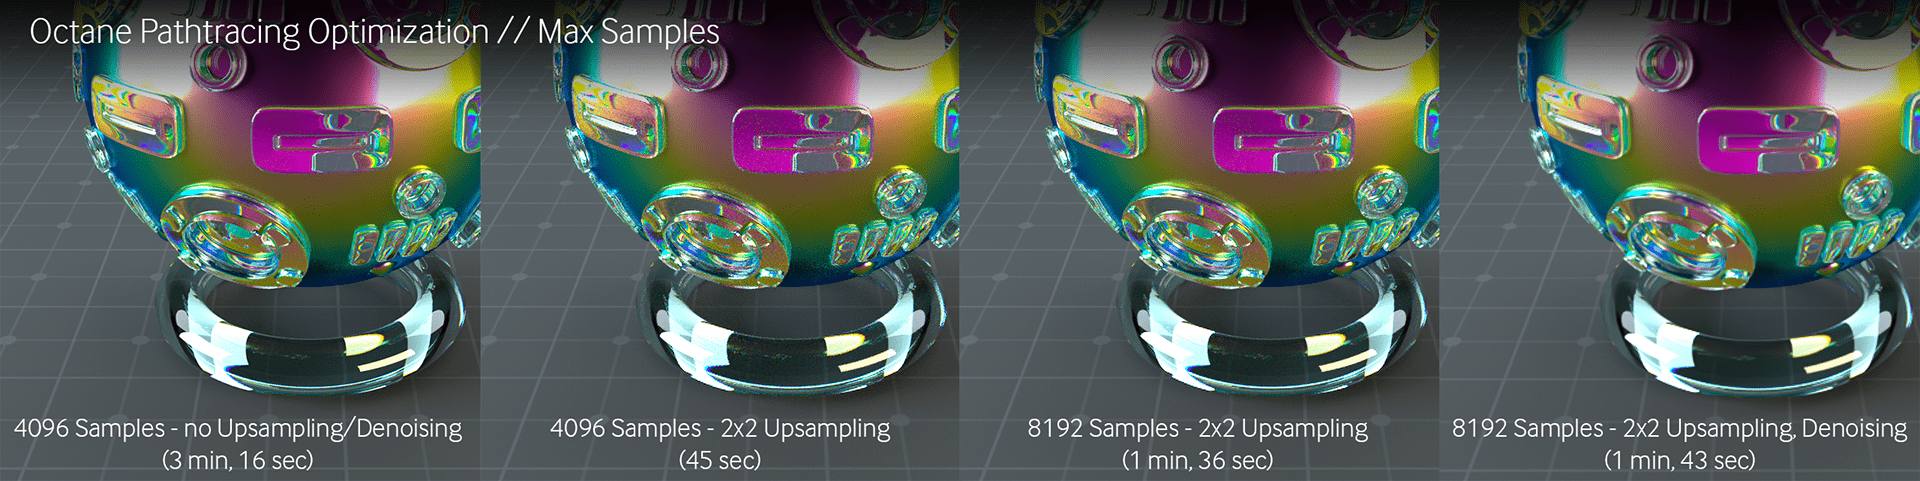
The upsampler really excels at facilitating higher sample renders while still achieving faster speeds. In the above example, a clean image without upsampling or denoising required an extensive 4096 samples. However, enabling upsampling allowed doubling the samples to 8192 while cutting the time in half. Pairing the upsampler with denoising then created a quality result suitable for many uses, all without significant added processing overhead.
It’s worthwhile experimenting solo or together with these tools to see if rendering times can be drastically reduced. Combining upsampling and denoising sometimes produces amazingly high-quality images at a fraction of the original time cost.
In conclusion, Octane’s denoiser and upsampler provide powerful AI-assisted solutions for accelerating the rendering process without sacrificing final image quality. With a sound understanding of how and when to apply these tools effectively, you can save significant time. However, it still takes practice to fully leverage their capabilities and know where to focus sample count versus resolution changes. That said – these tools are not a “magic bullet” yet and you still need to understand what the Kernel settings do in order to give the AI tools a solid foundation to work with. There are times when incorrectly applying these tools can actually slow down renders or degrade quality if you don’t know what you’re doing. But with experimentation and experience, and choosing the appropriate areas to concentrate efforts, these AI tools can definitely help streamline your workflows and help you get faster rendering in Octane.
iRender - The Best Render Farm for Octane Rendering
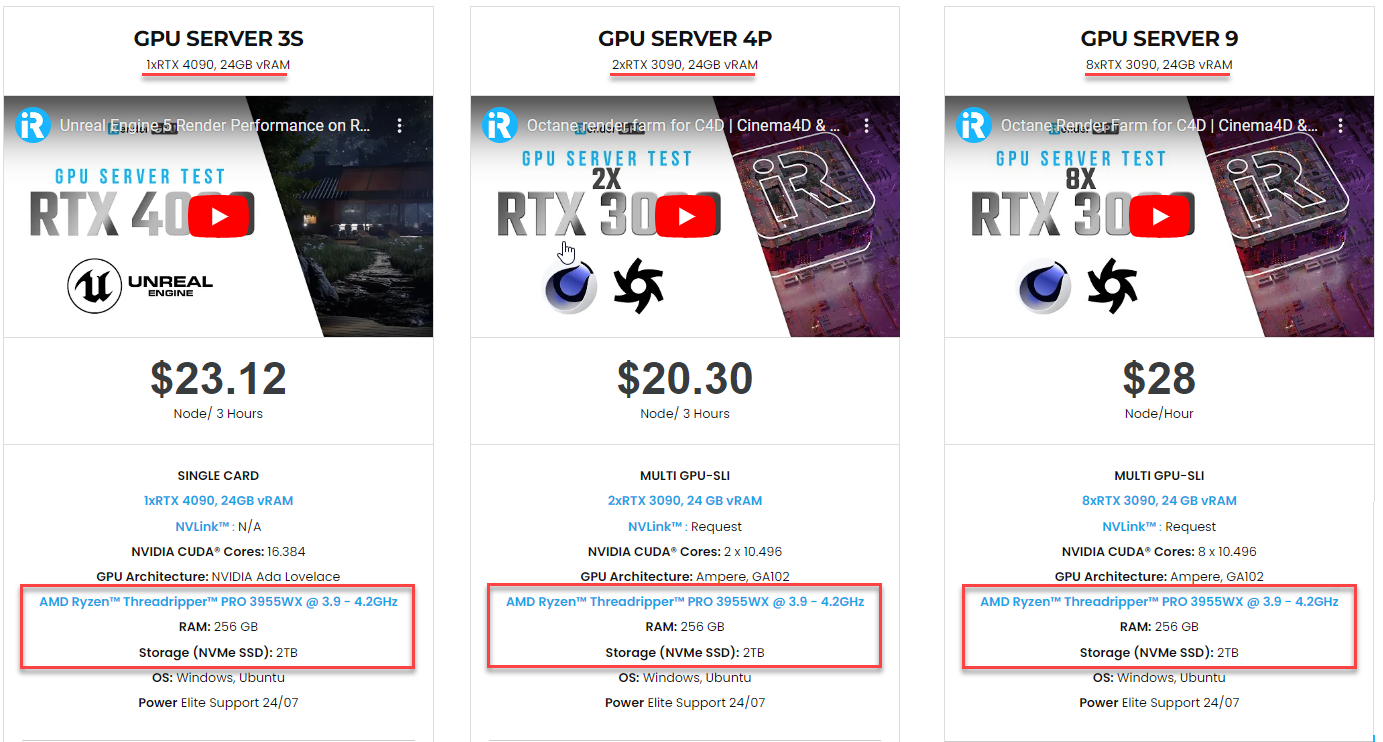
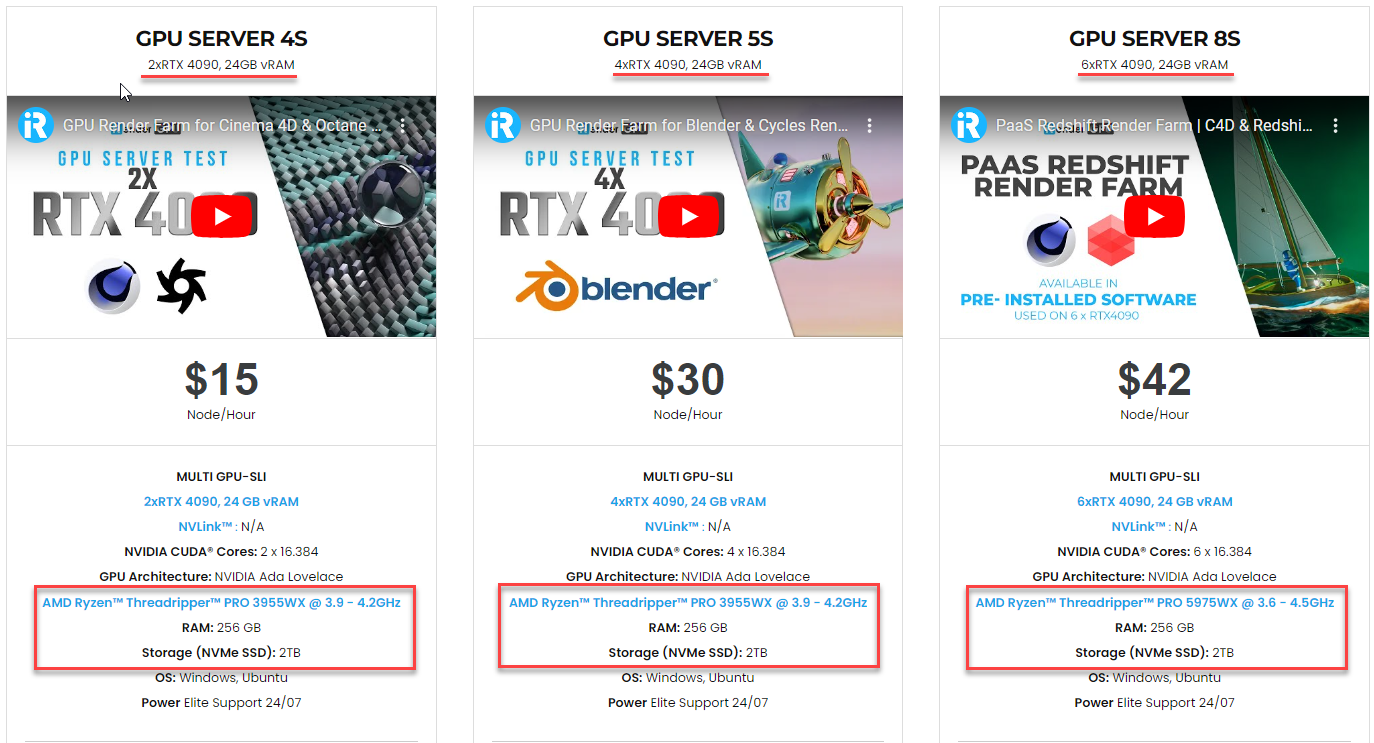
iRender powers up your creativity with unlimited GPU rendering resources. Our GPU render farm houses the most powerful 3D rendering machines. Configure from 1 to 8 GPU with top-tier RTX 4090/RTX 3090, Threadripper Pro CPUs, 256GB RAM and 2TB SSD storage – iRender’s machines are capable of any 3D project demands.
Once renting our machines, you will own them as your personal workstations. Therefore, you can use any software, plugins or versions you want.
As an official partner of Maxon, we provide pre-installed C4D machines to streamline your pipeline further! If you use C4D and Octane and are our Prime users, you can use our combo C4D + Octane licenses for free. Let’s see a workflow using C4D and Octane through our Desktop (all use in one) app.

We are offering an attractive 100% Bonus Program for our new users making the first deposit within 24 hours of registration. As a result, you can effectively double your recharged credits.
Claim your FREE TRIAL to try our RTX 4090 machines and boost your rendering now!
For further information, please do not hesitate to reach us at [email protected] or mobile: +84915875500.
iRender – Thank you & Happy Rendering!
Reference source: Scott Benson on otoy.com
Related Posts
The latest creative news from Octane Cloud Rendering.


