Basic Redshift Texture Options in Redshift for Cinema 4D
Redshift is a powerful GPU-accelerated renderer designed to meet the unique requirements of modern high-end production rendering. To put it another way, Redshift is designed to help creative individuals and studios of all sizes. Redshift, in fact, provides a slew of powerful features and integrates with industry-standard CG applications. Over the last few years, an increasing number of designers have begun to use Redshift for rendering, dramatically shortening their render times as a result of this renderer.
For today’s article, let’s look at the Basic Redshift Texture Options in Redshift for Cinema 4D, so that users can get a full understanding from the ground up, laying the groundwork for more advanced render settings in the future.
Introduction
The Redshift Texture Options give you better control over texture filtering and MIP-mapping on a per-texture basis.
Unless absolutely necessary, it is recommended the Texture Options be left at the default settings, otherwise rendering and texture out-of-core performance can suffer.
In C4D, the options are found under the ‘Advanced’ tab of the Redshift Texture Sampler node:
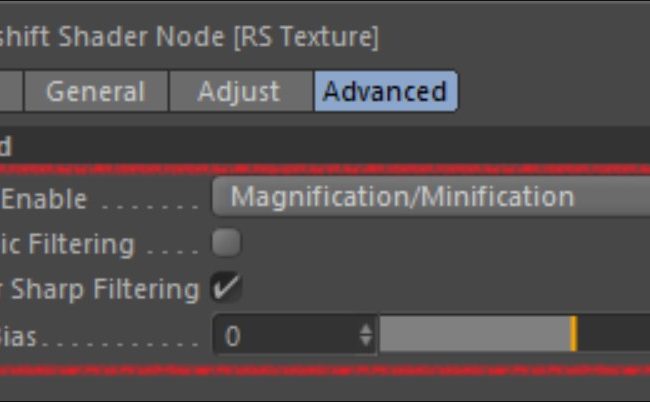
Image source: Redshift Document
Redshift Texture Options
Filter Enable
Selects the filtering enable mode of the texture sampler;
- None (no MIP-mapping, point-sampled for ‘minification’ and ‘magnification’)
- Magnification (no MIP-mapping, point-sampled for ‘minification’)
- Magnification/Minification (recommended default. MIP-mapped, with full filtering)
Sometimes a texture may require special filtering treatment, where the global texture sampling mode (found under the Optimization tab) might not be adequate.
For example, this can be the case when a texture has an alpha cut-out and the color part of the texture is not configured to take texture filtering into consideration. When this is the case, filtering and MIP-mapping will result in undesirable color bleeding artifacts that can manifest as a halo around the cut-out texture. If correcting your texture in this kind of situation is not an option, then it is recommended you change the ‘Filter Enable’ property to ‘Magnification’, so you still get soft, filtered results when magnifying the texture, but no filtering and thus bleeding when ‘minifying’ the texture.
Below is an example of a poorly configured texture and a correctly configured texture:
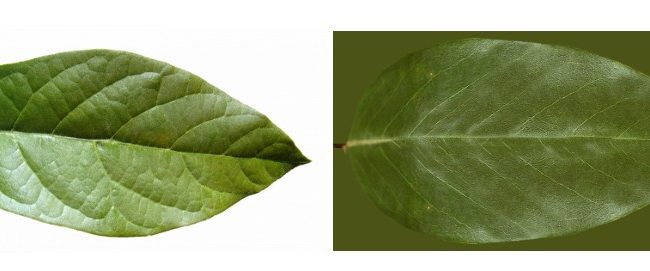 Poorly configured and problematic texture creates white fill around the leaf
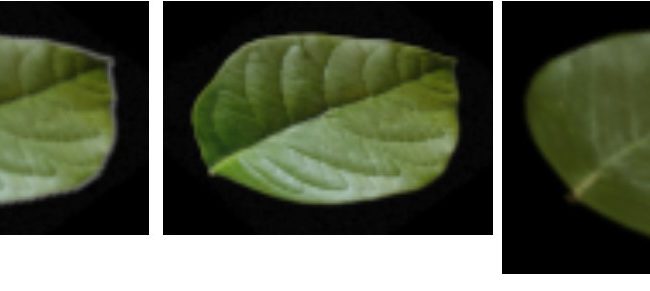 Another situation when you might need to disable filtering is when a texture contains non-color information, such as rotation, which could be used to drive the anisotropy rotation of reflection. When this is the case, filtering and MIP-mapping will result in ‘in-between’ values that might not make sense for the rotation texture to function properly. So, setting the ‘Filter Enable’ option to ‘None’ is recommended to remove any undesired artifacts due to filtering.
Bicubic Filtering
Enables bicubic filtering on textures that are magnified. This produces much softer looking textures than regular bilinear filtering, but at the expense of slower rendering.
Prefer Sharp Filtering
By default Redshift will attempt to bias texture filtering to produce the sharpest results. However, for very noisy tiled textures, sometimes this can produce interference patterns. Un-checking this option will disable the sharpness biasing, producing softer results that remove these interference patterns.
Note this option only takes effect when the ‘Filter Enable’ mode is set to ‘Magnification/Minification’.
Mip Bias
Allows you to bias the MIP level, such that values less than 0 result in sharper quality, but slower texture sampling. Values greater than 0 result in blurrier lower quality, but faster texture sampling.
Note this option only takes effect when the ‘Filter Enable’ mode is set to ‘Magnification/Minification’.
When MIP-mapping is enabled Redshift will load and sample pre-filtered multi-resolution texture data that is optimal for how large the texture appears in the render. For example, when a texture is very far away from the camera, less texture detail is required, so a lower resolution MIP level can be loaded without any loss of quality or perceived detail. Conversely, when a texture is very close to the camera, more texture detail is required, so the highest, native resolution MIP level is typically loaded. MIP-mapping is a necessary performance optimization that is commonly used in rendering.
There are some situations, however, when the algorithm to select the appropriate MIP level may not produce perfectly detailed results due to a non-perfect combination of the MIP-level pre-filtering and the AA settings. In this case, setting the MIP Bias to negative values will bring forward higher resolution MIP levels and thus sharpen the texture. Or, there may be a situation when you want to purposely soften the texture, so setting the MIP Bias to positive values will bring forward lower resolution blurrier MIP levels.
For example, a value of -1 will result in 2x the resolution of the MIP-level being used, while a value of -2 will result in 4x the resolution of the MIP-level, up to the maximum/native resolution of the texture. A value of 1 will result in 0.5x the resolution of the MIP-level, and a value of 2 will result in 0.25x the resolution of the MIP level being used, etc.
Be careful to not use too large negative values for the MIP Bias, as texturing and out-of-core performance can suffer, impacting render times.
The MIP Bias option has no effect when the ‘Filter Enable‘ option is not the default ‘Magnification/Minification’.
iRender - The Best Render Farm for Redshift
iRender is proud to be a professional GPU Accelerated Cloud Rendering Service provider for 3D Render, CGI, and VFX tasks with more than 30,000 clients. We are appreciated in many global rankings (e.g. CGDirector, Lumion Official, Radarrender, InspirationTuts CAD, All3DP, BlenderBaseCamp, VFX Rendering.)
Our service
We provide high-configuration servers (machines) that are specifically configured and optimized for GPU rendering. Using our service, you have complete control and flexibility over the server(s) you operate. Therefore, you can customize your creative working environment as you wish. With a range of multiple GPU servers (2/4/6/8x RTX 3090), you can choose the one that meets your need to start the rendering. Furthermore, we provide useful features to help you switch among the server packages without having to reinstall anything. You can even run multiple machines simultaneously to speed up the renders, not having to re-install anything, either.
Why choose us for your Redshift projects?
Redshift is a fully GPU-based renderer. This means that the graphic cards (or GPUs) in your system impact how long the renders take to complete. Also, Redshift scales very well with multiple GPUs and can significantly improve your render times. Therefore, the more powerful the GPU, the better, the more GPUs the faster the render will be.
At iRender, we have both powerful GPU and multiple GPU servers that absolutely speed up Redshift rendering. Our multiple GPU machines are designed with 2/4/6/8x RTX 3090. Also, they all have a strong AMD Ryzen Threadripper Pro 3955WX processor, allowing you to extract mesh data, load textures, and prepare scene data more quickly. Moreover, the workstations are ideal with 256GB RAM capacity and 2T NVMe SSD storage. We highly recommend you try the highest configuration server, the 8x RTX 3090. This server will be a super-configured one that brings crazy speed to Redshift. It is rated as one of the most worth-trying workstations so far for Redshift.

Redshift speed test videos
Let’s check out the rendering performance in Redshift for Cinema 4D on our RTX 3090 servers in the following videos.


Let’s get started!
Get the FREE COUPON to try our high-end computers for your Redshift projects now! For further information, please do not hesitate to reach out to us 24/7 on our website.
iRender – Happy Rendering!
Related Posts
The latest creative news from Redshift Cloud Rendering.