Deep Dive into Multi-Process Rendering in Unreal Engine 5
Multi-Process Rendering in Unreal Engine 5 is a method using multiple GPUs to render nDisplay views simultaneously. It allows specific viewports to be rendered in parallel across GPUs. Let’s deep dive into Multi-Process Rendering in today’s article!
Section 1: Introduction
1.1 What is Multi-Process Rendering?
Multi-Process Rendering was first introduced in Unreal Engine 5.2. It allows multiple GPUs to work on different parts of the nDisplay rendering. This means that specific viewports are rendered simultaneously on each separate GPU. For example, the primary GPU renders the outer frustum, while the secondary GPU renders the inner frustum.
Unreal Engine 4.27 has supported Multi-GPU rendering, but Multi-Process Rendering is new and it takes a different approach compared to Multi-GPU. The reason it is called Multi-Process Rendering is that it runs two separate Unreal Engine instances (processes) on each render node. The first node is a regular nDisplay node, which displays out to the LED screen. The second node operating as an additional, separate Windows process is a headless offscreen instance that is not visible directly. For example, with the frustum described above, the headless instance would render the inner frustum on the secondary GPU. It then shares this rendered texture back to the regular node’s memory. The primary GPU takes this inner frustum and composites it over the outer frustum. Finally, it displays it to the LED wall for output.
Multi-Process rendering only shares the final rendered texture between GPUs across the CPU/Motherboard, while Multi-GPU rendering shares all of the GPU memory via the NVLink and SLI, which requires huge bandwidth. Therefore, Multi-Process is more efficient than Multi-GPU. These two approaches can be compared in the below table.
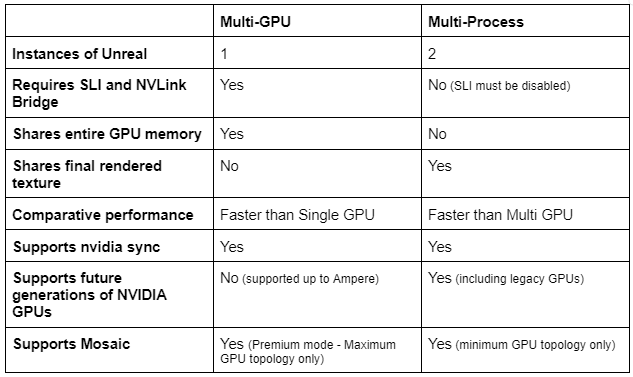
Source: epicgames.com
1.2 Technical and knowledge requirements
Technical requirements:
-
-
- A minimum of two GPUs
- SLI must be disabled (If using Nvidia Mosaic, it should not be Premium Mosaic since this enables SLI)
- Disable Intel Hyper-Threading or AMD Simultaneous Multi-Threading for best performance (Note that doing this may impact other software. You can get longer shader compile times)
- Nvidia driver version 531.41 (minimum) or above tested with virtual production tools in Unreal Engine 5.3
-
Knowledge requirements:
To use this method, you need to be familiar with the concepts covered in the ICVFX quickstart guide, such as how to create a new config.
Section 2: Getting Started
A Multi-Process nDisplay config, whether created from scratch or converted from an existing config, will contain the following aspects:
-
-
- On-screen Nodes: Each regular nDisplay node will be set to use the primary GPU.
- Off-screen Nodes: Additional nDisplay nodes will be added for each host and configured to use the secondary GPU.
- ICVFX Cameras: The Shared Sedia Input and Output are configured for each ICVFX camera component to transfer renders from the off-screen node to the on-screen node. This takes advantage of the off-screen nodes rendering on the secondary GPU for improved performance.
-
Let’s learn more details on setting up each aspect.
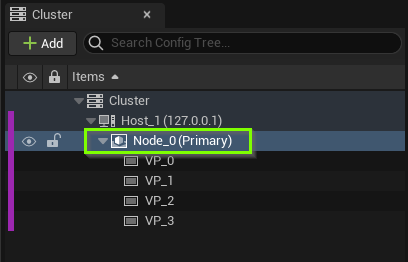
2.1 Set up the regular Onscreen nDisplay Node
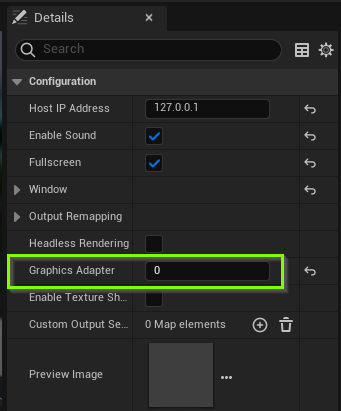
The regular “onscreen” nDisplay node must be set to render on a different GPU than the offscreen node. To do so, set the nDisplay node’s Graphics Adapter to 0. This will assign it to the primary GPU of the computer.
Note that some machines may require setting the GPU index to a number other than 0. If GPU utilization is unexpectedly high or low in the Switchboard monitor, changing this index number may help resolve it.
The Graphics Adapter setting can be found in the Details panel of each nDisplay node. It is important to ensure the onscreen node uses the primary GPU for rendering.
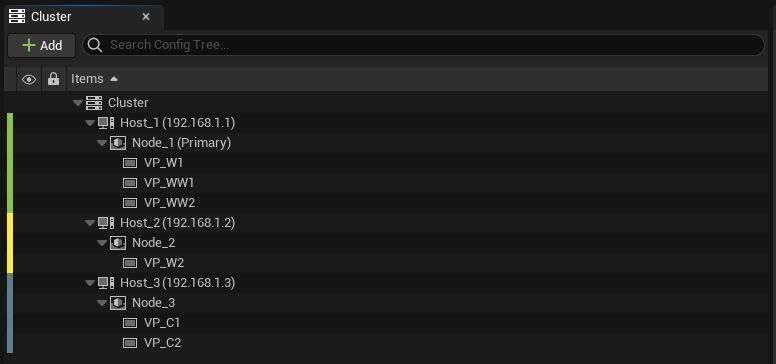
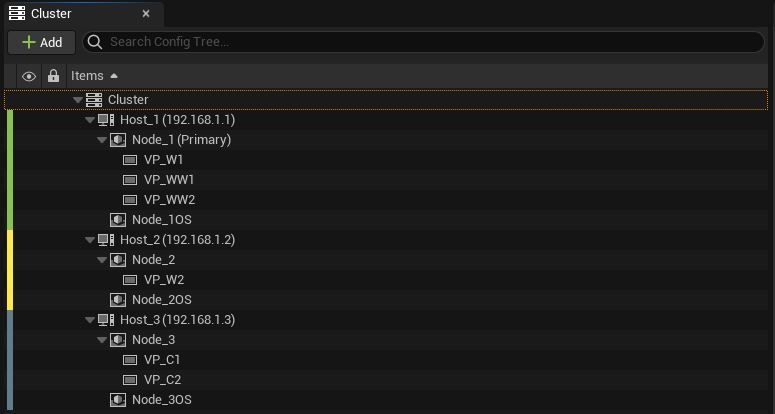
Find the regular nDisplay node in the Cluster tab:
Source: epicgames.com
Source: epicgames.com
2.2 Set up the Offscreen nDisplay Node
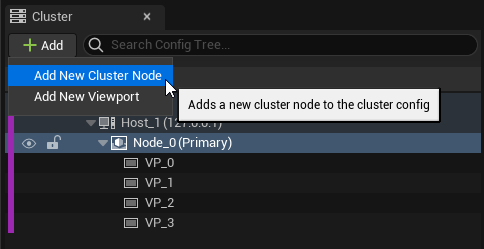
An offscreen render node must be added for each host machine.
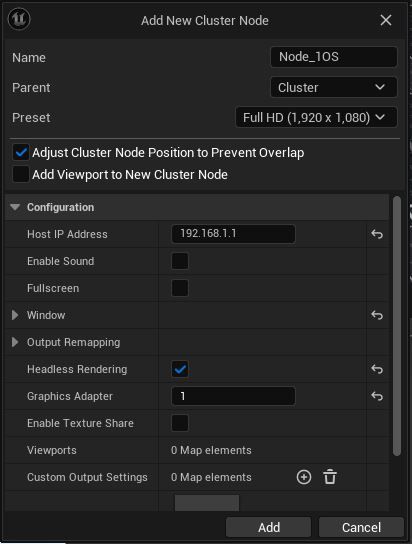
To do so: Select “Add New Cluster Node” from the Cluster tab
Source: epicgames.com

Source: epicgames.com
-
-
- Give the node a unique name identifying it as offscreen, such as adding “_OS”. Keep other parts of the name consistent with its paired host machine for easy identification.
- Untick “Add Viewport to New Cluster Node”. If this setting was enabled, the viewport would need to be removed for Headless Rendering.
- Tick “Headless Rendering” to force offscreen rendering without impacting the desktop real estate or interfering with Nvidia Sync.
- Set “Graphics Adapter” to 1 to assign it to the secondary GPU. Note that some systems may require a different number
-
2.3 ICVFX Camera Setup
Shared Media Input and Output
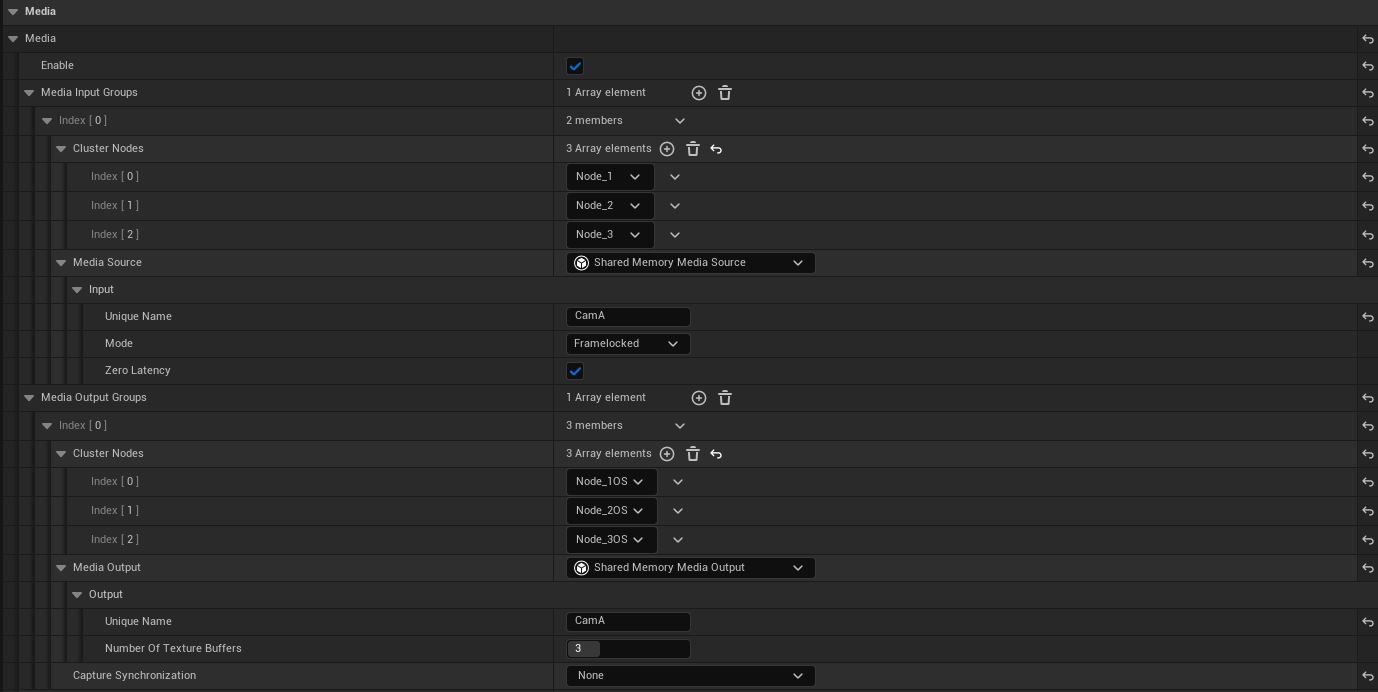
The ICVFX component has a Media section in its Details panel. Within this context, “media” refers to the inner frustum render that will be transferred from the offscreen to the onscreen node and then displayed over the outer frustum. The Media settings control how different renders are sent and received between nDisplay viewports. Media must be enabled and two areas configured:
-
-
- Media Output Groups determine where the render is sent from.
- Media Input Groups determine where the render is received.
-
For the Media Output Group:
When configuring the Media Output Group, there are two important aspects. One is that all offscreen nodes associated with a camera must be added under the Cluster Nodes Index. The other is that a unique name, like “CameraA”, is assigned as the Media Output. This name must be case-sensitive and unique between the ICVFX camera component as it is used to receive the texture on the input group.
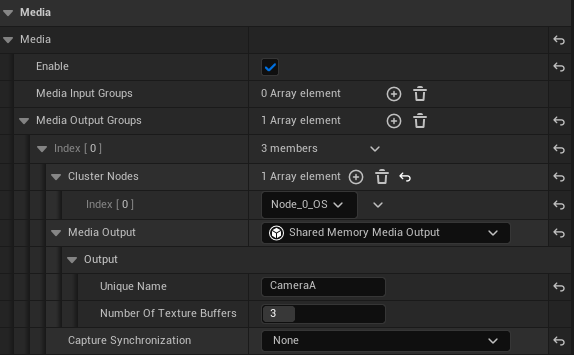
Source: epicgames.com
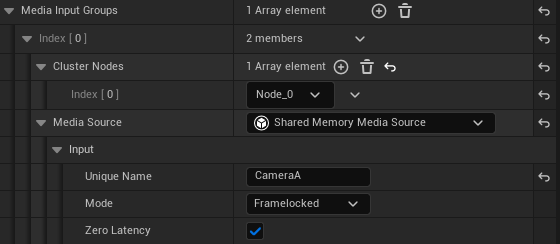
For the Media Input Group:
The Media Input Group has the same setup:
-
-
- The regular node(s) associated with each camera must be added to the Cluster Nodes Index. All nodes should be listed here.
- The unique name used here (e.g. “CameraA”) should be identical to the one set in the Media Output section of the corresponding ICVFX Camera component.
- Mode should be set to “Framelocked“. This ensures the frames rendered on the offscreen node are correctly paired with those being rendered on the onscreen node.
- “Zero Latency” should be enabled to remove any latency that is typically used as a buffer to protect against FPS drops.
-
Source: epicgames.com
When all these settings are updated, Compile.
2.4 Running Multi-Process with Switchboard
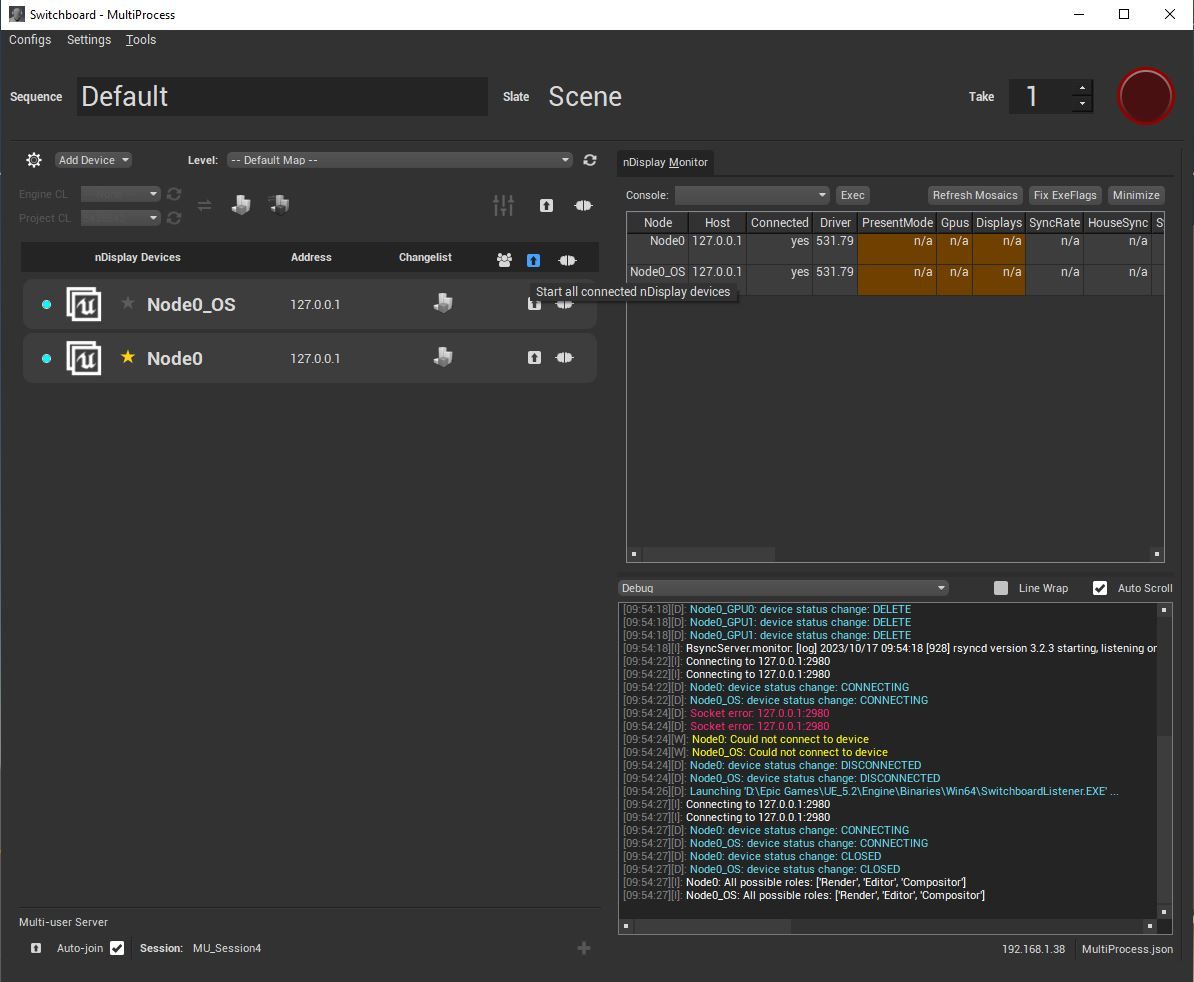
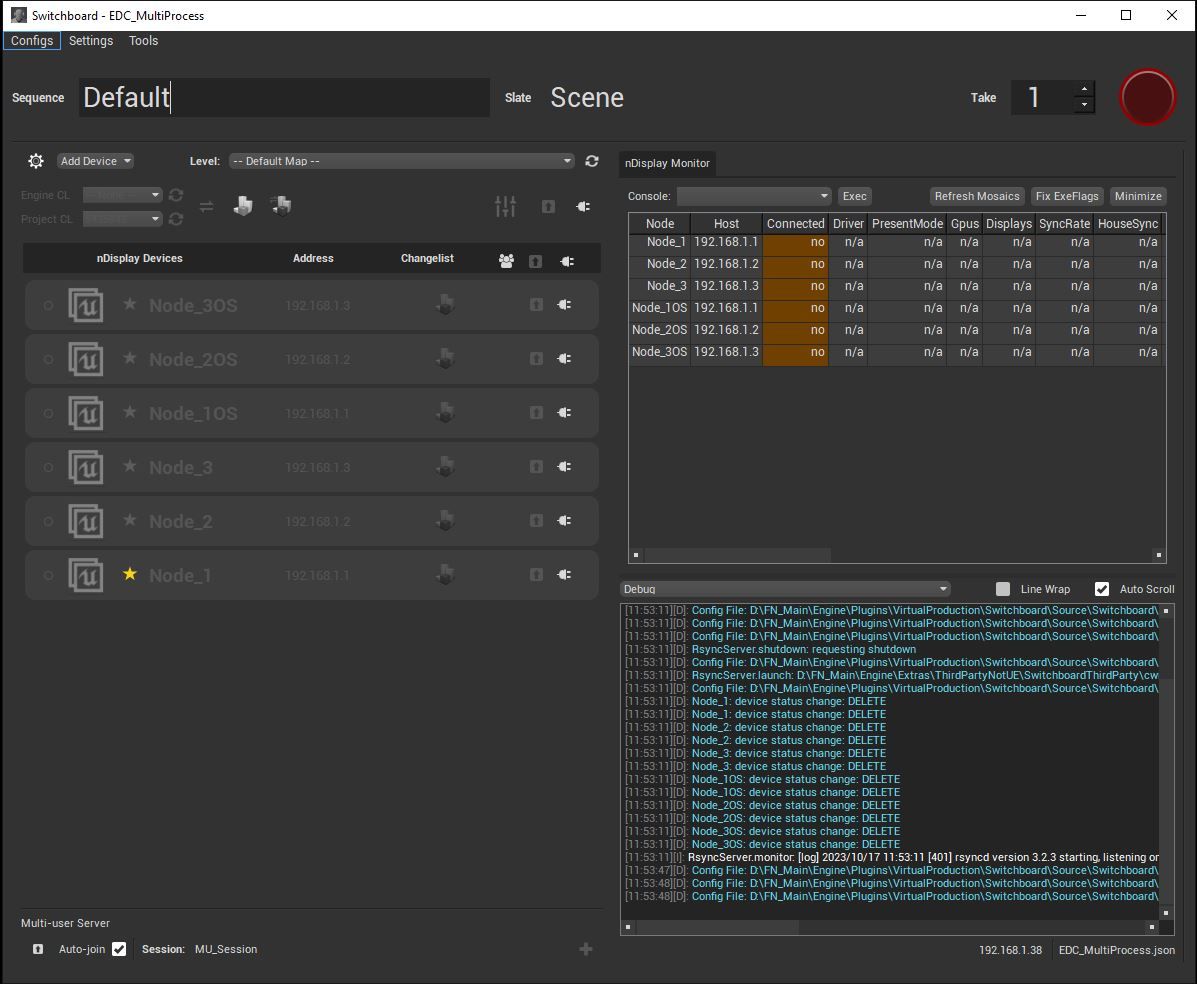
After adding the Multi-Process nDisplay config, the offscreen and onscreen nodes display separately in Switchboard per machine. Each node requires a Switchboard connection, but only one listener is needed per machine.
To optimize performance, both offscreen and onscreen nodes should be launched and run at the same time via the “Start All Connected nDisplay Devices” button.
Source: epicgames.com
Section 3: Converting an mGPU Config
Some existing nDisplay ICVFX users may already have used Multi-GPU and have configs they want to convert for multi-process rendering. Some settings on the computer and in Unreal Engine will need to be changed to make this possible.
The following section focuses on converting an existing nDisplay config from Multi-GPU to Multi-Process.
3.1 Settings
The NVIDIA Control Panel settings are specific to converting a Multi-GPU config to Multi-Process. To access the Control Panel, right-click on the desktop and choose it from the context menu.
-
-
- SLI: In a machine set up for mGPU, SLI is enabled. We will need to go to the section titled Set SLI and PhysX Configuration and disable SLI.
- Mosaic: Multi-GPU utilises maximum GPU topology, while Multi-Process needs minimum GPU topology. If using Mosaic, you will need to change this setting under the Set Up Mosaic section of the NVIDIA Control Panel. If you do not use Mosaic, this setting will not apply.
-
3.2 Adding Offscreen Nodes
In this example, the nDisplay config is a little more complicated and has a few more nodes to represent what advanced users will likely be working with.
Source: epicgames.com
In the Cluster panel, choose the host of each machine and +Add a new Cluster Node.

Source: epicgames.com
In the Add New Cluster Node window, adjust the following settings:
Source: epicgames.com
-
-
- Use the naming conventions of the nodes we already have, name this Node_1_OS to indicate that it is offscreen.
- Disable Adding a Viewport.
- Enable Headless Rendering.
- Keep the IP Address the same to match the regular onscreen node address.
- Set the Graphics Adapter to 1, which is the secondary GPU.
- Click Add.
-
We will go ahead and repeat the above process for the other nodes. We will set up Node_2_OS and Node_3_OS, all with the same settings as mentioned above.
Source: epicgames.com
3.3 Camera Setup
Next, let’s set up the ICVFXCamera component. In this project, there are two cameras, which means that we also have two frustums.
Source: epicgames.com
After that, open the Details panel for the first ICVFX Camera. These initial steps are the exact same as when we created a Multi-Process Rendering config in Section 2 (Getting Started).
Source: epicgames.com
In the Media Input Groups:
-
-
- We have three nodes to receive information in this project >> Use the dropdown menu to set them to Node_1, Node_2, and Node_3.
- In The Media Source, choose Shared Media.
- Set the Unique Name to ICVFXCamA.
-
Next, set up the Media Output Groups.
-
-
- Again, we will add three nodes. However, this time, set them to Node_1_OS, Node_2_OS, and Node_3_OS.
- Set The Media Source to Shared Media.
- The Unique Name is the same – ICVFXCamA. You should copy and paste the name since it is string-sensitive, even slight differences in the names can cause errors.
-
Next, repeat those steps for the second camera, but with a different Unique Name – ICVFXCamB.
Finally, Compile and save.
Switchboard
In the Switchboard interface, there are three Multi-Process Nodes and three regular nDisplay nodes. All these six nodes will need to be launched because there is both a regular nDisplay render node and an offscreen render node for each machine.
Source: epicgames.com
Now, our Multi-GPU config is converted and it is ready to be used for Multi-Process rendering!
With the information in this deep dive, we hope you will have a clear understanding of how Multi-Process Rendering works in Unreal Engine 5 and be able to configure your own projects to harness increased GPU performance.
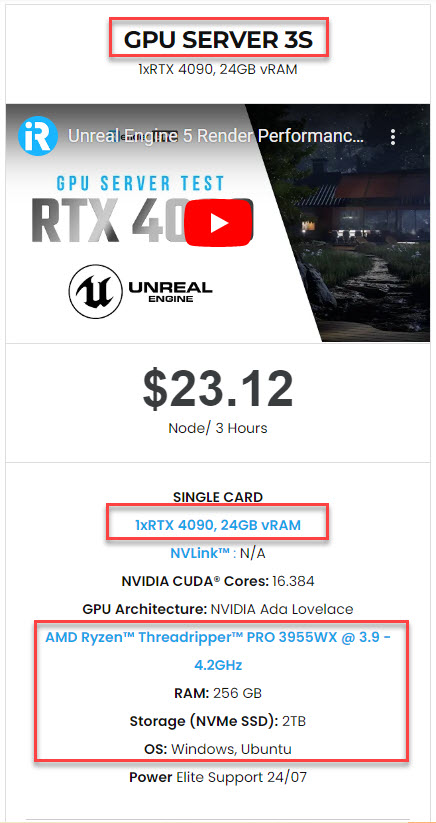
Section 4: Boost Unreal Engine 5 rendering with iRender
We offer a single RTX 4090 machine for faster rendering in Unreal Engine. Built with a powerful AMD Ryzen™ Threadripper™ PRO 3955WX CPU, 256GB RAM, and 2TB NVMe SSD storage, this machine is capable of any Unreal Engine project demands. You can use Unreal Engine, its plugins, and/or any other software of any version on our machine. Once renting our machines, you will own them as your personal workstations.
iRender allows users to use many machines on one account. Therefore, for big projects having tight deadlines and needing faster rendering, you can use multiple machines simultaneously just like using multiple independent computers.
Let’s see how our single RTX 4090 machine helps speed up Unreal Engine 5 rendering:


Claim your FREE TRIAL to try our RTX 4090 machines and boost your rendering now!
For further information, please do not hesitate to reach us at [email protected] or mobile: +84915875500.
iRender – Thank You & Happy Rendering!
Reference sources: epicgames.com
Related Posts
The latest creative news from Unreal Engine Cloud rendering.