How to composite Enscape animations with Blender
Enscape is a game-engine style rendering engine that has plugins available for Revit, SketchUp, Rhino, and ArchiCAD. It is a proprietary, simple program that allows you to view your models. Although it is very easy to use, it lacks the functionality and flexibility that other tools such as Blender’s Eevee (extremely powerful, free, and open-source), Unity (offers free versions), and Unreal Engine allow. One of the functions that Enscape has is the ability to set camera keyframes and export a short animation of your building model. This is standard keyframing and keyframe interpolation that is seen in all animation software, with the limitation that you can only keyframe the camera, the field of view, and the time of day. This means that should you want to create a more bespoke animation, it is simply not possible to do in Enscape and you should use other tools.
However, it is possible to composite over the underlying Enscape animations footage. However, Enscape does have an option to export out an XML file saving the camera positions.
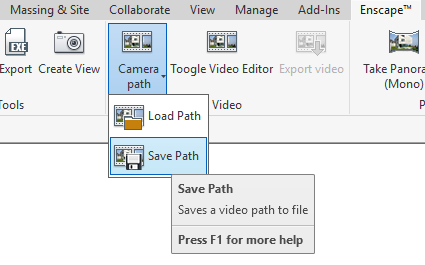
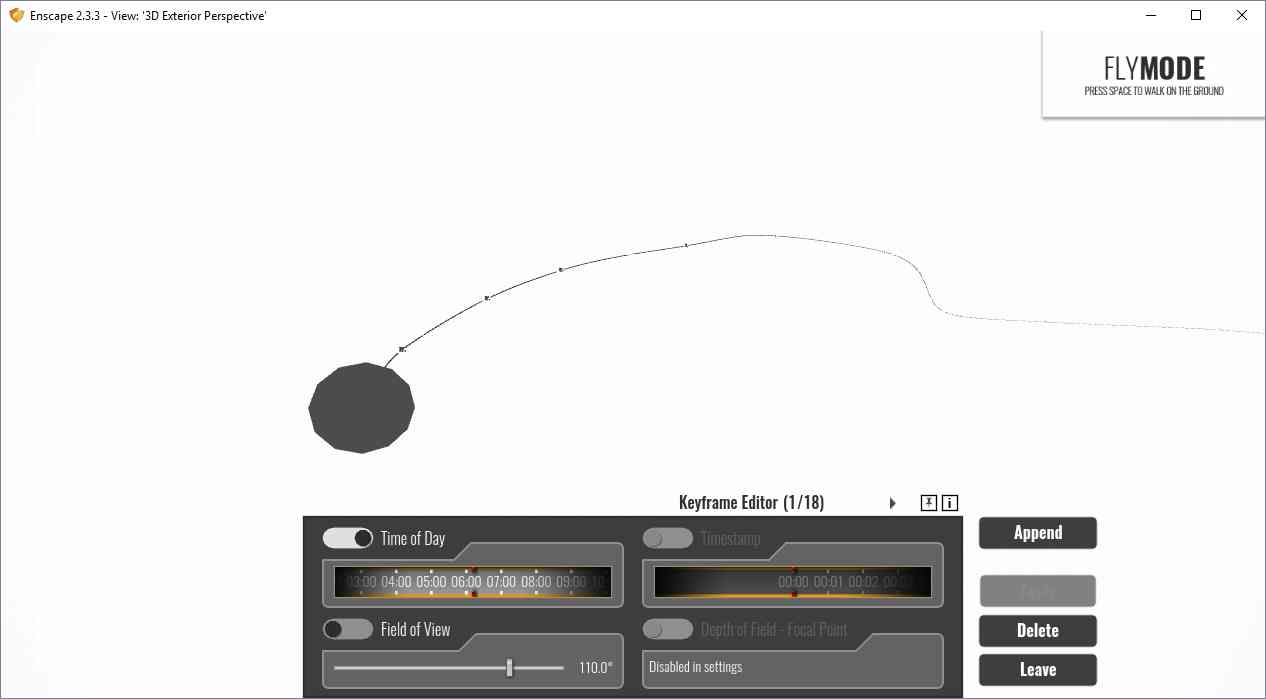
1. Export camera paths to an XML file from Enscape animations .
This XML data looks a little like this for an animation that shows 5 keyframes. Take note how the frames are measured in seconds, not frames, and that the time of day is recorded in terms of “hour”, and the field of view is recorded in radians.
<?xml version="1.0" ?>

<VideoPath version="1" easingInOut="1" shakyCam="0">

    <Keyframes count="18">

        <Keyframe order="0" hour="6.19048">

            <Position x="-866.038" y="23.1767" z="-79.7907" />

            <LookAt x="0.133988" y="0.0725552" z="-0.988323" />

        </Keyframe>

        <Keyframe order="1" timestampSeconds="10.0362">

            <Position x="-874.087" y="22.7914" z="-98.4712" />

            <LookAt x="0.051014" y="0.0422604" z="-0.997803" />

        </Keyframe>

        <Keyframe order="2" timestampSeconds="12.4903">

            <Position x="-876.866" y="23.2531" z="-106.341" />

            <LookAt x="0.396895" y="0.0325198" z="-0.917288" />

        </Keyframe>

        <Keyframe order="3" fieldOfViewRad="1.91964" timestampSeconds="50.9925">

            <Position x="-693.204" y="59.4014" z="-255.678" />

            <LookAt x="0.718453" y="-0.688584" z="0.0983752" />

        </Keyframe>

        <Keyframe order="4" hour="17.5333" timestampSeconds="111.771">

            <Position x="-856.114" y="91.0984" z="-13.3383" />

            <LookAt x="0.51913" y="-0.381081" z="-0.765037" />

        </Keyframe>

    </Keyframes>

</VideoPath>
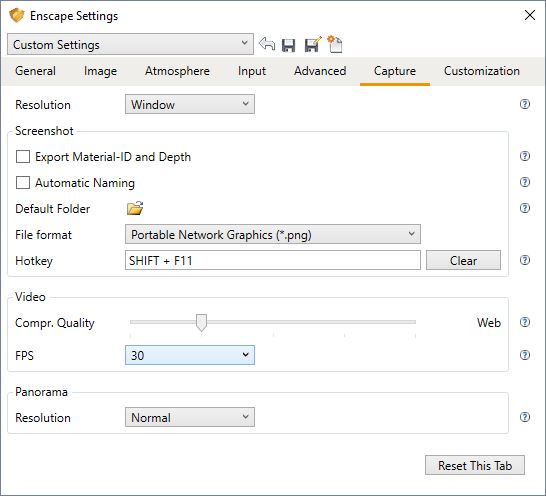
The data is almost enough to recreate a camera path. First, we also need the field of view which is sometimes not explicit in the XML, but you can find it out from your settings. It is given in degrees in the UI.
2. Enscape settings.
Finally you will also need the camera resolution and the frames per second to convert seconds to frame. This can be found in the Enscape settings.
Those settings can be set in your camera object and rendering settings in your favourite 3D software. The next step is to actually translate the camera position and directions to your 3D software. There are actually three pieces of information required to explicitly define a camera location and rotation. First, you need the position coordinates. Unfortunately, Enscape only gives us two: the camera position, and the camera direction vector.
The good news is that it seems to follow the same system that Blender uses for the camera “track to” solver. So apart from your camera object in Blender named Camera, you will also need to create an empty, named Target. This is the python script that you can run inside Blender to import the XML data into your camera and target object. Be sure to delete any existing keyframes for the object or it might get confused. Also check that the FPS is correct (the default is 30).
Your camera will now follow the path of the enscape camera. The coordinates are such that the project base point is set to be the origin. If you want, you can now export your project as an IFC, and view your IFC using Blender. You can additionally check if the camera is correct by setting a video underlay in your Blender camera.
You will then quickly notice that your camera is correct on the keyframes, but the interpolation may not match exactly. By default, Enscape does an “EaseInOut” easing, but doesn’t reveal exactly what interpolation it uses. I have found that it is roughly equivalent to a bezier curve without any handles. That is, you can go to the graph editor for the camera object, set your scale origins to be individual origins, then scale all keyframes down to 0.

You can now render and composite roughly camera tracked scenes on top of the Enscape footage.
3. Cloud rendering service for Enscape
iRender provides a high performance and configurable server system for 3D rendering, AI Training, VR & AR, simulation, etc. With our server, you can install any software you need, add your license, and do whatever you like with your project. These tools above are no exception. Most tools for fluids are computationally expensive. Understanding that, we have different config and package compatible with them, from CPU to single GPU, dual and even multi-GPUs.
You can see that our Server 3 configuration completely matches these above requirements for choosing a computer for Enscape. Let’s look at them in more detailed:
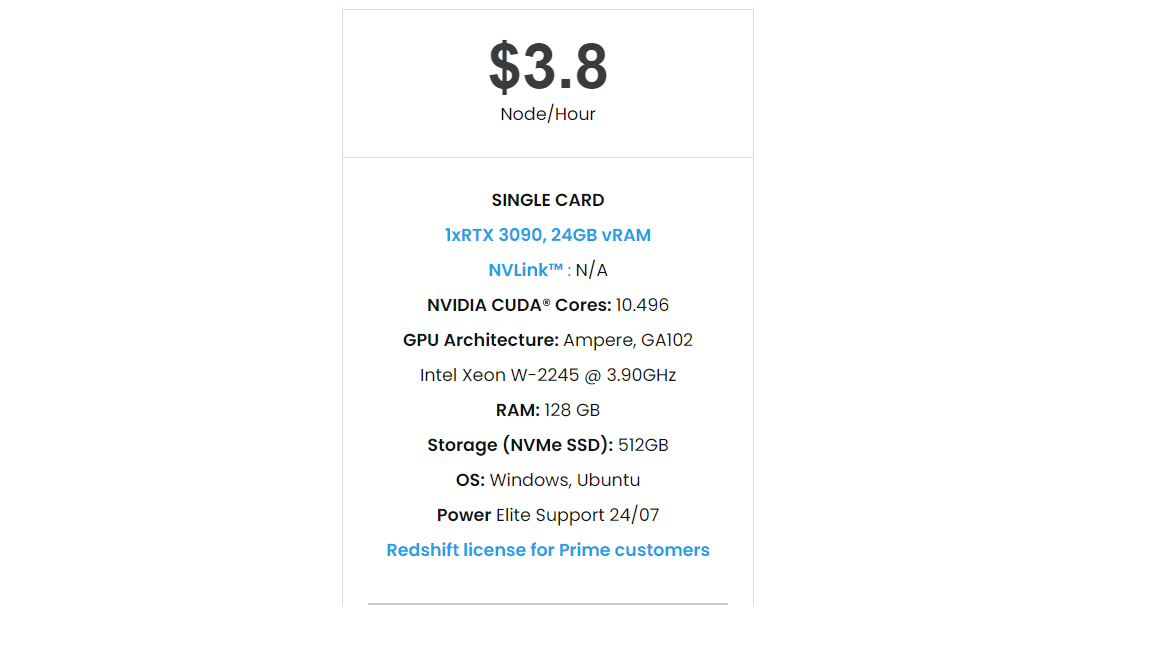
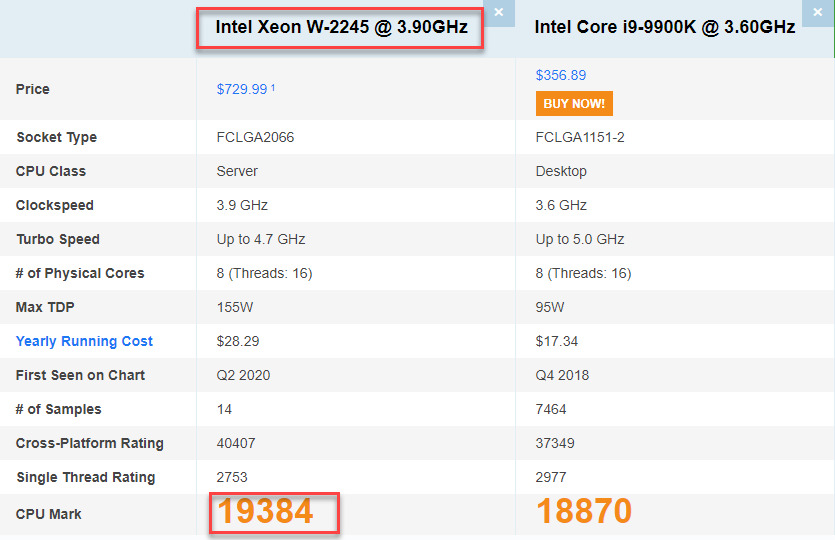
- Operating System of GPU SERVER 3: Once again, we need to confirm that Enscape use GPU card to render. However, a good CPU can speed up Enscape’s loading times. Because of this reason, iRender exclusively provide the Intel Xeon W-2245 with a strong processor base frequency which is 9GHz – 4.7GHz, 8 cores and 16 threads on GPU server 3. According to Bricsys, the minimum CPU is intel corei5. Here at GPU server 3 of iRender,the CPU is intel xeon W-2245 which can be compared to intel corei9 9900k
Let’s see rendering tests with Enscape on server RTX 3090 the latest NVIDIA CARD RTX 3090 with 24GB VRAM will help you reduce your render time very much at iRender:

Moreover, iRender has many more to offer.
- Free and convenient transfering tool: iRender offers a powerful and free file transfer tool: Gpuhub Sync. With fast file transfer speed, large data capacity, and completely free. You can transfer all the necessary data into our Gpuhub Sync tool at any time without connecting to the server. The data will be automatically synchronized in the Z drive inside the server, ready for you to use.
- Flexible price: You can always save from 10% to 40% with our Fixed Rental feature. For those who’s in need of server more than a day, or have extremely large project, we advise to choose daily/ weekly/monthly rental package. The discount is attractive (from 10 to 40% depends on your package), and you don’t have to worry about over-charging if you forget to shutdown the server. In this July, we offer a discounted price for GPU server 3 and other servers, users will take advantage of these to level up their renders.
- Real human 24/7 support service, helping you to handle the problem quickly, effectively, saving you both time and money.
If you have any questions, please do not hesitate to reach us via Whatsapp: +(84) 916017116. Register an ACCOUNT today and get FREE COUPON to experience our service. Or contact us via WhatsApp: +(84) 916017116 for advice and support.
Thank you & Happy Rendering!
Source: thinkmoult.com
Related Posts
The latest creative news from Enscape Cloud rendering, Lumion Cloud rendering, V-Ray Cloud Rendering , Twinmotion Cloud Rendering , 3D VFX Plugins & Cloud Rendering.