How to Render with a Transparent Background in Blender?
Rendering images with transparent backgrounds is one of the smaller skills in Blender that can unlock a lot of creative freedom. Whether it’s for visual effects, image collage, graphic design, or simply because you want the option to change the background later, rendering images with transparent backgrounds in Blender is common in many different workflows.
So, exactly how does a transparent background work, and how do you set it up? And why might it not work as intended? If any of those questions sound familiar, you’ve come to the right place.

Understand a transparent background in Blender
Before diving into the settings, it’s worth understanding what ‘transparent background’ actually means in Blender.
When an image has transparency, it means that, in addition to the Red, Green, and Blue channels, it also has an Alpha channel. The Alpha channel tells the computer which opacity value to use for each pixel of the image, essentially obscuring all the parts of the image that are considered transparent.
When we render an image with transparency, it means that instead of the background of the 3D scene being visible, it’s obscured in the Alpha channel – still within the 3D scene and affecting lighting and reflections, but transparent in the final image.
This alpha channel is particularly useful when:
- Exporting PNG images for web pages or UI design
- Merging rendered images onto photos or videos
- Creating product models
- Rendering assets for games or motion graphics
Blender supports transparent backgrounds in both Cycles and Eevee, but each engine handles lighting, reflections, and transparency slightly differently.
Render & save images with transparent backgrounds
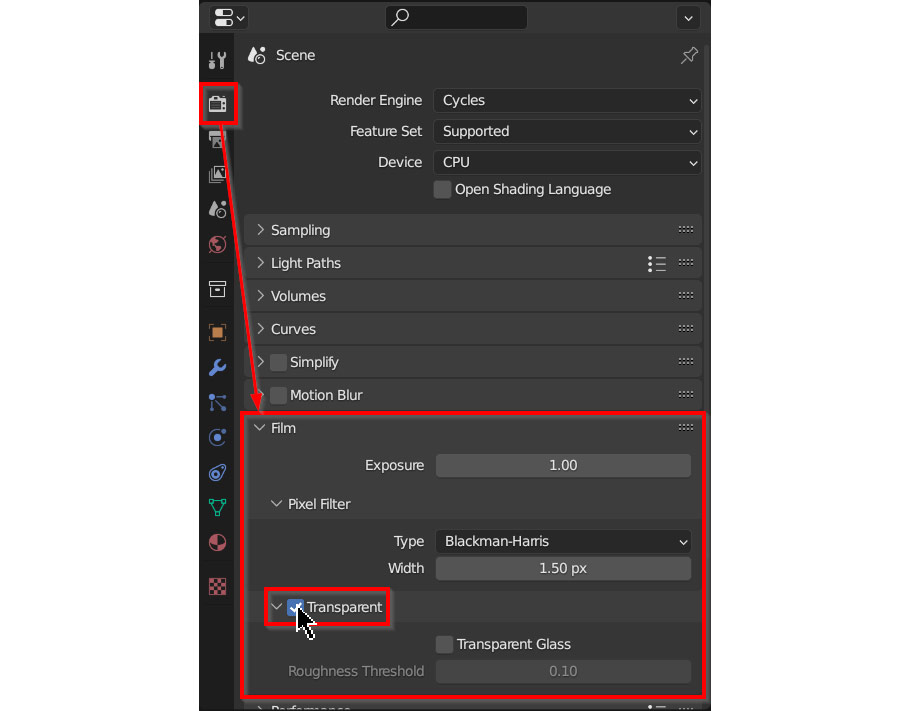
At its core, rendering with a transparent background in Blender is very simple. You can enable transparency in just one step: open the Properties panel > Render Properties > Film > turn on the Transparent option.
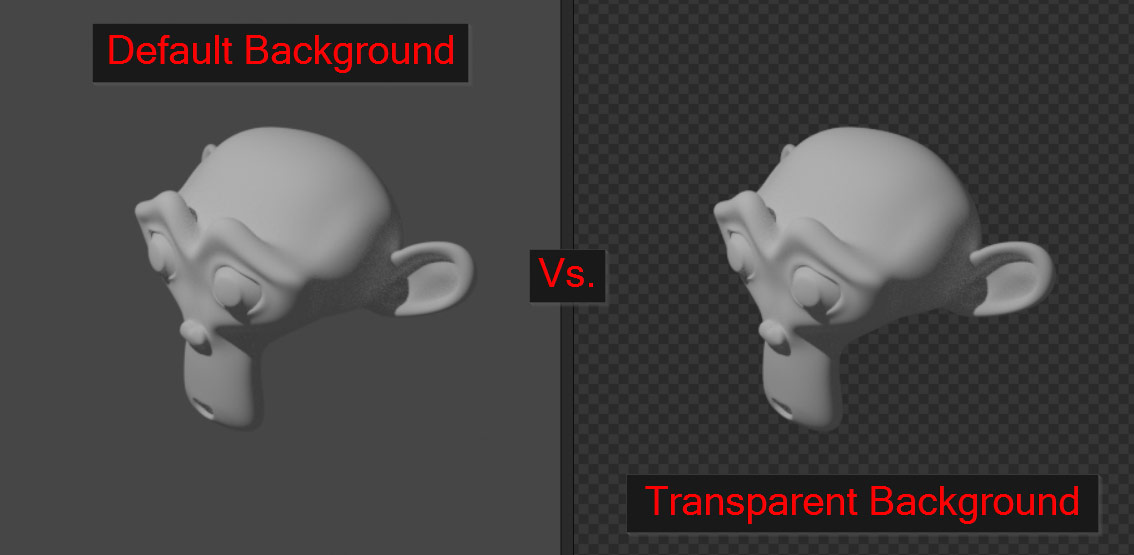
Once this setting is enabled, switch to Rendered Viewport mode. You’ll notice the background of the scene disappears and is replaced by a gray checkerboard pattern. This visual indication confirms that Blender will render the background transparent.
To ensure the final image retains that transparency, you need to export it in a format that supports the Alpha channel. Blender’s default settings usually work well, but it’s always better to double-check. Go to Output Properties, set the File Format to PNG, and make sure the Color is set to RGBA; otherwise, the Alpha channel will not be included in the output.

Then you can render and save your image as a PNG file with a transparent background, ready to use in your project. This process works the same way in Cycles, Eevee, and even the Workbench render engine. While the layout of the Render Properties might differ slightly between tools, they all include a Movie section with a Transparency checkbox. So, yes, the basic process is fairly simple. But as you’ll see later, some cases can present a few more challenges.
How to render animation with a transparent background in Blender?
Essentially, rendering animations with transparent backgrounds in Blender follows the same logic as rendering still images, since animation is simply a sequence of images played in order. The real question is how to apply this effectively in practice. In most professional workflows, the best way to export animations from Blender is not as a single video file, but as a sequence of images. While this may seem confusing at first, rendering each frame individually offers better quality, more flexibility, and allows you to stop or adjust the rendering process without restarting. Most importantly for this use case, transparency is fully supported using formats like PNG or OpenEXR, making them ideal for animations with transparent backgrounds.
To begin, follow the same initial setup as when rendering transparent still images. In the Properties panel > Render Properties > Movie, enable the Transparent option.

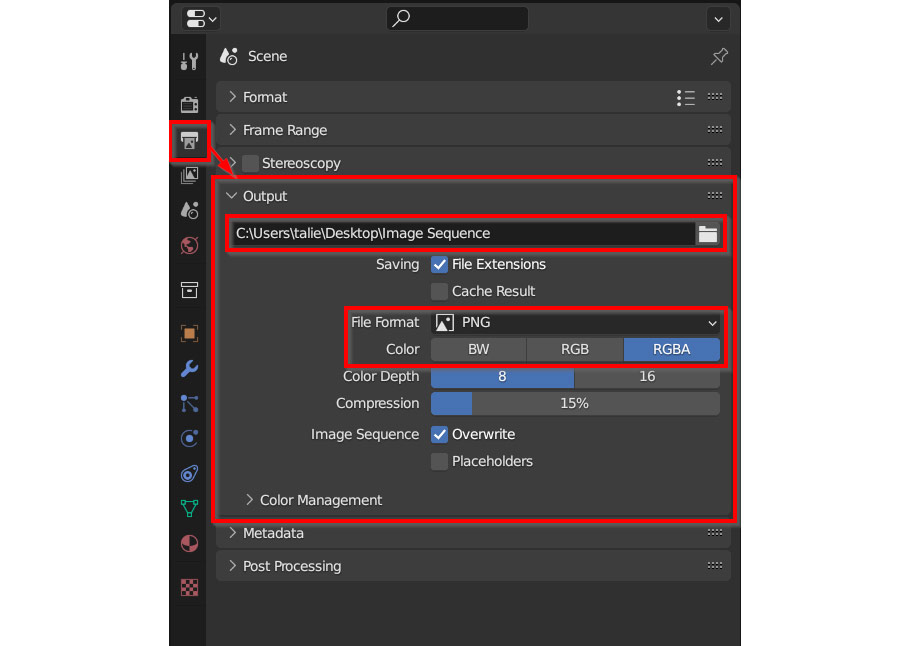
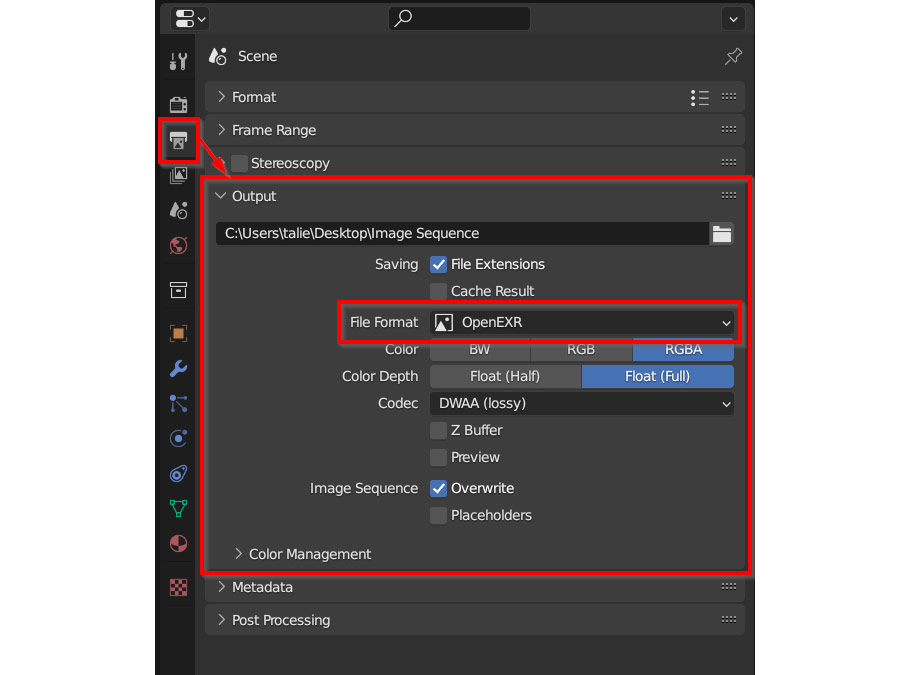
Next, to export your animation as a PNG image sequence, go to the Properties panel > Output Properties > Output. Set the File Format to PNG and ensure the Color is set to RGBA to include the alpha channel. You also need to determine where to save the file. Click the Folder icon next to the file path and select where Blender will save your animation frames.
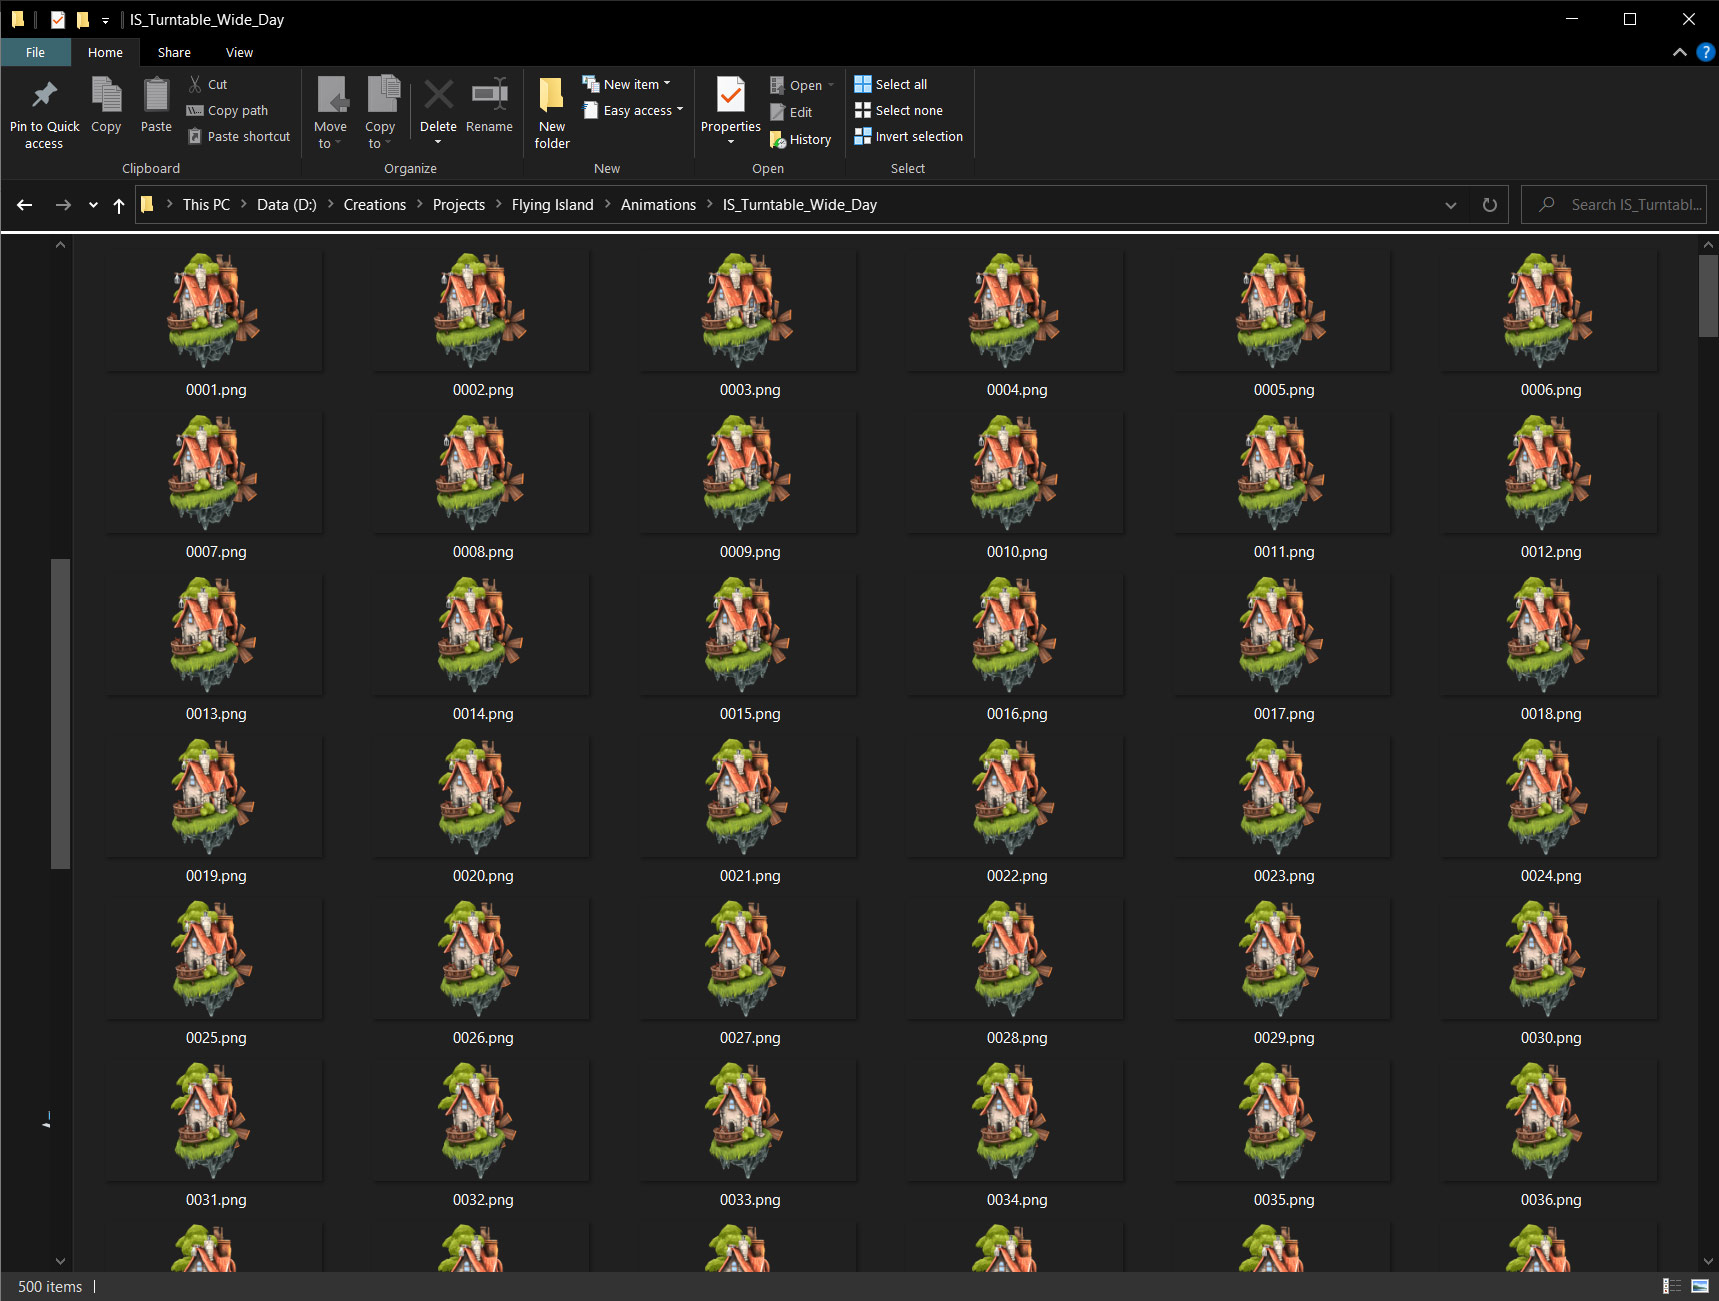
Once everything is set up, start the rendering process by selecting Render > Render Animation from the top menu or pressing Ctrl/Cmd + F12. Open the destination folder you selected earlier, and you will see individual frames being saved one by one as Blender processes the animation.
How to render glass with a transparent background?
When working with transparent background renders, it’s essential to pay attention to objects in your scene that also rely on transparency, such as glass materials. How Blender handles transparent glass varies depending on the rendering engine you’re using. Cycles and Eevee approach this differently, and while the differences may initially seem small, they can significantly impact the final render outcome.
Transparent Glass in Cycles
In Cycles, after you enable Transparent in the Film settings, you’ll also have access to an additional option called Transparent Glass. By default, glass materials in Cycles refract everything in the scene, including the background, even if that background is supposed to be transparent. When Transparent Glass is enabled, transparency is correctly preserved through glass objects. Both settings are valid depending on your creative intentions, but keep in mind that enabling transparent glass will prevent the actual refraction of any images superimposed behind the glass.

Transparent Glass in Eevee
In Eevee, the workflow is less flexible. After switching from Cycles to Eevee, you’ll notice that the Transparent Glass option is no longer available. Unfortunately, Eevee doesn’t offer a built-in solution for displaying true transparent glass with a transparent background. If your project requires this effect, the most practical approach is to build a custom shader button setup.
Troubleshooting transparency in Blender
Like most things in a 3D workflow, rendering with a transparent background isn’t always perfect. With so many render and export settings involved, it’s easy to miss a small detail that results in an undesirable outcome.
Here are some of the most common problems you might encounter when working with transparent background renders in Blender.
Rendered image saves with a black background
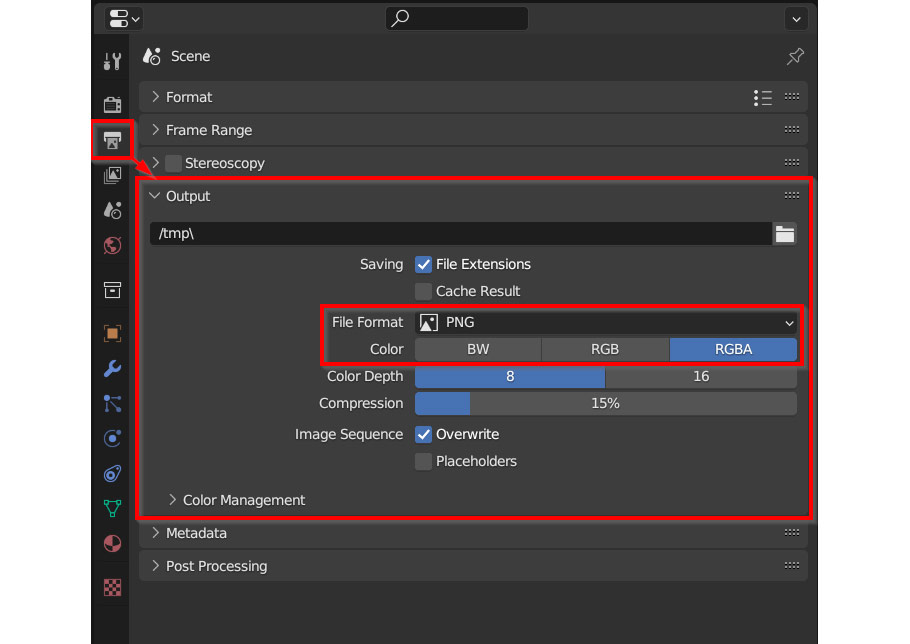
If your final render shows a black background instead of transparency after saving, the problem is usually related to your output format. Open the Properties panel > Output Properties > Output settings. Make sure the File Format is set to PNG and the Color option is set to RGBA. If the format is JPG, transparency will not be retained, as JPG doesn’t support the alpha channel.
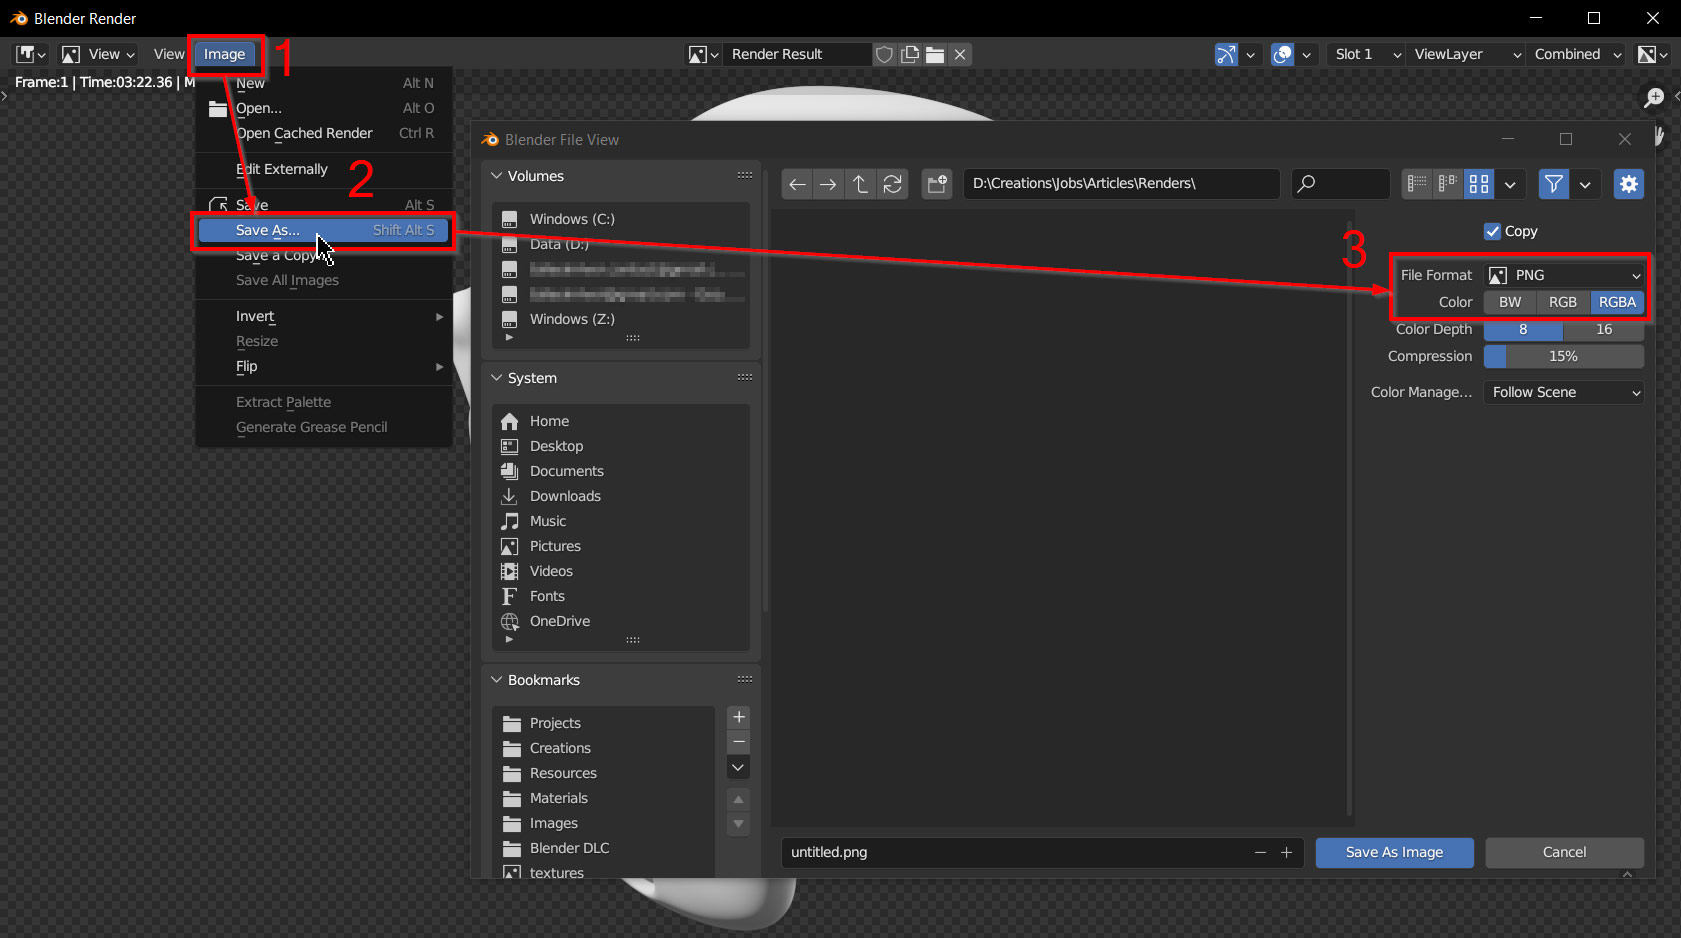
Don’t worry if you have already rendered your image. As long as the render is still open in Blender, you can fix this issue without re-rendering. In the render window, go to Image > Save As, then review the settings on the right-hand side. Select PNG format, confirm that Color is RGBA, and click Save as image to export the file with the appropriate transparency.
Semi-transparent or glowing objects not saving correctly
In some cases, you might render a scene with transparency and everything looks perfect in viewport and during rendering, but when you save the image, the result is completely wrong. While this issue doesn’t affect most projects, it often happens when exporting transparent PNG files that include glowing, luminescent, or semi-transparent objects. If you’ve ever encountered this, you know how frustrating it is.

So, is there a workaround? The short answer is: yes, but there are some limitations. There are two main approaches to solving this problem. The first is to export your render as an OpenEXR file instead of a PNG. The second option is to use a simple button setup in Blender’s Image Editor to manually adjust the alpha channel.
Let’s start with the OpenEXR approach. To render in EXR format, go to the Properties panel, open the Output section in the Output Properties tab, and set the File Format to OpenEXR. If the image has already been rendered, you’ll find a similar option in Image > Save As. When saving as an EXR file, the alpha channel is correctly preserved, and the image will look exactly the same as it did during rendering in Blender Compositor. However, this solution isn’t ideal for every workflow, as many applications don’t fully support EXR files, and even if they do, handling color and transparency can become confusing.
The second solution involves Blender Compositor and requires a basic understanding of the node workflow. The advantage here is that you can still export your final image as a standard PNG, which is widely supported across most software.
To use this method, switch to the Compositing workspace and enable Use Nodes. Next, recreate the node setup as shown below, paying close attention to the settings of each node. Ensure Clamp is enabled on the Add node and confirm that the Set Alpha node is configured as Replace Alpha.
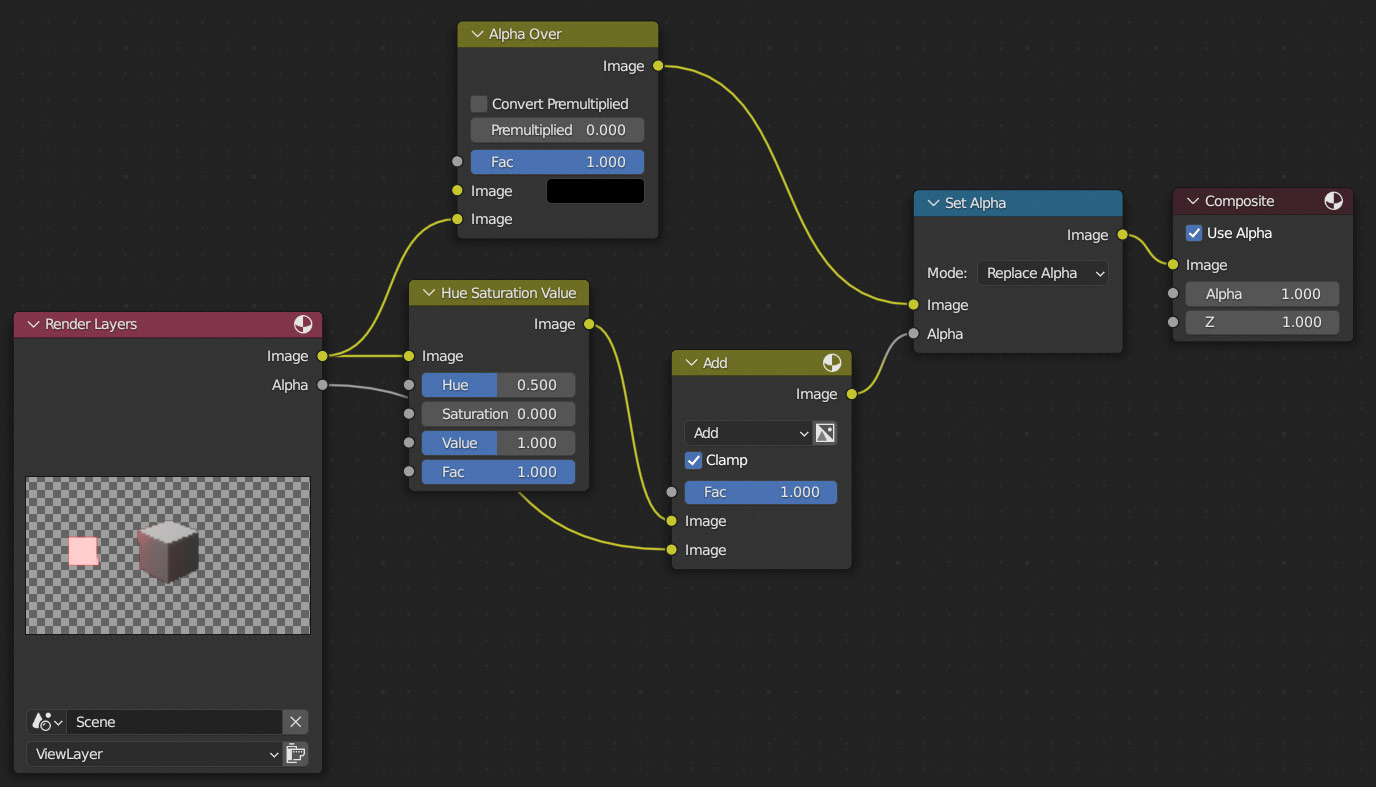
This technique works by extracting brightness information from the image and combining it with the existing alpha channel. While it produces good results in many cases, it’s not entirely accurate due to how Blender handles the internal color space. Unfortunately, currently, these are the most viable options for addressing transparency issues related to glowing or semi-transparent objects.
Q&A Section
1. Can Eevee render with a transparent background?
Yes. Eevee is capable of rendering with a transparent background. However, when it comes to glass materials or more complex transparency effects, Cycles generally produces more realistic and consistent results.
2. What format is best for rendering with a transparent background?
For still images, PNG with RGBA is the most practical choice. If your workflow involves image stitching or professional post-processing, OpenEXR is often a better option due to its robust alpha handling capabilities.
3. Can I render shadows on a transparent background?
Yes. You can retain shadows when using a transparent background by using a shadow catcher or enabling the transparent shadow option, depending on your scene setup and rendering engine.
4. Why does my rendered image look different after exporting?
Some image viewers and software do not handle the alpha channel correctly. To avoid confusion, always preview your exported files in applications that fully support transparency.
5. Does transparency increase rendering time?
A little. In Cycles, a transparent background might add a bit of overhead, but in most cases, the impact is minimal compared to factors like lighting complexity and sample count.
6. Why is my render background black in Blender?
A black background usually indicates that transparency isn’t enabled. Go to Render Properties > Film and enable Transparent to remove the default background color.
7. Can I render a transparent background in Blender using Shader Nodes?
Yes. You can manage background transparency through Shader Nodes. In the Shader Editor, go to the World tab, add Transparent BSDF, and blend it with the existing Background shader using Mix Shader. Adjusting the Factor value will control the background transparency.
8. Is it possible to have a transparent background in video renders using Blender?
Yes. Blender supports transparent backgrounds for video renders when you use formats that include an alpha channel, such as WEBM or QuickTime (MOV) with RGBA enabled. This makes it easier to integrate your animation into other video editing software.
iRender - A Powerful Render Farm Built for Blender
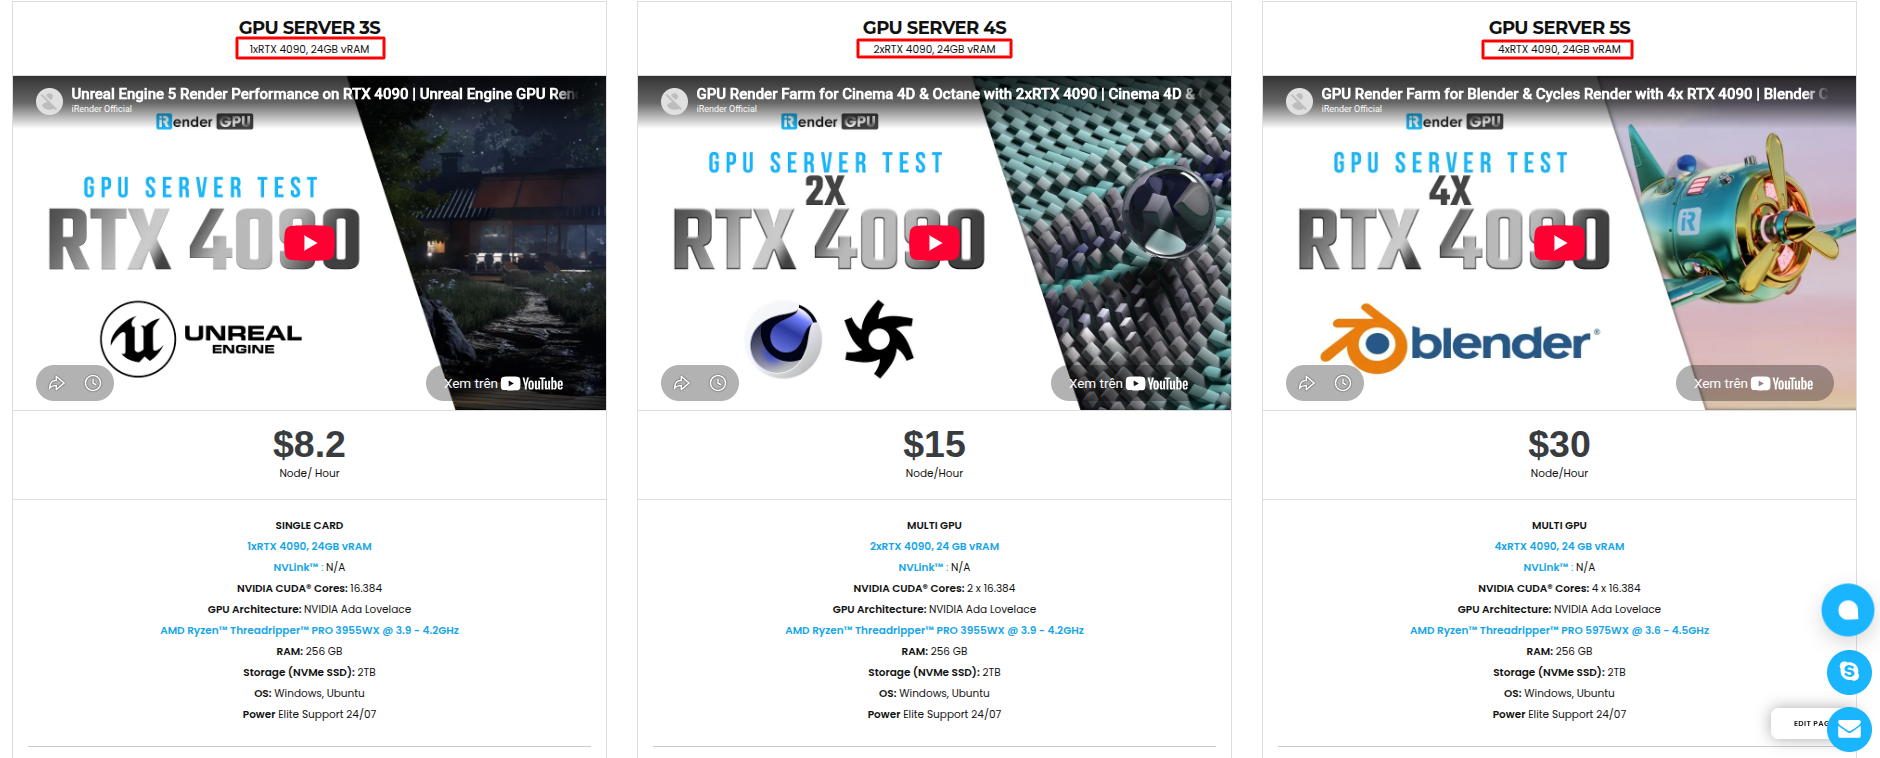
iRender is a high-performance render farm designed specifically for Blender, fully supporting all Blender versions, render engines, and plugins. Instead of investing in costly hardware upgrades, you get instant access to powerful GPU servers that help you render faster, smoother, and more efficiently.
All iRender servers are equipped with top-tier GPUs, giving Blender artists the performance they need for demanding scenes, animations, and complex materials.
- AMD Ryzen™ Threadripper™ PRO 3955WX (3.9-4.2GHz) or
- AMD Ryzen™ Threadripper™ PRO 5975WX (3.6-4.5GHz)
- 1/2/4x – NVIDIA RTX 4090
- 256GB RAM
- 2TB NVMe SSDs
Simple Your Workflow with Blender Preinstalled
Blender comes preinstalled on all iRender servers, so there’s no complicated setup process. Simply upload your project files, connect to the remote machine, and start working exactly as you would on your local PC. Once your environment is set up, it’s saved automatically. You can return anytime and continue rendering without reconfiguring your tools or settings.
Why choose iRender?
Unlike other traditional render farms, iRender allows you to upload and download files without starting the server, helping you save both time and cost. We provide an all-in-one Desktop app for Windows and a lightweight Drive app for macOS and Ubuntu, making file transfers quick and hassle-free.
Here’s what makes iRender a trusted choice for Blender artists:
- 100% Software Support: We support all 3D software, their plugins, and render engines.
- Full Control: Our service will give you full control over the servers you rent. Therefore, you are free to create your own working environment.
- Go Green: We are committed to using 100% solar renewable energy towards environmental sustainability.
- Real-human 24/7 Support: Our professional support agents and technicians guarantee to bring you the best rendering experience.
If you still wonder if this is the right place for your project, REGISTER NOW to get a trial and receive a 100% bonus promotion for your first transaction within 24hours with us.
For more detailed information, please contact us via Live chat 24/7 or WhatsApp: +(84) 912-785-500 or Email: [email protected].
iRender – Happy Rendering!
References: 3dmodels.org
Related Posts
The latest creative news from Blender Cloud Rendering.