How to speed up Blender Cycles X rendering
Blender Cycles X is a project launched in 2021 with the goal of rebuilding the Cycles architecture. It is not a new render engine in Blender, but simply an update of the current engine with many advantages, such as OptiX support and improved viewport rendering.
Although the new version of Cycles is better than the old one, we may want faster rendering speed. Therefore, in this article, we will discuss some methods to significantly enhance the Cycles rendering performance.
1. Enable GPU rendering only
Because Blender Cycles X is a GPU render engine, the first way to improve rendering speed is to use a graphics card instead of a CPU. Although Blender supports both GPU and CPU rendering, user experience shows that enabling only GPUs will result in a much faster rendering speed than the combined method. The performance of the Blender Cycles X also depends on the power and VRAM of the graphics card, especially for complex scenes. RTX 5090 and 4090 are currently the most powerful cards on the market.
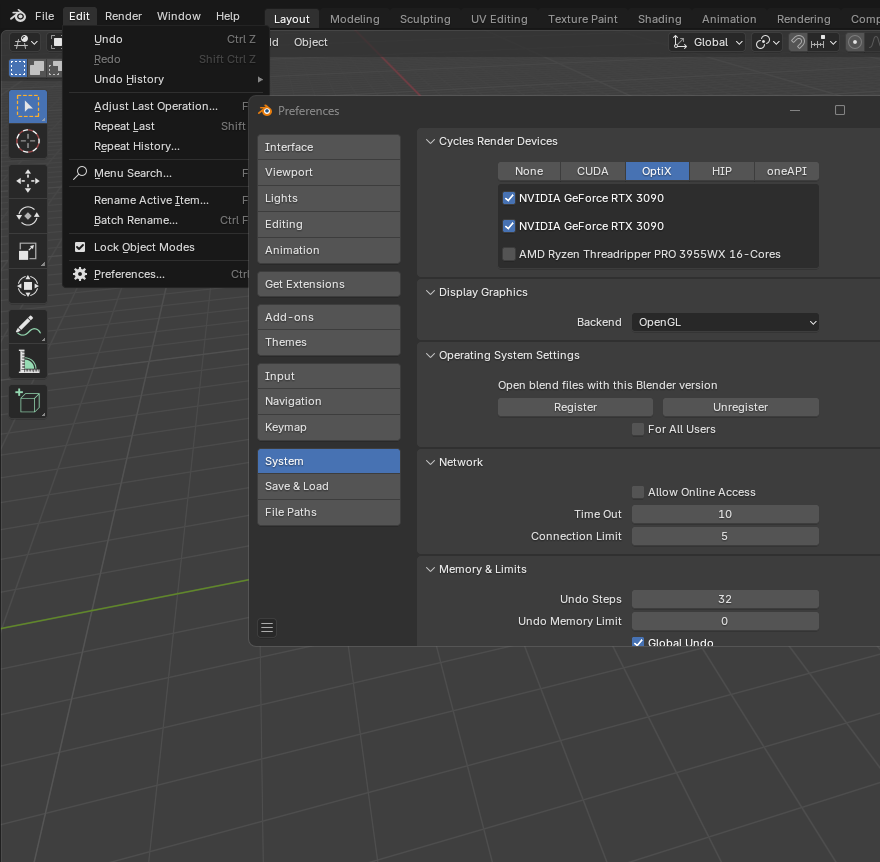
How to enable GPU rendering in Blender version 4.4
- Navigate to Edit > Preferences > System
- Select CUDA or Optix if you have an Nvidia graphics card. Note that CUDA is more stable while Optix is faster.
- Select HIP if you have an AMD graphics card.
2. Adjust the Light Path settings
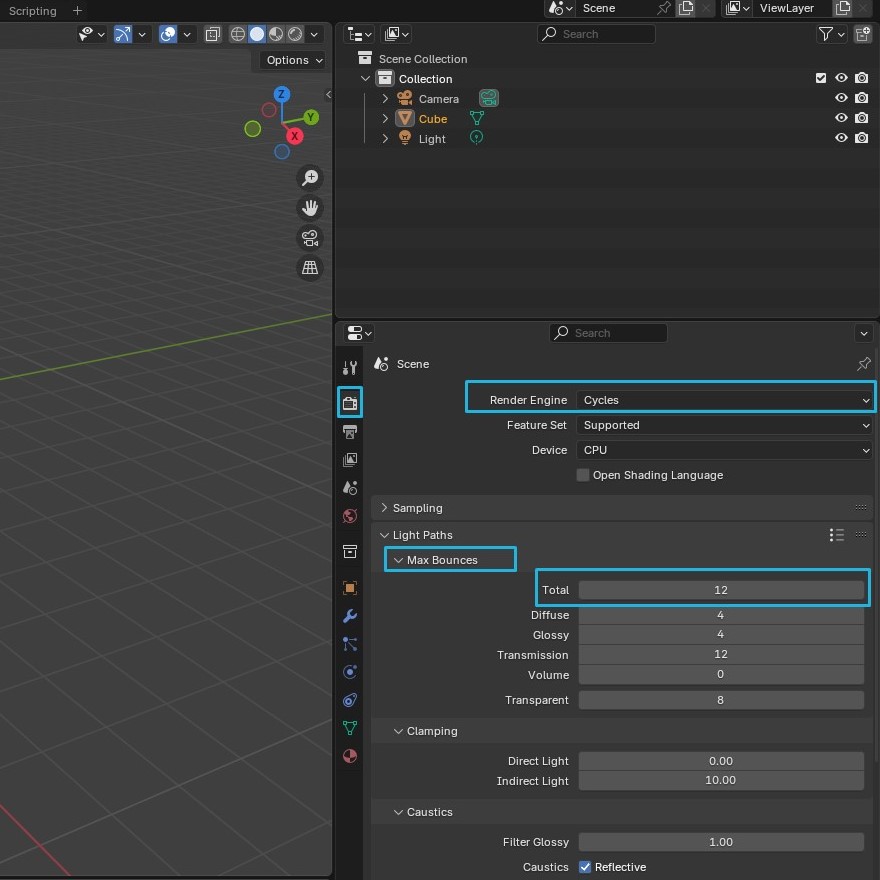
In 3D rendering, light reflections refer to the simulation of how light rays reflect and scatter off surfaces in a scene, affecting the realism of the image. The more bounces, the more realistic the scene. Reducing the Max Bounces value is another method to reduce the render time of Blender Cycles X. While the default value of Total Max Bounces is 12 for the most realistic lighting rendering effect, it will result in longer render times. You can reduce this value from 3 to 6 for faster rendering with only a slight loss of realism. A value of 0 will only result in direct lighting. Moreover, you can adjust the Max Bounces of individual light rays, such as Blossy or Diffuse, if needed.
How to navigate to Max Bounces settings in Blender version 4.4
- Go to the Properties panel on the right side
- Choose the Camera icon (called Render Properties)
- Change the Render engine to Cycles
- Scroll down to see the Max Bounces
3. Enable Blender’s Persistent Data
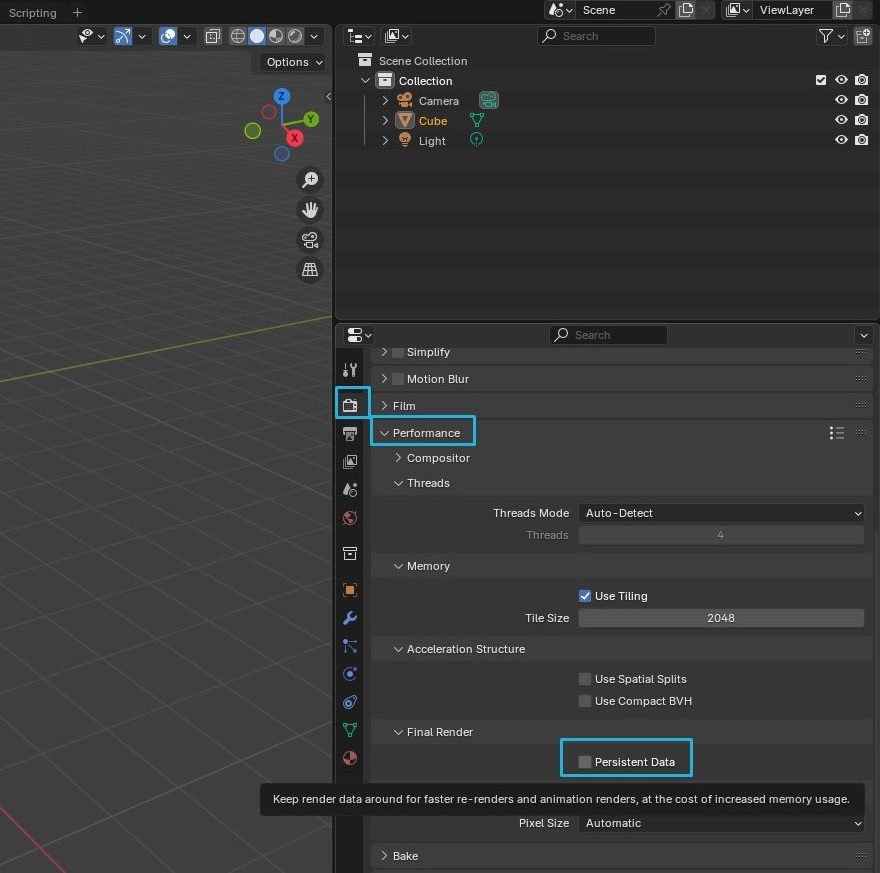
If you enable Persistent Data, Blender Cycles X will retain the render data of the first rendered frame to render subsequent frames, which speeds up the whole process. However, this method puts pressure on the graphics card’s VRAM to store the data. If your scene is very detailed, you may need to use a GPU with more VRAM. Another limitation is that it only supports immutable objects and the first ViewLayer of a multi-layer render.
How to activate Persistent data in Blender version 4.4
- Go to the Properties panel on the right side
- Choose the Camera icon (called Render Properties)
- Change the Render engine to Cycles
- Go to the Performance tab
- Scroll down to see the Persistent data
4. Optimize Multiple Importance Sampling
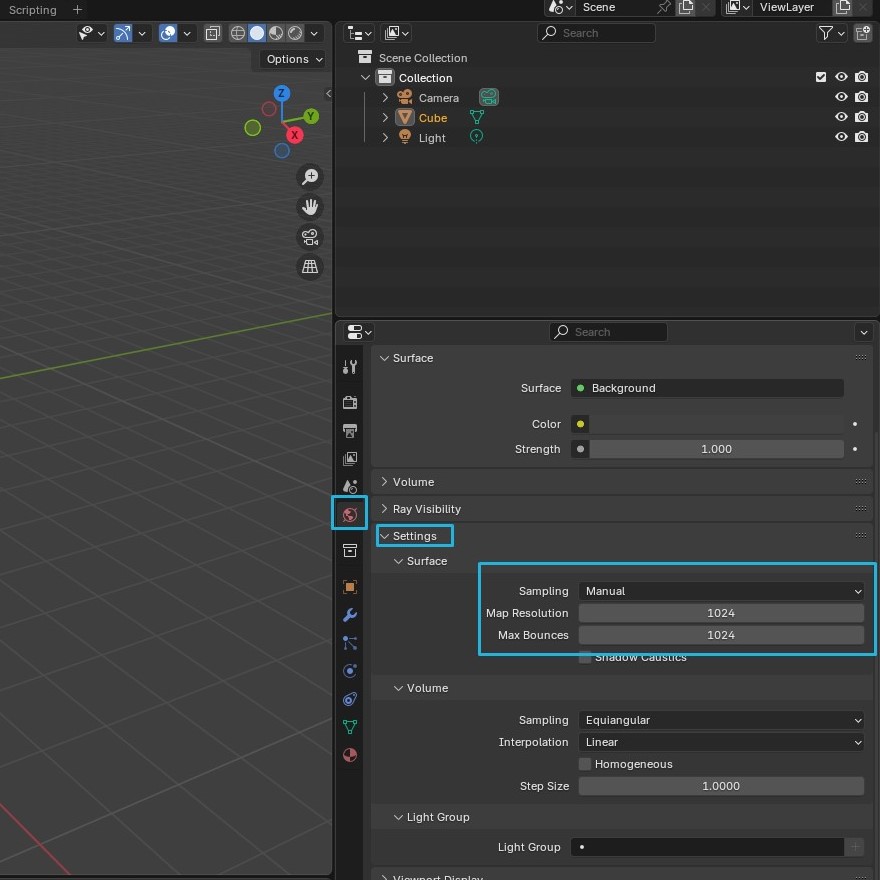
With Multiple Importance Sampling enabled, the render will have fewer fireflies, especially when using high-resolution HDR environments. The Map Resolution value of Multiple Importance Sampling is the value we will adjust to make Blender Cycles X render faster. You can reduce it from 1024 to around 512 to see if it speeds up the render while still keeping the number of fireflies at an acceptable level.
How to optimize HDRI Multiple Importance sampling in Blender version 4.4
- Go to the Properties panel on the right side
- Choose the Camera icon (called Render Properties)
- Change the Render engine to Cycles
- Go to the Global icon (World Settings) > Settings tab
- Change the Sampling setting from Auto/None to Manual
- Adjust the Map Resolution value
5. Use a render region
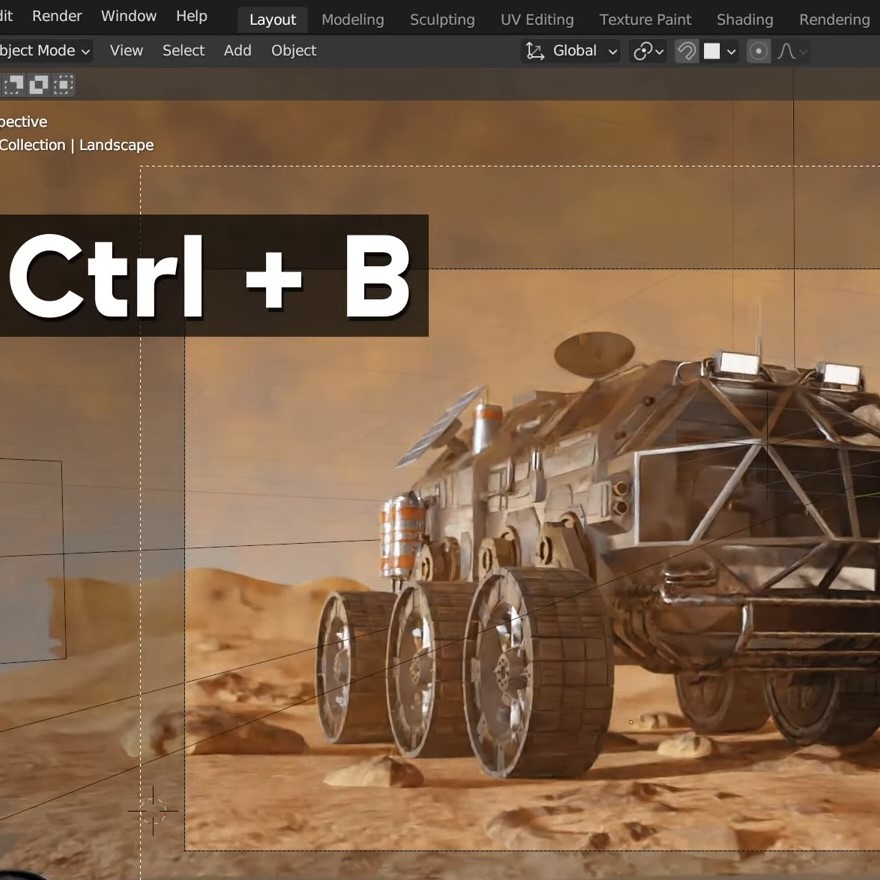
If you only want to render a preview of a certain area of your scene, you can speed up rendering your viewport using the Render Region feature. By pressing Ctrl+B, you can draw a rectangle around the target region, and Blender Cycles X will only render that part instead of the entire scene, saving you a lot of time. Moreover, you can even move the scene around the selected area while rendering. To exit Render Region, simply press Ctrl+Alt+B.
6. Decrease the Cycles X sampling count
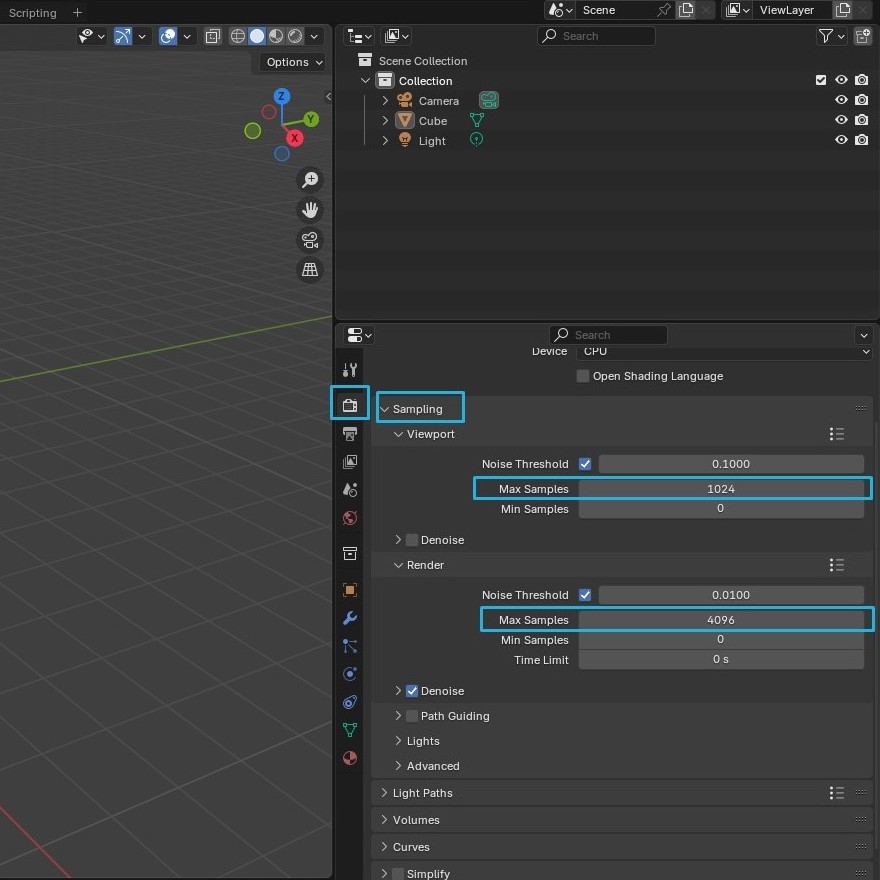
Sampling is the process of calculating the path of light when rendering. The higher the sample count, the more accurately Blender Cycles X can calculate the light. This helps reduce noise in the final image, but at the cost of rendering time. To avoid wasting rendering time, you should experiment to find the most effective number of samples for your scene. It is recommended to only change the Max Samples value and start from 500.
How to change the Render Max Samples in Blender version 4.4
- Go to the Properties panel on the right side
- Choose the Camera icon (called Render Properties)
- Change the Render engine to Cycles
- Scroll down to see the Sampling >> Render
7. Change the file output format
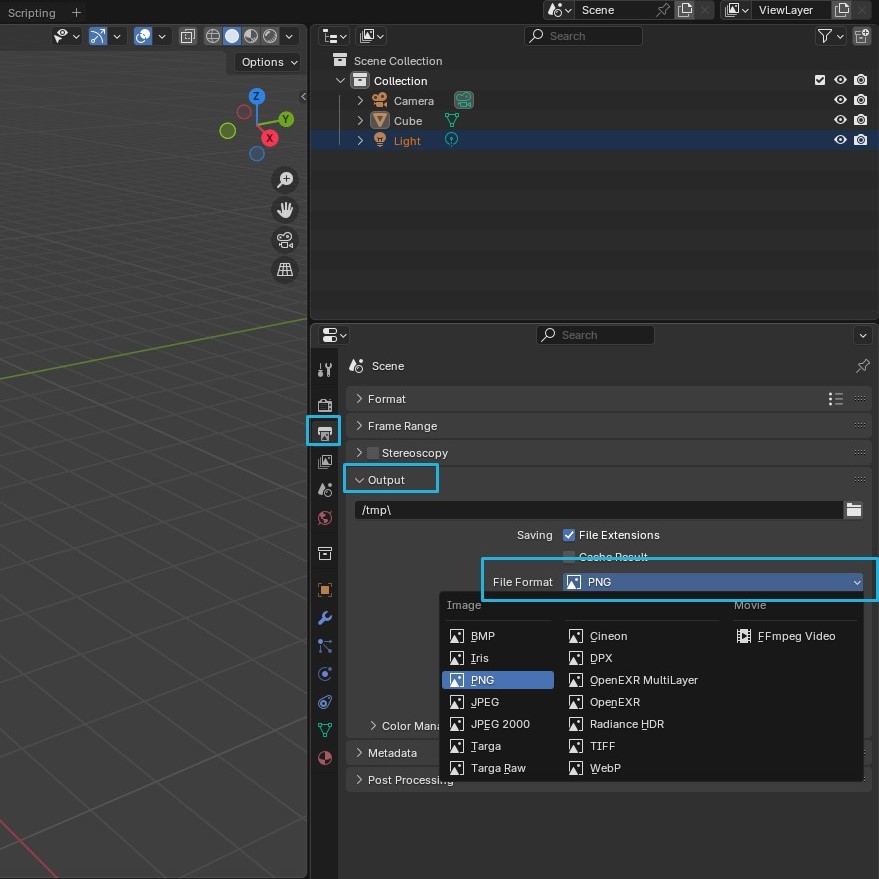
PNG is the most popular format used by Blender users due to its lossless compression. While it retains image information without losing quality, the compression process takes longer than other formats. Since OpenEXR is also lossless and compresses faster, you can change your render output format from PNG to OpenEXR to reduce the rendering time of Blender Cycles X.
How to change the file output format in Blender version 4.4
- Go to the Properties panel >> the Printer icon (Output Properties)
- Under the File Format dropdown, switch from PNG to OpenEXR
Fast rendering with Blender on iRender’s servers
iRender provides private high-configuration machines with upmarket specifications that excel in rendering, like AMD Ryzen™ Threadripper™ PRO 3955WX @ 3.9 – 4.2GHz, 1/2/4x RTX4090 or RTX3090, RAM 256GB, Storage NVMe SSD 2TB.
Why can iRender be a great render farm for you?
In addition to high-configuration servers, iRender provides many other utilities to provide the best user experience.
- Dedicated server for individuals: You have full control and access to the server you rent. The working environment (installed apps, files) will be stored for the next use.
- Easy and free file transfer between your computer and iRender’s server: The transferring task can be done via iRender GPU application for Windows and the iRender Drive application for MacOS.
- Human’s assistance: iRender’s attentive agents are always ready to support all your queries.
- All software compatibility: iRender’s PCs are built to meet the configuration needs of all 3D software and rendering tools at a variety of cost levels for users to choose from.

New users will get a 100% bonus for the first transaction within 24 hours of their registration. No minimum amount!! If you top up 50$, you will get 100 points in total to hire our machines.
If you have any questions, please get in touch with me through email [email protected] or our 24/7 support team for a quick response.
Thank you for reading
Sources: Gachoki studios, Blender, CG Boost, Ryan King Art
Related Posts
The latest creative news from iRender Cloud Rendering for Blender