How to use an background or reference image in Blender
A background or reference image is a useful tool when modeling in Blender. Imagine having reference materials right next to your model, you can easily compare them to each other to refine the model, just in one software. This makes the modeling process more efficient and productive, right?
In this article, we will cover two main parts. The first part is the difference between background and reference images in Blender. The second one is how to use this tool effectively. Let’s scroll down!
Background vs Reference images
The similarities
- Rendering availability: Both Background Images and Reference Images are called “empty” objects. This is because they will not be rendered with your scene. In case you want to render your model with a background image, you need to follow some steps. For example, you can try the tutorial in the YouTube video “Two Easy Ways to Add Blender Backgrounds to Your Projects” by Writing and Design.
- Settings: Both have similar settings options like transparency level, position, and view mode.
The differences
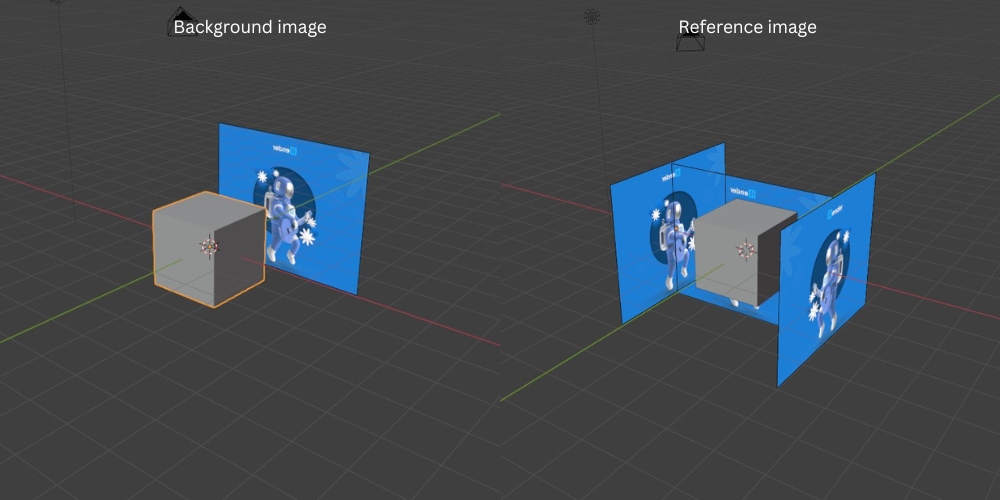
- Position: The background image will always be placed behind the object based on the camera, while the reference image can be added to your current view of the object. If you change the view, you can add another reference image to the object.
- Viewability: Since the background image is transparent, you can see the object even if it is behind the image. Unlike the background image, the reference image is considered an object. If your model is behind the image, it will be hidden.
How to set and adjust background or reference images
Add the image
- Adding a background image
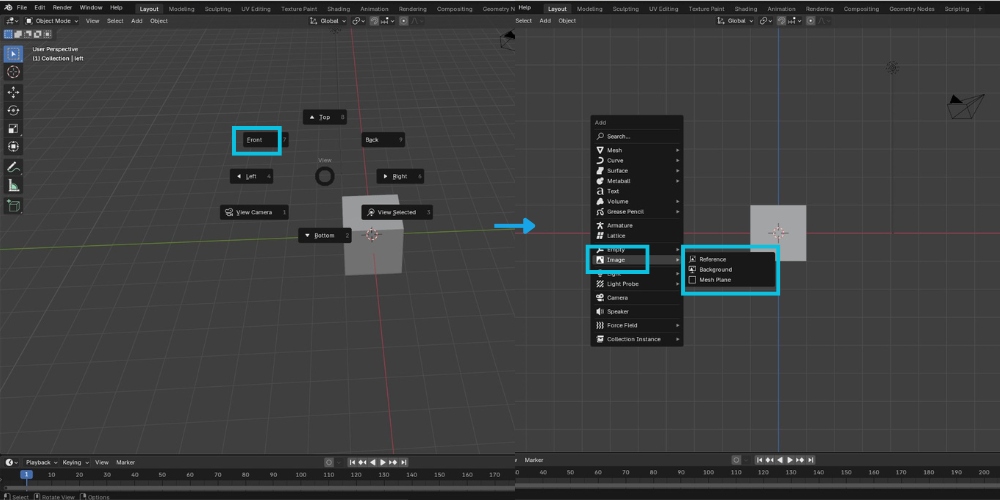
Because it always appears behind the object, you can simply use the shortcut Shift + A and select Image from the pop-up menu.. When hovering over the Image tab, you will see three options: Reference, Background, and Mesh Plane. Next, click Background and search through your folders to find the target image. After importing the image into the scene, you should press F2 to rename it, which will help it stand out among the many other elements in the scene.
- Adding a Reference image
The steps are quite similar to the above guide; however, you should change the viewpoint before adding a Reference image. Since the Reference image is set to your viewpoint, not the camera’s perspective, it is recommended to change the viewpoint to Front or Back using the backtick button on your keyboard before pressing Shift + A. This will add the reference photo, either facing front or facing back. And don’t forget to rename the file. Repeat the steps if you need to add more reference photos at different angles.
Adjust the image properties
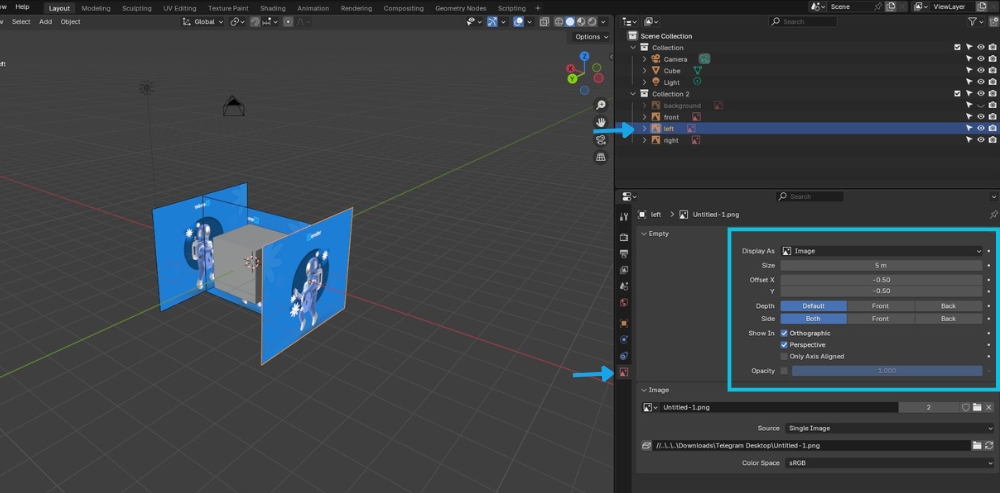
To change the background or reference images settings, select the image in the right-side panel and click the picture icon which is called data-object data properties. There are some choices that you can customize below:
⚙️ Display As:
Select from the drop-down menu to change the object type. Currently the selected object is an image, you can change it to an arrow, circle, or other shapes.
⚙️ Offset X/Y:
This is an alternative to manual positioning. Their values represent the percentage of horizontal and vertical deviation from the original position. Since the position of the image changes as a percentage, it is also affected by the size of the image. Assuming the size is 5 meters, the position changes as follows:
- Default (-0.5, -0.5): The position you choose when adding the image will be considered the original position.
- Offset Y (0): The image is shifted 50%, i.e moved 2.5 meters above the origin.
- Offset Y (1): The image is shifted 100%, i.e. moved 5 meters above the origin.
⚙️ Depth:
It indicates whether the image is displayed in the current position or in front/behind the object.
For example, you set the image to pass through the object. If you select:
- Default, the view will be as you set it.
- Front, the image will be displayed in front of the object even in Front or Behind view.
- Behind, the image will be displayed behind the object even in Front or Behind view.
⚙️ Side:
This option specifies which side the image can be visible: front, back, or both.
⚙️ Show in:
There are 3 options that determine which angle the image will be displayed at.
- Orthographic: The image will only be displayed at the view you initially set. For example, you can only see the Front image in the Front view.
- Perspective: To see the Front image from any angle, you need to select this option as well.
- Axis Alignment Only: If you enable this option along with the above two options, you can only see the image when the view is along the axes. For example, you can only see the Front image in the Front view, along the Y axis. If you change to other angles, you can only see the outlines of the image.
⚙️ Opacity:
Checking this box will allow you to adjust the transparency of the image. Move the slide from 0 to 1 to change from fully transparent to fully opaque.
Small tips
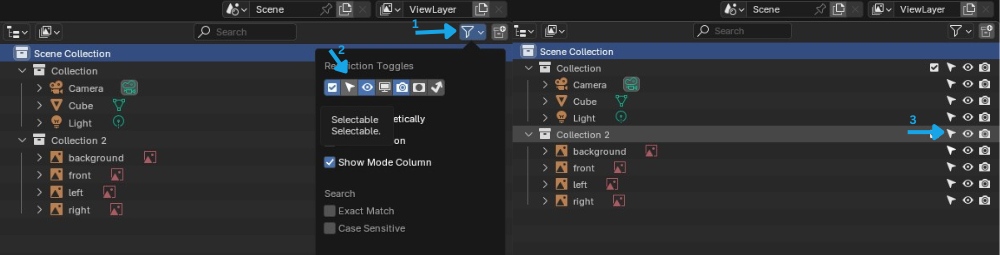
When starting modeling, you might not want to accidentally select the background or reference images instead of your model. If so, you can make them unselectable by following these steps: On the right panel, put the images in the same collection, then click the Filter icon and turn on the Selectable (arrow) icon. Finally, turn off the Selectable (arrow) icon next to the collection.
You can see the image above to easily visualize the steps.
Fast rendering with Blender on iRender’s servers
iRender provides private high-configuration machines with upmarket specifications that excel in rendering, like AMD Ryzen™ Threadripper™ PRO 3955WX @ 3.9 – 4.2GHz or AMD Ryzen™ Threadripper™ PRO 5975WX @ 3.6 – 4.5GHz, 1/2/4/6/8 x RTX4090 or RTX3090, RAM 256GB, Storage NVMe SSD 2TB.
Why can iRender be a great render farm for you?
In addition to high-configuration servers, iRender provides many other utilities to provide the best user experience.
- Dedicated server for individuals: You have full control and access to the server you rent. The working environment (installed apps, files) will be stored for the next use.
- Easy and free file transfer between your computer and iRender’s server: The transferring task can be done via iRender GPU application for Windows and the iRender Drive application for MacOS.
- 24/7 assistance: iRender’s attentive agents are always ready to support all your queries.
- All software compatibility: iRender’s PCs are built to meet the configuration needs of all 3D software and rendering tools at a variety of cost levels for users to choose from.

New users will get a 100% bonus for the first transaction within 24 hours of their registration. No minimum amount!! If you top up 50$, you will get 100 points in total to hire our machines.
If you have any questions, please get in touch with me through email [email protected] or our 24/7 support team for a quick response.
Thank you for reading
Sources: Blender, Graphics and programming, Rogodigital, All3DP
Related Posts
The latest creative news from iRender Cloud Rendering for Blender