Learning GPU Lightmass Global Illumination in Unreal Engine
GPU Lightmass (GPULM) is a light-baking method that precomputes complicated light interactions from lights with Stationary or Static mobility and stores that data in created lightmap textures that are applied to the scene geometry. GPU Lightmass significantly decreases the time required to calculate, build, and generate lighting data for complicated scenes, with speeds equivalent to distributed builds using Swarm with CPU-based Lightmass. Furthermore, GPULM provides new interactive workflows that allow you to change the scene, then recalculate and rebuild lighting on the fly. This workflow is not achievable with the Lightmass CPU-based system. Let’s learn about GPU Lightmass Global Illumination in Unreal Engine with iRender in today’s articles.
1. GPU Lightmass Global Illumination in Unreal Engine
1.1 Enabling GPU Lightmass
Follow these below steps to enable GPU Lightmass in your Unreal Engine projects:
Step 1: From the Edit > Plugins menu, open the Plugins tab > Under the Built-In > Editor category, find and enable GPU Lightmass.
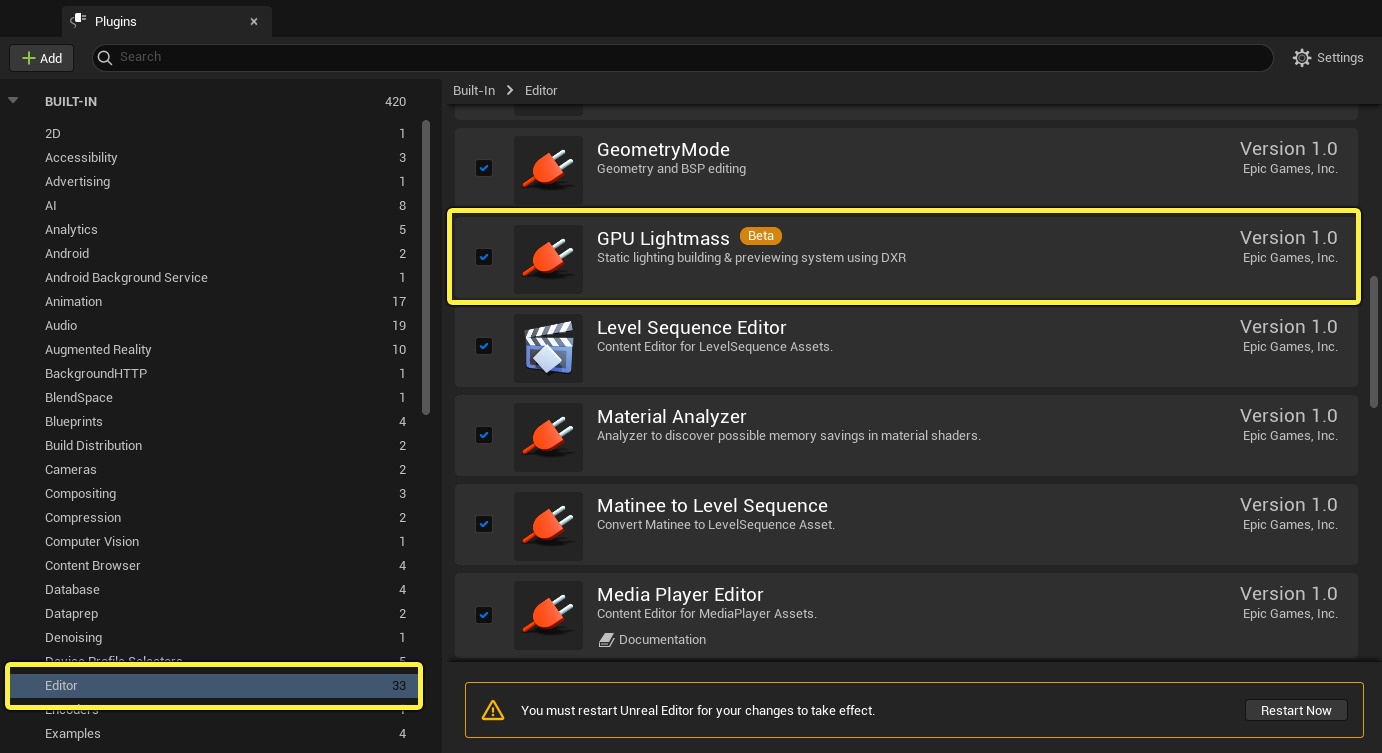
Tip: After you enable GPU Lightmass, a prompt window to restart the Unreal Editor will appear. To save time, you should modify the following Project Settings before restarting the Editor.
Step 2: From the Edit > Project Settings menu, open the Project Settings window.
-
-
-
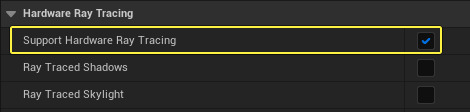
- Under the Engine > Rendering category, enable the following settings:
-
-
- Hardware Ray Tracing > Support Hardware Ray Tracing (Note: Ray Traced Shadows and Ray Traced Skylight are not required for GPU Lightmass to work. If you don’t need them for your project, leave these features disabled.)
-
-
- Under the Engine > Rendering category, enable the following settings:
-
-
-
-
-
-
-
-
- Virtual Textures > Enable Virtual Texture Support
- Virtual Textures > Enable Virtual Texture Lightmaps
-
-
-
-
-
-
-
-
- Under the Platforms > Windows category, set Targeted RHIs > Default RHI: DirectX 12
- Restart the unreal editor for these changes to take effect.
-
-
1.2 Additional Requirements for Setting Up GPU Lightmass Global Illumination in Unreal Engine
Below are additional recommendations for the GPU Lightmass to work best in your projects:
Reducing GPU Timeout Detection and Recovery Crashes
A timeout delay (or TDR) can occur when you have a complex scene that puts the GPU under heavy load. As a result, a crash occurs within Windows 10. This type of crash affects not only Unreal Engine but also anything else on your PC that uses the GPU. Typically, you will see a message like the one below.

It is possible to avoid or reduce the occurrence of these types of crashes by increasing the time it takes for the GPU to timeout, allowing your GPU to potentially recover without closing the Editor. For information on how to change the timeout delay and recovery settings in Windows 10, see the Movie Render Queue page here.
Disabling Real-Time Ray Tracing Features
GPU Lightmass leverages Microsoft’s DXR API for ray tracing, which requires DirectX 12. While GPU Lightmass requires ray tracing to function, it does not require any additional ray-tracing features such as ray-traced shadows, ambient occlusion, or reflections.
It is best to disable all of these features unless you explicitly want to use those ray-tracing features together with baked lighting. If you need baked lighting with ray-traced features, you can create a scene with both static and dynamic lights. To disable ray tracing effects, use the console command below.
r.RayTracing.ForceAllRayTracingEffects 0
Alternatively, you can adjust your project configuration file to disable all ray-tracing features when the project loads. In your project’s Config folder, add the following lines to the project’s DefaultEngine.ini configuration file, under the [/Script/Engine.RendererSettings] section:
[/Script/Engine.RendererSettings]
r.RayTracing.ForceAllRayTracingEffects=0
Configuring GPU Memory
GPU Lightmass requires a sufficient amount of GPU memory to account for its overhead. Keeping this in mind, the following factors influence the success of using GPULM to bake complex scenes.
-
-
-
- There must be sufficient GPU memory available to save the entire scene in memory at the lowest level of detail (LOD) mesh, i.e. the highest quality LOD mesh.
- During light builds, the Virtual Texture system can consume a lot of memory. This heavily depends on the complexity and size of your scene.
- A sufficient amount of CPU memory must be available to store all generated lightmaps in RAM. Lightmaps can be swapped out to the CPU’s RAM by the GPU, but they are not saved to disk until the entire light bake is completed.
- DX12 consumes more GPU memory than DX11. If you have a DX11 scene that was pushing the limits of your GPU memory, it may be difficult to use in DX12 without some sacrifices due to additional overhead from ray tracing and virtual texture requirements.
- For optional settings such as Irradiance Cache, GPULM has its own memory usage requirements.
-
-
For large scenes, the CPU-based Lightmass system requires a significant amount of memory, which could be problematic for light baking. These types of issues are frequently mitigated by using a distributed build with Swarm. When running out of memory in GPULM, the only solution is to optimize the scene by reducing geometric or texture detail or to upgrade to a GPU with more memory.
Configuring GPU Memory
Enabling the Virtual Texture system with Virtual Texture Lightmaps enables lightmaps to be created and saved as virtual textures. This has the additional benefit of allowing light builds to update in real-time in the level viewport. It also allows for editing while the scene is being built, rather than having to cancel or wait for the build to finish.
GPULM doesn’t at all require the Virtual Texturing system to be enabled in order to build lighting but requires it for interactive and real-time editing functionality. If you do not plan to use virtual texturing in your project or do not need an interactive preview, you can disable these features to save time in the editor.
Enabling Multiple GPUs for Building Lighting
When you use an NVIDIA SLI-based GPU that also supports ray tracing, you can use multiple GPUs to compute lighting for your project. The following steps enable multi-GPU support.
-
-
-
- Your GPUs must be linked using NVLink bridges, and SLI must be enabled in the NVIDIA Control Panel.
- From your [Engine Install Path]/Engine/Config folder, in the Unreal Engine DefaultEngine.ini file, under the [/Script/Engine.RendererSettings] section, enable multiple GPUs by adding r.AllowMultiGPUInEditor=1.
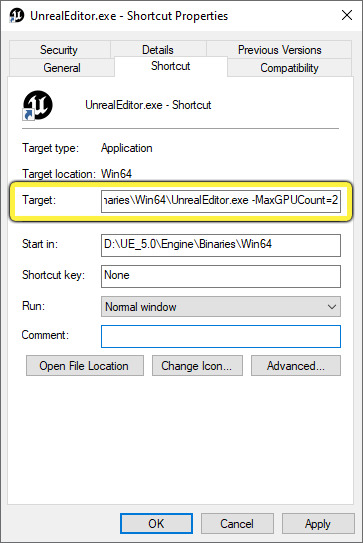
- Use the command line -MaxGPUCount=[n] (where n defines the number of GPUs available via SLI when launching the editor). For instance, -MaxGPUCount=2 would use two GPUs when in multi-GPU mode to compute lighting.
Optionally, you can create a shortcut for UnrealEditor.exe and in the Properties settings, set the add -MaxGPUCount=[n] to the Target line.
-
-
Once the editor has started, you can confirm that you are in Multi-GPU mode by opening the Output Log and searching for the message: LogD3D12RHI: Enabling multi-GPU with 2 nodes
When using multiple GPUs, performance can reduce build completion times on average. When volumetric lightmaps are not heavily used, build times in medium-sized test scenes using two RTX-2080TIs were found to be about 1.7x faster on average. Improved build completion times are determined by a variety of factors, including scene size and complexity, engine multi-GPU support, and the number of GPUs used.
Limitations of multi-GPU support
GPU Lightmass multi-GPU support is ideal for single-area architectural and virtual production environments. Depending on the complexity of the level and the amount of VRAM available on the GPU, large game levels may encounter memory and virtual texture limitations. If the design and setup of architectural and virtual production environments are complex, they may reach the same limitations as game-size levels. Limitations of multi-GPU are as follows:
-
-
-
- The calculation of Volumetric Lightmaps is not yet supported. Scenes with a high volumetric lightmap computation will see a less overall performance improvement.
- Each GPU generates its own irradiance cache. Depending on the content, there may be minor shading differences between baked tiles. This can be resolved by increasing the Irradiance Cache Quality or by completely disabling Use Irradiance Caching.
- Texture encoding and denoising are CPU-based operations that are unaffected by multi-GPU.
-
-
2. iRender - The best render farm for Unreal Engine
iRender is proud to be a professional GPU Accelerated Cloud Rendering Service provider for 3D Render, CGI, and VFX tasks with more than 30,000 clients. We are appreciated in many global rankings (e.g. CGDirector, Lumion Official, Radarrender, InspirationTuts CAD, All3DP, BlenderBaseCamp, VFX Rendering.)
Our service for Unreal Engine
We provide remote machine rental services, specifically, high-configuration dedicated servers (RTX 3090 and RTX 4090 physical machines/computers) for you to completely control via the Remote Desktop application. You will set up your creative working environment as you wish on our servers to optimize and render projects whenever/wherever you want.
Currently, we have single RTX 3090 and dual RTX 3090 (with NVLink support) packages that are the two most suitable servers for Unreal Engine rendering. Their detailed configuration is as the following pictures.

Both packages have a strong AMD Ryzen Threadripper PRO 3955WX CPU. Also, they are ideal with 256GB RAM capacity and 2T NVMe SSD storage, which meets all your small to very big projects. If you have very huge projects that you want to render in Unreal Engine 5.1 to use its new multiple GPU support, consider using our 2x RTX 3090 server (with NVLink supported). For faster rendering, you can even use several servers simultaneously. It will be an absolutely cool experience to control a crew of servers running together to complete the render through one computer’s screen.
Let’s get started!
Stop researching! We are the right place for your Unreal Engine renders. Create an account and we are ready to prove that! For further information, please do not hesitate to reach us at [email protected] or Whatsapp: +84915875500.
iRender – Happy Rendering!
Reference source: unrealengine.com
Related Posts
The latest creative news from Unreal Engine Cloud rendering.