
Lighting in Octane for Cinema 4D: HDRI (part 1)
OctaneRender is a physical-based render engine developed by OTOY. It’s available as a standalone product and as a plug-in for DCC (Digital Content Creation) host apps like Maya, 3D Studio MAX, and Cinema 4D. Now it is being used widely in feature films, commercials, and even architectural rendering, etc. As we all know, lighting in 3D is a tricky, yet incredibly important thing. The purpose of this article is to go over all the various types of lights from a high level, explain when and how to use them, and a bit about how to optimize them. The focus of this writeup is HDRI lighting. Let’s get started!
What is HDRI lighting?
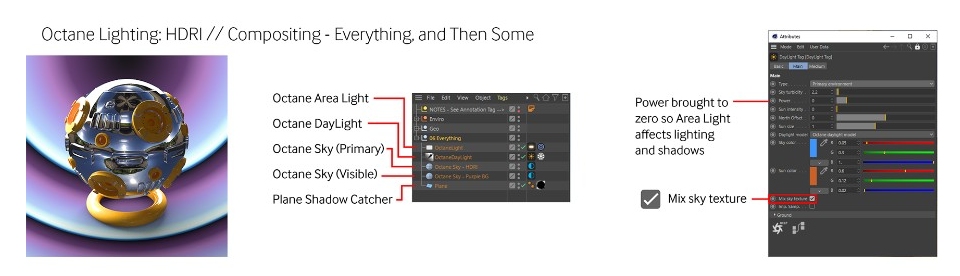
First, HDRI lighting (Image-based lighting) is a quick, easy way to introduce natural-looking lighting and reflections in your scene. The concept here is that we take a Sky object, wrap a big image around the inside of it. Then we use it to emit light, create reflections in the metallic and specular materials in the scene, and also serve as an overall background if needed. The HDRI sky can be used alone, or mixed in with other light sources.

HDRI stands for High Dynamic Range Image. The most common file format for one of these is an .HDR file. Files in this format contain light exposure data that flat files like PNG and JPEG do not have. You can put a PNG or JPEG or anything else in an Octane Sky, but it won’t work well for lighting the objects in a scene (see above). The JPG version is useful for compositing, though, which we’ll get to later. HDRIs are almost always in a 2:1 aspect ratio, and are bizarrely distorted when viewed flat. When they wrap around the sky sphere, the distortion goes away and they look fine.

Often you’ll be presented with the option of getting different resolutions for the HDRI. Lower resolution files will load faster and take less time to render. Higher resolution ones will render sharper, but that’s really only apparent in the background, and not so much in reflections. If you are only using it for lighting and reflections and plan to replace or obscure the background, a lower resolution version will help with render speed and will be nicer on the GPU’s VRAM.
HDRI Workflow
First, we need an HDRI. There are free cc0 ones on hdrihaven.com, paid ones are available from various sources on the web. Make sure you get an .HDR file. Start with a 2K version. If it’s too blurry, go up to a 4K. 16K isn’t often needed unless the final output is large and the image is being used as a background. Now we need an Octane Sky with an Environment tag to put the HDRI in.
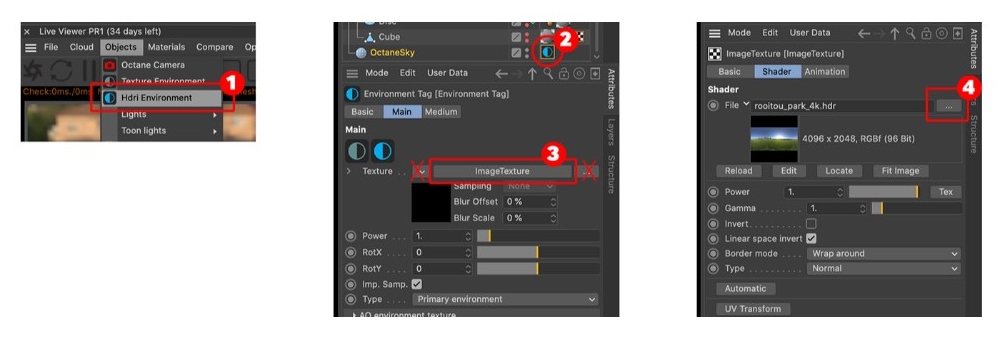
Then under the Objects menu in the Live Viewer, select an HDRI Environment. This will make an Octane Sky object with an Octane Environment tag. Next, click the tag, and it should show up with a Texture field that’s populated with an ImageTexture node. This is the important part – the HDRI goes INSIDE the Image Texture Node. To do this, click the button that says ImageTexture – NOT the dropdown button to the left of it, and NOT the three dots to the right of it (those two things will replace the ImageTexture node which we don’t want). Once in the ImageTexture node settings, now we can hit the three dots to the right of the field that says File and find the downloaded HDRI.
That is to say, recent versions of Octane have a Node Editor button at the bottom of the options in the Environment Tag that launches the Node Editor. This allows us to do some advanced processing on the image, or replace it with whatever we want. For now, if we click this, we can see the basic structure. On the right is the Environment tag, and on the left is the ImageTexture node that’s piped into it. The HDRI is loaded into the ImageTexture node rather than replacing it. Go ahead and close the node editor for now.
Environment Tag Options
Here are some options you can adjust in the Environment tag itself.
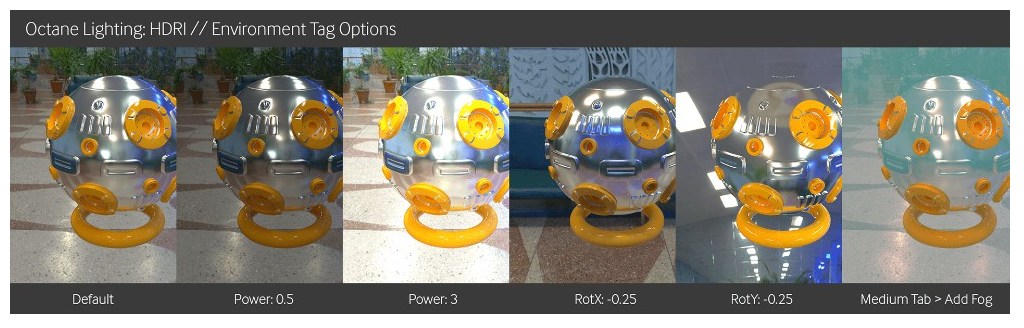
- Power is what is used to change the intensity of any light – this is useful if the HDRI is too dark or bright, or if it’s being used in combination with other light sources.
- Rot.X and Rot.Y: These rotate the HDRI. RotX shifts the image horizontally and RotY shifts it vertically. You can also just rotate the sky object. These values go from -1 to 0 to 1, so a clockwise 90 degree turn would be 0.25, a counterclockwise 180 degree turn would be -0.5, etc. Best to just grab the slider and move it until you like the lighting and placement of the image.
- Medium Tab: Another cool thing you can do here is add volumetric fog to the whole scene. Go to the Medium tab of the Environment tag. Just hit the Add Fog button and it will set you up with a Scattering Medium node. You can then adjust settings like density and other things that are out of the scope of this document to get a general fog going in the scene.
- AO Environment Texture: Changes the color of the Ambient Occlusion only if Direct Lighting with Ambient Occlusion is being used. It does nothing in Pathtracing or PMC modes.
- Imp. Samp.: Helps reduce noise generated by HDRI lighting – leave it on.
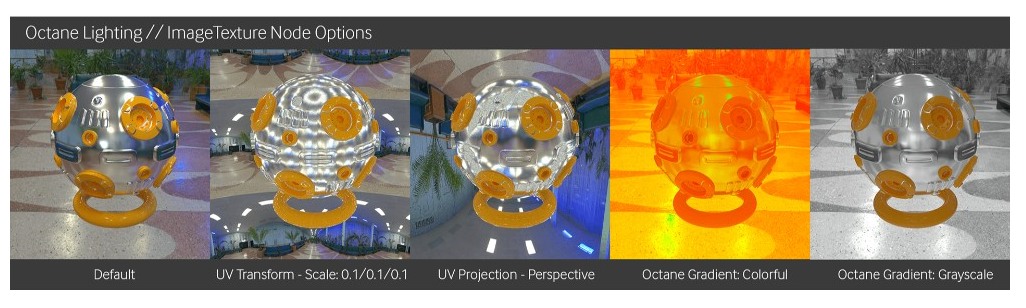
Image Texture Options
Next, the ImageTexture Node has its own options that complement the ones in the Environment Tag. Here are the relevant ones for HDRI lighting:
- Power: This node has its own field for Power which adds to the Power of the Environment tag. It’s a good idea to just choose one place to edit the power and stick with it.
- Gamma: Leave it at 1 for a properly made .HDR file. If a JPG or something else is being used, it will have to go to 2.2 to get it bright enough. Gamma has to do with Linear Workflow, which is a pretty complex topic for another writeup.
This ImageTexture node is the same one used when making materials, so it has the same options. A UV Transform node can be added which controls some of the properties of the HDRI. In the default setup, only X and Y Scale values (S.X, S.Y) and the Z rotation value (R.Z) do anything. This isn’t super useful for a realistic scene, but in an abstract one, these can produce some really weird and cool results. There’s also the option to add a UV Projection node – if it is changed to Cubic or Perspective, it will distort the image in fun ways.
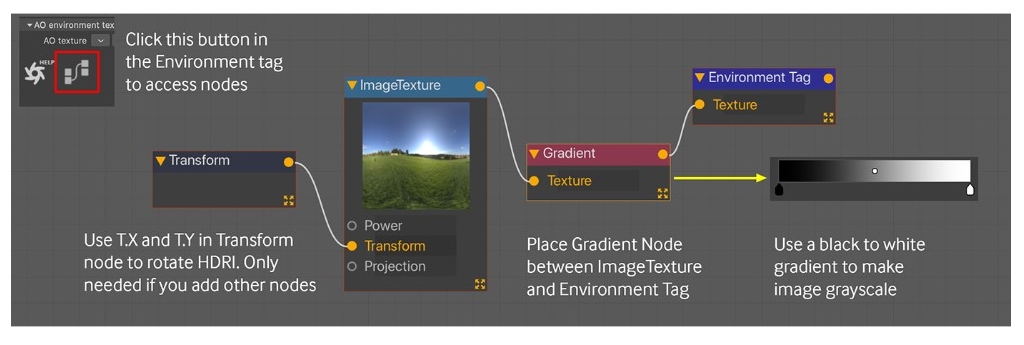
Since this uses the same node network as the one materials use, we have access to the rest of the Octane nodes to modify the image further. Users need to launch The Node Editor from the Environment tag options to start playing with this. The image can be color corrected, distorted, inverted, or modified in other ways with various nodes. The Octane Gradient in particular is very useful here. We can use it to recolor the image, or desaturated by using a black to white gradient.
Important caveat:
Most importantly, As soon as you add any new nodes to this network, the RotX and RotY control in the Environment tag won’t work anymore. The rotation values for the Sky object itself in the Coords tab will also no longer work. In order to rotate the HDRI now, you need to hook up a UV Transform node to the ImageTexture node, and then the T.X and T.Y controls are now used to rotate the HDRI (NOT the R.X and R.Y)
Conclusion
So that’s the end of part one on the HDRI lighting topic today. Hope that with those basic information, you could have a general overview and a better understanding of HDRI light in Octane for Cinema 4D. And don’t forget to stay tuned for our part two, which will cover HDRI used in background images. In addition, iRender also provides high-configuration machine rental service to help you save time and costs in the rendering process.
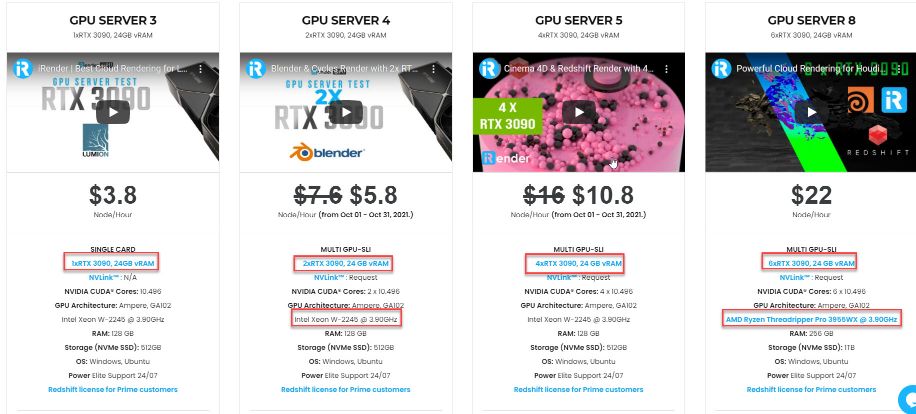
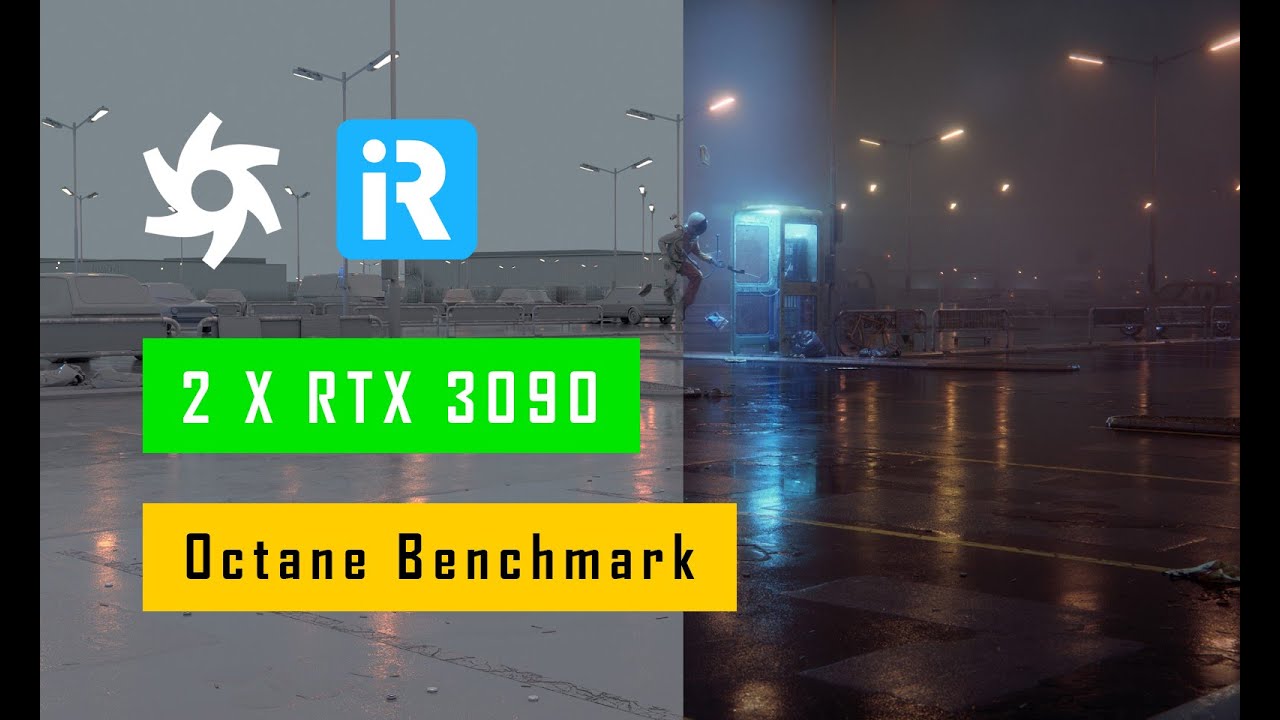
In short, iRender is always up to date with the latest card models from NVIDIA such as RTX 3080, RTX 3090 with VRAM from 10GB to 24GB totally satisfying for software that utilizes the power from multi-cards. With these above powerful servers (1/2/4/6 x RTX 3090) and NVLink combined, iRender brings Octane users unprecedented rendering power, performance, and capability wherever you are. We are proud to shout out that we are one of the most suitable render farms for Cinema 4D Octane. Let’s see a rendering test with Octane project at iRender:


So, do not hesitate anymore. Let’s become a member of the iRender community today to get FREE COUPON to stop wasting pointless hours of rendering. Always at the forefront of cutting-edge graphics technology, we do the rendering, the creativity is yours!
iRender – Happy Rendering!
Reference source: otoy.com
Related Posts
The latest creative news from Octane Cloud Rendering, Cinema 4D Cloud Rendering , Houdini Cloud Rendering , 3D VFX Plugins & Cloud Rendering.


