Make Comic Book Quality Cartoon Drawings with Daz Studio
Daz Studio is a powerful 3D rendering software that is super easy to use. Anybody, regardless of their skill level and experience as a 3D artist, can create stunning 3D images with the help of Daz and their awesome marketplace. But did you know that you can create professional-quality 2D cartoon drawings with Daz Studio, a 3D software?
That’s no joke! There is a little-known feature built in to Daz Studio that every cartoonist and 2D artist should know about. If you have used Daz Studio as a reference for 2D drawing before, you are going to be blown away when you learn this one simple trick that has been hiding inside Daz Studio for years. It’s simple but powerful and could completely change your pipeline for creating cartoons and comics. It really has the potential to save artists a ton of time!
In blog today, let’s iRender explore how to make comic book quality cartoon drawings with Daz Studio – a powerful 3D rendering software.
Why Would An Artist Use 3D Software To Make 2D Cartoons?
It may seem strange at first glance, but when you think about it, whether art is in 2D or 3D, keeping the proper angles, perspectives, and proportions is crucial. If you are doing illustrations for comic books, cartoons, manga, or graphic novels, you are probably drawing the same objects and characters from different perspectives constantly. Depending on how detailed your art style is, this could become extremely time-consuming.
On the other hand, if you are a beginner or an amateur artist like myself, you may be looking for ways to improve your craft or speed up your pipeline. Regardless of your skill level, you should do anything you can to enable yourself to tell the stories you want to tell.
3D actually can help with that. Using a 3D model as a reference is no different than doing a human study in an art class or purchasing a wooden posing doll to help you draw the human figure. The amazing thing about Daz Studio is that you can quickly create, design, and pose a character in minutes. With countless presets, customizations, and morphs available, it’s easy to create something unique. There are hundreds of amazing poses already designed by skilled 3D artists, and all you have to do is click on them for Daz Studio to immediately apply these poses to your characters.
With Daz Studio, you can create the entire set for a scene in 3D. Objects, buildings, trees, you name it. Create your world, place and pose your characters, and then move the camera to any place you want it. When you hit render, your computer will generate an image with flawless perspective, every time.
Drawing From A 3D Reference
When first started using Daz Studio for my 2D art projects, you can just follow this: setting up a scene, positioning the camera at the perspective you wanted, and then using that image as a reference. In some instances, you can even drag the image into Procreate or Photoshop and trace directly over the image.
If you are a pro artist, you probably find that this is enough. Having references for complex figures and poses can be extremely helpful. For some people, while it helped, it might not do anything to save time or speed up the pipeline. As a hobbyist, this isn’t a huge deal. On the other hand, for artists who are working in a professional setting, time is money. That’s why making 2D cartoon drawings with Daz Studio may be a good solution!
Using A Toon Shader
This is a popular option for making stylized graphics in video games, television, and movies. Generally, most toon shaders have a lot of flexibility and can create a lot of cool and artistic looks. Think video games like Breath of the Wild, Okami, or even Fortnight. If you want to make cartoon-style 2D art in Daz Studio, you can use a toon shader to your advantage. There are quite a few toon shaders available on the Daz marketplace, such as Line renderer 9000 and Sketchy – Toon Edge and Art Style Shaders for Iray, so if toon shading is a route you want to take, this may be a good place to start.
You can also accomplish some basic cartoon effects right out of the box with the 3Delight render engine. To do this, you will have to enable it in your render settings. Navigate to Render Settings, and then in the upper corner, click the arrow and lines button. Click preferences and turn on show hidden properties. With that enabled, you can click on general and see Render Style as an available option now. Change it to cartoon. When you are ready, hit render!

Definitely experiment with the options and how lighting affects your results. Again, consider using one of the paid shaders if this doesn’t satisfy your desires! Without changing any default lighting at all, you would be able to get some fun results in your own scene.
You might enjoy playing with cartoon shading, but you would still prefer a way to speed up your 2D drawing pipeline using 3D with the ability to colorize with your own style and art program of choice. Unless you spend a lot of time mastering the cartoon shader and find a style that you like, this is probably going to take a ton of experimentation and playing with different lighting setups. You may instead be interested in line rendering and outlining. This little-known feature can be a huge game-changer for 2D artists who also like Daz Studio!
Line Rendering In Daz Studio
Daz Studio uses two different render engines to generate images: Iray and 3Delight. These engines handle materials, surfaces, lighting, and more to create realistic images. Mastering these engines for optimum results is difficult and takes dedication. That said, if your goal is simply creating 2D cartoon drawings with Daz Studio, you don’t really have to worry about any of that. It is possible to generate detailed lined outlines of anything in that 3D software!
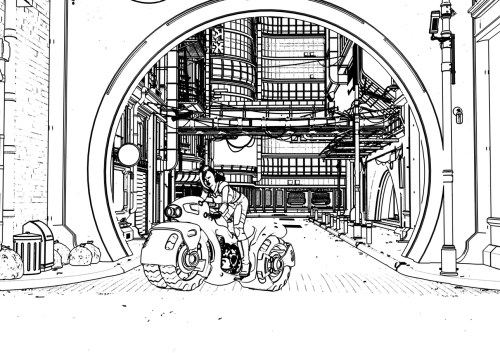
This is an awesome and powerful secret hidden within Daz Studio. By generating these outlines, you save yourself having to trace over an image yourself or redraw the same items over and over again. With the outlines created, in perfect perspective and size, you can get right into the fun stuff, such as coloring and finalizing your cartoon drawing. This could seriously save artists a ton of time, and any level of artist could use it to accelerate their pipeline.
How It’s Done
Step One
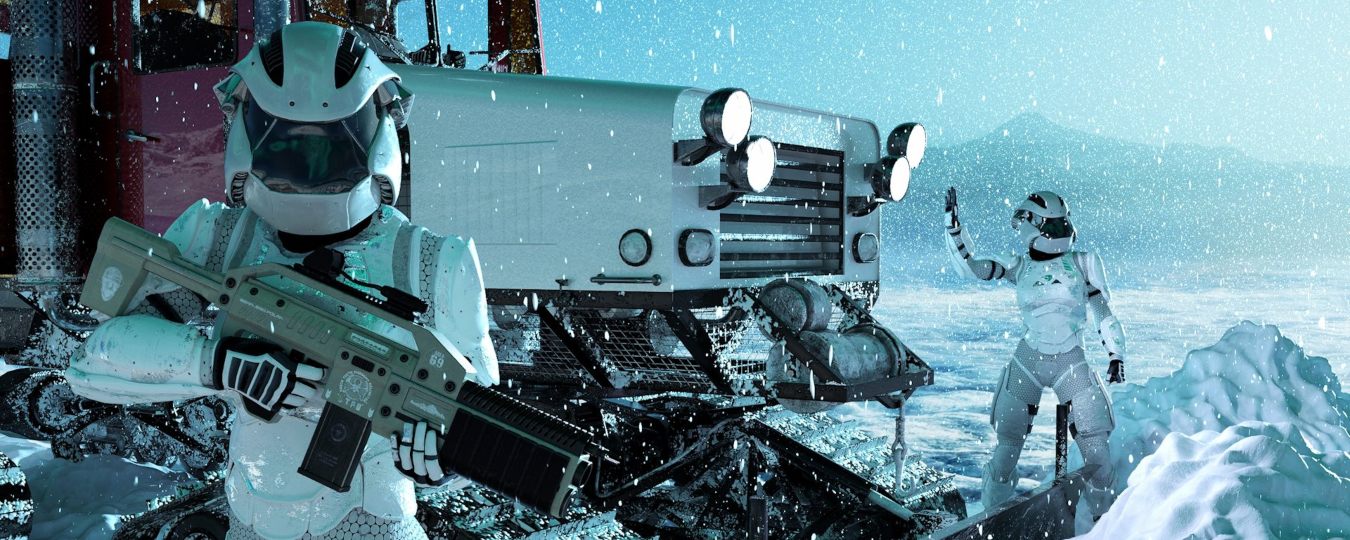
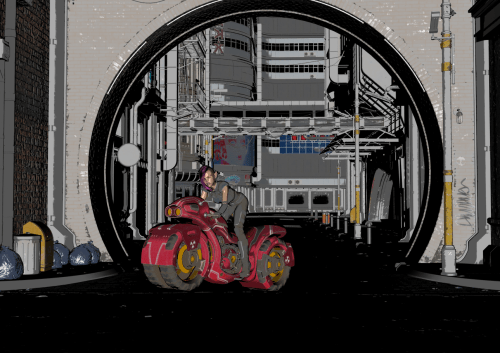
Set up a character or scene in Daz Studio. If you are new to the program and need help doing this, check out our collection of tutorial videos. Again, don’t worry about placing cameras or lights, customizing surfaces, or anything like that. They will use the default lighting and camera. This scene below used some sci-fi elements that can find in the library, posing the scene as if this were a shot in a graphic novel — perhaps a high-speed chase!
Step Two
Once you have set up the scene you want to draw in 2D, maneuver the camera so that you are viewing the scene from the perspective you want to use in your drawing.
Step Three
If you are only drawing a single figure or object, skip this step. If you are drawing a complex scene that has multiple “layers” that would overlap — for example, a city scene with a car driving down the road and a person walking on the sidewalk beside it — you are going to need to render the image in groups. Don’t stress; it will be easy!
If you want to do groups — and in many cases, you may want to do this from an artistic perspective for layering down the road — identify the parts of the image that overlap. You are going to have to hide everything from view by clicking on the eye within the scene tab. Start with having only the background visible. With everything else hidden, proceed to Step Four!
Step Four
Once you are ready to “render” or capture the scene you want to make in a 2D cartoon style drawing, click on the render setting button. Make sure you apply the following settings: In Render Preferences, select Scripted 3Delight. By Render Script, select Outline. Finally, in Render Files, click Browse, and then create a new folder anywhere you would like in your computer’s directory. Be sure to put it somewhere that is easy to find, and label the folder accordingly.
NOTE: If you are rendering a complex drawing as described in Step Three, be sure to label the folder with some indication as to which group it belongs to. You are going to have to repeat Step Four and Five for each group and save each group into its own unique folder. A good naming convention will help you keep track of what is what when you are ready to reassemble the image in Photoshop, Procreate, or whichever drawing program you prefer.
Step Five
When you finish with Step Four and have set up a destination folder for the render, all you have to do is click on the render button. Now sit back, and let your computer do the heavy lifting. Depending on your computer’s performance, this could take a minute or so, but it shouldn’t take long.
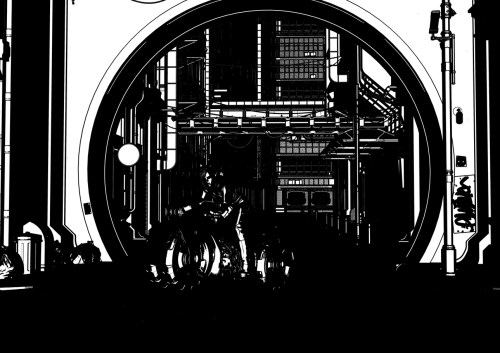
NOTE: Don’t panic! When your computer is done rendering, your image is going to look solid black like this. Don’t worry. It will work! You can name it, and go ahead and save it as the default PNG. Once you save it, head over to the folder you designated. Inside you will see a series of files. The black image, an actual 2D rendering of the surfaces, a rendering of the shadow areas, and most importantly of all, an outline!
If you were doing a complex scene, go ahead and head back to Daz Studio. Now you can hide the layer you already rendered, and reveal the next one. Render it out the same way you did before, just make sure you create a new folder so the automatically rendered images don’t conflict with each other because Daz gives them the same name.
You can repeat this process as many times as you need. With all of these “layers,” you can rebuild your scene as you work in your own favorite art program!
For little change, you can take this same scene and reposition the camera for a second more dramatic action shot, change the angle of the motorcycle slightly upward, just to give it that extra feel of the action. In all, it took just a few seconds to adjust and re-render up close. Therefore If you wanted to make an entire comic sequence of this scene, you could have your outlines done in very little time at all!

While the lines don’t always come out perfectly, and sometimes, depending on the lighting, some lines and details may be overlooked, I still love this method. There are several render settings you can work with as well in the Renderer Options tab. If you want to play around with the line thickness, you can easily do this by adjusting the Normal Line Width. Besides that, there are dozens of other settings that I will most certainly be looking into and reading up on.
Cartoon Drawings With Daz Studio Is Free And Easy
This is a powerful technique that is fast and easy. It has the potential to seriously speed up your pipeline and improve the realism, proportions, and perspective in your work. This technique will enable learning artists and professionals alike to work smarter, faster, and better. You are able to draw perspectives, angles, and action shots in ways that are beyond your current skill level, elevating the quality of your work as an end result.
The professional cloud rendering service for Daz 3D
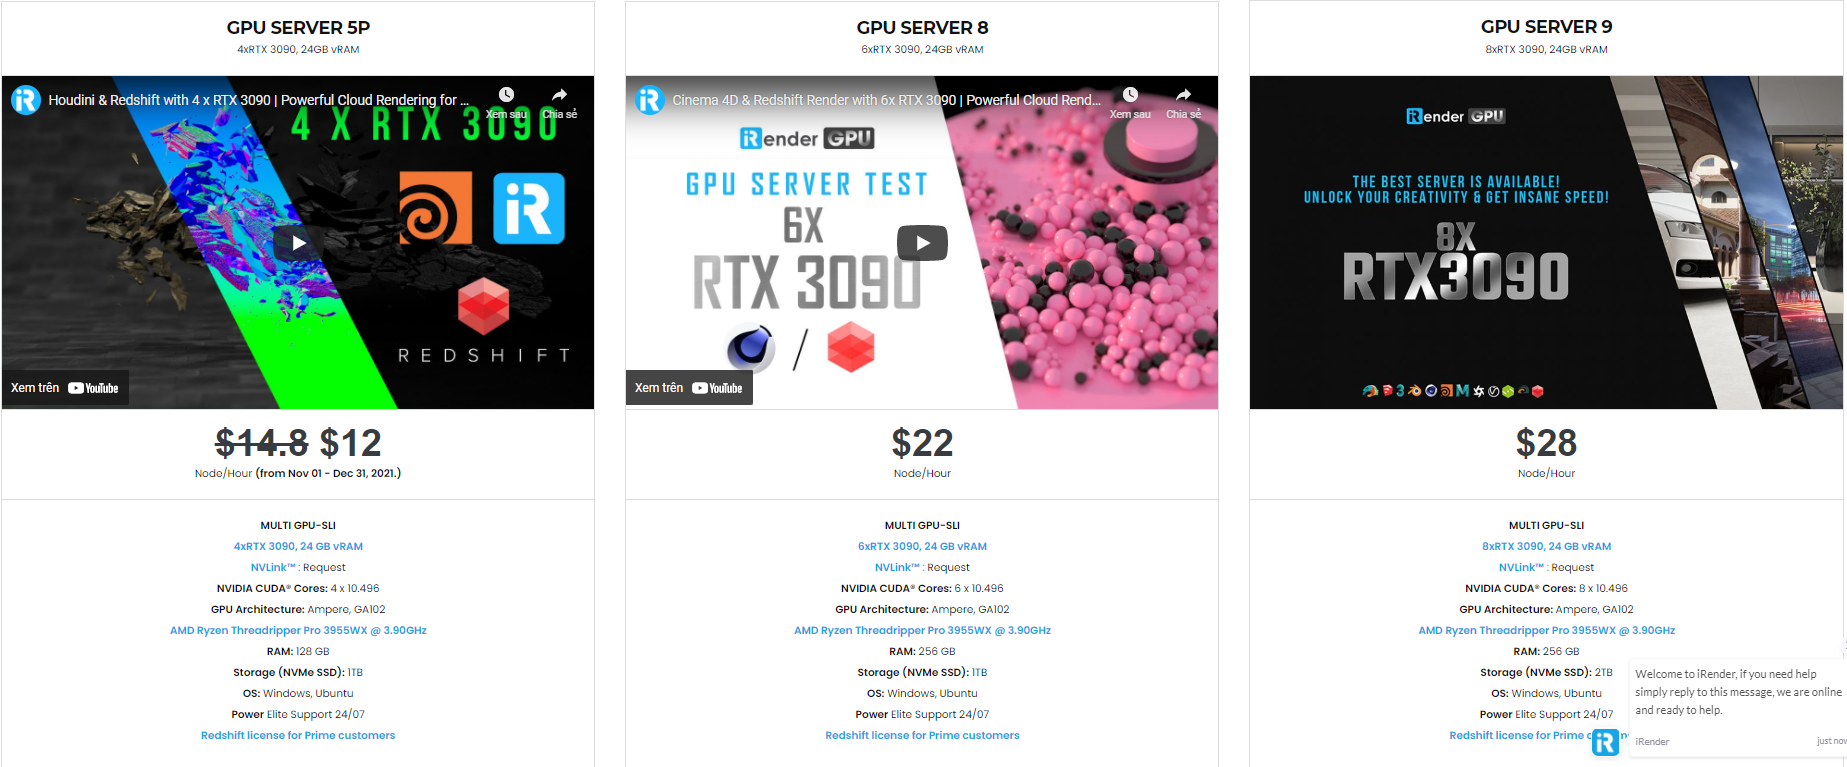
iRender is a GPU-Acceleration Cloud Rendering Service for Multi-GPU Rendering with Powerful Render Nodes: 2/4/6/8x RTX 3090/3080/2080Ti. iRender provides High-performance machines for GPU-based & CPU-based rendering on the Cloud. For Daz 3D users can leverage the power of single GPU, multi GPUs to speed up your render time. Users can easily choose their machine configuration from recommended system requirements to high-end options.

Why iRender?
Reasonable price (lots of bonus)
You will be charged on a per-minute basis. However, you can always save up to 30% with our Fixed Rental feature. For those who are in need of the server for more than a day, or have extremely large projects, we advise choosing daily/weekly/monthly or even yearly rental packages. The discount is attractive (10% for daily packages, 20% for weekly and monthly packages)
Real human 24/7 support
Our support is always online 24/7, helping you to handle the problem quickly, effectively, saving you both time and money.
Conclusion
If you have any questions, please do not hesitate to reach us via Whatsapp: +(84) 972755742. Register an ACCOUNT today and get FREE COUPON to experience our service. Or contact us via WhatsApp: +(84) 972755742 for advice and support.
iRender – Happy rendering
Source & pictures: Daz3D blog
Related Posts
The latest creative news from Daz3d Cloud Rendering, Redshift Cloud Rendering, Nvidia Iray Cloud Rendering , Octane Cloud Rendering, 3D VFX Plugins & Cloud Rendering.