Movie Render Queue’s render settings in Unreal Engine
Movie Render Queue’s render settings are used to control how your sequences are rendered. They include anti-aliasing, custom console commands, output format, rendering mode, and other features. This guide will cover the settings interface, the list of available settings, and the ability to save your settings as presets. Let’s learn more about them with iRender!
1. Learning Movie Render Queue’s render settings
Prerequisites:
-
-
-
- Enable the Movie Render Queue plugin in Unreal Engine first. In the Unreal Engine menu, go to Edit > Plugins, in the Rendering section, locate and enable Movie Render Queue > restart the editor afterward.
- Having created a project with a Level Sequence to render.
-
-
1.1 Opening Render Settings
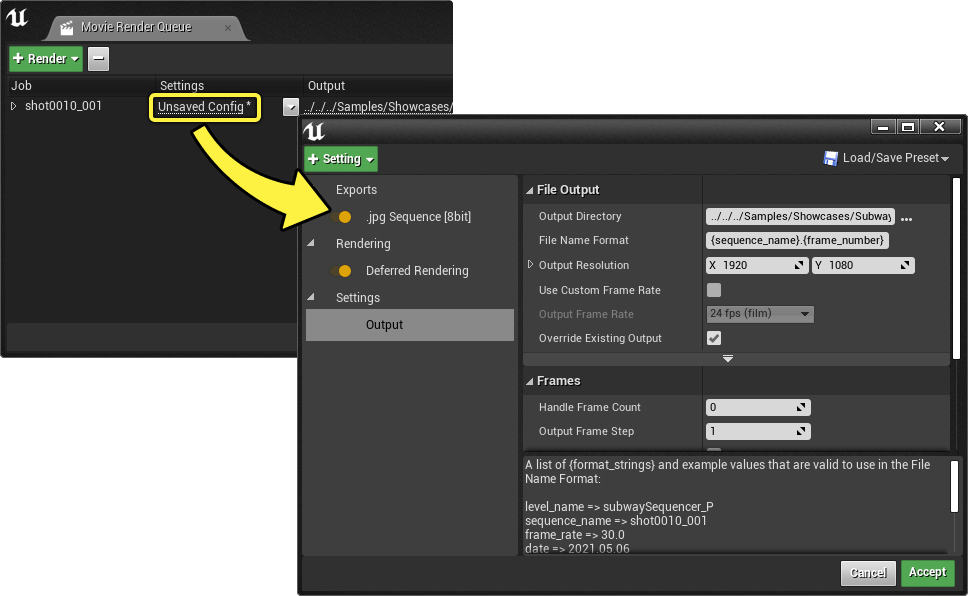
You can open the Render Settings window by clicking the Settings entry for your job.
1.2 Interface Overview
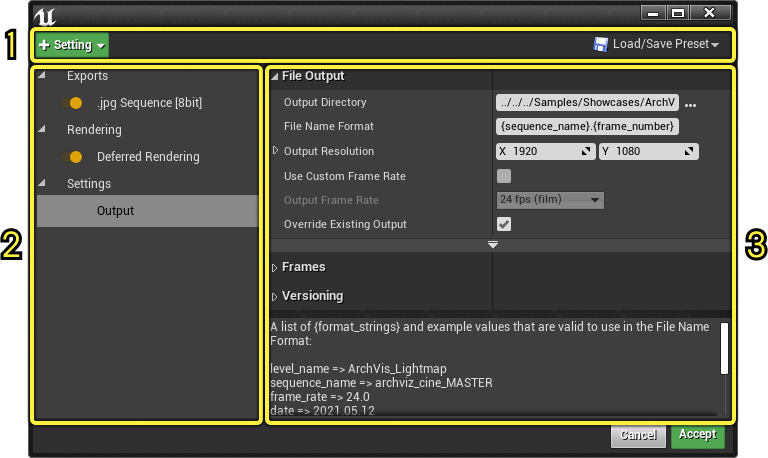
The Render Settings window is divided into three main sections:
-
-
-
- The toolbar: includes a menu for adding new settings as well as loading or saving the current setting list to a preset.
- Settings List: shows the current job settings and contains toggles to enable or disable them. Each setting is classified into Exports, Rendering, or Settings.
- Settings Details: Displays the properties of the setting from the Settings List that was selected.
-
-
1.3 Settings List
When you click the + Setting button, a list of different settings that you can add to your job will appear. They are organized into three groups: Settings, Exports, and Rendering as the below picture. Explore each of these groups in the following sections.
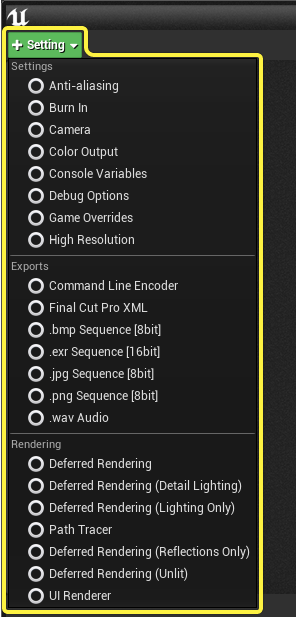
Settings
The Settings group includes options for rendering quality, console variables, and other render features.
-
-
-
- Output: The Output setting sets the directory, file name, frame rate, and output resolution of your output file. Token format strings can be used to personalize your file name and directory path. Output is a compulsory setting that cannot be removed from the settings window.
- Anti-Aliasing: Anti-aliasing manages the number of samples needed to generate the final render. The render is produced by two types of sampling: Spatial and Temporal.
- Burn In: Burn In allows you to apply custom watermarks to your render that include information about the render and shot. You have the choice of either adding the Burn In to the final image or rendering it to a separate layer.
- Camera: The Camera setting controls shutter timing and allows you to specify an overscan percentage to add extra pixels around the edges of your image.
- Color Output: With a custom OpenColorIO (OCIO) configuration, the Color Output setting overrides Unreal’s default color space settings. Even if you are not utilizing an OCIO-based workflow, you can utilize it to disable the Tone Curve portion of post-processing.
- Console Variables: Console Variables allow you to specify which console commands to run when the render begins. This is handy when trying to set quality settings in the Editor that are too computationally expensive for real-time preview. When the render is finished, the variables will be reset.
- Debug Options: These options allow you to debug certain render behavior. In most cases, you do not need to use these options if you are not troubleshooting issues with your renders.
- Game Overrides: Game Overrides modify a variety of common game-related settings, including Game Mode and Cinematic Quality. This comes in handy if the game’s typical mode displays UI elements or loading screens that you don’t want to capture.
- High Resolution: The High-Resolution options allow you to utilize tiled renders to create larger images without being limited by maximum texture sizes or GPU memory constraints.
-
-
Exports
The Exports category controls which image, audio, and video formats will be used to output your sequence.
-
-
-
- Command Line Encoder: You can use the Command Line Encoder to produce your own output format from third-party software like FFmpeg. This setting needs the use of an encoder executable and the activation of parameters in your Project Settings.
- Final Cut Pro XML: The Final Cut Pro XML format generates an XML file that Final Cut Pro and other video editing software supporting this format can read. This is not supported in shipping builds.
- .bmp Sequence [8bit]: This option outputs the movie as a sequence of .bmp images. Pixel values are restricted to the [0-1] range, which means that no HDR values are kept. This uses the sRGB encoding curve.
- EXR Sequence: This option saves the movie as a sequence of .exr images. If the Tone Curve is activated, linear values are scaled to nearly the [0-1] range, with only the highest highlights going above one. Disabling the Tone Curve writes linear values in the [0-100] range or more depending on the intensity of lights and other bright things. On .exr targets, no sRGB encoding curve is applied.
- .jpg Sequence [8bit]: This option outputs the video as a sequence of .jpg images. Uses the sRGB encoding curve.
- .png Sequence [8bit]: Saves the video as a sequence of .png images. Uses the sRGB encoding curve. Enabling Enable Alpha Channel Support in Post Processing project settings supports transparency.
- WAV Audio: Creates a .wav audio file in addition to any other output formats you’ve chosen.
- Apple ProRes Video Codecs: Produces a .mov file using Apple ProRes, Apple’s lossy video compression codec. This requires the activation of the Apple ProRes Media plugin.
- Avid DNx Video Codecs: Produces a movie file with the high-definition lossy video codec Avid DNx. The Avid DNxHR/DNxMXF Media plugin must be enabled for this to work.
- Prestreaming Recorder: The Prestreaming Recorder is used to produce render caches for cinematics that use Virtual Textures or Nanite.
-
-
For every particular sequence, more than one export item can be specified. You may, for example, export your sequence as a .jpg image sequence and a .wav audio file to mix in your video editing software.
Rendering
The Rendering category includes options for creating different view-mode images and render passes.
-
-
-
- Deferred Rendering: Produces the sequence’s final image, which corresponds to what you see in the viewport.
- Deferred Rendering (Detail Lighting): Uses a unique shader variation that only displays lighting paired with normal maps. It can be useful to demonstrate the geometry of a Level.
- Deferred Rendering (Lighting Only): Similar to Detail Lighting, but without the use of normal maps to affect lighting.
- Path Tracer: Shows path-tracing data for each frame as it is calculated. At the moment, the Path Tracer does not support full rendering features.
- Deferred Rendering (Reflections Only): Uses a specific shader variation to make the entire world reflective.
- Deferred Rendering (Unlit): Uses a specific shader variation that displays only the base color and no lighting information.
- UI Renderer: Includes any UMG widgets introduced to the viewport in the final render. This is an experimental feature.
- Object Ids (Limited): The Object Ids render pass generates an image in which each component in the scene is given an ID. IDs can be categorized individually or according to other criteria such as material, folder, or actor name. This requires the installation of the Movie Render Queue Additional Passes plugin. In shipping builds, object ids are not supported.
-
-
1.4 Presets
By default, render settings are temporarily set for your editor session and are lost when the session is closed. You can save your settings as Presets to share them between projects or to use different parameters for different sequences. Presets can be saved and reused in two types: Master and Shot.
Type 1: Master
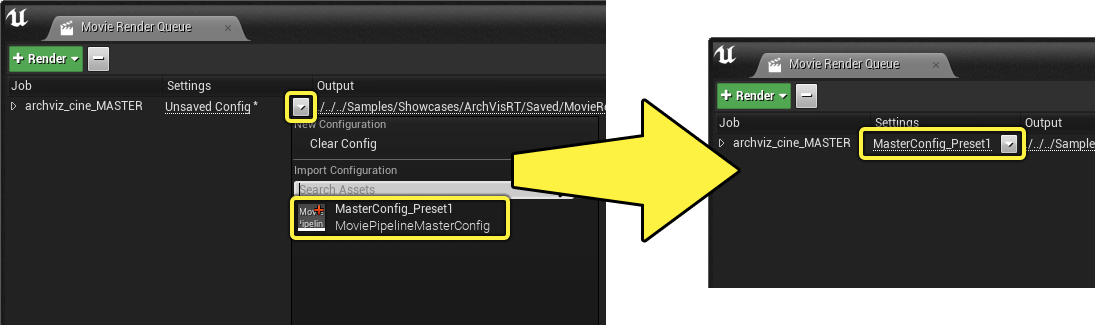
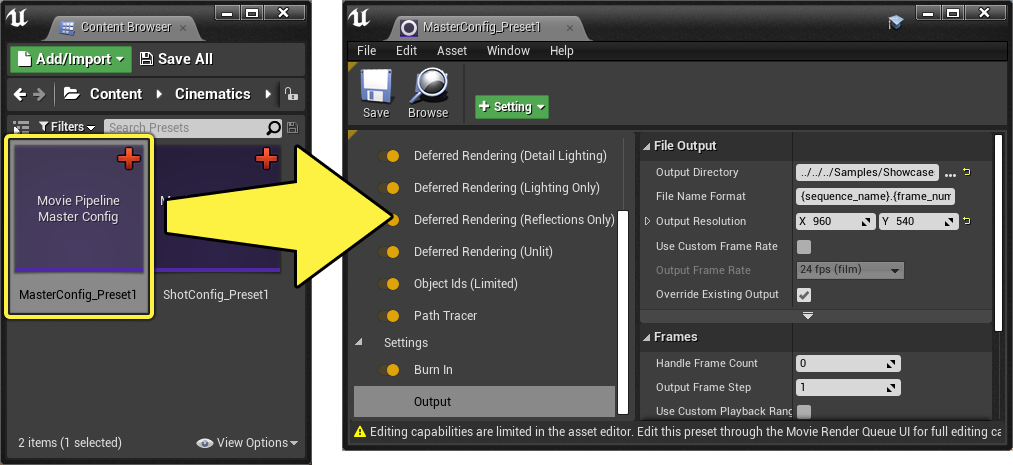
Master presets are intended to be applied to the top-level task in order for their settings to be propagated to the camera cuts beneath them. To save your current settings as a master configuration, choose Load/Save Preset and then Save As Preset. After that, you’ll be prompted to save a Movie Pipeline Master Config Asset.
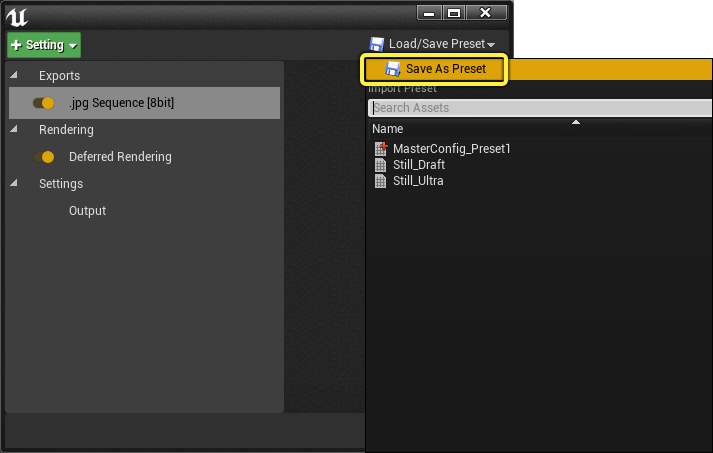
You can then apply this preset to a job in your queue by selecting the saved Movie Pipeline Master Config Asset from the settings dropdown menu.
Type 2: Shot
Shot presets enable you to override render settings for each camera in your render. They may be useful if particular shots in your cinematic sequence need different settings from those employed by the Master.
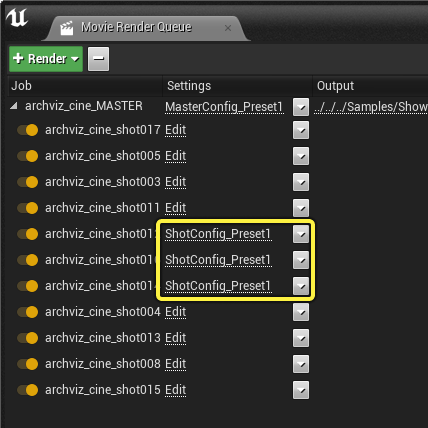
To save and use Shot presets, expand a job in your render queue to see its child cameras. Each camera has its own settings field, which can be modified. To open the settings window for that camera, click one of the Edit fields.
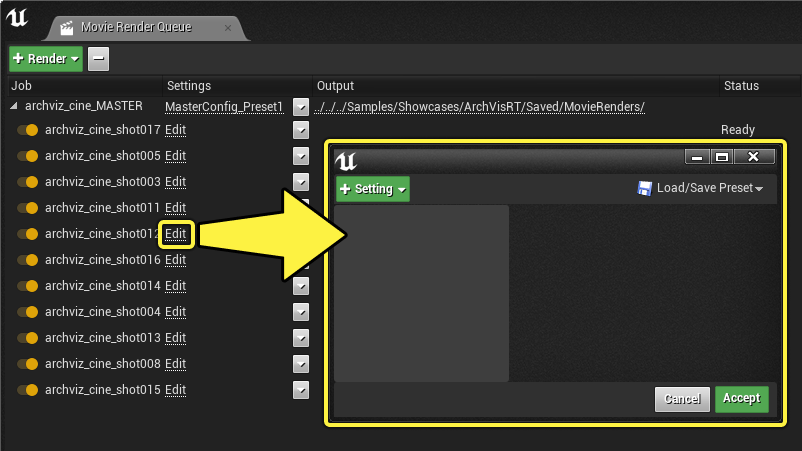
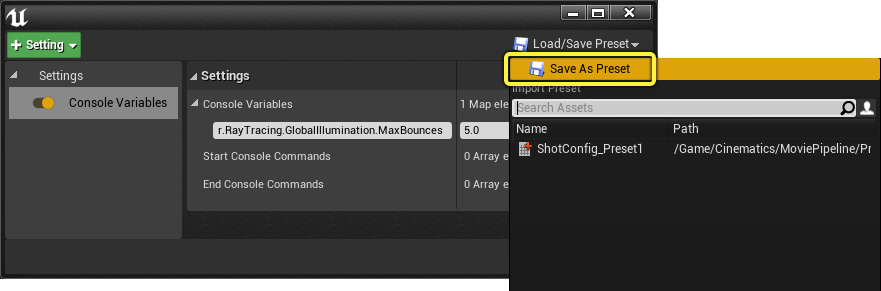
You can add settings by clicking the + Setting button and selecting a setting from the list. Click Load/Save Preset and then Save As Preset to save your current settings as a shot preset. After that, you’ll be required to save a Movie Pipeline Shot Config Asset.
By clicking the dropdown menu in the settings field and selecting the stored Movie Pipeline Shot Config Asset, you can apply this preset to a specific shot in your queue in the same way that you apply a Master preset.
Editing Presets
When you assign a preset in the Settings column, the name of that preset will be changed. When you click a preset, you’ll be directed to the configuration editor, where you can modify the configuration. These modifications do not change the preset asset; they only affect a temporary copy of it.
If you want to directly edit the presets, you have two options:
-
-
-
- You can access the editor via the Movie Render Queue UI and pick Save as Preset to overwrite an existing preset.
- By double-clicking them in the Content Browser, you can open and edit them directly. This will open an editor where you can add settings, modify their values, and save the changes using the asset’s Save buttons.
-
-
2. iRender - The best render farm for Unreal Engine
iRender is proud to be a professional GPU Accelerated Cloud Rendering Service provider for 3D Render, CGI, and VFX tasks with more than 30,000 clients. We are appreciated in many global rankings (e.g. CGDirector, Lumion Official, Radarrender, InspirationTuts CAD, All3DP, BlenderBaseCamp, VFX Rendering.)
We provide remote machine rental services, specifically, high-configuration dedicated servers (RTX 3090 and RTX 4090 physical machines/computers) for you to control via the Microsoft Remote Desktop application. You will set up your creative working environment on our servers to optimize and render projects whenever/wherever you want.
Our cloud rendering services for Unreal Engine
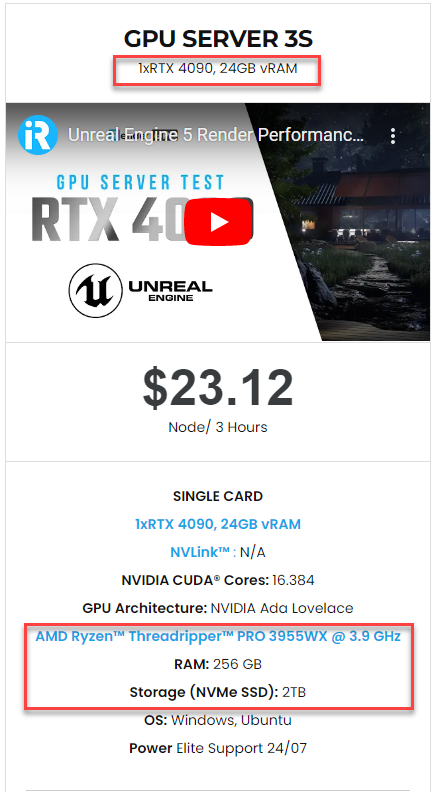
Unreal Engine utilizes the video card primarily to display the graphics on the screen. A faster video card will give you a higher FPS in the viewport or in a stand-alone game. At iRender, we have a single RTX 4090 server package that is the most suitable for Unreal Engine rendering. Its detailed configuration is as the following pictures.
-
-
-
- One GPU – NVIDIA GeForce RTX 4090 24GB: With 24GB of VRAM and terrific performance, RTX 4090 is one of the best GPUs to use for game development, Virtual Production, Architectural Visualization, and even VR content.
- One CPU – AMD Ryzen™ Threadripper™ PRO 3955WX 3.9 GHz: A strong 16-core processor for heavily threaded tasks.
- 256GB RAM: exceeds the amount of RAM needed for the Unreal Editor by itself. It allows you to do RAM-intensive tasks and work with other programs in addition to Unreal Engine at the same time.
- 2T storage SSD: A fast NVMe drive for the OS and applications and a large project drive.
-
-
For big projects having tight deadlines and needing faster rendering, you can use several servers simultaneously. iRender allows users to use multiple servers on one account. The installation is also simple: Just set up Unreal Engine on one server (machine) and clone it to many other machines.
Let’s check out Unreal Engine 5 rendering performance on our single RTX 4090 server:

Let’s get started!
Create an account now to try our RTX 4090 server for your Unreal Engine! For further information, please do not hesitate to reach us at [email protected] or mobile: +84 915 875 500.
iRender – Happy Rendering!
Reference source: unrealengine.com
Related Posts
The latest creative news from Unreal Engine Cloud rendering.