Rendering Pyro Simulations with Redshift
Pyro, introduced in C4D 2023.1, is a new tool for creating realistic smoke and fire simulations. In the previous article, we learned about using Pyro simulations with Octane in Cinema 4D. Today, we will continue exploring Rendering Pyro Simulations with Redshift. Let’s get started!
Overview
The Pyro settings included in the Pyro Scene tab of the Pyro Output object allow for different display modes and qualities of the simulation to be previewed in the Viewports. Simply use one of the shading display modes there (Gouraud Shading, Quick Shading, or Constant Shading) to do this. However, to render the simulation with Redshift, diffuse lighting or generate light itself, the simulation must be cached first. There are a few ways for this:
The current frame of the simulation can be temporarily stored in RAM by using the Pyro Output object. To do this, you need to set the desired simulation channels to On or On Export in the Object settings of the Pyro Output object. Once that’s done, a Redshift Pyro Volume material can be directly applied to the Pyro Output object for rendering purposes. When utilizing the RAM cache, rendering is possible in the 3D views, and the Picture Viewer or Redshift RenderView as well. However, after closing and reopening the scene, the simulated frame and its RAM storage will be lost and need to be regenerated by playing back the simulation again. Compared to rendering a .vdb cache file, rendering directly from RAM uses more overall memory. Nonetheless, this way is still useful for test renders during simulation configuration or checking material settings.
When Pyro components are set to On mode in the Pyro Output object, the RAM cache is created not just for rendering but also becomes available in the Object Manager. This allows directly using the Pyro Output object as the basis for a Volume Builder, enabling components of the Pyro simulation to be converted into geometry. Alternatively, it allows creating vector fields that can then be used as force objects.
If the required simulation properties are set to On Export at the Pyro Output object, they will only be cached in RAM during the rendering process. Additionally, this mode is meant to specify which properties should be stored in a .vdb cache file.
The simulation can be saved as a sequence of .vdb files by setting the desired channels to On Export in the Pyro Output object and then clicking the Cache button in the object’s Cache tab. This cached .vdb sequence can later be reloaded into the same scene using the Pyro Output object, an RS Volume object, or a Volume Loader object. The cached .vdb file sequence can also be loaded into other programs or other C4D scenes without needing to recalculate it. Once cached, the Pyro Emitter tag or Pyro Output object is no longer required in the scene. As an alternative, the Pyro Output object can itself load .vdb caches, in which case a Redshift Pyro Volume material would then need to be assigned to the Pyro Output object for rendering, similar to using a RAM cache.
Properties marked as Off on the Pyro Output object will still be visible in the viewports while simulating if they are enabled on the Pyro Emitter tag. However, Off properties cannot be rendered or saved in a cached file. The only exception is for storing an Initial State of the simulation. In that case, properties that were simulated using the Pyro Emitter tag will also be included in the Volume Set, even if marked Off on the output object.
Note
Rendering a RAM cache: when rendering a RAM cache, only the Pyro properties that are also enabled on the Pyro Emitter tag or Pyro Fuel tag can be rendered. Simply marking properties as On or On Export on the Pyro Output object alone is not sufficient. Since only the Emitter tag settings determine what is shown directly in the viewports during simulation (without rendering), the selected properties on the Pyro Output object are irrelevant for that display. Therefore, a rendered output can differ greatly from the viewport simulation. For example, when using the Color option on the Pyro Emitter tag for Density, it will always be visible in the viewports, but the Color option on the Pyro Output object must be set to On or On Export to include it when rendering.
Optimising memory usage: Rendering a Pyro simulation using RAM cache (with On or On Export modes on the Pyro Output object) in the Picture Viewer or Redshift RenderView can significantly increase memory usage. The simulation data is duplicated in RAM to allow continued work in the scene during rendering. Therefore, for optimized memory performance when rendering Pyro sims, it’s best to first save the simulation as a .vdb sequence, then load it back into the scene using the Pyro Output object or RS Volume object. Alternatively, if you want to use the simulation to render a single image only, the desired state can be saved as a Volume Set object and used as the Initial State in the simulation. This creates a single smaller .vdb file instead of a full sequence.
Rendering a simulation in RAM with Redshift
First, you need to set Redshift as the active Renderer in the Render Settings.
If the required Pyro simulation properties have been marked On Export or On at the Pyro Output object, you can create a Volume material via the Create menu in the Material Manager under Redshift/Volume. You will need to enter the names of activated channels like density, temperature or color.
However, it is more convenient to use the default Pyro Volume material which automatically handles typical simulation channels like density and temperature. It also uses a realistic Blackbody simulation for temperature color distribution by default.
Within the RS Volume or Pyro Volume materials, Scatter represents the rendered volume’s Density (VDB grid: density) and Emission represents the Temperature of the simulation (VDB grid: temperature). These are two key features of a Pyro simulation for rendering. The RS Volume or Pyro Volume material can then be applied to the Pyro Output object to directly render the simulation.
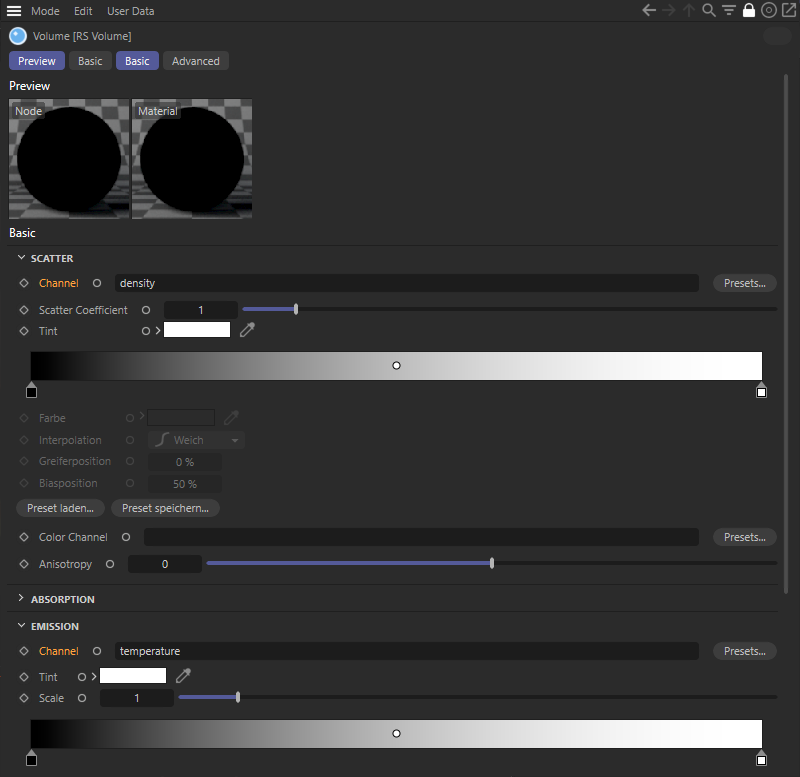
Typical density and temperature assignments of a Pyro simulation within an RS Volume node
This C4D scene has two material variations demonstrating the individual coloring of the temperature simulation.
Note
If you want to render the simulation directly in the Redshift Render View or Picture Viewer without caching to a VDB file, you can use both the On and On Export modes on the Pyro Output object. However, for combining the Pyro Output object with something like a Volume Builder, the On mode is required if no .vdb cache exists yet.
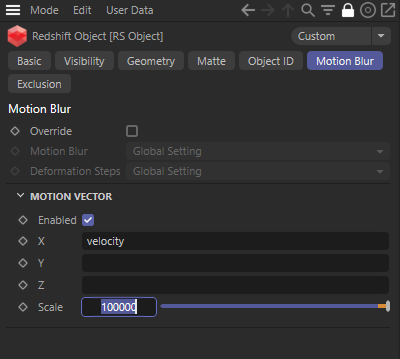
To display motion blur in the rendered simulation, a Redshift Object tag needs to be assigned to the Pyro Output object. Within the tag, you activate the Motion Vector evaluation, then enter velocity as the simulation channel for the velocity vectors in the simulation at the X field. Controlling the intensity of motion blur using the Scale value. It’s also important to remember that Motion Blur must be enabled in the Render Settings.
Rendering VDB files with Redshift
If a Pyro simulation has been cached out and saved as a sequence of .vdb files, one of the objects that can be used to load that sequence is the RS Volume object. You can find this RS Volume object in the Volume menu if Redshift is set as the active renderer in the Render Settings.
You can find the option to load the .vdb files at the RS Volume object. First, specify the path to the first file of the sequence in the Path field. Then switch to the object’s Animation tab, you will see the Mode menu where you can choose Simple Mode, for example. In Simple Mode, the saved simulation is automatically loaded frame by frame as the animation is rendered. Once the last file in the sequence is reached, playback will end. The other available modes control how the simulation replay behaves after the last frame. You should press Detect Frames button to automatically count the number of files and enter their number on this dialog page. Be sure to check that the Frame Rate matches the frame rate used in your original scene, otherwise, the loaded simulation may play back at a different speed than it was simulated at.
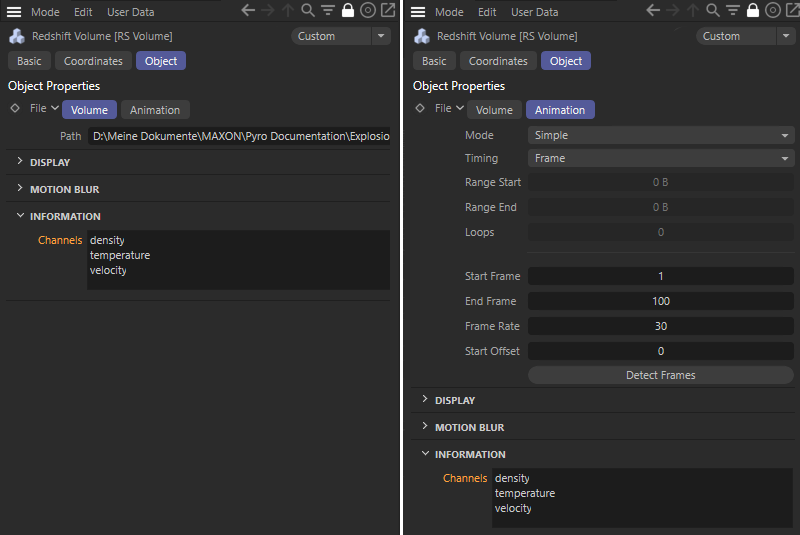
After specifying the Path to a VDB sequence (left image), its playback can be controlled in the Animation tab (right). In addition, the Information area shows which object properties are included in the VDB sequence.
As shown in the above images, the Channels list shows which properties are included in the loaded VDB files. These same terms can then be used in the RS Volume material to define the simulation’s colors, density and emission during rendering. This process is the same as rendering a simulation cached in RAM, except here the Redshift Volume or Pyro Volume material is assigned to the RS Volume object instead.
Note
In contrast to the direct rendering of a RAM-cached simulation, no Redshift Object tag is needed when using the RS Volume object to enable Motion Blur rendering. There, you can simply enter velocity for the X channel, if the loaded simulation has the velocity property.
iRender - The best render farm for Redshift rendering
![]() iRender provides powerful render machines supporting all Redshift (with any DCC software and plugins) versions. Our GPU render farm houses the most robust machines from 1 to 8 RTX 4090/RTX 3090, AMD Threadripper Pro CPUs, 256GB RAM and 2TB SSD storage to boost rendering Redshift projects of any scale. Check out our Redshift GPU Cloud Rendering service to have more references and find the best plan for your Redshift projects.
iRender provides powerful render machines supporting all Redshift (with any DCC software and plugins) versions. Our GPU render farm houses the most robust machines from 1 to 8 RTX 4090/RTX 3090, AMD Threadripper Pro CPUs, 256GB RAM and 2TB SSD storage to boost rendering Redshift projects of any scale. Check out our Redshift GPU Cloud Rendering service to have more references and find the best plan for your Redshift projects.
Reference sources: help.maxon.net
Related Posts
The latest creative news from Redshift Cloud Rendering.